Do you have an idea for an app but lack the programming knowledge to begin building it? In this weekly blog series, I will take you, the non-programmer, step by step through the process of creating apps for the iPhone, iPod touch, and iPad. Join me each week on this adventure and you will experience how much fun turning your ideas into reality can be! This is part 30 of the series. If you are just getting started, check out the beginning of the series here.
For the vast majority of apps that you build, it makes tremendous sense to make sure your app can be sold to as many iOS users in as many countries and languages as possible. The App Store is available in over 150 countries in 40 languages and automatically handles international payments and current conversion for you. All you need to do is make sure your app can support a variety of languages. I'll show you the basic steps in this post as we make the iAppsReview project multi-lingual.

Internationalization and Localization
Before we begin, let's get a few terms straight. Internationalization is the process of designing your app in such a way that it can support multiple languages. Localization is the process of adapting the app for a specific language and culture.
Basically, you internationalize your app once, but you localize it for each separate language and culture that you support.
What Does Localization Include?
When you think about localizing an app, you most likely picture the process of translating the visible text to another language. Although this is certainly a big part of the process, localization includes:
- Translating static text in the user interface.
- Formatting and translating dynamic text generated by your app at run time.
- Providing multiple versions of images that contain text or culture-specific content.
- Recording sound files for each supported language.
In this post, I'm going to address the first three items in this list.
Internationalizing Step by Step
Let's dive right in and internationalize the iAppsReview project. You can get the latest version of the project from this link. If you get stuck as you follow the steps in this post, you can get the completed version of the project from this link.
Note that if you create a brand new project in Xcode 5, all the steps in this section are already performed for you. However, since we have moved iAppsReview from iOS 6 and Xcode 4 to iOS 7 and Xcode 5, we need to perform these steps manually.
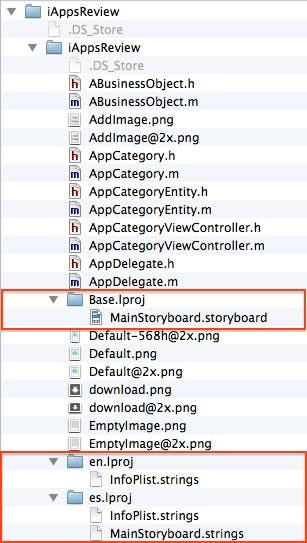
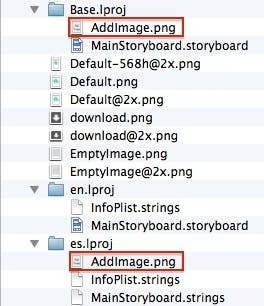
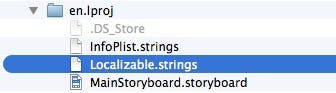
- First of all, I'd like you to look at the folder structure of the project before we make any changes. If you launch the Finder app and examine the project you will see the folder structure shown in Figure 1. Notice there is only one subfolder, en.lproj, that contains an InfoPlist.strings file. The first part of the folder name indicates my default language (english or "en"). We'll learn more about the strings file later in this post. Also notice the Mainstoryboard file is located in the project's root folder.
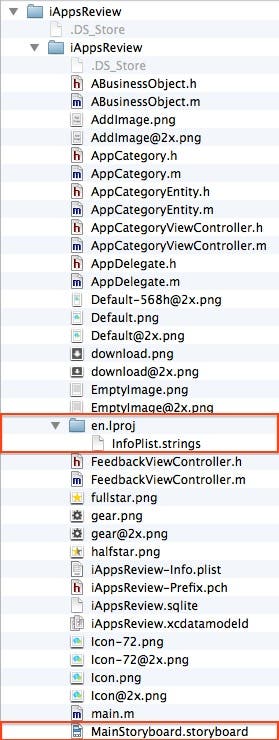 |
| Figure 1 - The project folder structure |
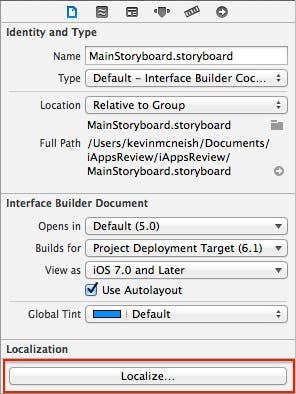
- Since my entire app's user interface is located in the storyboard file, we need to internationalize this file so we can later localize it for specific languages. To do this, go to Xcode's Project Navigator and select the MainStoryboard file.
- Next, go to the File Inspector by selecting the button on the far left in the Inspector toolbar, and then click the Localize... button (Figure 2).
 |
| Figure 2 - Localizing the storyboard |
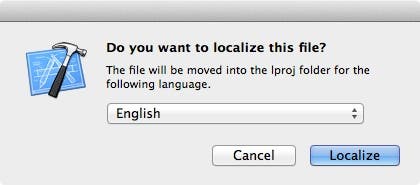
- Pressing the Localize... button displays the dialog shown in Figure 3. Confirm the operation by clicking the Localize button.
 |
| Figure 3 - The localize confirmation dialog |
- If you go back to Finder, you will now see the folder structure shown in Figure 4, where the storyboard file has been moved under the en.lproj folder.
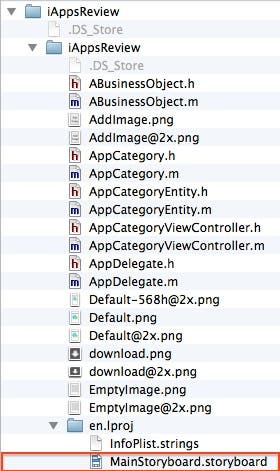 |
| Figure 4 - The MainStoryboard file has been moved to the en.lproj folder. |
- Our next step involves setting up a base internationalization. This is a relatively new mechanism for internationalizing your app, introduced in Xcode 4.5. Rather than having a separate storyboard file for each language that you support, you create a single base storyboard file and simply create separate string translation files for each language that you support.
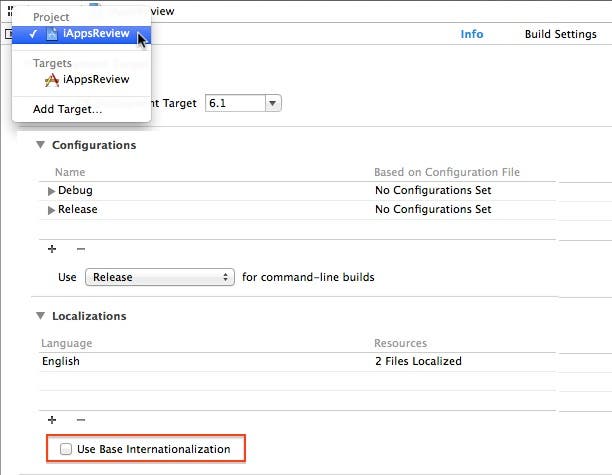
To set up this base, click the very first node in the Project Navigator to display the Project Editor. In the list box at the top-left of the Project Editor, under Project select iAppsReview, and then select the Use Base Internationalization check box (Figure 5).
 |
| Figure 5 - Select the Use Base Internationalization check box. |
- Selecting this option launches the dialog shown in Figure 6. By default, it selects the MainStoryboard file to create the base localization. Click the Finish button to continue.
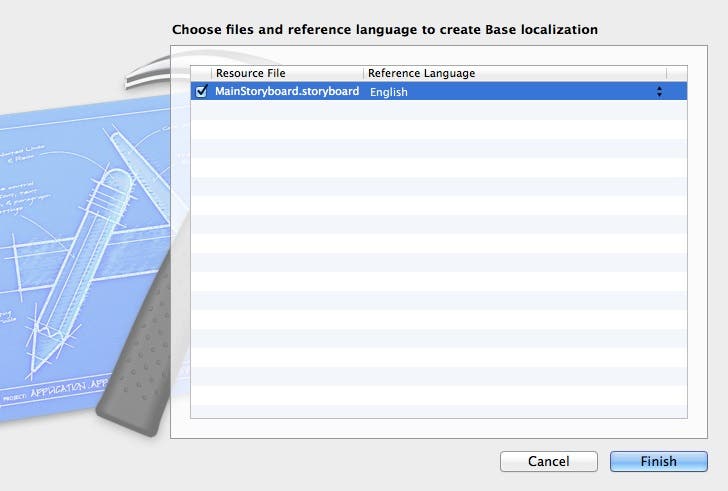 |
| Figure 6 - Choosing files to create a base localization |
When you do this, you can see a new Base language has been added under the Localizations section of the Project Editor (Figure 7). The original-language storyboard will now be used as the base language for all other localizations.
 |
| Figure 7 - A new Base language has been added to the Localizations. |
- If you examine the project's folder structure in Finder, you will see a new Base.lproj folder has been added and the MainStoryboard file has been moved to the new folder (Figure 8).
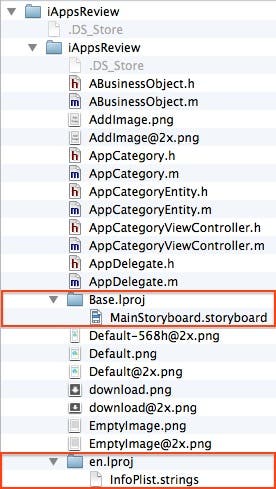 |
| Figure 8 - A new Base.lproj folder contains the MainStoryboard file. |
This completes our basic internationalization setup. Now we're ready to localize the project for a specific language.
Adding a New Language
Let's add support for the Spanish language to the project.
- Go back to the Project Editor, click the plus sign below the language list as shown in Figure 9.
 |
| Figure 9 - Add Spanish as a language supported by the project. |
- When you do this, a dialog appears asking you to choose the files and reference language (Figure 10). Accept the default selections and click the Finish button.
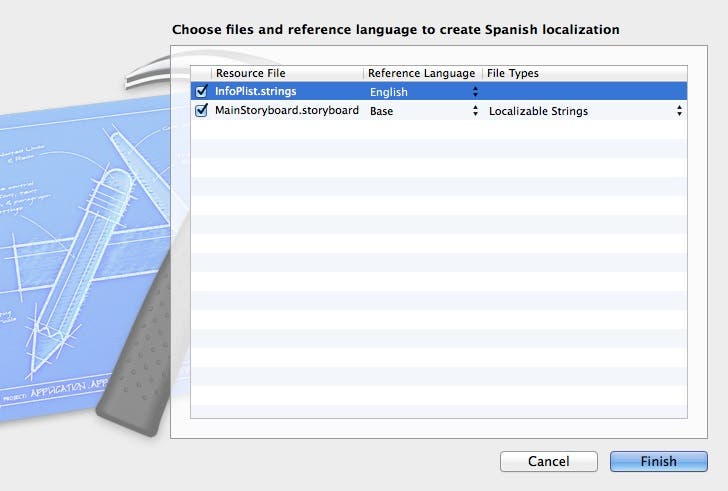 |
| Figure 10 - Select the default selections and click Finish. |
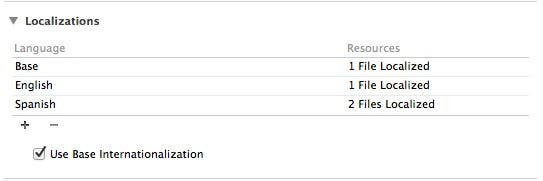
When you do this, Spanish is added to the list of Localizations in the Project Editor (Figure 11).
 |
| Figure 11 - Spanish is added to the list of Localizations. |
- If you go to the Finder app, you can see the new folder structure shown in Figure 12. As you can see, there is a new Spanish es.lproj folder that contains an InfoPlist.strings and Mainstoryboard.strings file. All of the files that are specific to the Spanish language will be located in this new folder.
 |
| Figure 12 - The new Spanish es.lproj folder |
- Next, go back to the Project Navigator. Notice there is now an arrow to the left of the storyboard file. If you click on this arrow, it expands to reveal the files shown in Figure 13. There is now a Spanish MainStoryboard.strings file. Let's take a closer look at this file.
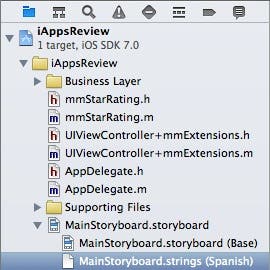 |
| Figure 13 - The Spanish MainStoryboard strings file. |
- In the Project Navigator, click on the MainStoryboard.strings (Spanish) file. This displays the contents of the file in the Code Editor as shown in Figure 14.
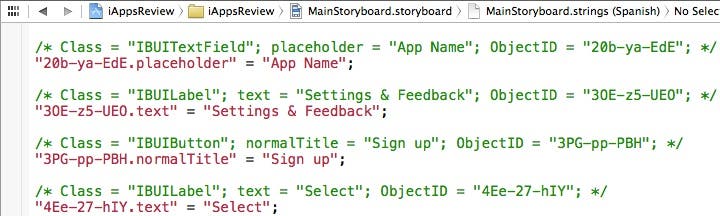 |
| Figure 14 - The Spanish MainStoryboard.strings file |
Xcode searched through the entire storyboard file and found each instance of text and wrote it out to this strings file. Each entry in this strings file is a key/value pair. The first part of the key is the object ID of the user interface element from which the text was extracted. You can see an object's ID by selecting it in the design surface and going to the Identity Inspector's Document section (Figure 15).
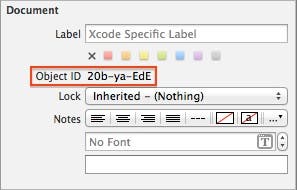 |
| Figure 15 - You can see a UI object's ID in the Identity Inspector. |
Localizing to a New Language
Now we're ready to perform the actual translation of the user interface text from English to Spanish. Since I'm not a Spanish speaker, I used Google Translate to convert a few English phrases to Spanish (my apologies to Spanish speakers!). This is definitely not the recommended approach in a real-world app. You need to find someone who is fluent both in your base language and the language you are translating to so you can provide your users with the best possible experience. However, we'll use this brute force technique for now.
Search the MainStoryboard.strings (Spanish) file for the keys shown in Figure 16 and replace the English text with the Spanish text shown there.
 |
| Figure 16 - Translate the English text to Spanish. |
The nice thing about this newer localization model is that translators only need to work with the files that are in the language-specific folders. They don't need to change the storyboard files (although they should certainly look at the context in which the text is used to provide an accurate translation).
Testing the Spanish Localization
Now we're ready to test the Spanish localization in the Simulator. To get this to work, you typically need to remove the app from the Simulator, clean the project, and reinstall the app again.
To do this:
- Launch the Simulator by selecting Xcode > Open Developer Tool > iOS Simulator from the Xcode menu.
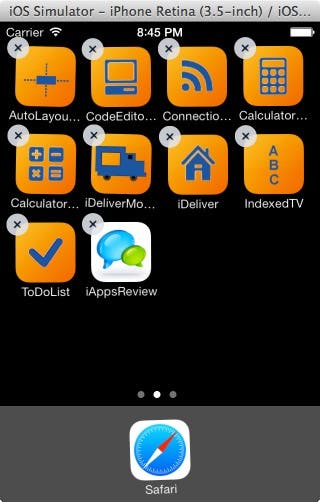
- Click to the right of the page control (the white dots) at the bottom of the screen to go to the second screen of icons.
- Hold your mouse down on the iAppsReview icon until all the icons begin to shake.
- Click the X in the upper-left corner of the icon (Figure 17).
 |
| Figure 17 - Remove the iAppsReview app from the Simulator. |
- When the confirmation dialog appears, click the delete button to remove the app from the Simulator.
- Next, press Shift+Command+H to get out of edit mode.
Now we're ready to change the default language of the Simulator to Spanish.
- Click to the left of the page control in the Simulator to go back to the first screen of icons.
- Click the Settings app icon.
- Select General > International > Language.
- In the Language list, select Espanol (Figure 18).
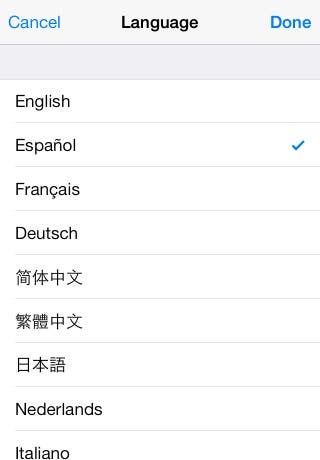 |
| Figure 18 - Select Espanol from the Language list. |
- Click the Done button and you will see a message that says "Cambiando idioma...", which translates to "Setting Language...".
- You will know the selection has taken effect when you see the Home screen icons with Spanish names (Figure 19).
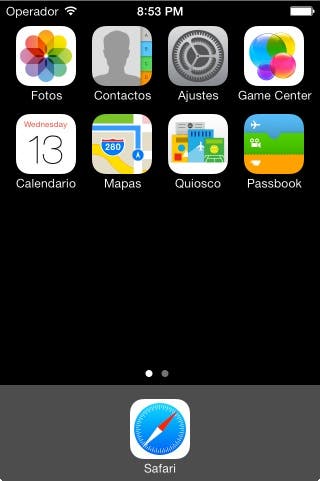 |
| Figure 19 - The Home screen in Spanish |
- Go back to Xcode and select Product > Clean from the menu.
- Next, click the Run button and you should see the updated Spanish text in the first scene of the app (Figure 20)!
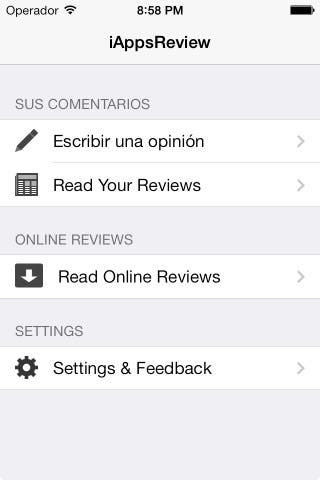 |
| Figure 20 - Spanish text in the Simulator! |
Handling Storyboard Text Changes
This all works great once the dust has settled on your storyboard. However, what happens if you change text in the storyboard at a future date?
Apple has a command line tool called ibTool that you can use to update the strings files. To run this tool:
- Click on the Applications folder in your Mac's dock and then click on the Utiliities folder.
- Select Terminal.app.
- When Terminal launches, type a change directory (cd) command to navigate to your project's Base.lproj folder. For example, Figure 21 shows the cd command I used to navigate to the Base.lproj folder on my developmenet machine.
 |
| Figure 21 - In Terminal, change directories to the project's Base.lproj folder. |
- Next, you need to run the ibtool command in the Terminal app as shown in Figure 22.
 |
| Figure 22 - Run ibtool from a Terminal command line. |
Just to be clear, this command is:
ibtool MainStoryboard.storyboard --generate-strings-file NewStrings.strings
- You can now go to the Base.lproj folder, copy the new strings from the file and then paste them into each storyboard strings file.
For more information, check out Apple's Preparing Your Nib Files for Localization help topic under the section Using ibtool at this link.
Localizing Images
You don't necessarily need to localize all of your app's images, but you definitely need to localize the images that contain text or have a specific cultural context. As it turns out, there is an image in iAppsReview that contains English text that we need to localize.
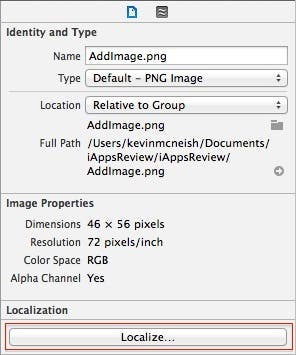
- In the Project Navigator, expand the Supporting Files group and select the AddImage.png file and you will see the image contains the text Add Image (Figure 23).
 |
| Figure 23 - Images containing text need to be localized! |
- Go to the File Inspector by clicking the button on the left in the Inspector toolbar.
- Click the Localize... button shown in Figure 24.
 |
| Figure 24 - Localize the AddImage.png file. |
This displays a confirmation dialog (Figure 25).
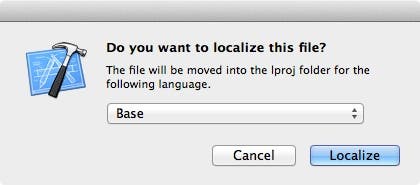 |
| Figure 25 - Confirm the localization of AddImage.png. |
- Click Localize and then you will see multiple languages listed under the Localization section (Figure 26).
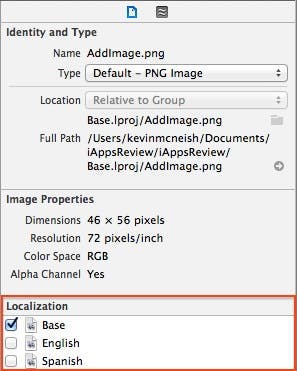 |
| Figure 26 - Multiple languages are listed for the image file. |
- Select the Spanish check box. This adds a copy of the image file to the project. To see this, go to the Project Navigator, click on the arrow to the left of the AddImage.png file and you will see the Base and Spanish versions of the file (Figure 27).
 |
| Figure 27 - The Base and Spanish images. |
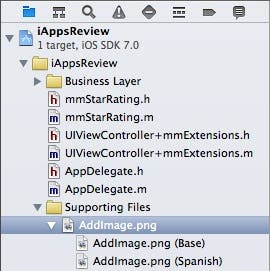
- If you go to the Finder app and check out the project folder structure, you will see there is a copy of the AddImage.png file stored in the Base.lproj folder and another in the es.lproj folder.
 |
| Figure 28 - New copies of the AddImage.png file |
As you might imagine, these new images are not localized, they are simply copies of the original image file. We need to create a version of the image file that works well in the Spanish language. Rather than translating the text on the image, I decided to create a button without text that I can use for the Spanish language version as well as other languages. It's simply an image of a plus sign. We're going to delete the existing AddImage.png file under the es.lproj directory and replace it with a new one.
- Go to the Finder app and delete the AddImage.png file from the es.lproj folder.
- Drag the AddImage-es.png file from the root folder of the project and drop it in the es.lproj folder.
- Rename the image file to AddImage.png. This replaces the original file.
Now follow these same three steps for the AddImage@2x.png file (this is the version of the file that is used when running on a device with a Retina display).
To test the new image:
- Press Xcode's Run button.
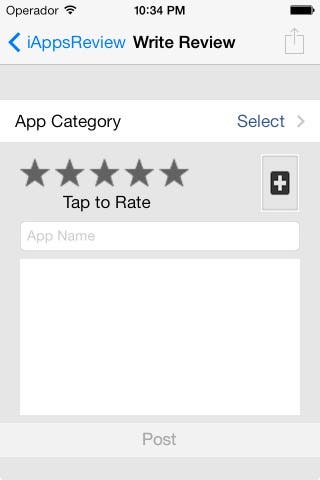
- When the app appears in the Simulator, select the Write a Review option.
- You should see the plus sign image shown in Figure 29!
 |
| Figure 29 - The Spanish plus sign image at run time. |
Internationalizing and Localizing Dynamic Strings
Often, apps contain program code that dynamically sets the text of controls or other messages at run time. Obviously, if you have hard-coded strings in your app, you need to make sure you provide translations of these strings for all the languages your app supports. Let's check one case of this type of text in iAppsReview.
- In the Project Navigator, select the SettingsViewController.m file. Note the hard-coded Done and Cancel English strings shown in Figure 30.
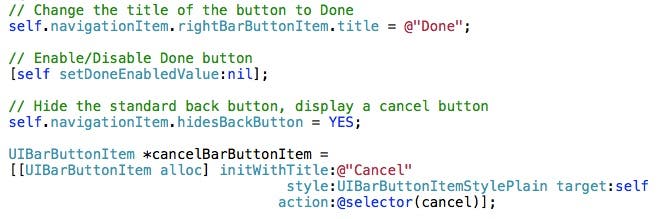 |
| Figure 30 - The Done and Cancel strings are hard-coded to English. |
- Change the code in the file as shown in Figure 31.
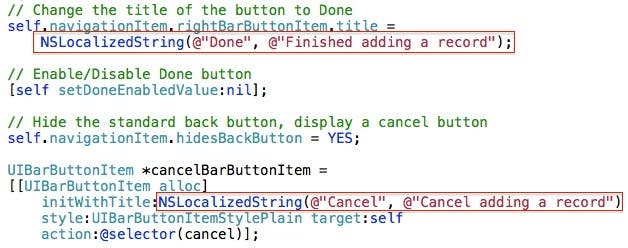 |
| Figure 31 - Use NSLocalizedString for any hard-coded text in your app. |
The NSLocalizedString function gets a localized string from a strings file for the current language. It takes two arguments:
- A key
- A comment
At run time, NSLocalizedString uses the key to look up the translation for the current language in a strings file. The comment is important! It's used by translators to provide context for the text being translated.
By performing this step for all hard-coded text in your app, you are internationalizing these strings, and getting them at a place where they can be localized. Let's do that now.
- Go to the Terminal app and run the commands shown in Figure 32.
 |
| Figure 32 - Run the genstrings command. |
For the sake of clarity, you first need to run a change directory (cd) command that takes you to your project's root directory:
cd Documents/iAppsReview/iAppsReview
Next, you must run the genstrings command. This command line tool reads through all of your app's implementation (.m) files, searches for the NSLocalizedString function and places all strings that it finds into a file named Localized.strings. Here's the command:
find . -name \*.m | xargs genstrings -o en.lproj/
- If you go to the Finder app, you can see the Localizable.strings file which has been added to the project's en.lproj folder (Figure 33).
 |
| Figure 33 - The newly generated Localizable.strings file. |
- Let's add this new file to the project. Go to the Project Navigator, right-click the Supporting Files group and select Add Files to "iAppsReview"... from the popup menu. In the Add Files dialog, select the Localizable.strings file and then click Add (Figure 34).
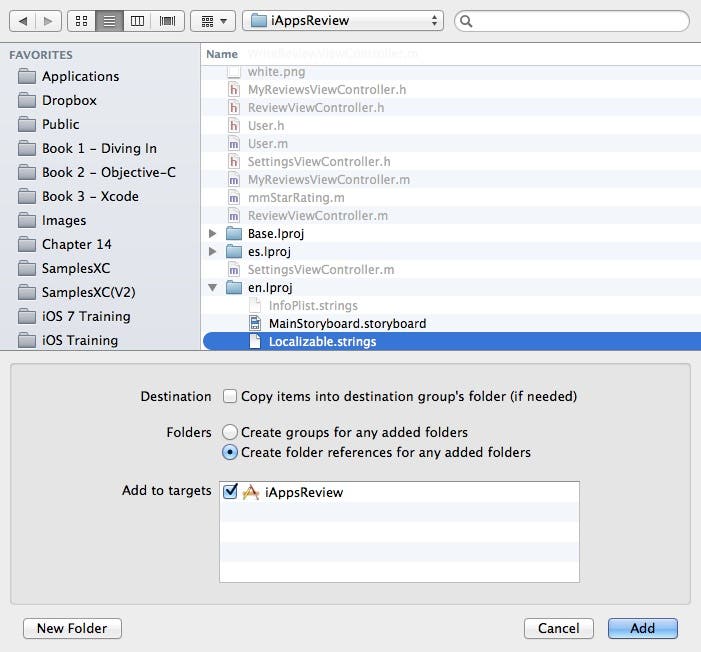 |
| Figure 34 - Add the Localizable.strings file to the project. |
- Let's take a look at the contents of this strings file. Go to the Project Navigator and select the Localizable.strings file. You will see the contents shown in Figure 35.
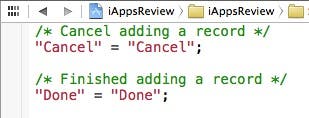 |
| Figure 35 - Localizable.strings contents |
So the genstrings utility found the two occurrences of NSLocalizedString that we added to the project, extracted the comments that we added as well as the base translation for each. On the left side of the equal sign, the key is "Cancel" and the base text is "Cancel", and in the second line the key is "Done" and the base text is "Done".
Now we're ready to create a Spanish version of this file and translate, or localize it.
- With the file still selected in the Project Navigator, go to the File Inspector (the button on the left in the Inspector toolbar) and under Localization, select the Spanish check box (Figure 36).
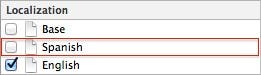 |
| Figure 36 - Select a Spanish localization of the Localizable.strings file. |
- This creates a Spanish version of the Localizable.strings file. To see this, go to the Project Navigator, expand the Localizable.strings file and you will see the files shown in Figure 37.
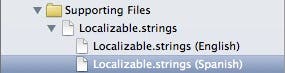 |
| Figure 37 - The Spanish Localizable.strings file |
- Click on the Localizable.strings (Spanish) file to displays its contents in the Code Editor. Translate the text to Spanish as shown in Figure 38.
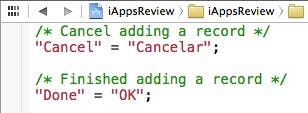 |
| Figure 38 - Translate the strings to Spanish. |
Now let's run the app to see how these Spanish strings work at run time.
- Click Xcode's Run button.
- When the app appears in the Simulator, select the Settings & Feedback option.
- Click the Edit button and you should see the Cancelar and OK buttons shown in Figure 38!
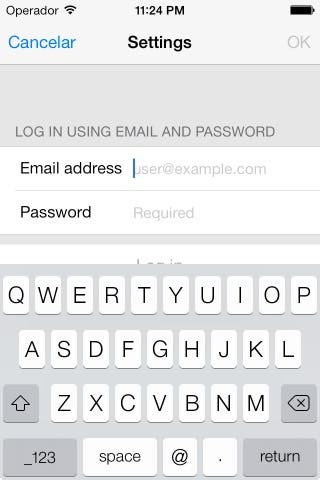 |
| Figure 39 - The Cancelar and OK buttons at run time |
You have succeeded in getting three of the main tasks performed for localizing an app!
Conclusion
Once you get the hang of the internationalization and localization of iOS apps, you will find that you can master the process and provide a high-quality experience for users of many different languages. Rather than giving your users the impression that the app was translated from another language, you can help them feel the app was written specifically for their language and locale.