Do you have an idea for an app but lack the programming knowledge to begin building it? In this weekly blog series, I will take you, the non-programmer, step by step through the process of creating apps for the iPhone, iPod touch, and iPad. Join me each week on this adventure and you will experience how much fun turning your ideas into reality can be! This is part 35 of the series. If you are just getting started, check out the beginning of the series here.
In my previous post, I discussed making your web-enabled apps scalable by outsourcing your web services to a third-party company, and I provided an overview of the services offered by Google, Amazon, and Microsoft. In this post, I'm going to dive into Google App Engine so you can get a detailed look at how to access web services hosted by Google from your iOS app. I'll provide an overview of Google App Engine's features, and show you how to set up and use Google's iOS sample app.

Note that you need to run Google's iOS sample app on an actual device, not in the Simulator. This means you need to have a paid Apple Developer account ($99 per year).
Google App Engine on the Google Cloud Platform
Google lists the following features that are part of their App Engine:
- Support for native applications on Android and iOS devices
- Automatic scaling and load balancing
- Storage, retrieval, and processing data outside of mobile devices
- Orchestrating push notifications to Android and iOS devices
- User authentication
- Interaction between users
- Sending email messages
- Geo-location awareness and geo-proximity search
- A fully featured local development environment that simulates Google App Engine on your computer
- Task queues for performing work outside of the scope of a web request
- Scheduled tasks for triggering events at specified times and regular intervals.
- Monitoring and management of your mobile backend.
From this feature list, Google makes clear that App Engine is for both Android and iOS native apps. In the iOS world, the term native refers to apps created with Xcode and written in Objective-C.
The term scaling refers to the ability of a network to handle an increasing amount of work. This means that if your app goes viral, and the number of users increases dramatically, Google's infrastructure should be able to handle it. One of the important technologies that provides scalability, is load balancing—the method for distributing workload across multiple servers on a network. When one server approaches its capacity, requests are automatically routed to another server that can handle the workload.
Google Cloud Endpoints
Google Cloud Endpoints is a feature of Google's App Engine that makes creating a web backend for your app much easier. Figure 1 contains a graphic from Google that provides a high-level overview of how endpoints work. It demonstrates that you can create a single backend that can be accessed from an iOS, Android, or web app.
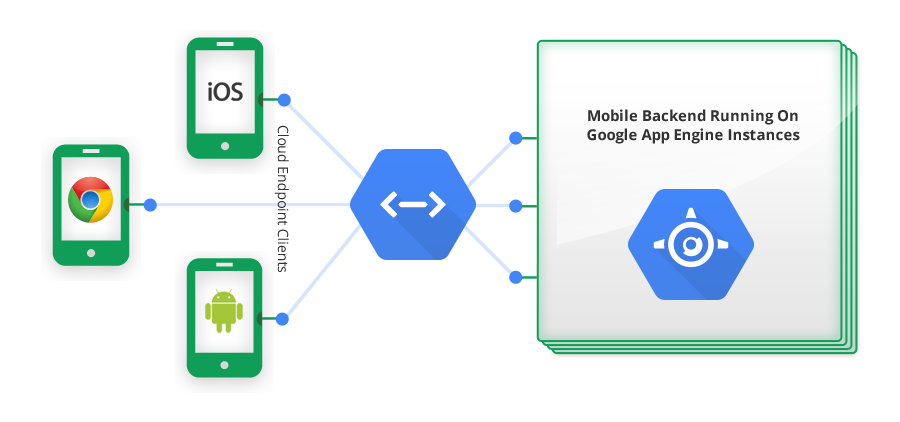 |
| Figure 1 - Google Cloud Endpoints make it easier to create a web backend for your app. |
Here are some of the features that Google outlines for their Cloud Endpoints:
- Simplifies exposing and consuming web services from your mobile backend.
- Provides authentication so your mobile backend code can know the identity of the user.
- Uses Google infrastructure to scale your app to meet demand
- Use tooling support to have boilerplate (repetitive) code auto-generated for you
- Generates strongly typed Android and iOS clients (objects) as well as lightweight JavaScript clients
We will look more closely at these features a little later on.
Data Storage and Access
It's hard to imagine a web-enabled app that doesn't require some type of data storage. The Google App Engine environment provides a few options for storing your app's data:
- App Engine Datastore - A datastore that stores and retrieves entities in a fashion similar to Core Data in iOS.
- Google Cloud Storage - A storage service for objects and files up to terabytes in size, that are accessible from Python, PHP, and Java apps.
- Google Cloud SQL - A relational SQL database based on the MySQL database. This is similar to using a SQLite database directly, without the benefit of Core Data.
Most apps will use the App Engine Datastore to store their app's data and Google Cloud Storage to store any images or other media files associated with their app.
When you upload images to Google Cloud Storage, you can provide direct URLs to these images to your app. This allows your app to retrieve these images directly from the cloud storage without involving your mobile backend code, making it fast, efficient, and scalable. For more information on data storage, check out this link.
You can also use Google App Engine Images Services to resize, rotate, flip, crop, and enhance images. You can then serve the processed images directly to your clients without involving your mobile backend code.
Google App Engine also has a Memcache feature that allows you to store frequently-accessed data in Memcache rather than the App Engine DataStore. This can make your app run faster and scale better, and saves you money.
Push Notifications
Google App Engine makes it easy to send push notifications to your iOS users by means of Apple Push Notification Services. Push notifications provide a way for your app to be alerted that something interesting has happened when the app isn't running in the foreground.
A push notification can take one of the following forms:
- Displaying an alert or banner
- Display an icon badge
- Playing a sound
If you have just a few users of your app, you could use Apple Push Notification Services (APNS) directly, without the help of Google's App Engine. However, if your app goes viral, you need the scalability that Google App Engine provides. For example, if you want to send notifications to hundreds of thousands of users, you should not open hundreds of thousands of connections to APNS. Instead, you need to implement connection pooling, which allows you to reuse connections when sending out your notifications. Rather than having to write your own connection pooling logic, Google App Engine provides connection pooling and batching requests that takes care of all of this for you. For more information, check out this link.
Accessing the Google Search API
Another great feature of Google's App Engine is that your app can use Google's App Engine Search API to give your users full text search capability over some of the data managed by your app. If your app provides access to a large number of items, you can construct documents that contain searchable data and then add these documents to an index. Your mobile backend can then create search queries, including full-text search queries, and run them against the documents in the index.
You can also use Google's Search API to perform geo-proximity searches (such as, a list of all nearby gas stations). This process is similar to the full text search, but you add geo-location as one of the document properties and then include geo-proximity condition in your search queries.
Custom Maintenance and Other Jobs
Another useful feature of Google's App Engine is its Cron Service, which you can use to perform tasks at regular intervals such as:
- Sending daily notifications to your users
- Sending subscription renewal notices
- Sending an email using the Mail API
- Update data stored in Memcache every 10 minutes
- Update player statistics every hour
Step By Step With the Mobile Application Starter
So that you can get a feel for how Google App Engine works without taking the time to create a mobile backend for your app, Google has a Mobile Backend starter that includes:
- A ready-to-deploy, general-purpose cloud backend
- iOS and Android Guestbook sample apps
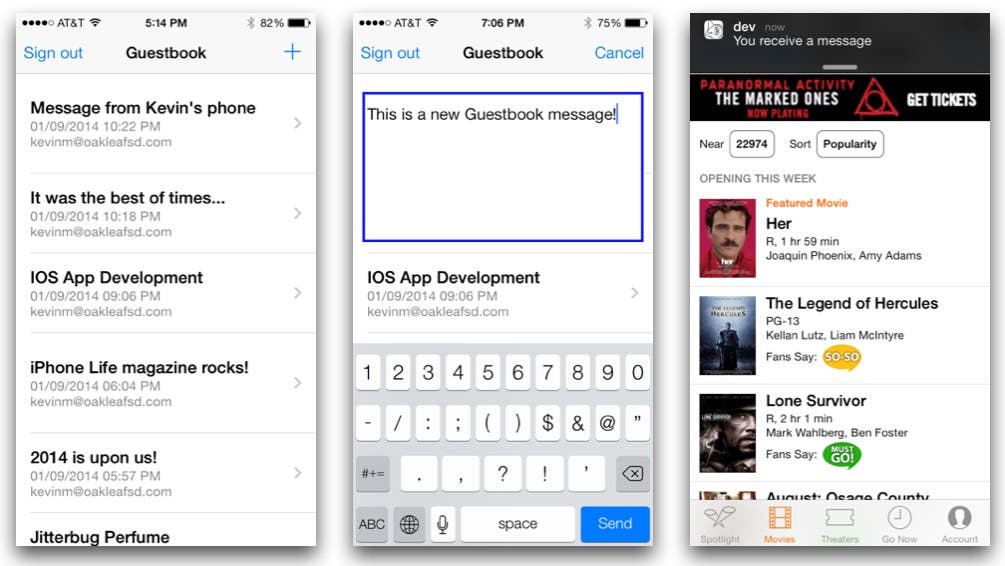
Figure 2 contains screenshots of Google's iOS Guestbook sample app.
 |
| Figure 2 - Google's iOS Guestbook sample app |
The image on the left shows a list of messages that have been created using the Guestbook app. When you or another user adds a new message, it automatically appears in this list after a short period of time. If you want to speed up the process, you can refresh the list by tapping and dragging the list down. This adds any new messages to the list.
To add a new message, just tap the + button in the navigation bar and the screen shown in the center of Figure 2 appears. Just type your message and tap the keyboard's Send button.
The Guestbook app takes advantages of Apple Push Notifications, so if the Guestbook app isn't the currently running app, you will get a banner message indicating a new message has been entered (either by you, or another user). You can see this in the image on the right in Figure 2.
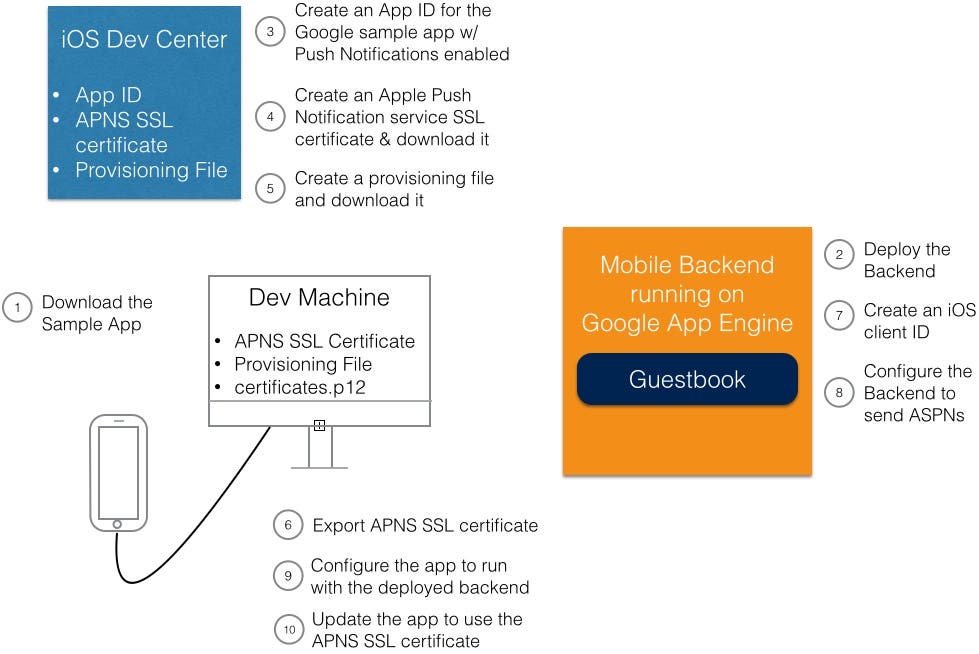
There are eleven main steps involved in setting up and running the sample app. It's easy to get lost in the process, so I have illustrated each step in the overview diagram shown in Figure 3.
 |
| Figure 3 - An overview of the steps to implement the Google iOS sample app. |
Here is a basic description of each step. I'll provide greater detail for each step in the sections that follow.
- Download Google's iOS Sample App to your development machine.
- Deploy the Sample App backend on Google's servers.
- In the iOS Dev Center, create an App ID for Google's iOS sample app with Push Notifications enabled.
- In the iOS Dev Center, create an Apple Push Notification Service SSL Certificate.
- In the iOS Dev Center, create a provisioning file for Google's iOS sample app.
- Export the Apple Push Notification Service SSL certificate to a .p12 file.
- Using Google's Developer Console, create an iOS Client ID in the Mobile Backend.
- Using Google's Developer Console, configure the Mobile Backend to send Apple Push Notifications.
- On your development machine in Xcode, configure Google's iOS sample app to run with the Mobile Backend.
- On your development machine in Xcode, update Google's iOS sample app to use the Apple Push Notification Service SSL Certifcate.
- Run Google's iOS sample app on an iOS device.
I recommend following along with the steps outlined in the next sections so you can get a feel for what it's like to integrate your app with Google's App Engine.
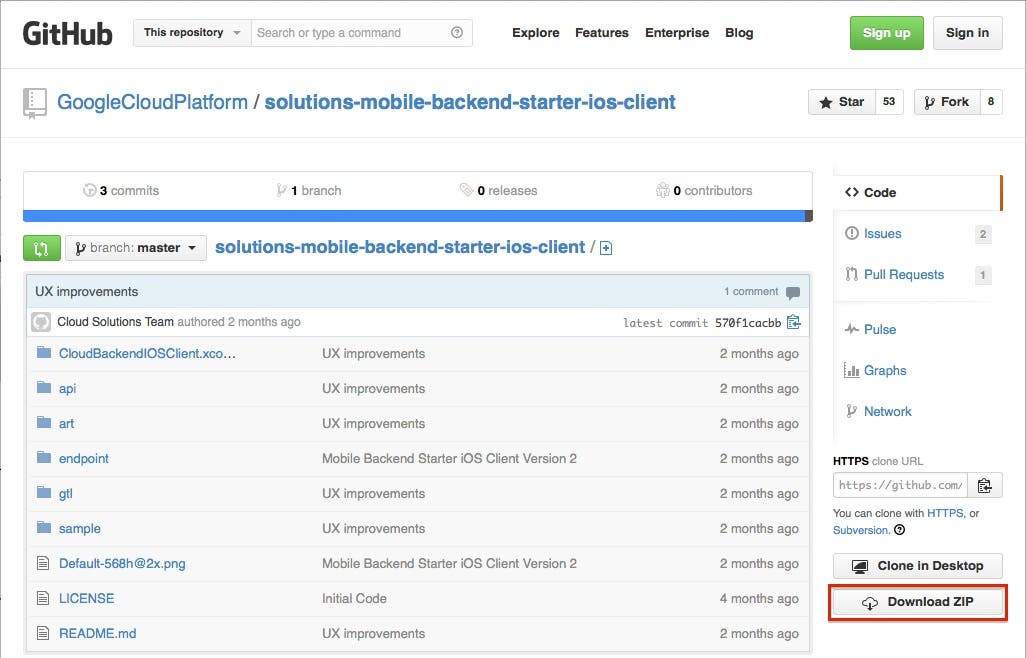
Step 1: Downloading the iOS Sample App
Now you're ready to download Google's iOS sample app.
- Navigate to this link to download the iOS sample app. In the GitHub page, click the Download Zip button (Figure 4).
 |
| Figure 4 - The iOS Sample App download page |
- In Finder, navigate to your Downloads folder and expand the solutions-mobile-backend-starter-ios-client-master folder.
- Double-click the CloudBackendIOSClient.xcodeproj file to open the project in Xcode.
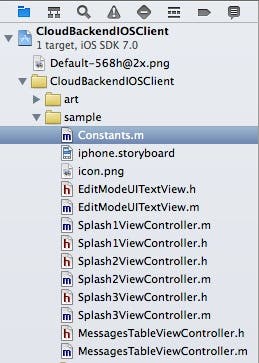
- In the Project Navigator, expand the project node, then expand the CloudBackendiOSClient subnode, and then expand the sample subnode.
- Click on the iphone.storyboard file and you will see several scenes, a few of which are shown in Figure 5. This will give you an idea of the inital screens to expect when you eventually run the app.
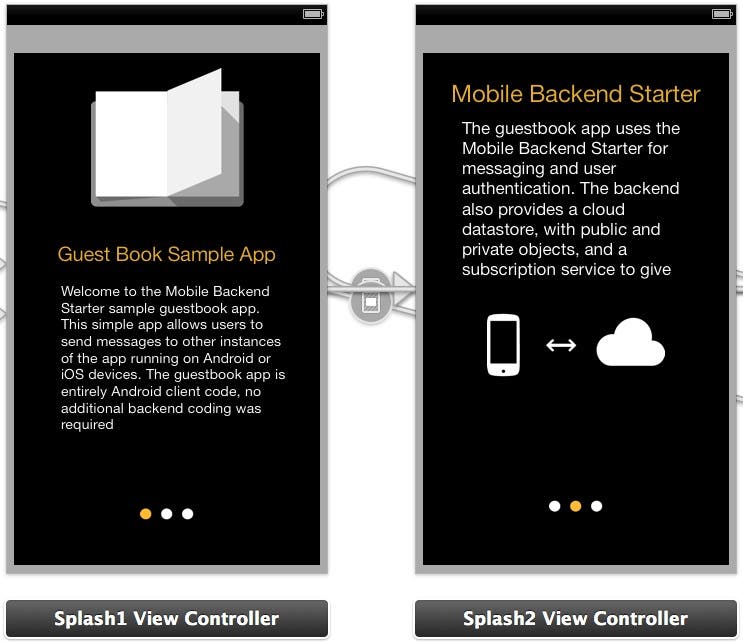 |
| Figure 5 - The iOS sample app's storyboard. |
- Now let's change the sample project's bundle identifier. To do this, click the very first node in the Project Manager, which displays the Project Editor in the center of the Xcode window. Next, click the Info tab. In the Custom iOS Target Properties section you will see the Bundle Identifier setting (Figure 6).
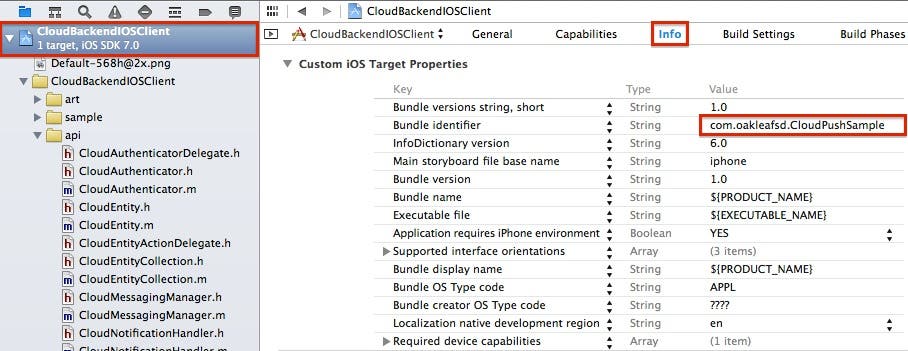 |
| Figure 6 - Change the Bundle Identifier. |
- Completely delete the existing bundle identifier and replace it with com.<company name>.CloudPushSample, where <company name> is the url of your company (don't include the angled brackets). This helps make the bundle identifier unique.
Step 2: Deploying the Mobile Backend on Google's Servers
Now you're ready to deploy the Mobile Backend (depicted by the shape on the right in Figure 3), which will run on the Google App Engine. For the Google sample app, the Mobile Backend receives and stores new messages, retrieves a list of recent messages, and sends notifications to all users when a new message is posted.
Follow these steps to deploy the Mobile Backend
- To get started, navigate to this link which takes you to the Google Cloud Platform page as shown in Figure 7.
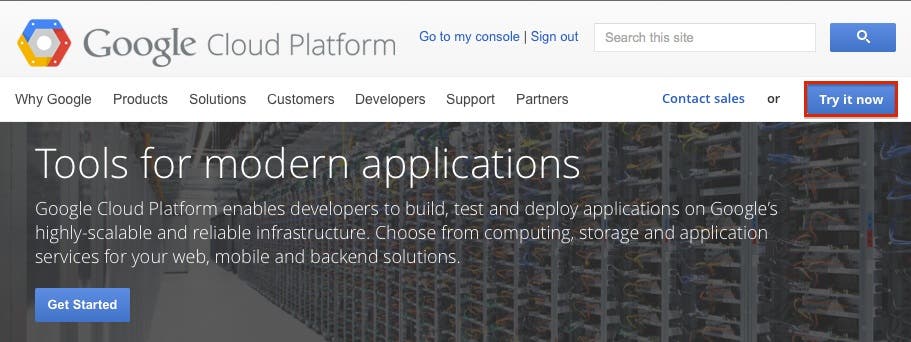 |
| Figure 7 - Click the Try it now button. |
- Click the Try it now button. If you are not already signed in, you will be prompted to do so. If you don't already have a Google account, you can create one on this page.
- If this is the first time you have logged in as a Google Developer, you may see a page that asks you to agree to Google's conditions. In order to continue, you need to click the Accept button.
- This takes you to the Google Developers Console (Figure 8). If you have never created a Google project, you will see the message You don't have any projects! Click the Create Project button to create a new project.
 |
| Figure 8 - Google's Developer Console |
- In New Project dialog, enter Project name as Guestbook. A Project ID is automatically generated for you (Figure 9).
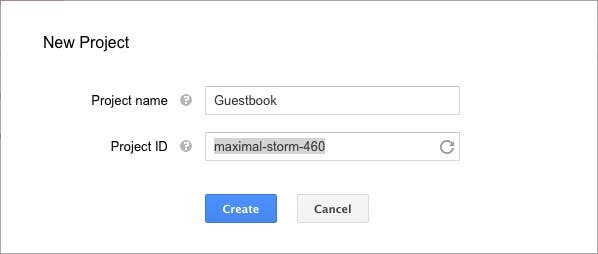 |
| Figure 9 - Create a new Guestbook project. |
- Click the Create button. If this is the first time you have created a Google project, you may see an SMS verification dialog that asks you to enter a phone number which will be used to either send a text message or a voice call that will supply you with a verification code. After you enter the verification code, you will be taken back to the New Project dialog where you can click the Create button.
- This will take you back to the Developer's Console and you will see a Creating project message.
- When project creation is finished, you will see the text Welcome. Not sure what to do next? Click the Mobile Backend Starter link (Figure 10).
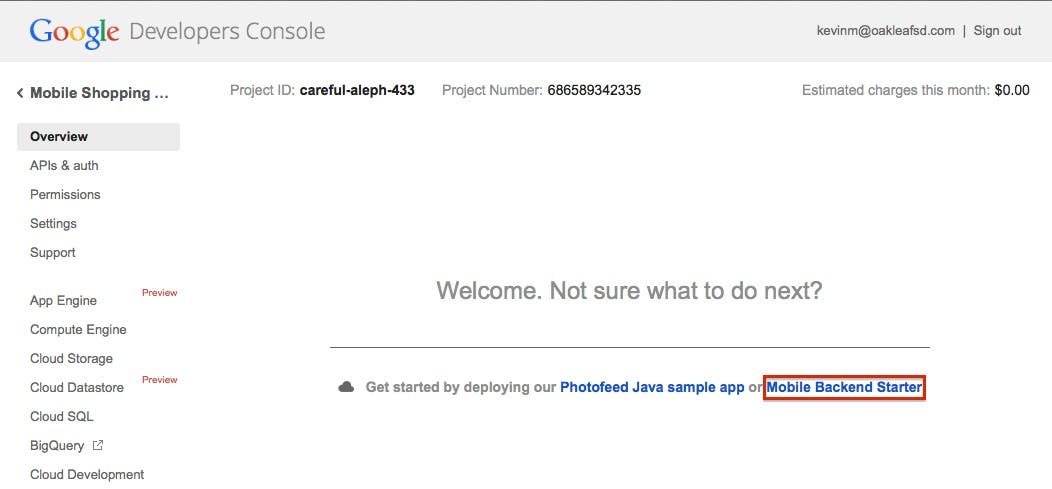 |
| Figure 10 - Click the Mobile Backend Starter link. |
- This displays the Mobile Backend Starter page (Figure 11). Click Deploy.
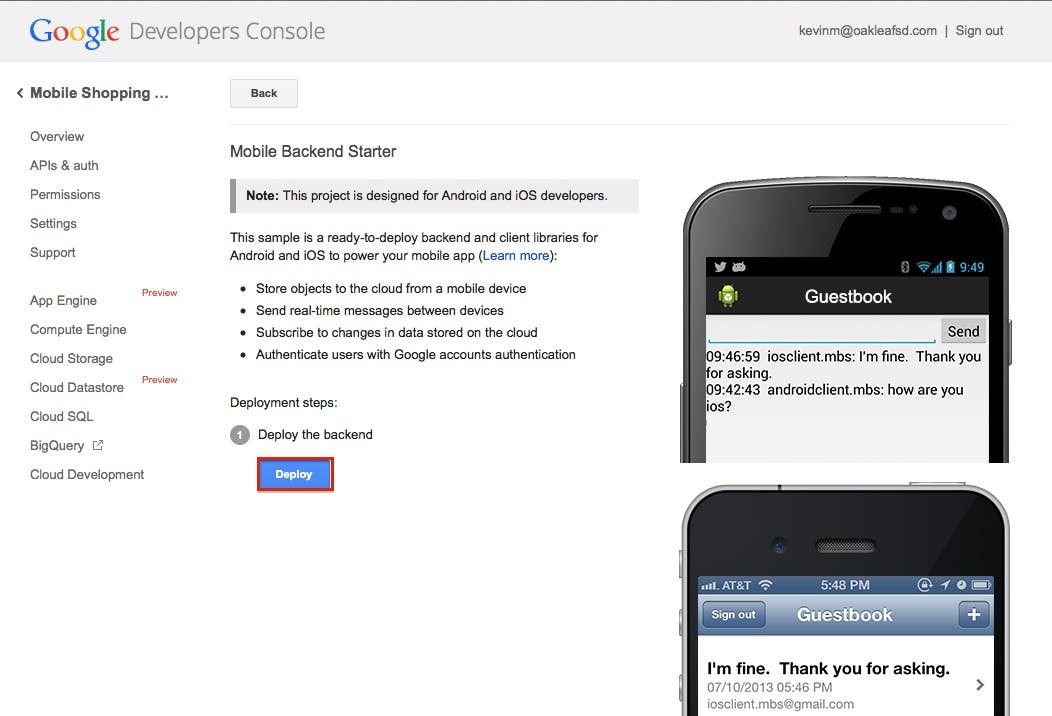 |
| Figure 11 - Click the Deploy button. |
- After clicking the Deploy button, a colored circle appears to the right of the button and displays the deployment progress beneath it (Figure 12).
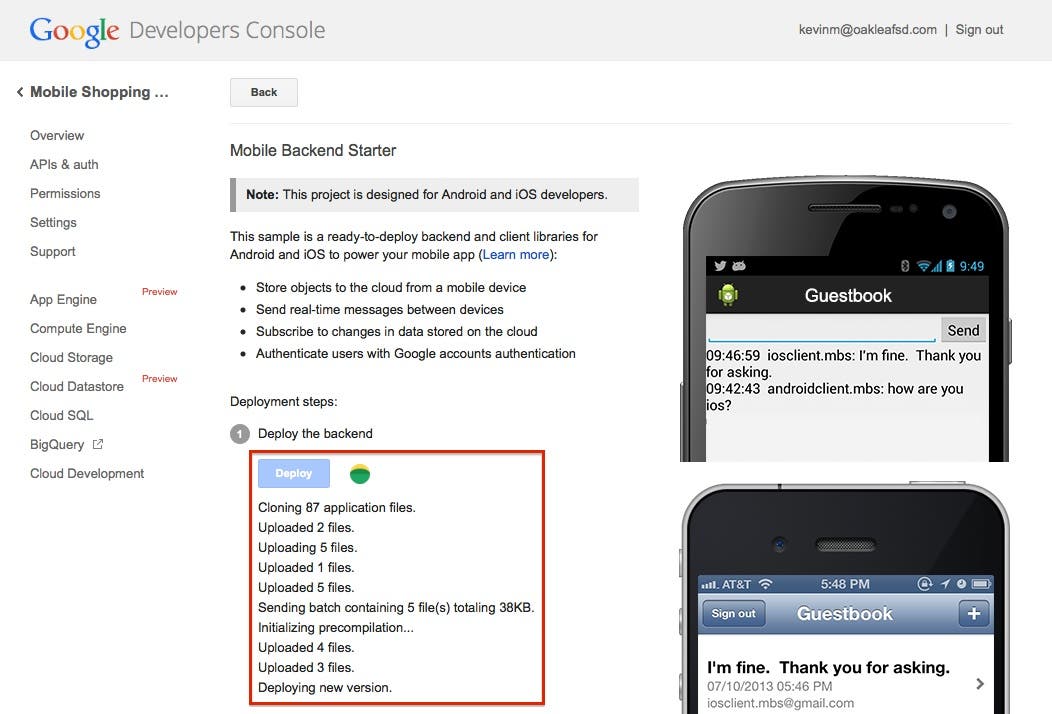 |
| Figure 12 - The backend deployment is in progress. |
- After a few minutes, you will see Install running at bottom of the list (Figure 13).
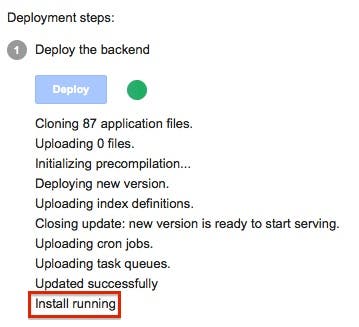 |
| Figure 13 - The backend install is running! |
- Click the Back button at the top of the page, which takes you back to the Guestbook project page.
- Click the Guestbook link at the top of the page. This takes you back to the Developers Console home page (Figure 14).
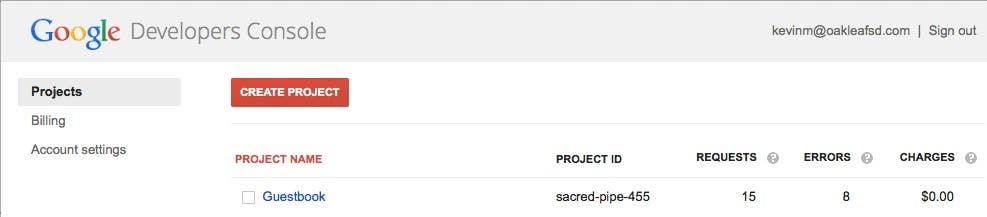 |
| Figure 14 - The Google Developer's Console home page. |
This completes the set up of the backend.
Step 3: Create an App ID in the Apple iOS Dev Center
Now you're ready to create an App ID for Google's iOS sample app. Normally, you can create an App ID and associated certificate and provisioning files in Xcode. However, when you have an app that needs special permissions such as Push Notifications, you need to create the ID, certificate and provisioning files in the iOS Dev Center as outlined in the following steps.
- In your web browser, navigate to the iOS Dev Center and log in.
- On the right side of the page, select Certificates, Indentifiers & Profiles (Figure 15).
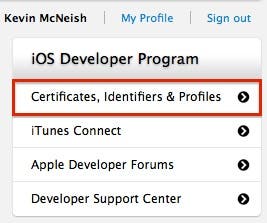 |
| Figure 15 - Select Certificates, Identifiers & Profiles. |
- On the left side of the page under the iOS Apps section, select Identifiers (Figure 16).
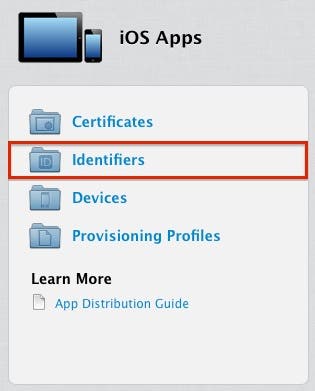 |
| Figure 16 - Select Identifiers. |
- This takes you to the iOS App IDs page. Click the plus (+) button to create a new App ID (Figure 17).
 |
| Figure 17 - Click the plus (+) button to create a new App ID. |
- In the Registering an App ID page, enter a description in the Name box, such as Google App Engine Client (Figure 18).
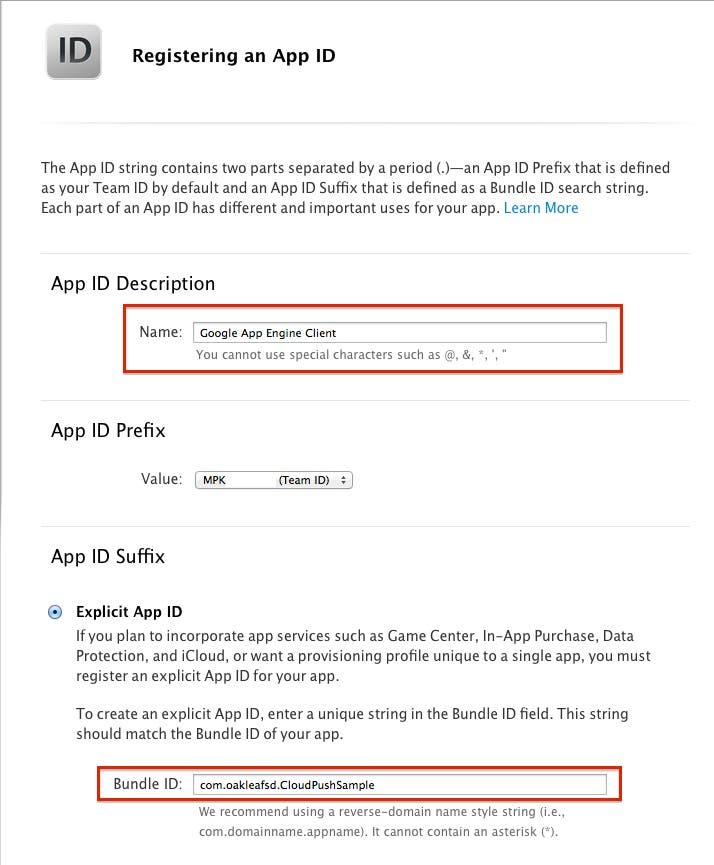 |
| Figure 18 - Enter a Name, Team ID and Bundle ID. |
- In the App ID Prefix section's Value box, select the Team ID you want to use for the App ID (if you only have one Team ID, just leave the default ID selected).
- In the App ID Suffix section's Bundle ID box, enter the same bundle ID you specified in in Xcode back in step 1.
- In the App Services section, select Push Notifications (Figure 19).
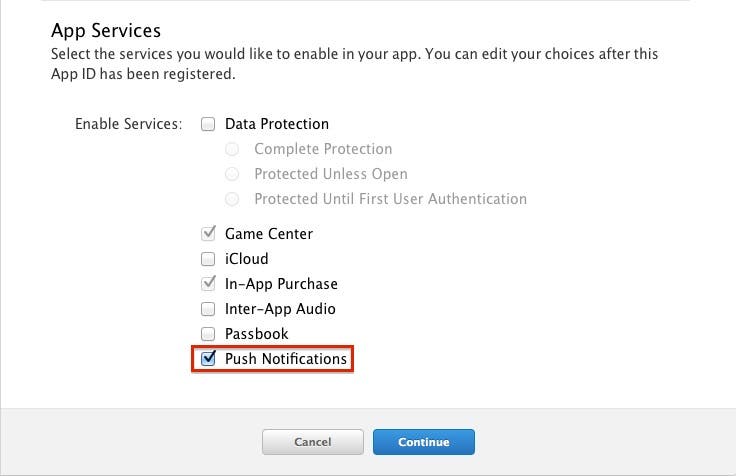 |
| Figure 19 - Select Push Notifications. |
- Click Continue. This displays a Confirmation page (Figure 20).
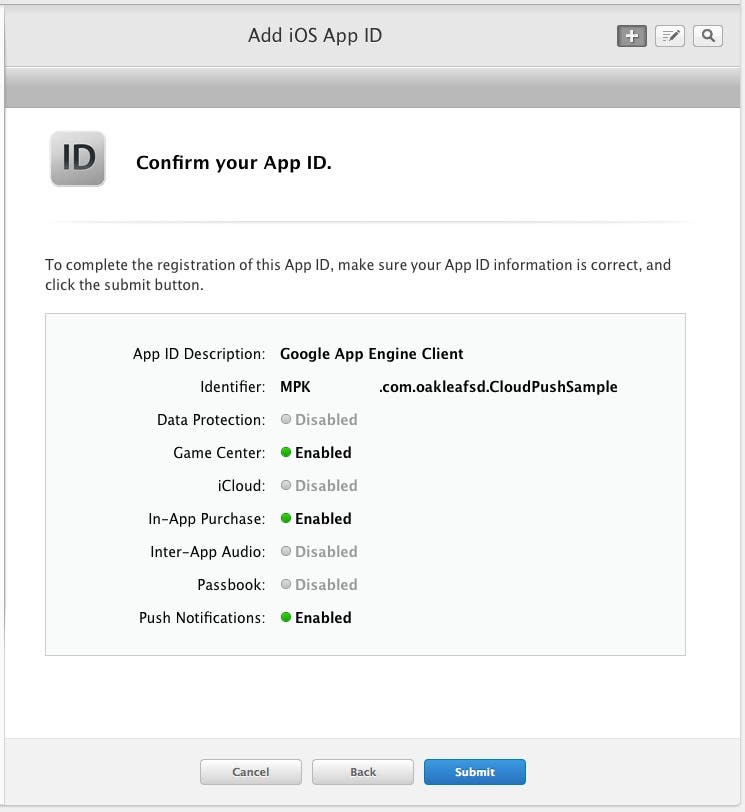 |
| Figure 20 - The Confirm Your App ID page. |
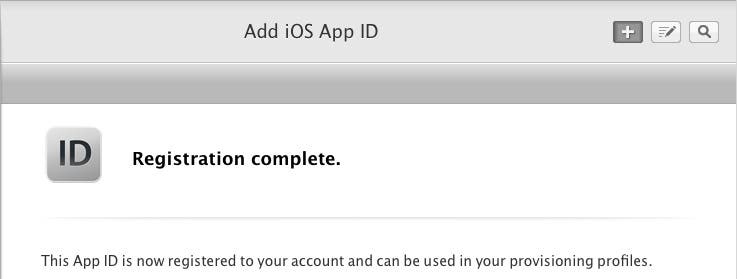
- If something looks wrong, click Cancel, or Back. If everything looks good (it should) click Submit. This displays a Registration complete message (Figure 21).
 |
| Figure 21 - The registration is complete! |
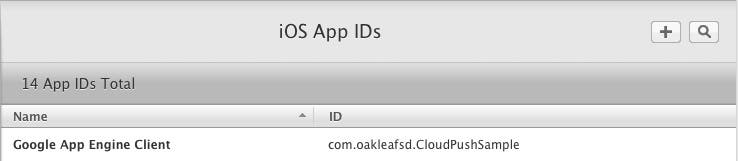
- Click the Done button to close the pane. You should now see Google App Engine Client in the list of iOS App IDs (Figure 22).
 |
| Figure 22 - The new Google Mobile Assistant App ID |
Stay on this web page because you have another step to perform.
Step 4: Create an Apple Push Notification Service SSL Certificate
In order to implement push notifications in your app, Apple requires that you obtain special security credentials in the form of an SSL certificate. Each certificate is tied to a single application with a specific bundle ID, which you created in the previous step.
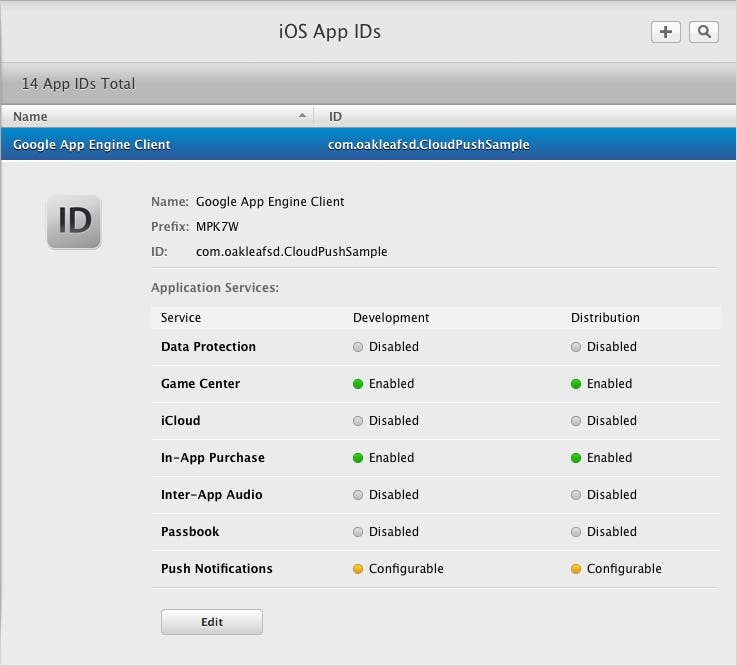
- In the iOS App IDs list (Figure 22), click the Google App Engine Client. This displays the details for the app ID as shown in Figure 23.
 |
| Figure 23 - The App ID details |
- Click the Edit button. At the bottom of the App ID edit page, in the Push Notifications section, under Development SSL Certificate, click the Create Certificate... button (Figure 24).
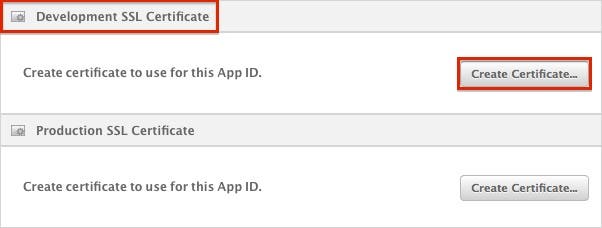 |
| Figure 24 - Click the Create Certificate... button. |
- This displays the Add iOS Certificate page shown in Figure 25.
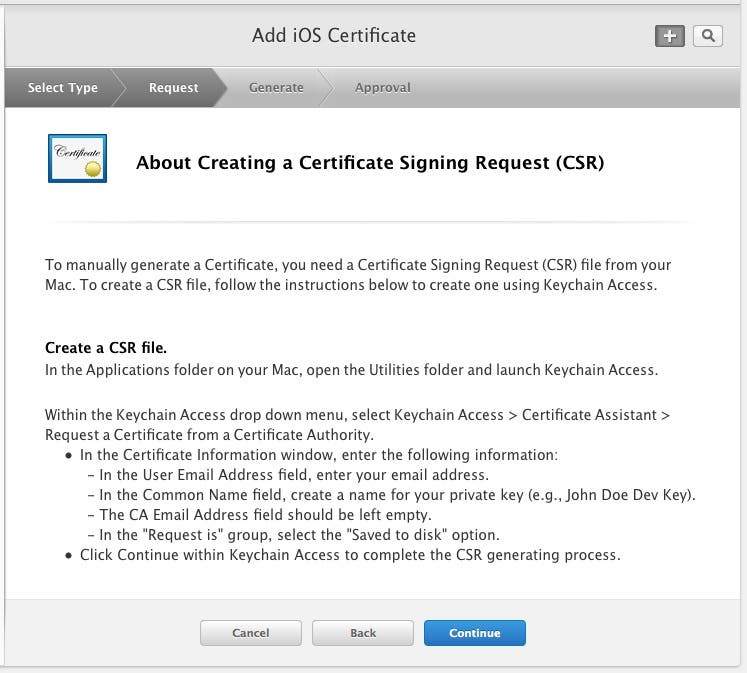 |
| Figure 25 - Instructions for creating a certificate signing request. |
- As described in the instructions shown in Figure 25, go to the Applications folder on your Mac, open the Utilities folder and launch Keychain Access.
- In the Keychain Access menu, select Keychain Access > Certificate Assistant > Request a Certificate from a Certificate Authority....
- In the first step of the Certificate Assistant (Figure 26), specify the email address of the Certificate Authority (CA) and select the Saved to disk option.
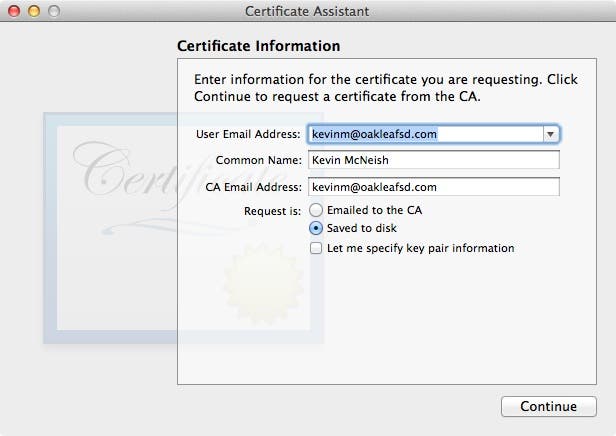 |
| Figure 26 - Specify the email address of the certificate authority and select Saved to disk. |
- Click Continue. In the Save dialog's Where box, select the location where you want to store the certificate on your machine (Desktop is the default), and then click Save.
- In the Conclusion step of the Certificate Assistant, click the Done button.
- Go back to your web browser and in the Add iOS Certificate page (Figure 25), click the Continue button.
- This displays the Generate your certificate page (Figure 27). Click the Choose File... button and navigate to the folder in which you saved your certificate request (it's on your Desktop by default).
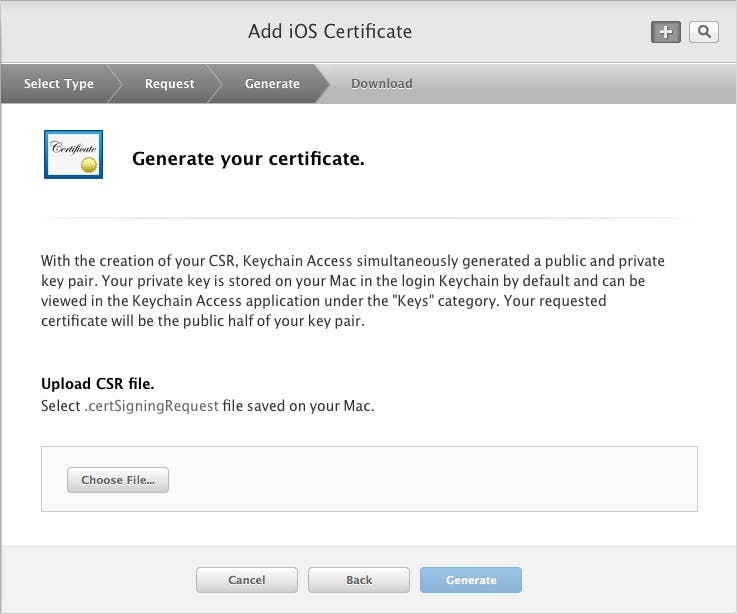 |
| Figure 27 - Click Generate to generate your certificate. |
- In the Generate your certificate page (Figure 27), click the Generate button.
- After several seconds, you will see the Your certificate is ready page (Figure 28). Click the Download button to download the certificate to your computer's Downloads folder.
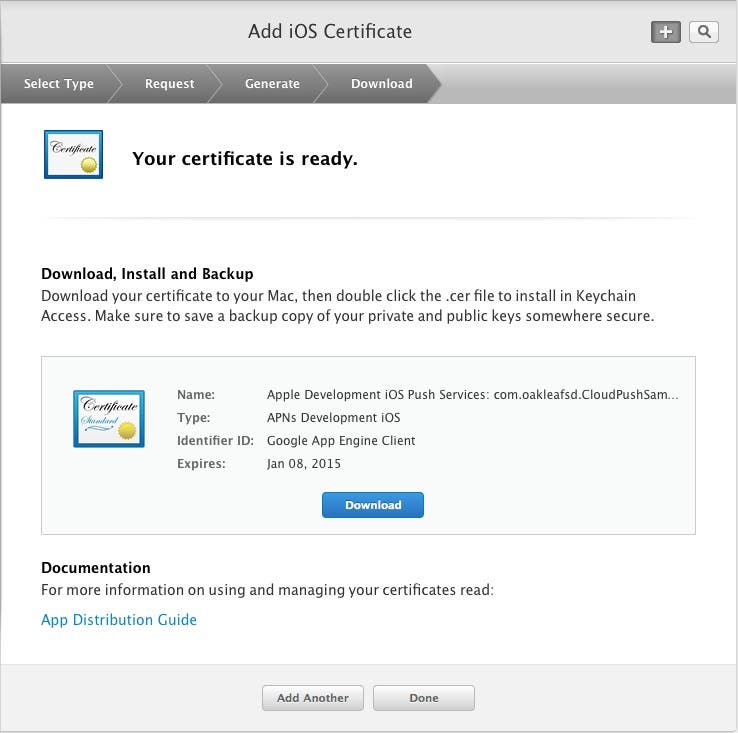 |
| Figure 28 - Click the Download button to download your new certificate. |
- The certificate is small so it downloads quickly. Click the Done button, and you should see your new certificate in the list of iOS Certificates (Figure 29).
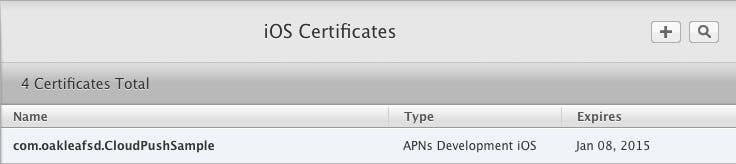 |
| Figure 29 - The new certificate is displayed in the list. |
Leave your browser open to this page because we will come back to it in the next section.
- In Finder, navigate to the Downloads folder and double-click the certificate file, which ends with a .cer extension. This displays the Add Certificate dialog. Click Add, and you should see the newly installed certificate file in the Keychain Access window (Figure 30).
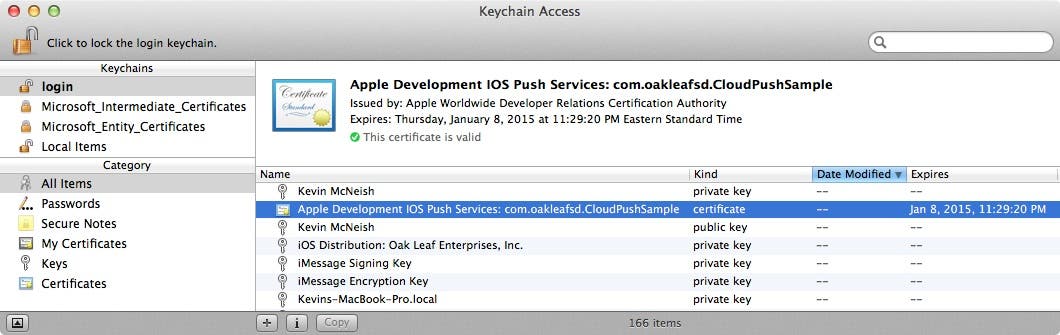 |
| Figure 30 - The newly installed certificate. |
Step 5: Creating a Provisioning File
In this step you will create a provisioning file for the Google iOS sample app. This allows you to run the app on an iOS device.
- Go back to the iOS Dev Center in your web browser, and in the panel on the left under Provisioning Files, select Development (Figure 31).
 |
| Figure 31 - The list of provisioning files |
- Click the plus (+) button in the upper-right corner of the web page to create a new certificate. In answer to the question What type of provisioning profile do you need? under the Development section, select iOS App Development and click Continue.
- In the next step, Select App ID, select the App ID for the Google App Engine Client as shown in Figure 32, and then click Continue.
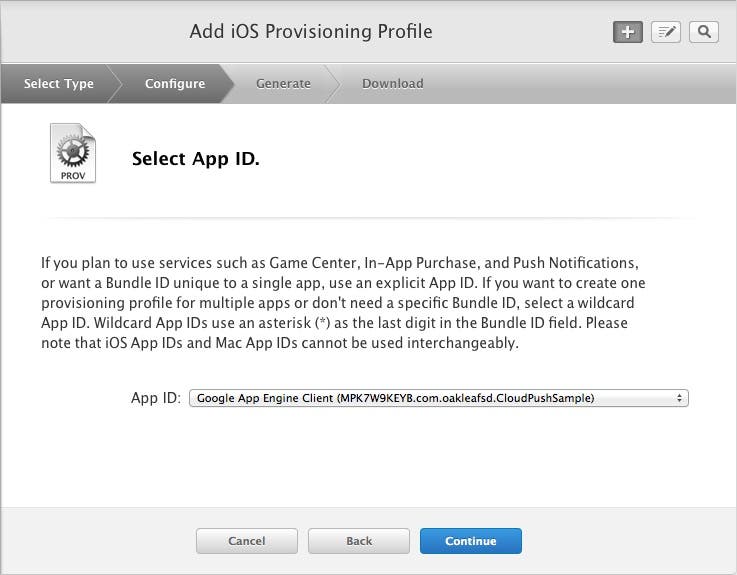 |
| Figure 32 - Select the Google App Engine Client ID. |
- In the Select certificates step, select the certificate(s) you would like to include in the provisioning file and then click Continue.
- In the Select Devices step, select the devices you want to include in the provisioning profile. It's common to select all devices so you can test on a variety of devices.
- In the Name this profile and generate step, enter a Profile Name and click the Generate button to generate the provisioning file (Figure 33).
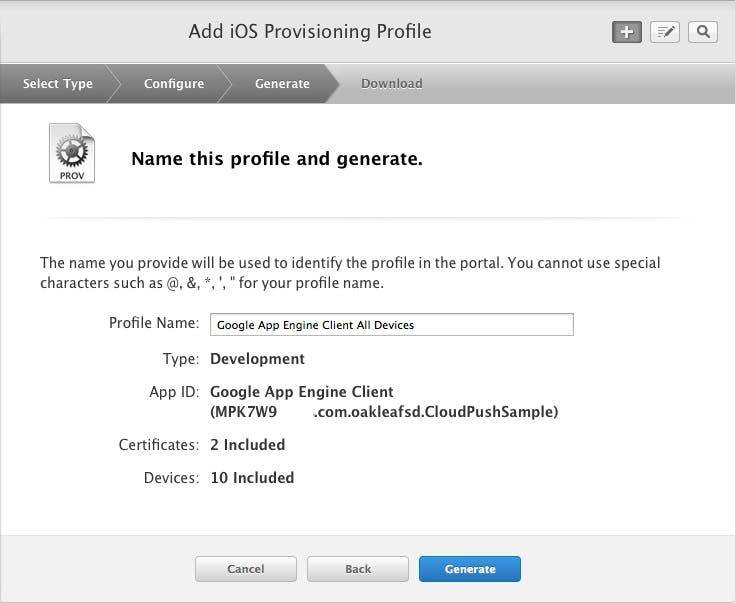 |
| Figure 33 - Name the profile and generate the provisioning file. |
- After several seconds when the provisioning file is generated, you will see Your provisioning profile is ready as shown in Figure 34. Click the Download button to download the provisioning file to your computer's Downloads folder.
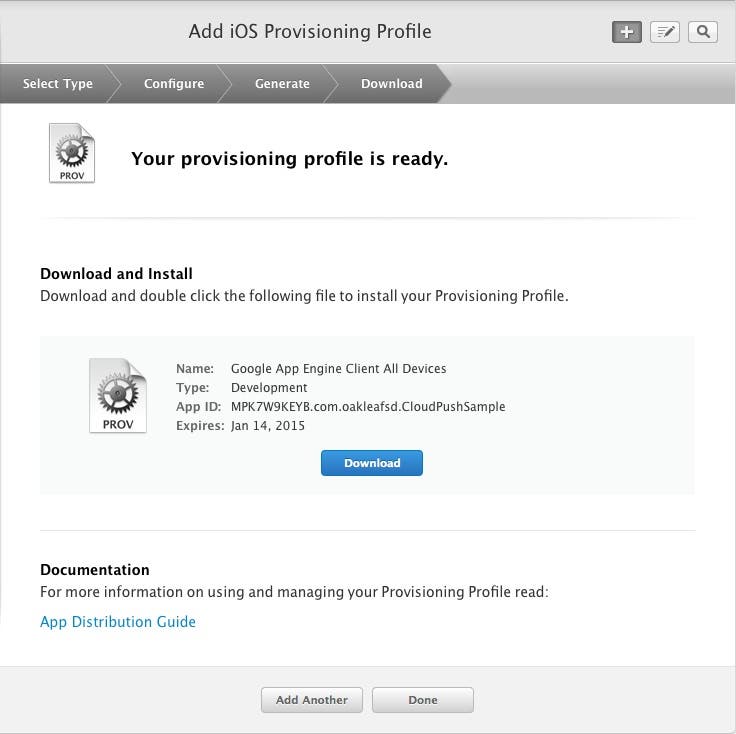 |
| Figure 34 - Download the provisioning file when it's ready! |
- Attach the iOS device on which you want to install the Google iOS sample app. Next, in the Xcode menu, select Window > Organizer to display the Organizer window. In the left pane of the Organizer window under the device you have just connected, select Provisioning Files.
- In the Finder app, navigate the Downloads folder and locate the new provisioning file (it has a .mobileprovision extension). Drag, the provisioning file onto the Organizer Window (Figure 35).
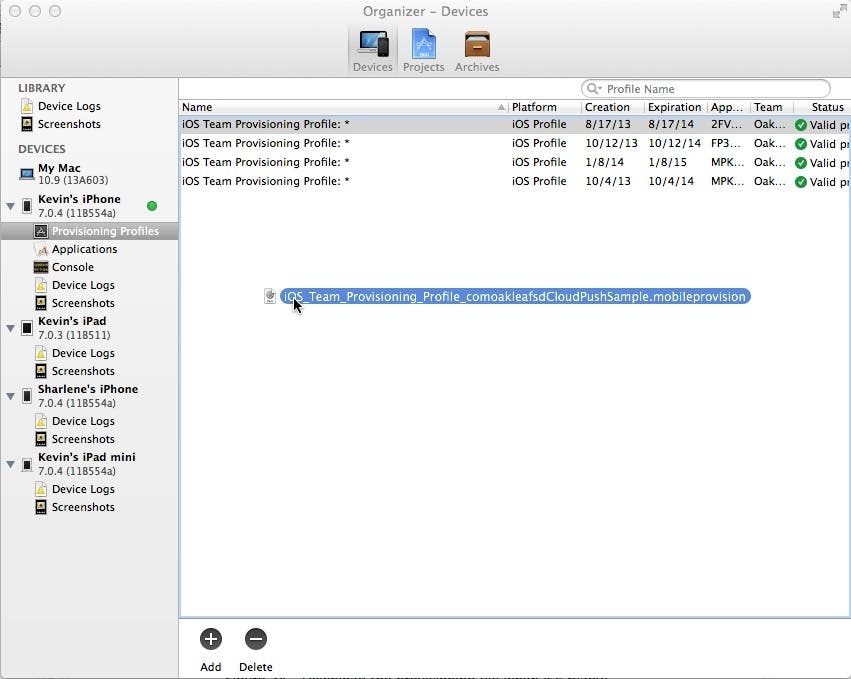 |
| Figure 35 - Drag and drop the provisioning file on the Organizer Window. |
You should now see the new provisioning file in the list.
Step 6: Export the Push Notification SSL Certificate
In this step you will export the Push Notification service SSL Certificate to a *.p12 file so you can upload it to the backend later.
- Open the Keychain Access app on your Mac.
- In the panel on the left under Category, select My Certificates (Figure 36).
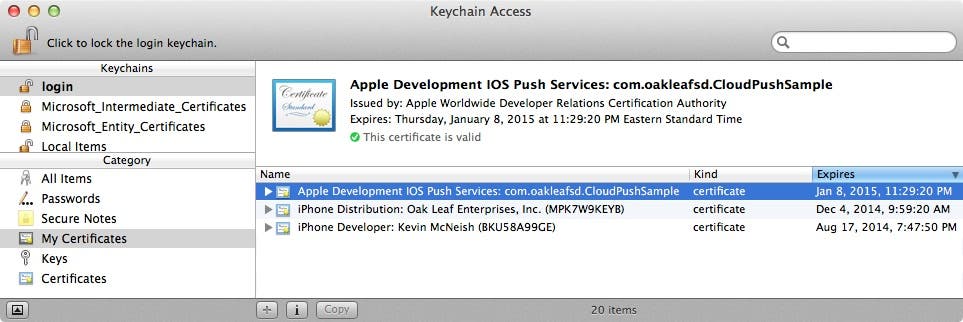 |
| Figure 36 - The certificate in the Keychain Access window. |
- In the list on the right, click the Expires column so the certificates are sorted in descending order by expiration date. The new Push Services certificate should be at the top.
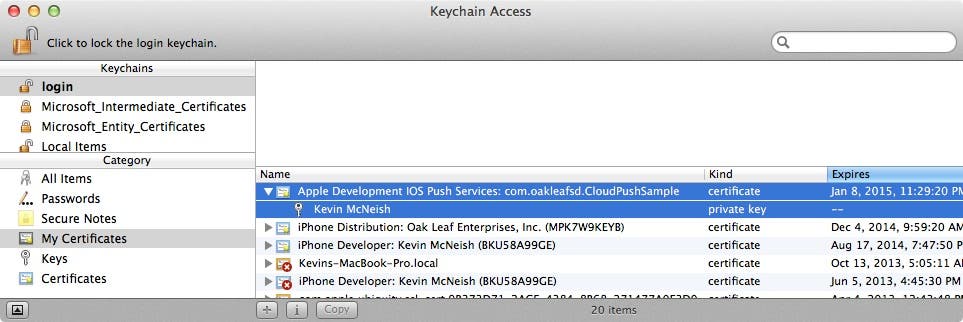
- Click the arrow to the left of the certificate to expand it. Next, click the Push Services certificate to select it, hold the shift key down, and click the private key to select it too (Figure 37).
 |
| Figure 37 - Select the certificate and the key. |
- Right click the selected items and select Export 2 items... from the shortcut menu.
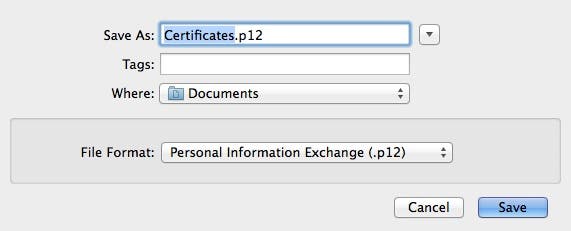
- In the save dialog (Figure 38), specify in the Where box the location where you want to save the exported files (to get full control of where the files are saved, click the down arrow to the right of the Save as box). Afterwards, click Save.
 |
| Figure 38 - Save the exported items. |
- In the dialog that appears next, enter a Password, and then type it again in the Verify box. Afterwards, cick OK. At this point you will be prompted to enter your login password.
This saves the Certificates.p12 file to the directory you specified.
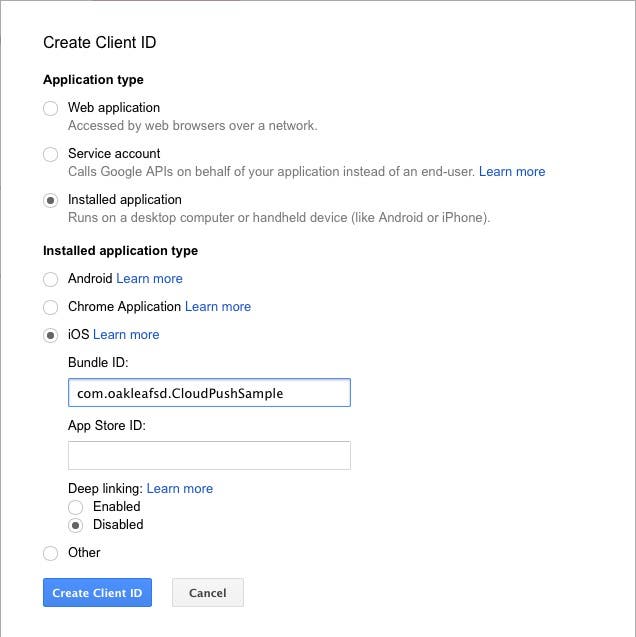
Step 7: Creating an iOS Client ID
In this step you will create a client ID in the Google API Console which allows the app and the backend to identify each other.
- In your web browser, navigate to the Google API Console.
- Make sure that the Guestbook project is currently selected. As shown in Figure 39, you should see Guestbook in the upper left corner of the page. If you don't see Guestbook, click the back arrow in the upper left corner, and select the Guestbook project.
 |
| Figure 39 - Make sure the Guestbook project is selected. |
- In the menu on the left, select APIs & auth > Credentials (Figure 40).
 |
| Figure 40 - Select APIs & auth > Credentials. |
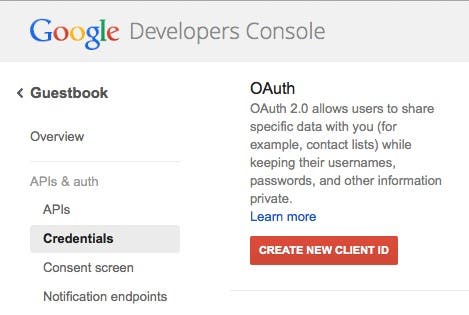
- Under OAuth, click the CREATE NEW CLIENT ID button.
- Make the following changes in the Create Client ID dialog (Figure 41):
 |
| Figure 41 - The Create Client iD dialog. |
- Under Application type, select Installed application
- Under Installed application type, select iOS.
- In Bundle ID, enter the bundle ID you specified for the Google sample app in Xcode.
- Leave the App Store ID textbox blank.
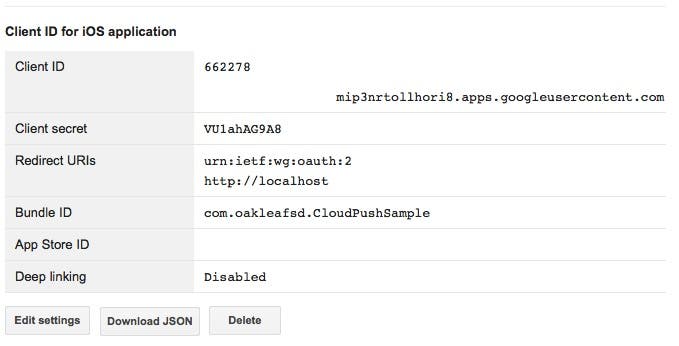
- Click the Create Client ID button. This displays the new Client ID for iOS application (Figure 42).
 |
| Figure 42 - The new client ID is displayed in the Google Developers Console. |
The Client ID will be used in the upcoming steps.
Step 8: Configuring the Backend to Send Apple Push Notifications
In this step, you will configure the mobile backend on Google's servers to send Apple push notifications.
- Go back to the Google Developers Console in your web browser. Take note of the Guestbook Project ID.
- In your browser's address bar, enter the following address to navigate to the Mobile Backend configuration page, replacing your-project-id with the Guestbook project ID you noted in the previous step:
https://your-project-id.appspot.com/admin/configure.jsp
- Under the Authentication / Authorization section (Figure 43), select Secured by Client IDs, and then in the iOS Client ID box, enter the client ID you created in the previous section (if you need to go find this ID again, go to the Developer's Console in your web browser and in the panel on the left, select APIs & auth > Credentials). Note that the client ID is a set of numbers followed by a hyphen, followed by a series of numbers and letters (I've blocked out some of the numbers in Figure 43 for privacy purposes).
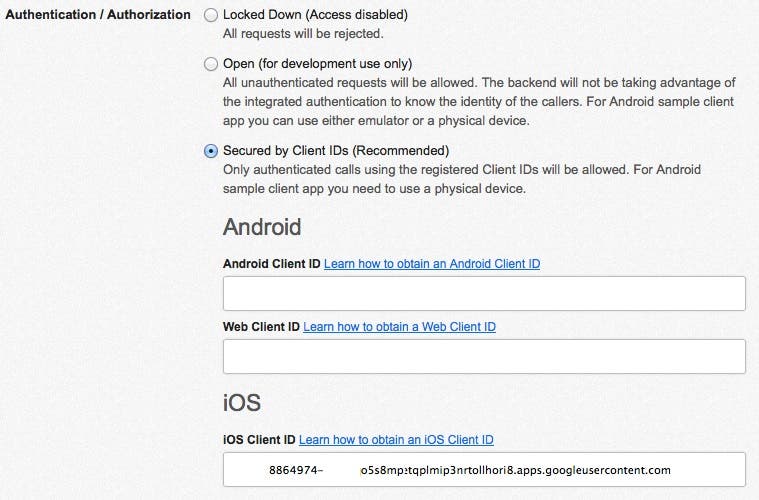 |
| Figure 43 - Set the iOS Client iD. |
- Next, under Google Cloud Messaging and iOS Push Notification select the Enabled option (Figure 44).
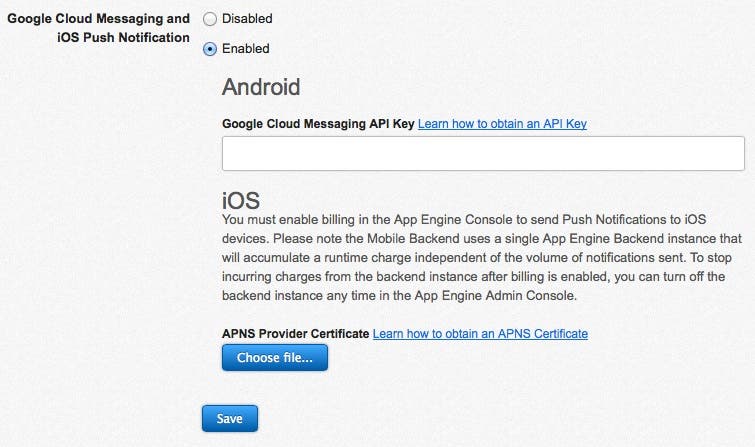 |
| Figure 44 - Enable iOS Push Notifications |
- For the APNS Provider Certificate, click the Choose file... button (Figure 44). Navigate to the location where you saved the Certificates.p12 file, select the file and then click Choose.
- In the APNS Certificate Password dialog, enter the password you assigned to the certificate in Step 6: Export the Push Notification SSL Certificate, and then click OK.
- Click the Save button. After a few seconds you should see a Done message.
Step 9: Configuring the iOS Client App to Run With the Deployed Backend
In this step you will update the Google iOS sample app so that it works with the backend you have set up on Google's servers.
- Open the CloudBackendiOSClient project in Xcode.
- In the Project Navigator, expand the sample group below the CloudBackendiOSClient group (Figure 45) and select the Constants.m file.
 |
| Figure 45 - Select the constants.m file. |
- Change the following constant values based on the Client ID, Client Secret, and Project ID information in Google's API Console (again, it's under APIs & auth > Credentials):
- Change kCloudBackendClientID to the ClientID value.
- Change kCloudBackendClientSecret to the Client Secret value.
- Change mobilebackend11 in kCloudBackendServiceURL to your Project ID.
Step 10: Updating the Code Signing Certificate
- In the Project Navigator, select the first node, which displays the Project Editor.
- In the panel on the left of the Project Editor under Project, select CloudBackendiOSClient.
- Select the Build Settings tab and scroll down to the Code Signing section. Under Code Signing Identity in the Debug setting, select the CloudPushSample code signing entity (Figure 46).
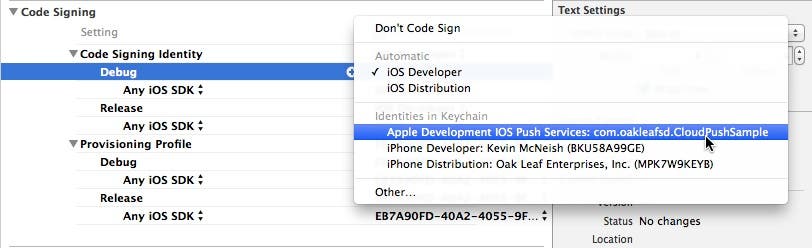 |
| Figure 46 - Set the Code Signing Identity for the Debug setting. |
Step 11: Running the Sample
- Attach an iOS device to your Mac development machine
- At the top left of the Xcode window, in the Scheme control, select your iOS Device (Figure 47).
 |
| Figure 47 - Select your iOS device in the Scheme control. |
- Click Xcode's Run button to build the project and run it on your device. When the app first appears on your iOS device, you should see the screen shown in on the left side of Figure 48.
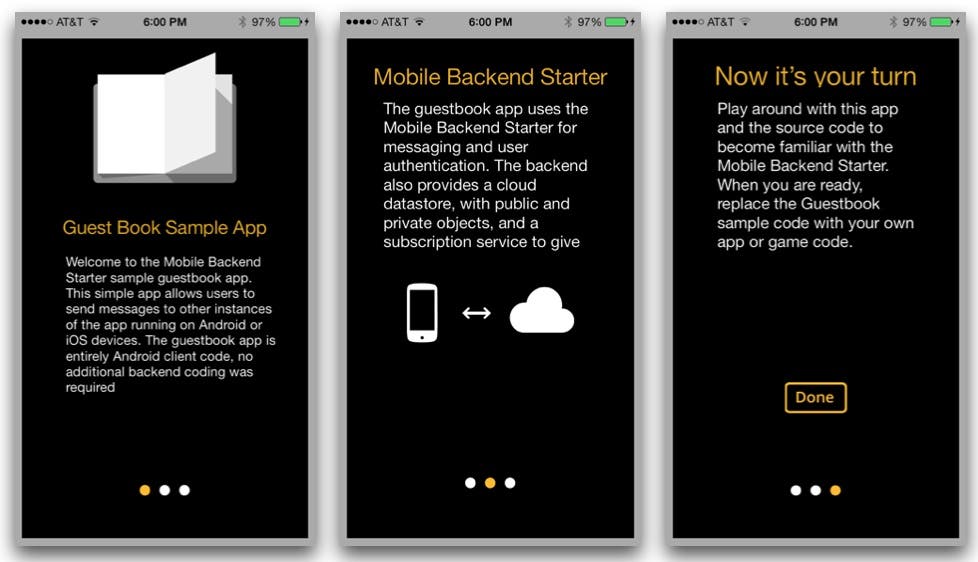 |
| Figure 48 - The iOS Guestbook app's opening scenes. |
- Swipe the iOS device's screen to navigate to the next screen shown in the center image of Figure 48.
- Swipe the iOS device's screen again to navigate to the next screen shown in the image on the right in Figure 48.
- Tap the Done button (note that you will only see these opening screens the first time the app is installed on a device).
- This takes you to the Guestbook list screen. When you first run the app and no messages have been created by any users, the table view will be empty (Figure 49).
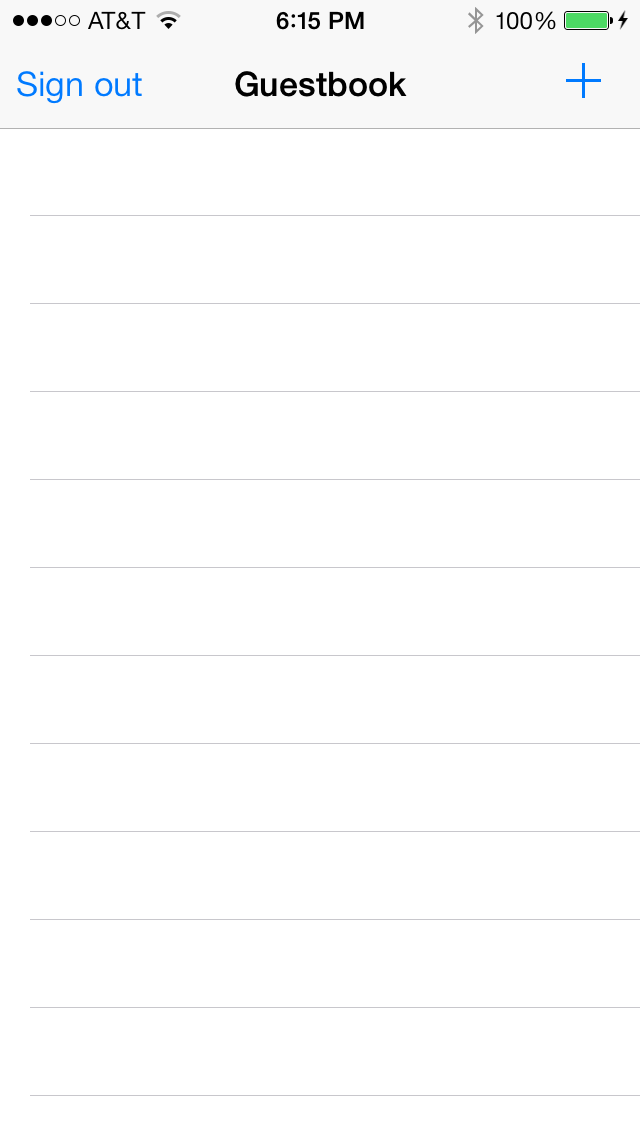 |
| Figure 49 - The empty Guestbook list. |
- Click the plus (+) button to add a new message. This displays the screen shown in the center of Figure 2. Enter your message text and tap the Send button to send the message to the Mobile Backend, which will store it in the database, and then send out an Apple Push Notification to all users to alert them that a new message has been added.
To see the how this works on multiple devices you can install the Guestbook app on a second iOS device. Whenever you add a message on one device, you will see a notification on the other device (if the Guestbook app isn't the app that is currently open on the device). If you want to see the message you just entered on your own device, just wait a few minutes and it will automatically appear in the list. If you don't want to wait, just tap on the table view and pull down towards the bottom of the screen until the plus (+) sign disappears, and then let go. This will refresh the list and show all messages that have been added since the last time the list was refreshed.
Conclusion
As you can see, it wasn't trivial to set up Google's iOS sample app. The fact that the app uses push notifications definitely added a degree of difficulty! In my next post we'll take a closer look at the code in the sample app as well as the code in the mobile backend so you can have a clearer understanding of how the app and Google's App Engine work behind the scenes.