Do you have an idea for an app but lack the programming knowledge to begin building it? In this weekly blog series, I will take you, the non-programmer, step by step through the process of creating apps for the iPhone, iPod touch, and iPad. Join me each week on this adventure and you will experience how much fun turning your ideas into reality can be! This is part 32 of the series. If you are just getting started, check out the beginning of the series here.
in this week's post, I'm going to break down the process of installing and running an app on a real iOS device (rather than the Simulator). Even if you think you know everything there is to know about this process, things have changed a bit under Xcode 5, so I recommend you read on!

Why Run Your App on a Real iOS Device?
All the work we have done in this series so far has been in Xcode's iOS Simulator. As powerful as the Simulator is, there are still a number of things you can't do, such as take a picture, make a phone call, check for a cell signal, and so on. You need to run your app on an iOS device to test these parts of your app.
Ultimately, even if the Simulator did everything you needed it to do, it's still imperative that you test your apps on a real iOS device. There are two main reasons for this:
- The Simulator is much faster than a real iOS device.
- The Simulator is forgiving.
The Simulator runs on your Mac, which has far more processing power and resources than an actual iOS device. You really won't be able to see how fast (or slow) your app runs until you run it on an iOS device.
In addition, the Simulator is forgiving. For example, it can locate files that you may not have bundled properly into your app. You won't know this until you try to run your app on an iOS device. According to Apple, one of the biggest reasons apps are rejected is because they crash as soon as you are run. This tells us that these developers didn't run the app on a real device, otherwise they would have found the crash themselves.
Joining an iOS Developer Program
Your first step in getting your app to run on a real iOS device is to join one of Apple's iOS Developer Programs. This is different from being a Registered Apple Developer, which is free, and allows you to download and install Xcode.
When you join an iOS Developer Program, you pay an annual fee (starting at $99). Why does Apple charge a fee? It helps separate those who are serious about app development from those who are not. This fee is extremely low when you think about the fact that Xcode and the iOS Simulators are completely free. For your annual fee, you can submit as many apps as you like to the App Store and Apple's QA team puts your apps through its paces looking for bugs and crashes, making sure you have developed a high-quality app. Your annual fee also gives you access to beta versions of iOS and Xcode. This allows you to get your hands on an early copy, enhance your apps, and get them ready for the App Store when Apple officially releases the new version of iOS to the general public. You also get access full access to the Member Center and iTunes Connect where you can manage your apps.
As shown in the high-level overview in Figure 1, you can enroll in an iOS Developer Program as an Individual or a Company.
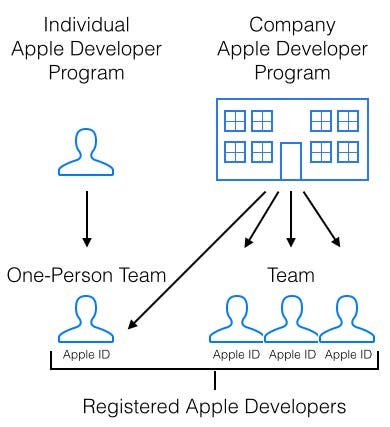 |
| Figure 1 - You can enroll in an iOS Developer Program as an individual or a company. |
If you sign up as an individual, you are considered a one-person team. If you enroll as a company, you can add other persons to your team. In either case, all team members must be Registered Apple Developers (members of the free program). Registered Apple Developers have an Apple ID that identifies a specific person associated with a unique email address. As shown in Figure 1, you can use your Apple ID to join multiple teams. However, an Apple ID can only be associated with a singles iTunes Connect team. So, developers should create another Apple ID for different individual or company accounts that they want to manage separately in iTunes Connect.
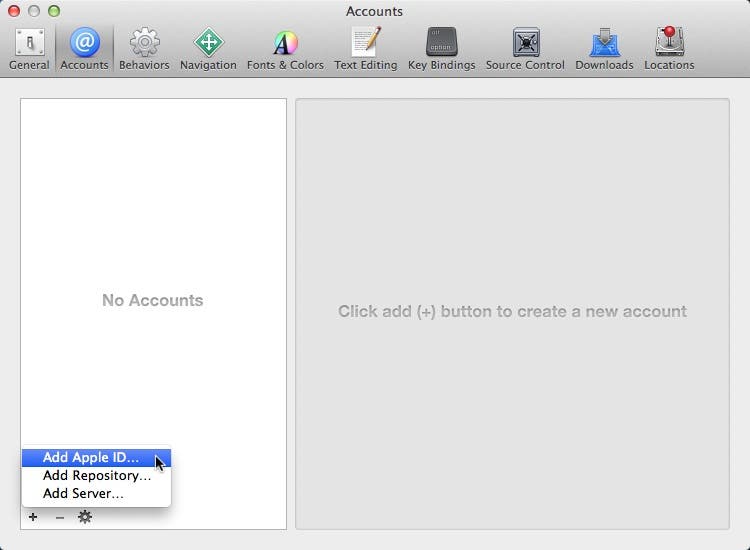
You can join an Apple Developer program directly in Xcode 5. Here are the steps:
- From the Xcode menu, select Xcode > Preferences.
- At the top of the Preferences window, click Accounts.
- At the bottom-left corner of the window, click the Add button (+), and select Add Apple ID... as shown in Figure 2.
 |
| Figure 2 - Adding an Apple ID |
- This displays a dialog the dialog shown in Figure 3. Click the Join a Program... button.
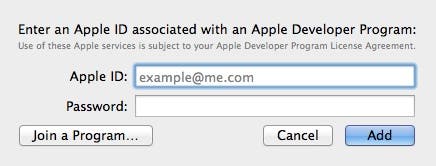 |
| Figure 3 - Joining an Apple Developer Program |
- This launches the Apple Development Programs enrollment web page (Figure 4) in your default browser. Follow the instructions to enroll in one of the Apple Developer programs.
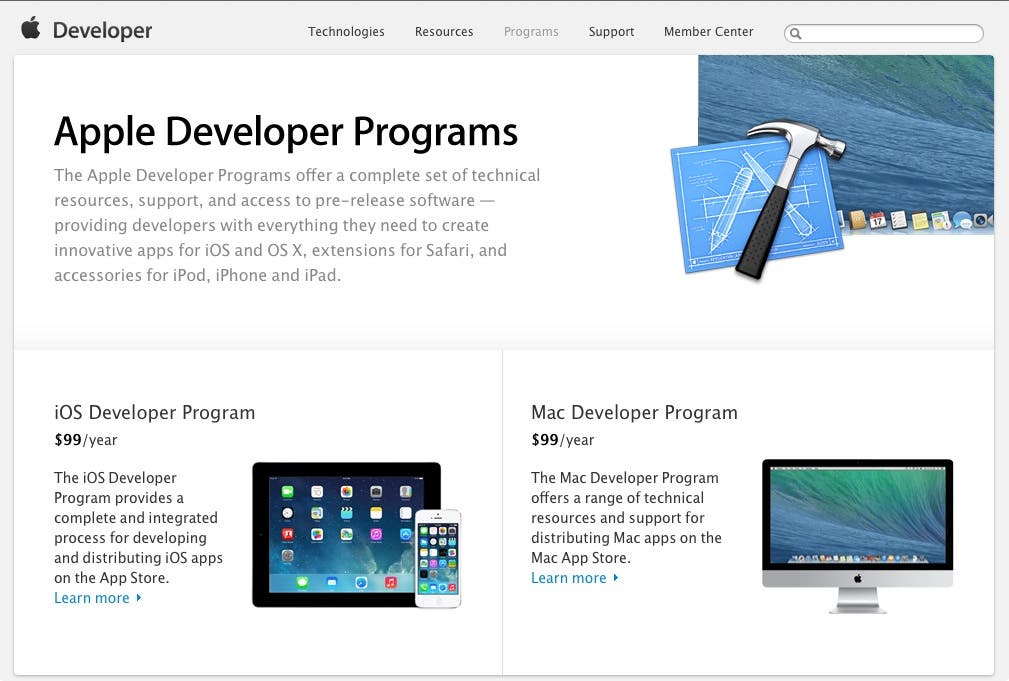 |
| Figure 4 - Apple's Developer Programs enrollment web page |
Your Unique Team ID
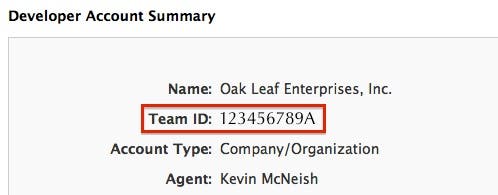
Whether you are a one-person team or company team, Apple assigns your team a unique 10-character Team ID. You can find your Team ID through the online Member Center.
- In your browser, navigate to the iOS Dev Center.
- At the top of the iOS Dev Center page, click the Member Center link.
- At the top of the Member Center page, click the Your Account toolbar button.
- Your Team ID appears in the Developer Account Summary (Figure 5).
 |
| Figure 5 - Finding your Team ID |
Understanding Code Signing
Unfortunately, the world has more than its fair share of miscreants who would love nothing more than to hijack your app, modify it with evil intent, and redistribute it without your knowledge.
To prevent this from happening, Apple has implemented a security model that involves code signing your app. Code signing is the process of generating a cryptographic hash—a fixed-size bit string—from the contents of your app. This occurs when you build your app in Xcode. If anyone subsequently tries to change the contents of the app file, it will no longer match the cryptographic hash and iOS will refuse to run it.
Code signing also involves stamping your app with a certificate issued by Apple so your users can be sure the app is from a known source.
Apple Signing Certificates
Once you have registered in an iOS Developer Program, you can request a signing certificate from Apple that allows you to code sign your apps. There are two main types of signing certificates:
- Development Certificate - Allows you to sign your apps so you can test them on an iOS device.
- Distribution Certificate - Allows you to sign your apps so you can submit them to the App Store.
Note that any team member can request a development certificate, but only a team agent or admin can request a distribution certificate.
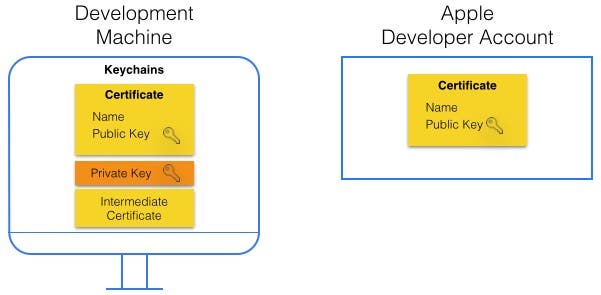
When you request a signing certificate from Apple, two copies of the certificate are generated—one that Apple keeps with your developer account and a second certificate that is stored on your development machine in your keychain (Figure 6).
 |
| Figure 6 - Two copies of a certificate are generated. |
When the signing certificate is generated, Apple issues you a set of keys—one public key and one private key. These two keys comprise your signing identity. The signing certificate, stored in your keychain, contains your public key and identifies you as the owner of the key pair. The private key is also stored in your keychain and is used to generate the cryptographic hash. When you install Xcode on your development machine, an intermediate certificate is stored in your keychain to ensure that your certificate is issued by a certificate authority.
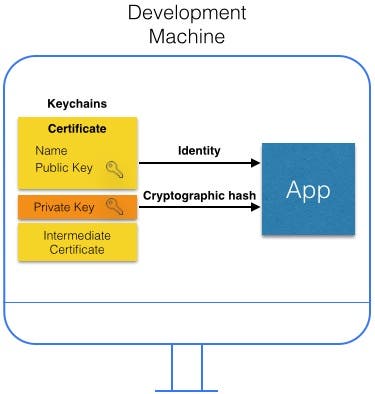
When you build your app, Xcode uses your signing identity to sign your app with the identity from your public key and a cryptographic hash generated from the private key as shown in Figure 7.
 |
| Figure 7 - Signing your app at build time |
Requesting a Development Signing Certificate
In the past, requesting a certificate from Apple and installing it on your development machine was a real hassle. The process was fraught with disaster and could take several hours. Fortunately, Xcode 5 greatly simplifies the process.
The easiest way to request a development signing certificate is by launching Xcode and connecting an iOS device to your development machine.
- If it's not already open, launch Xcode.
- Connect the iOS device on which you want to install your app to your development machine using a USB cable.
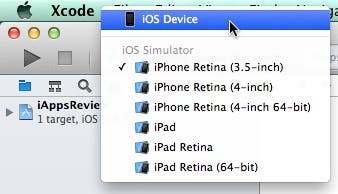
- After a few moments, you should see iOS Device appear as one of the options in the Scheme control (Figure 8).
 |
| Figure 8 - The iOS Device appears in the Scheme control. |
If you select the iOS Device option and then click the Run button, you will see the error dialog shown in Figure 9.
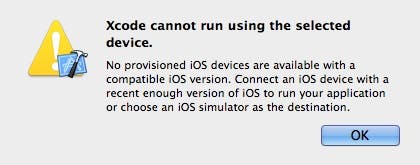 |
| Figure 9 - Cannot run using the selected device |
This message is a bit misleading because it sounds like the iOS device I connected doesn't have the latest version of iOS installed (it does). What it's really telling me is that the iOS device has not been set up, or provisioned, as a development device.
- The easiest way to fix this problem is through Xcode's Organizer window. From the Xcode menu, select Window > Organizer.
- In the list on the left side of the Organizer, select the iOS device you just connected to your development machine, and then click the Use for Development button (Figure 10).
 |
| Figure 10 - Selecting to use a device for development |
- If you don't have a developer account specified on your development machine yet, you will see the error dialog shown in Figure 11. If you haven't joined a developer program yet, click the Join a Program... button and follow the steps outlined there. If you have joined a developer program, click the Add... button to add your Apple ID.
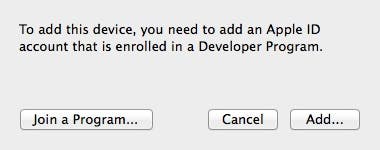 |
| Figure 11 - Join a program or add an Apple ID. |
- When the next dialog appears, enter your Apple ID and Password, and then click the Add button (Figure 12).
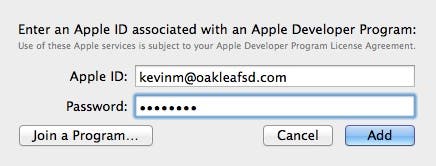 |
| Figure 12 - Enter an Apple ID |
- When the next dialog appears, place a check mark next to the development team you want to use for provisioning and then click the Choose button (Figure 13).
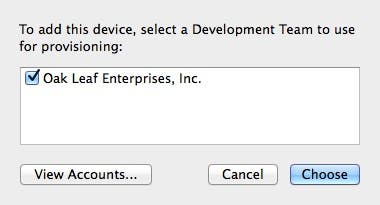 |
| Figure 13 - Select a development team. |
- After several seconds you will be returned to the Organizer window and you should see a green light next to your iOS device (Figure 14).
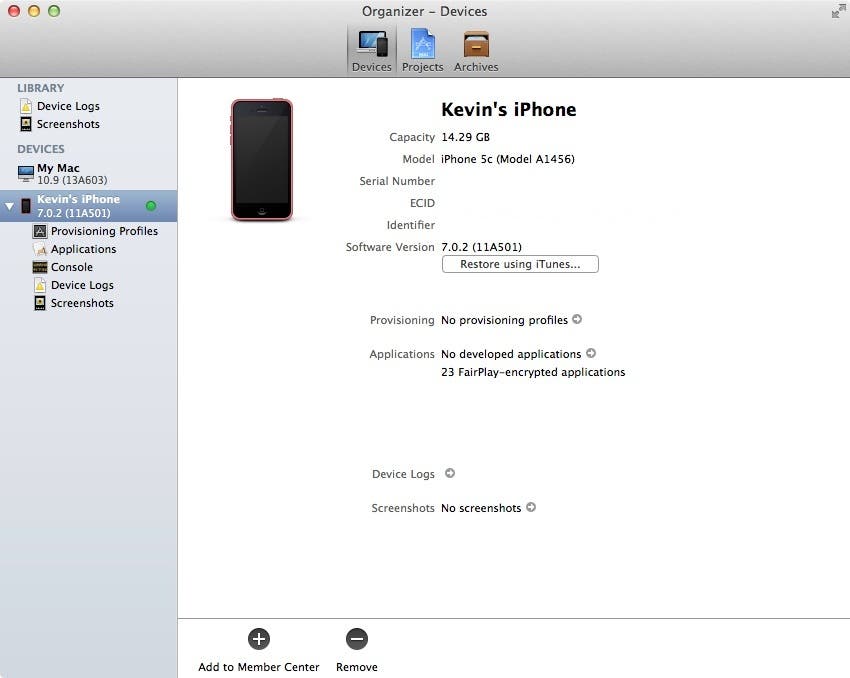 |
| Figure 14 - A green light appears next to the device. |
- If you now press Xcode's Run button, you will see the "No matching code signing identity' error message in the Project Editor shown in Figure 15. That's because we still don't have a development signing certificate on our development machine.
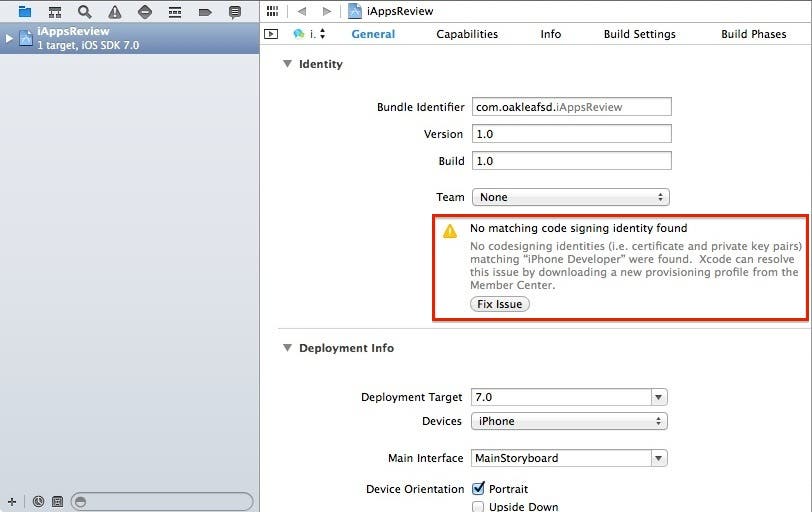 |
| Figure 15 - The No matching code signing identity found warning message |
- To fix this problem click the Fix Issue button (Figure 15).
- In the next dialog that appears, select the Development Team you want to use for provisioning and click the Choose button (Figure 16).
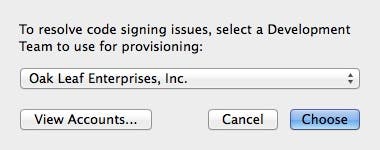 |
| Figure 16 - Select a development team. |
- Next, a dialog with the warning No code signing identity found appears. Click the Fix Issue button (Figure 17).
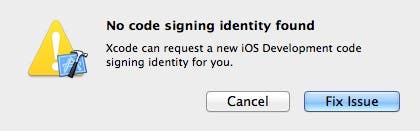 |
| Figure 17 - No code signing identity found |
- Now a dialog appears with a spinning activity indicator and a message that states Resolving code signing issues... (Figure 18).
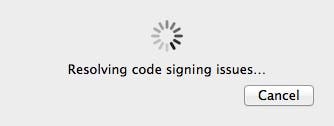 |
| Figure 18 - Xcode is resolving the code signing issues. |
- Next, a dialog appears asking to use a key in your keychain. Click the Allow button (Figure 19).
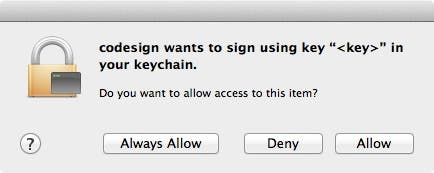 |
| Figure 19 - Allow codesign to use your keychain |
- When control returns to Xcode, go to the menu and select Xcode > Preferences. Click the Accounts button at the top of the dialog, and then click the View Details... button. At the top of the dialog you should see the new certificate n the Signing Identities list (Figure 20).
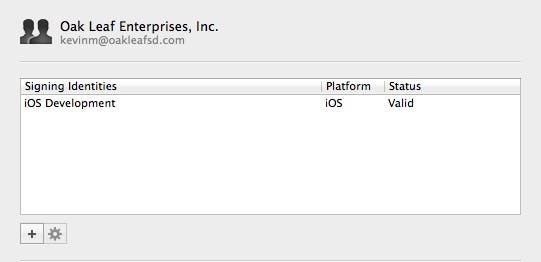 |
| Figure 20 - The signing identity has been added. |
- At this point, make sure your iOS device is selected in the Scheme control at the top of the Xcode window, and then click the Run button. Your app should now be installed and run on your iOS device!
Requesting a Distribution Signing Certificate
When you're ready to submit your app to the App Store, you are going to need a distribution signing certificate. Here are the steps you need to take to request and install this certificate on your development machine.
- Open the Xcode Preferences window by selecting Xcode > Preferences from the menu.
- At the top of the Xcode Preferences window, select the Accounts button.
- In the list on the left, select the team you want to use, and then click the View Details... button.
- A dialog appears listing any signing identities you already have. To request a new signing certificate, click the Add (+) button below the Signing Identities list and select the iOS Distribution certificate (Figure 21).
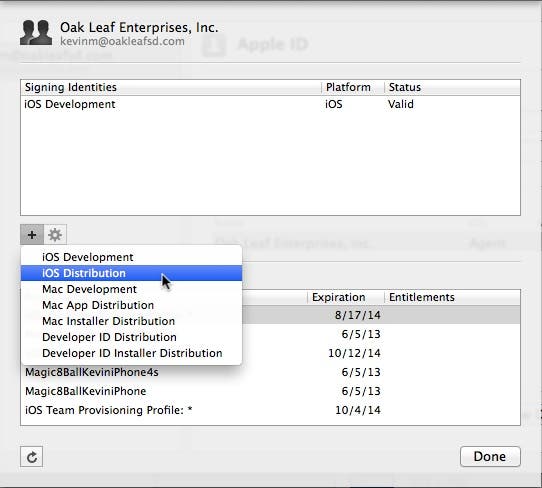 |
| Figure 21 - Adding a Distribution Signing Certificate |
- While the signing certificate is being generated, an activity indicator displays at the bottom-left corner of the dialog. When generation is complete, you will see the Signing Identity Generated alert shown in Figure 22.
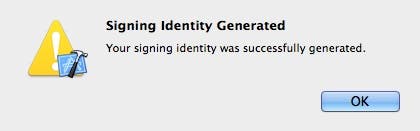 |
| Figure 22 - The Signing Identity has been generated! |
- Click the OK button to close the dialog and you will see the new signing identity listed in the Signing Identities list (Figure 23).
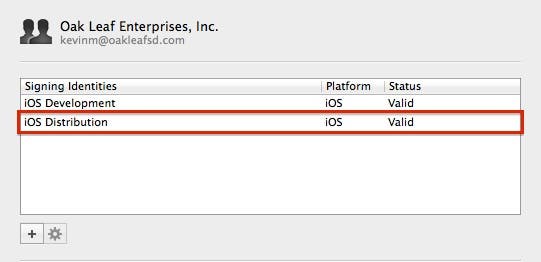 |
| Figure 23 - The new signing identity has been added to the list! |
Now that this process is complete, you should be able to see the new certificate in the Member Center area of the iOS Dev Center web site. To do this:
- In your web browser, navigate to the iOS Dev Center.
- At the top of the web page, select Member Center.
- In the toolbar at the top of the Member Center page under Developer Program Resources, click the Certificates, Identifiers & Profiles link (Figure 24).
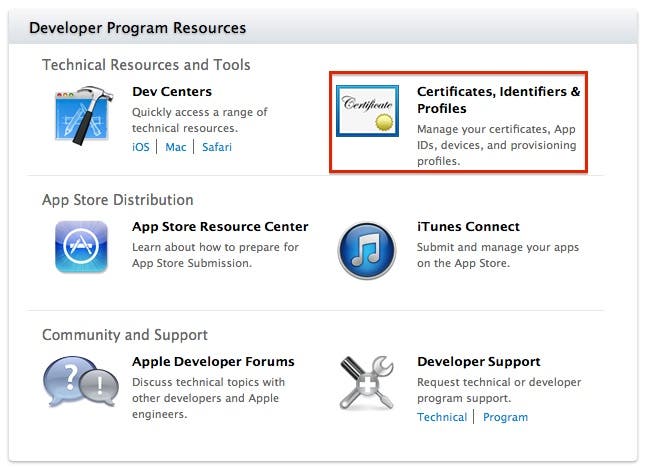 |
| Figure 24 - Click the Certificates, Identifiers, and Profiles link. |
- In the Certficiates, Identifiers, and Profiles page, click the Certificates link (Figure 25).
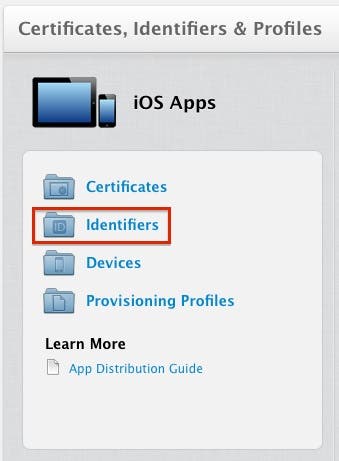 |
| Figure 25 - Select the Certificates link. |
With the All option selected on the left side of the page, you should see all of your certificates in the list on the right (Figure 26).
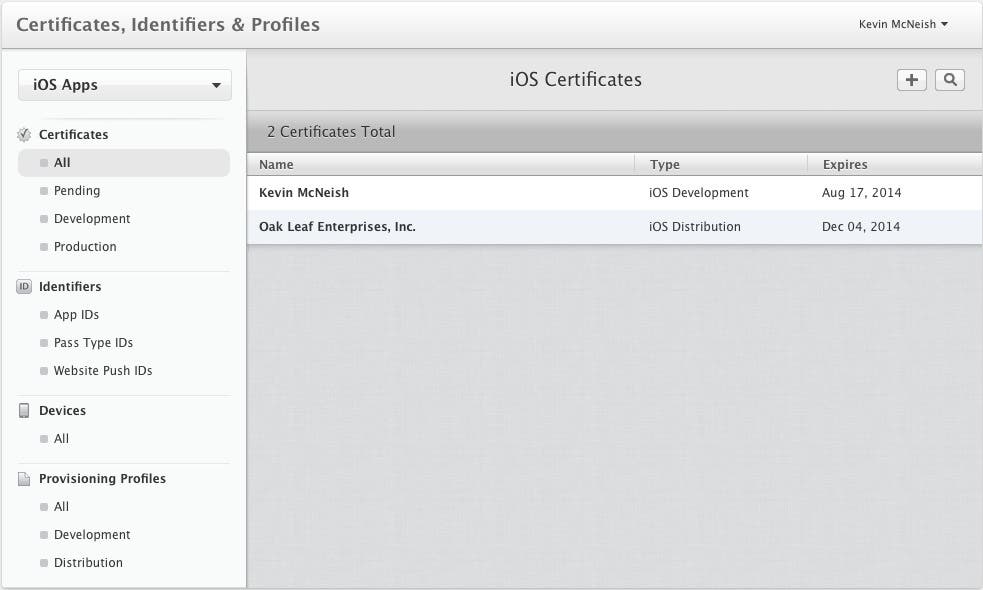 |
| Figure 26 - Your list of certificates in the Member Center |
Provisioning Files
After going through the steps in the previous section, Xcode creates a team provisioning profile which can be viewed in the Organizer window by clicking on the Provisioning Profiles node in the left pane of the Organizer as shown in Figure 27.
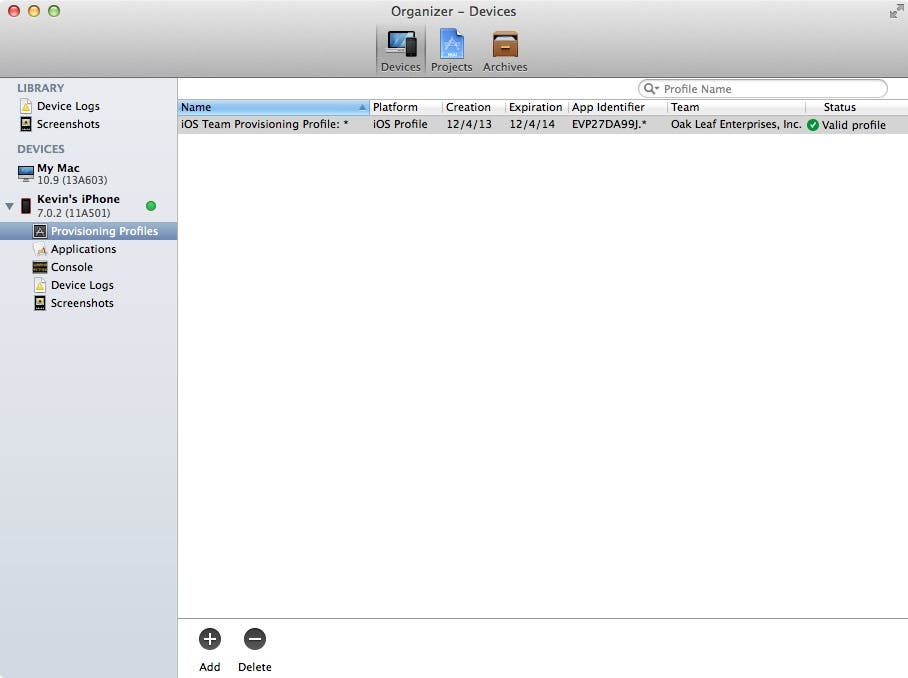 |
| Figure 27 - Your team provisioning files can be viewed in the Organizer window. |
A team provisioning file is a development provisioning file that Xcode manages for you. It allows your app to run iOS devices and use specific technologies during development. A team provisioning file contains:
- A wildcard App ID that matches all of your team's apps, OR an explicit App ID that matches a single app
- All devices associated with the team
- All development certificates associated with the team
If your app can use a wildcard App ID (it can if it uses iCloud and other iOS-specific technologies), then Xcode generates a team provisioning profile named iOS Team Provisioning Profile: * as shown in the Name column in Figure 27. If you add a capability to your app such as Game Center or In-App-Purchase that requires an explicit App ID, Xcode creates a team provisioning file named iOS Team Provisioning Profile: followed by the app's bundle ID.
For a one-person development team, the development provisioning profile allows all apps signed by you to run on all of your registered devices (Figure 28).
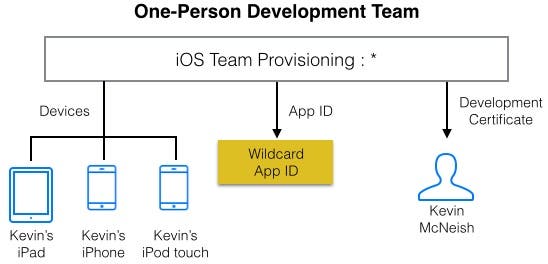 |
| Figure 28 - A team provisioning file for a one-person development team |
For a company, a team provisioning file allows any app developed by a team to be signed by any team member and installed on any team device (Figure 29).
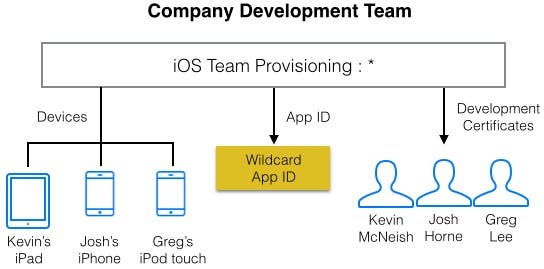 |
| Figure 29 - A team provisioning file for a company development team |
In the future, as you add team members, devices, and capabilities to your app, Xcode automatically updates the team provisioning file for you.
Conclusion
Provisioning your iOS devices so that you can test your apps on them is critical to the app development cycle, allowing you to see how your app functions in the "real world." Hopefully this blog post has cleared up some of the mystery surrounding this process. In upcoming posts, we will take advantage of the ability to run iAppsReview on an iOS device, and move the project further to completion.