Do you have an idea for an app, but lack the programming knowledge to begin building it? In this weekly blog series, How To Unleash Your Inner App Developer, I will take you, the non-programmer, step by step through the process of creating apps for the iPhone, iPod Touch, and iPad. Join me each week on this adventure, and you will experience how fun turning your ideas into reality can be! This is Part 6 of the series. If you're just getting started now, check out the beginning of the series here (this post has been updated to iOS 8, Xcode 6.3 and Swift 1.2.)
In my previous post, you were introduced to several user-interface controls including the text field, text view, image view, and rounded rectangle button. We finished the main iAppsReview scene and added a new App Category scene.

Taking Off the Training Wheels
Now that you have learned some of the basic skills for adding new scenes to a storyboard and configuring table views, I'm going to have you create a few scenes on your own. I find that once you take off the training wheels (the explicit step-by-step instructions with images for each step), you really find out what you know, and what you don't know. All of the instructions for creating the scenes in this post can be seen in the video I have created for this post which can be found at this link. This video uses Xcode 5, but the instructions are virtually identical to Xcode 6.
SEE ALSO MacUser Logs Off
To begin with, launch Xcode and open the iAppsReview project you have created so far, or you can download the project from this link.
Creating the My Reviews Scene
As shown on the right side of Figure 1, the first scene you are going to create is the My Reviews scene. In this scene, the user can read the reviews they have written for different apps. This scene is triggered from the Read Your Reviews row of the iAppsReview scene.
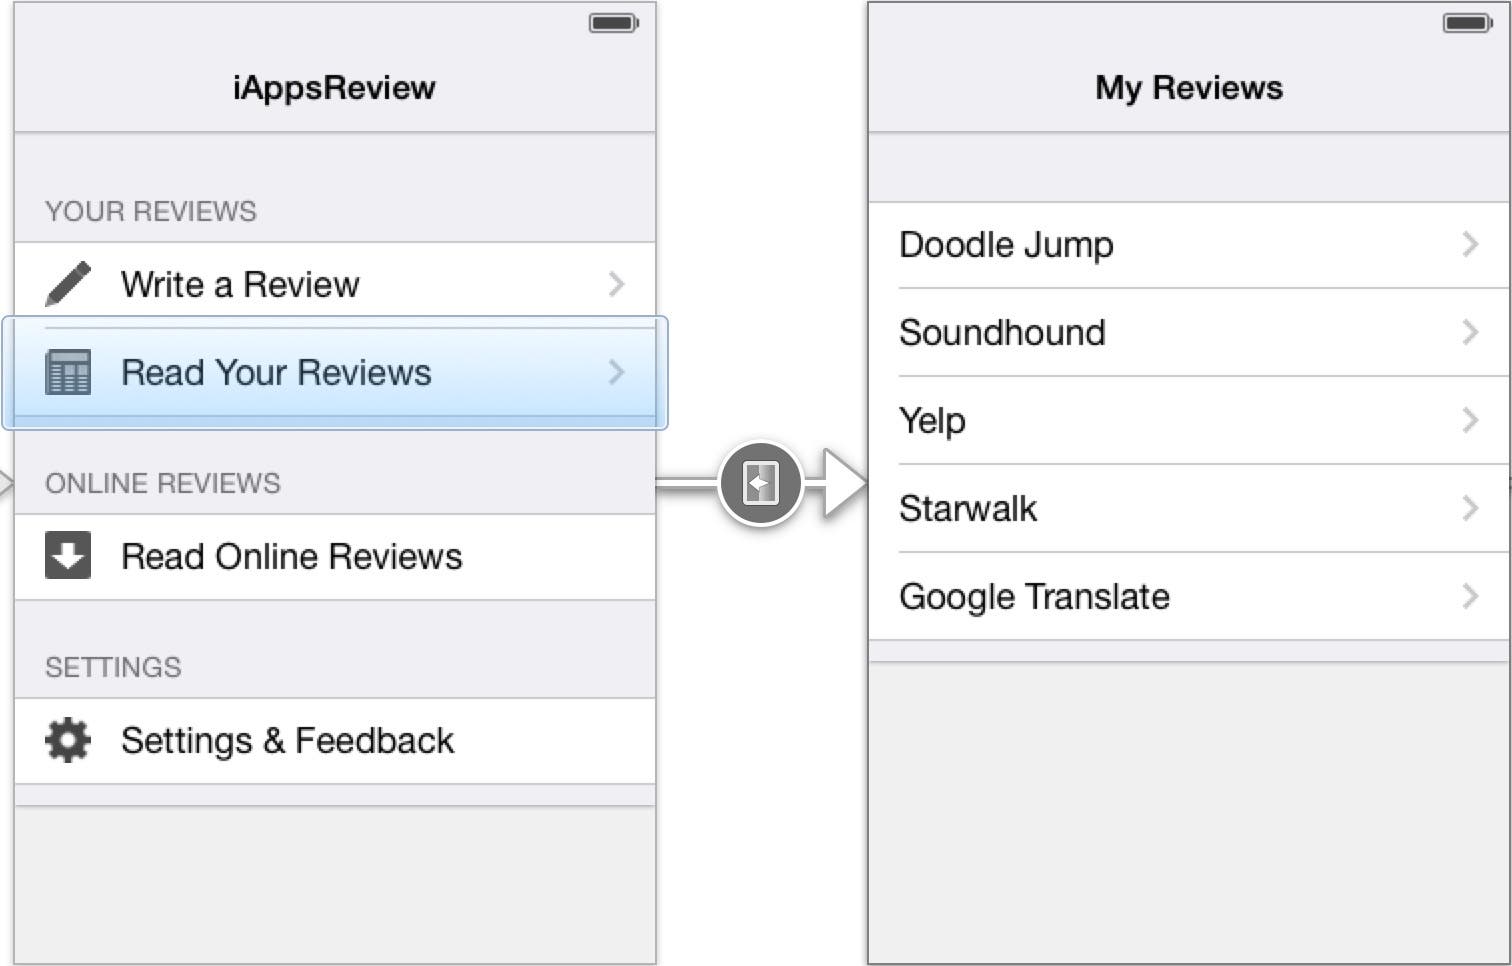 |
| Figure 1 - The My Reviews scene is triggered from the Read Your Reviews row. |
You have already learned everything you need to know to create the My Reviews scene. The main steps to follow are outlined below. Afterwards, you can watch Part A of the video I have created for this post:
- Add a new Table View Controller to the storyboard. Although Figure 1 shows the scene directly to the right of the iAppsReview scene for the sake of clarity, I recommend positioning it directly below the Write Review scene instead;
- Create a push segue between the Read Your Reviews row of the iAppsReview scene and the new table view controller.
- In the navigation bar of the new scene, change the title to My Reviews.
- Change the table view's Content attribute to Static Cells.
- Change the table view's Style attribute to Grouped.
- Delete the last two cells in the table view.
- Change the remaining cell's Style attribute to Basic.
- Set the cell's Accessory attribute to Disclosure Indicator.
- Make four duplicates of the cell.
- Change the Text of the cell's label from Title to Doodle Jump.
- Change the Text of the other cells' labels to the text shown in Figure 1.
- Run the App in the Simulator to see how it looks at run time!
Creating the Online Reviews Scene
Next, you are going to create the Online Reviews scene shown on the right side of Figure 2. This scene allows users to read online reviews that other users have written. This scene is triggered from the Read Online Reviews row in the iAppsReview scene.
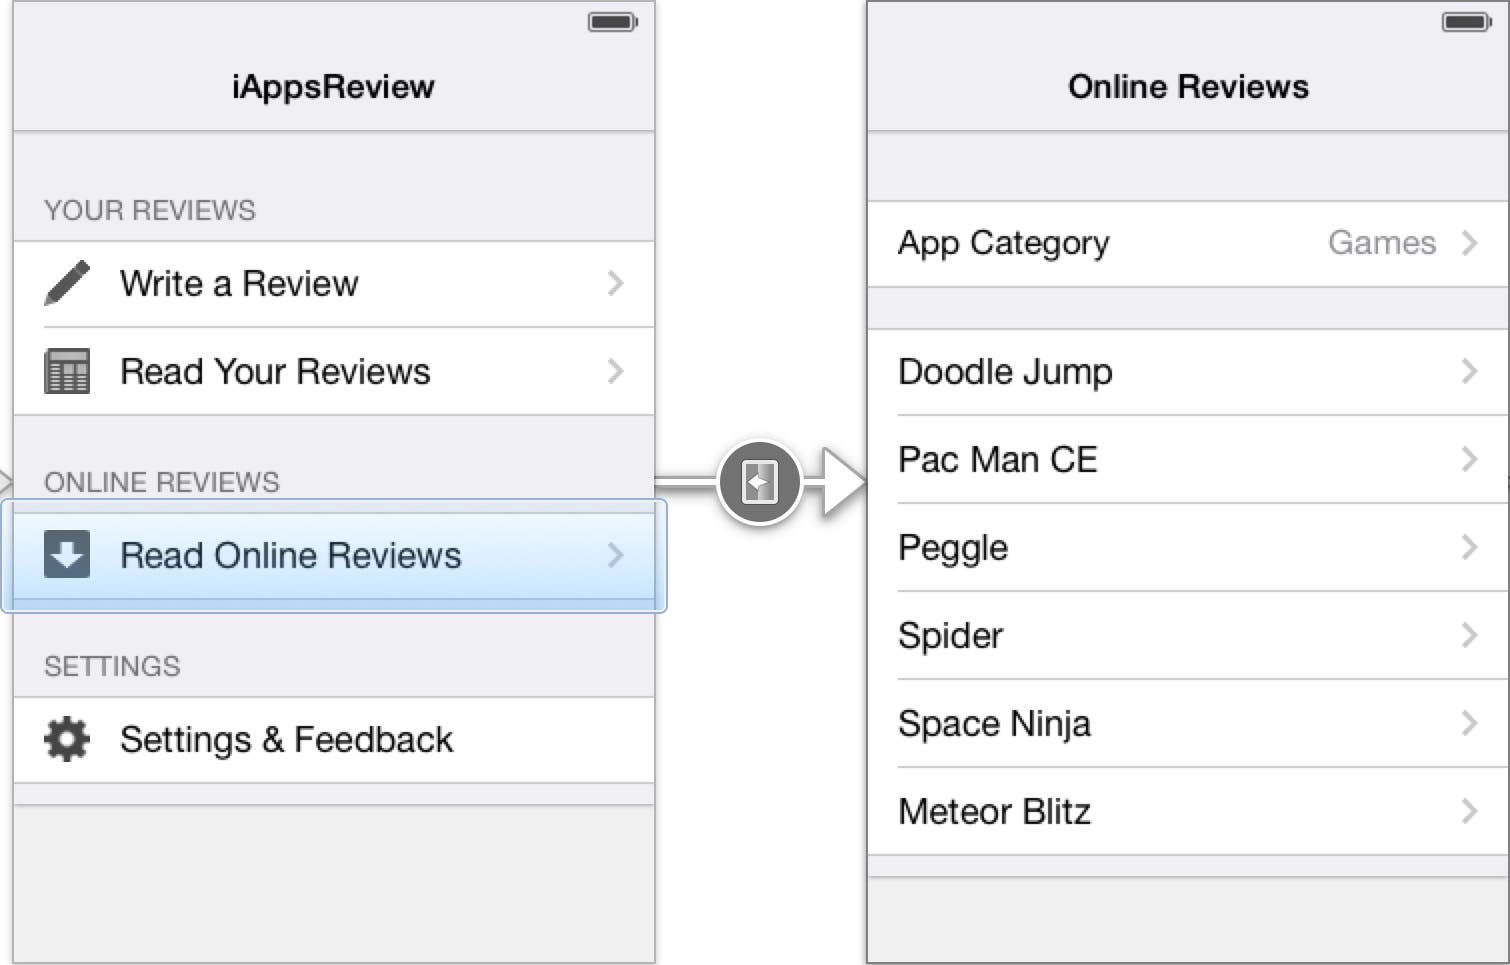 |
| Figure 2 - The Online Reviews scene is triggered from the Read Online Reviews row. |
This scene is very similar to the My Reviews scene you created in the previous section, except the table view has two sections instead of one. The cell in the first section of the table view has its Style attribute set to Right Detail. The cells in the second section of the table view have their Style attribute set to Basic. For the sake of organization, I recommend you locate this new scene on the storyboard directly below the My Reviews scene you created in the previous section.
See if you can create this new scene by yourself. You can refer to the steps in the previous section and in previous posts for clues, but try to create it on your own. Afterwards, you can watch Part B of the video I have created for this post.
Creating the Review Scene
Both the My Reviews and Online Reviews scenes can share a Review scene where the user can read their own reviews as well as reviews posted by others on line. Figure 3 shows what the final scene should look like. This scene can be launched from the Doodle Jump row in the My Reviews scene as well as the Doodle Jump row in the Online Reviews scene.
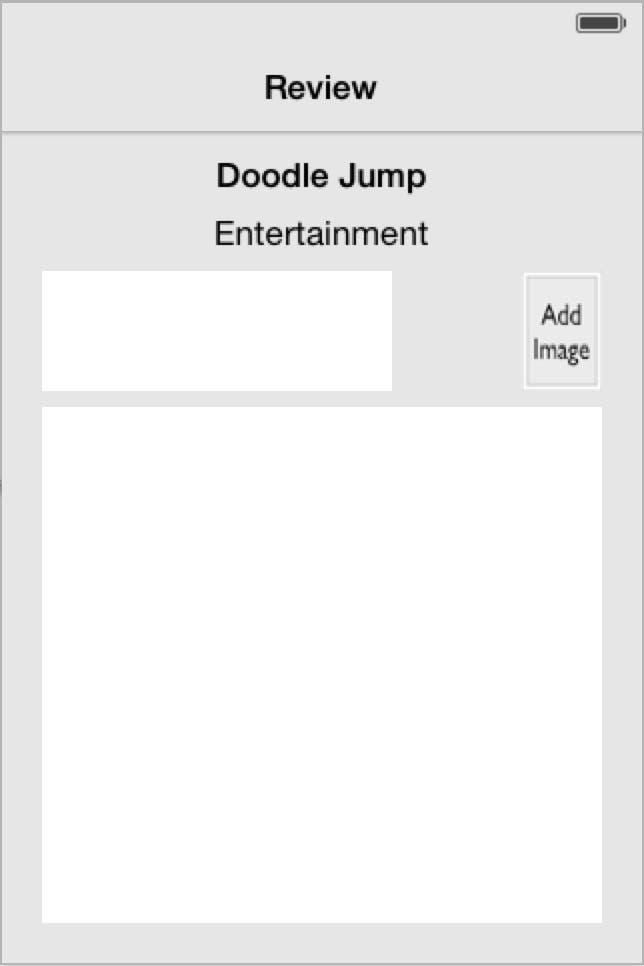 |
| Figure 3 - The Review scene |
Again, you should be able to create this scene from the information I've given you in my previous posts. Afterwards, you can watch Part C of the video I have created for this post.
Here is a list of the main steps:
- Add a View Controller to the storyboard and position it to the right of the My Reviews scene.
- Create a push segue from the Doodle Jump row of the My Reviews scene to the new view controller.
- Create a second push segue, this time from the Doodle Jump row of the Online Reviews scene to the new view controller.
- Change the title of the navigation bar in the new view controller to Review.
- Set the Background color attribute to the light gray crayon color named Mercury.
- Add a Label to the top center of the scene (positioned according to the guide lines). This label is used to display the name of the App being reviewed. Change the Font attribute of the label to System Bold 17.0. Set the Alignment of the label to Centered, and then stretch the left and right sides of the label to the width of the scene until you see the left and right guide lines appear. Finally, change the text of the label to Doodle Jump.
- Add a second Label directly below the label you just added. This label is used to display the app category. Set the label's Alignment to Centered and then stretch the label to the left and right edges of the scene using the guide lines. Finally, change the text of the label to Entertainment.
- Now you're ready to add the five-star review control to the scene. To do this, add a View to the scene directly below the label you just added, and place its left edge on the scene's left guide line. Go to the Size Inspector and change the view's Width to 175 and the Height to 60. Afterwards, go to the Identity Inspector and change the Class to mmStarRating. Finally change the background color of the five-star control to Mercury.
- Add an Image View directly below the label, but on the right side of the scene. The image view is used to display a thumbnail of an image that may be associated with the review. Go to the Size Inspector and change the image view's Width to 40 and its Height to 60. Afterwards, reposition the image view to the right side of the scene. Finally, go the Attributes Inspector and set the Image to AddImage.png.
- Add a Text View control directly below the five-star review control. The text view will be used to display the review comments. Next, center the text view in the scene and then stretch the left and right sides of the text view to the edges of the scene using the guide lines. Delete the latin text from the text view and replace it with the text shown in Figure 3 (or text of your own choosing).
- Next, pull the bottom of the text view control down towards the image view until you see the horizontal guide line appear.
- Although it's not shown in the video that accompanies this post, you need to specify autoresizing for the controls on this scene as we did for the Write Review scene in my previous post. Try to figure out the correct settings on your own, and then examine the completed project link at the end of this post to see how you did.
- Run the App in the Simulator to see how the new scene looks at run time!
Creating the Settings Scene
The next scene that needs to be created is the Settings scene shown in Figure 4. This scene allows the user to log in using their email and password, or, if they don't have an account yet, sign up for one. Later in this blog series, we will enhance this scene so the user can enter their email address and password directly into the table view rows.
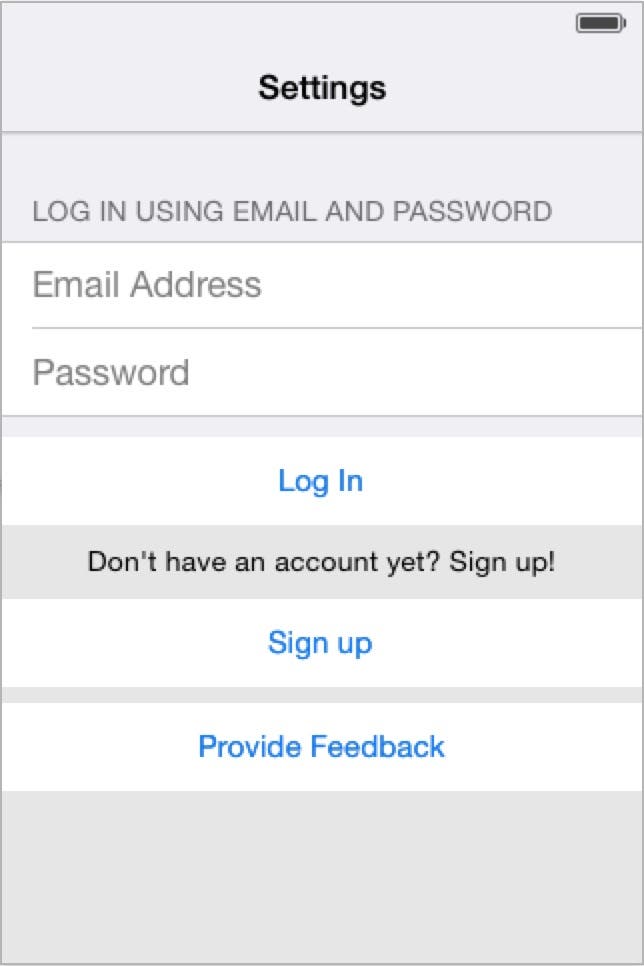 |
| Figure 4 - The Settings scene. |
Go ahead and try this on your own using the steps outlined below, and then afterwards, you can watch Part D of the video I have created for this post.
- Add a Table View Controller to the storyboard and place it below the Online Reviews scene.
- Create a push segue from the Settings & Feedback row of the iAppsReview scene to the new table view controller.
- Change the title in the navigation bar of the new scene to Settings.
- Change the table view's Content attribute to Static Cells, and its Style attribute to Grouped.
- Delete the last two cells in the table view, leaving one cell remaining.
- Change the remaining cell's Style attribute to Basic.
- Change the Color attribute to the crayon labeled Tin.
- Since we need two cells in this table view, click off the cell label and then click back on it again to select the cell itself. Afterwards, press Command+D to create a duplicate of the cell.
- Change the text of the first cell's label to Email Address and the second cell's label to Password.
- Now let's set the header text of the table view. To do this, click in the gray area right next to the table view to select the table view section, and then change the Header attribute to Log in using email and password.
- Now we need to add a view directly below the table view to contain the other controls in the scene. To do this, add a View to the scene and position it below the table view until you see the blue horizontal bar appear and then release your mouse to place the view on the scene. Next, drag the resizing handle on the bottom of the view until the height of the view is 264 pixels.
- Change the Background color attribute of the view to the Mercury crayon color.
- Add a Button at the very top-center of the view you just added. You can place it right against the top edge of the view. Change the title of the button to Log in. Stretch the left and right sides of the button to the left and right edges of the scene. Afterwards, set the Background image attribute of the button to white.png.
- Add a Label centered directly below the button you just added, using the horizontal guide line for spacing. Set the Alignment attribute of the label to Centered and then stretch the left and right edges of the label up to the vertical guide lines in the scene. Afterwards, change the Font of the label to System 14.0. Finally, change the Text of the label to Don't have an account yet? Sign up!
- Add a Button centered directly below the label you just added. Change the text of the label to Sign up. Afterwards, stretch the left and right sides of the button to the left and right vertical guide lines of the scene, and then set the Background to white.png.
- Add one final Button to the bottom center of the scene. Change the Text of the label to Provide Feedback. Afterwards, stretch the left and right sides of the button to the left and right vertical guide lines of the scene, and then set the Background to white.png.
- As with the previous scene, you need to specify autoresizing settings for the buttons, label, and the view that contains them. Again, you can examine the finished project to check your work.
- Run the App in the Simulator to see how the scene looks at run time!
Conclusion
There's one more scene left to be created—the Feedback scene that allows the user to provide feedback about the app. This scene provides some special challenges that require us to write a small amount of code, so we will cover that in my next post.
Hopefully, you were able to perform most of the steps on your own. In case you ran into trouble going through these steps, you can download the completed project from this link. If you had to rely on the videos to complete each scene, I recommend going back through and trying it again until you can complete the steps on your own. Doing this will provide you with a solid basis for creating prototypes of your own iOS apps!