The iPhone Camera App: Best iPhone Camera Settings & More

Tamlin Day pairs a lifelong love of technology with a passion for teaching, bringing approachable Apple expertise to his work as a writer and educator at iPhone Life.
Learn More Tamlin Day pairs a lifelong love of technology with a passion for teaching, bringing approachable Apple expertise to his work as a writer and educator at iPhone Life.
Learn MoreWhat to Know
- You can launch your camera by long-pressing the icon on your Lock Screen and adjust your settings using the icons in your Camera app.
- The different camera modes take different kinds of videos or pictures.
- To take a picture, just tap the shutter button or the volume button on your iPhone.
Whether you just got an iPhone or are looking to brush up on what you know, this in-depth iOS Camera app guide will teach you the fundamentals of your iPhone camera. Read on to have each iPhone camera icon explained, how to access your camera from the Lock Screen, and all the tips and tricks you need to get the most out of your iPhone’s camera.
The Basics of Taking a Photo or Video with Your iPhone
If you’ve ever fumbled to open the Camera app or missed the perfect time to press the shutter, this section will teach you how to open your iPhone camera quickly. First, familiarize yourself with the camera controls on your iPhone. This is a diagram of each iPhone camera button (and others) on the iPhone 17. If you have a different iPhone, visit the iPhone user guide and find your model.

Image courtesy of Apple
Here are the top iPhone camera tips you need to know to get started with iPhone photography.
- Open the Camera app from your Lock Screen & Control Center. Sometimes, you only have a second to capture the perfect moment on camera quickly. Fortunately, you can access your Camera app from either your Lock screen by pressing the Camera icon you'll find there, add it to your Control Center for quick access that way, or program the Action button on the iPhone 15 line to rapidly launch your camera.
- Quickly switch camera modes. Once you open the Camera app, you will want to choose a camera mode. Your photo options are Photo, Portrait (if available on your iPhone model), Spatial, and Pano. Your video options are Video, Slo-Mo, Cinematic, and Time-Lapse. You can switch between them by swiping.
- Switch to the selfie (front-facing) camera. Front-facing selfies take the guesswork out of self-portraiture by flipping the camera so that you can see yourself while you snap the picture. You can switch from your iPhone's rear-facing camera to its forward-facing camera quickly in Video, Photo, or Portrait mode. To switch to the selfie camera, tap the front-facing camera icon (the camera icon with arrows going in a circle) at the bottom right of your screen.
- Zoom in & out. Zooming in and out on the iPhone is intuitive in the iOS Camera app. Using a pinching gesture, you can zoom in or out to frame your subject. On some iPhone models, you can skip the pinch and use the zoom button and zoom slider to quickly get to different levels of zoom. You can also do an auto zoom by adjusting your picture's aspect ratio. Pro tip: you can even zoom in and out while taking selfies!
- Use the zoom button & slider. You've got another method of zooming in and out in addition to pinching the screen. You can use the zoom button and slider at the bottom of your screen for optical and digital zoom.
- Focus the iPhone camera. You can focus the iPhone camera by tapping on your desired subject on your iPhone screen. For iPhones with features like Portrait Mode, you can go in later and change the focus by tapping on different parts of the screen.
- Adjust exposure and depth of field. A yellow square will appear over your subject. If you don't see it, tap your subject on the screen. To make your image brighter or darker, you can adjust the exposure using the sun icon next to the yellow focus icon. You can adjust depth of field by tapping the f icon to bring up the Depth Control slider.
- Use the iPhone camera timer. To use the camera timer, set up your shot, tap the menu icon, tap Timer, choose the delay length, then tap the Shutter button and get into position.
- Operate auto & manual flash. Tap the flash icon, which looks like a lightning bolt, then select either auto, on, or off based on your preference.
- Use the iPhone Camera Control button. Press the Camera Control button to open the Camera app, press it again to take a photo, or hold the button down to take a video. Light-press the button to open the zoom feature, and more.
- Operate your iPhone's shutter. When you're ready to take the picture, just tap the white circle at the bottom or press either of the volume buttons to capture a photo.
- View the picture you just took. When you're done, you can view the photo on your iPhone by either tapping the image in the bottom left corner of your iPhone while your camera app is open or going to your Photos app.
Every iPhone Camera App Icon
Making use of the icons on the screen can help a photo session go more smoothly, but why isn't there a guide to what each icon and symbol means to make the camera easier to operate? This section breaks down what each icon and symbol means in the camera app, such as the Live Photos, Timer, and Flash icons, and explains how to use those functions.
Note: This is how Camera app icons appear on an iPhone 17 Pro running iOS 26.
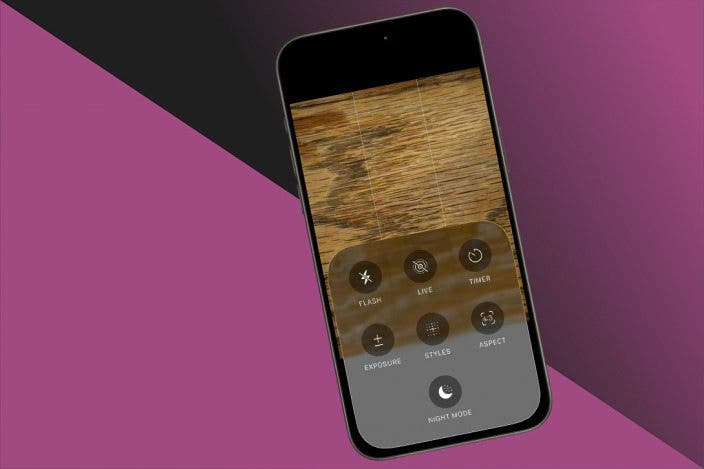
Let's start at the top-right corner of the screen. Tap the Menu icon to reveal more controls.
![]()
You'll see Flash, Live, Timer, Exposure, Styles, Aspect, and Night Mode.

- Flash: The Flash icon appears at the top left of your screen. This icon opens up a menu that allows you to either turn on Auto flash or toggle your manual flash on and off between shots. This icon is also to the left of the menu icon.
- Live Photos: The Live Photo icon is located at the top of your screen and can be toggled on or off to enable or disable Live Photos.
- Timer: The Timer icon is visible once you tap the menu icon at the top of the screen allows you to set a timer for either 3, 5, or 10 seconds.
- Exposure: The Exposure icon allows you to adjust how bright or dark your picture is based on how much light it allows. You can swipe on your screen to adjust and see what you like.
- Styles: The Styles icon will take you to a menu where you can choose a style for the photographs you take in that session to create a consistent look and save you time adding filters after the fact.
- Aspect Ratio: The Aspect Ratio icon will let you choose between several aspect ratios for your photo, and allow you to preview each as you swipe through. This can save a lot of time when it comes to cropping later.
- Night Mode: The Night Mode icon lets iPhone users take clear, vivid pictures in low-light situations. This camera app icon is also to the left of the menu icon.
Now, to the top left. Tap the Format and Resolution icon. This lets you switch between photo formats and resolutions available on your iPhone.
![]()
The Focal Length menu allows users to switch between different zoom levels, anywhere up to 8x with the latest iPhones. Tap, then pull up slightly on the screen for even more granular control.

The Shutter icon, which appears at the bottom center of your field of view, will have a different appearance in different modes, but in every mode, the basic function remains the same; if you tap the shutter icon, an image, or several images, will be added to your Photos app.
At the bottom left of the screen, you can tap the circle to access your camera roll.

Below the Shutter button, you'll see the Video/Photo toggle. Tap this to switch between the two camera functions.

On the bottom right, you'll see the Camera Switch button. The Camera Switch button lets you switch between the front and rear-facing cameras.

iPhone Camera Modes
Like Photo and Video mode, your camera's other modes are all available on the horizontal menu at the bottom of your Camera app. Time-Lapse, Slo-Mo, Cinematic, Pano, Video, Portrait, and Photo modes all offer different ways to capture the world around you. While some modes, like Video and Photo, might sound straightforward, the other modes can look intimidating if you don't know what the labels mean. Let's go over each mode.
- Video: Video mode is just what it sounds like; you use this mode to take a video instead of a photo. You won't have as many control options as you do with photo, but your iPhone is pretty good at figuring out how best to adjust to your scene. You can turn Flash off or on, change Exposure, or use Dual Capture mode.

- Photo: Photo mode is your basic camera mode; you're just taking a picture without the bells and whistles of some of the other modes. You have plenty of customization options here, just check out our list above!
- Portrait: Portrait mode helps your pictures of people and pets look their best by focusing on the subject and gently blurring the background. This feature is only available on the iPhone X and later.
- Spatial: Spatial mode allows users to take photos and videos to view in 3D on Apple Vision Pro.
- Pano: Pano mode allows you to take a panoramic shot. You'll want to hold your iPhone as steadily as you can as you move it around to capture the shot, but a little yellow line will guide you and help you stay on track.
- Time-Lapse: Time-Lapse lets you capture longer periods of time in a series of short pictures, which can be cool for representing things like a flower blooming or an airplane taking off. When using this one, you'll want to make sure your iPhone is stable and you have plenty of battery before you begin.
- Slo-Mo: Slo-Mo mode takes a slow-motion video by taking fast images to create a slowed-down recording of your dynamic scene. Just a few seconds of recording can create a pretty long video!
- Cinematic: Cinematic mode is basically Portrait mode for videos. It focuses on a subject and gently blurs the background for a more cinematic look. This is only available in the iPhone 13 and later.
FAQ
- How can I save my camera settings so I don't have to reset them every time I want to take a photo? You can preserve your camera settings by opening Settings, then tapping Apps, Camera, Preserve Settings, and choosing which settings to save.
- What does the new Camera Control button on my iPhone do? The Camera Control button can be pressed, tapped, lightly touched, or swiped to open the Camera app and use a variety of features. You can also customize the Camera Control button!
- I want to become a better iPhone photographer. What can I learn? We have a roundup of iPhone photography tips that include using manual exposure, using the self timer, and more.

Tamlin Day
Tamlin Day is a feature web writer for iPhone Life and a regular contributor to iPhone Life magazine. A prolific writer of tips, reviews, and in-depth guides, Tamlin has written hundreds of articles for iPhone Life. From iPhone settings to recommendations for the best iPhone-compatible gear to the latest Apple news, Tamlin's expertise covers a broad spectrum.
Before joining iPhone Life, Tamlin received his BFA in Media & Communications as well as a BA in Graphic Design from Maharishi International University (MIU), where he edited MIU's literary journal, Meta-fore. With a passion for teaching, Tamlin has instructed young adults, college students, and adult learners on topics ranging from spoken word poetry to taking the perfect group selfie. Tamlin's first computer, a Radioshack Color Computer III, was given to him by his father. At 13, Tamlin built his first PC from spare parts. He is proud to put his passion for teaching and tech into practice as a writer and educator at iPhone Life.

 Michael Schill
 Rhett Intriago
 Amy Spitzfaden Both


 Olena Kagui

 Rachel Needell


 Linda Ruth
 Leanne Hays