How to Time-Lapse a Video on iPhone
From sunsets to ocean waves, this article is a user-friendly guide to working with time-lapse on iPhone

Rheanne has spent over a decade producing hundreds of educational videos showing people how to get the most out of their iPhones, iPads, Apple Watches, and Macs.
Learn More Rheanne has spent over a decade producing hundreds of educational videos showing people how to get the most out of their iPhones, iPads, Apple Watches, and Macs.
Learn MoreThe iPhone makes it easy to create time-lapse videos right in the Camera app — no video editing required! It’s as simple as pointing and tapping, like any other photo or video function on the iPhone. However, it’s important to plan ahead so you get your time-lapse recording right the first time around, because it may not be possible to recreate the event. In this tutorial, we’ll show you how to operate the iPhone’s time-lapse feature and make sure the results are awesome on the first try.
Related: Why is My iPhone Camera Shaking & How to Fix It
What Is Time-Lapse on iPhone
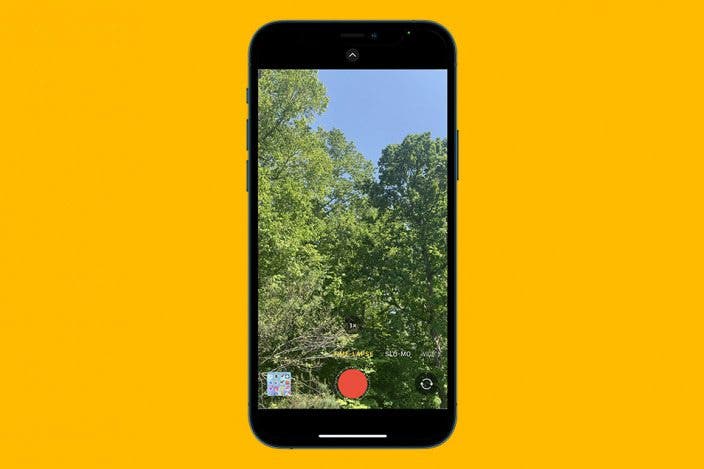
How to Use Time-Lapse Video Mode on the iPhone
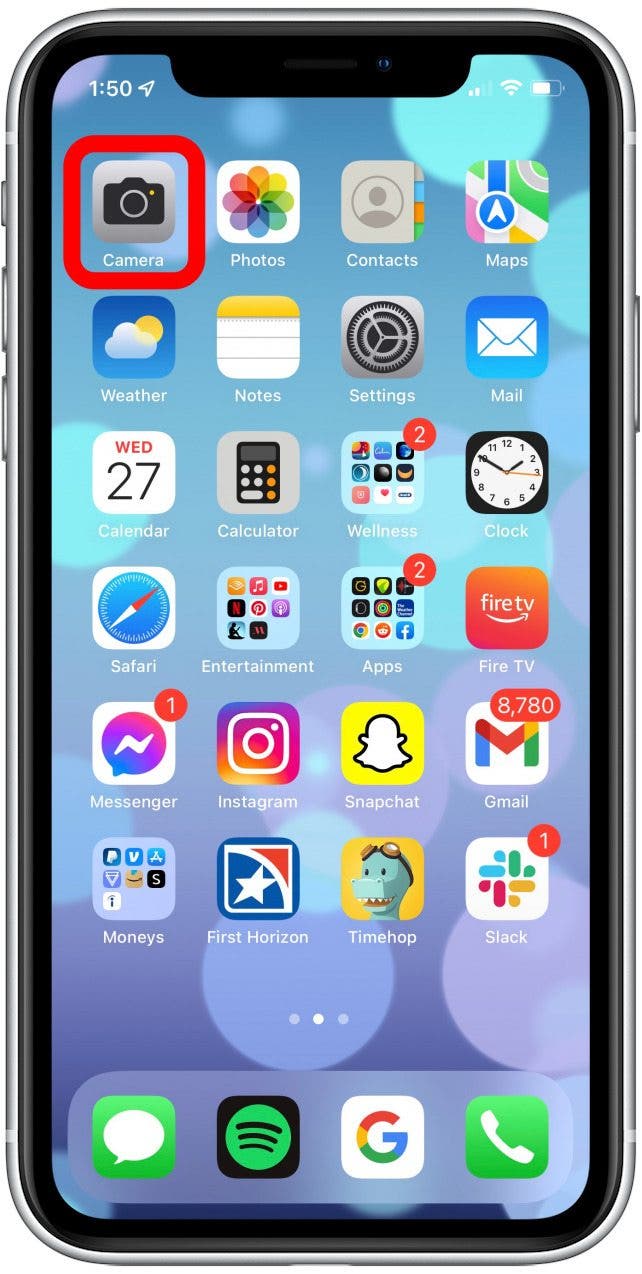
- Open the Camera app.
- Swipe through the shooting mode options until you land on time-lapse.

- Tap the part of the screen you want to record. This will automatically focus the iPhone camera on your subject.

- Optionally, after tapping, swipe up or down to adjust the exposure on the iPhone camera and make the video darker or brighter.

- Tap the red Shutter button to start and stop the time-lapse video.

*Important Note: time-lapse is very sensitive. Be sure to hold the iPhone in place and very still for at least 30 seconds (ideally 30 minutes or more) to capture an event. Once you are done recording, the video will appear in your photos app.
Try Time-Lapse in Night Mode!
As of the iPhone 12 line, you can now take time-lapse videos in Night mode! All you have to do is start shooting time-lapse in low-light conditions, and Night mode will automatically activate. You can now track the moon and stars throughout the course of the night, capture the movements of a bustling night in the city, or watch your campfire change from flames to embers. There are so many new options here, so if you have an iPhone 12, be sure to try this out. Pro tip! Use a tripod for a clearer, steadier shot.
4 Tips for Best Results When Using Time-Lapse
- Go for contrast. The best time-lapse recordings capture the contrast between moving objects and fixed ones, like a seedling growing in a pot or shoppers moving about a perfectly still store.
- Keep the iPhone stationary. When you’re recording, keep the iPhone stationary for the best results. Better yet, instead of holding the iPhone or resting it on a surface, invest in an iPhone tripod. A small, inexpensive tripod will work wonders for your time-lapse video.
- Plug in your iPhone. While time-lapse videos are designed to use less memory than a regular video, they do use substantial battery power. If you want to record a 30-hour time period (the maximum amount of time allowed), you’ll want to plug your iPhone into a power source.
- Explore your options. For more advanced time-lapse options, consider a third-party app. On the iPhone, you don’t have control over how often the video grabs new images — twice per second, every two seconds, etc. That is all set automatically. For greater flexibility and functionality, including the ability to add music, try options like Lapse It (free) or Frameographer ($4.99).
Time-lapse recording is a creative way of shortening an event that takes place gradually without huge gaps in footage. Thanks to the built-in time-lapse mode in the iPhone’s camera, all the work is done behind the scenes, so you end up with a beautiful, quick, sharable video.
Need inspiration? Check out a time-lapse video created by our Senior Video Producer Rheanne Taylor at bit.ly/3ftjI1U.

 Amy Spitzfaden Both
 Olena Kagui
 Rachel Needell

 Cullen Thomas

 Leanne Hays
 Rhett Intriago