Do you have an idea for an app but lack the programming knowledge to begin building it? In this weekly blog series, I will take you, the non-programmer, step by step through the process of creating apps for the iPhone, iPod touch, and iPad. Join me each week on this adventure and you will experience how much fun turning your ideas into reality can be! This is part 28 of the series. If you are just getting started, check out the beginning of the series here.
Just about every app has the need to store and retrieve settings that are specific to the user. User settings include information such as name, ID, email address, password, high score (for games), preferences, and so on.

Where to Manage User Settings?
One of the first questions you need to ask yourself is "where do I want my users to manage app settings?" Users can typically access settings in one of two places:
- Directly within the app
- Through the built-in iOS Settings app (Figure 1)
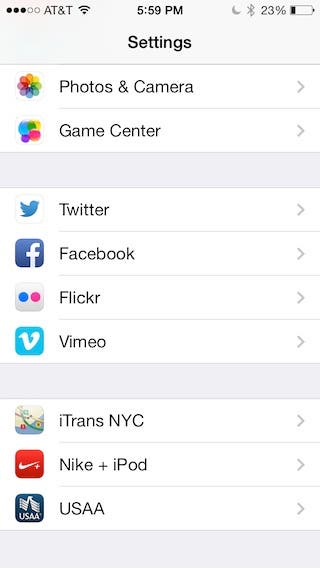 |
| Figure 1 - You can choose to edit your app's preferences in the built-in Settings app. |
Typically, if you have settings that users change frequently, you should allow them to edit them directly within the app. This helps avoid the irritation of the user having to constantly exit your app, change the preference in the Settings app, and then go back into your app again.
Apple has some great documentation that shows you how to manage preferences by means of the Settings app in their Preferences and Settings Programming Guide, which I highly recommend that you check out if you want to go that route.
However, since that path is already well documented by Apple, In this post I'm going to show you how to use a custom Settings scene in the iAppsReview app to allows users to manage settings directly within the app. In addition, we are going to use Core Data to store the various user settings. For now, we are going to ignore the fact that the password information we are storing and retrieving should be encrypted (we'll discuss encryption in a future post).
We'll pick up where we left off in my previous post where I demonstrated how to perform in-place editing in table view. You can get the latest version of the iAppsReview project from this link. As always, I recommend that you perform the step-by-step instructions yourself for the best learning experience, but if you get stuck along the way, you can get the complete project at this link.
Examining with the User and UserEntity Classes
As with the other entities that we have retrieved using Core Data, I have created a User business controller object that can retrieve the UserEntity that contains the user settings from the database.
Let's take a look at the User and UserEntity classes.
- Open the iAppsReview project in Xcode.
- In the Project Navigator, click on the UserEntity.h file to select it and you will be able to see the properties shown in Figure 2.
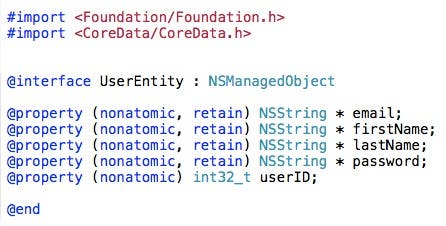 |
| Figure 2 - UserEntity properties |
Notice that in addition to the email and password properties, there are also firstName, lastName, and userID properties. We won't be implementing these other properties right now, but I wanted you to see that they exist.
- Now go back to the Project Navigator, select the User.h file and you will be able to see the getUser method declaration shown in Figure 3.
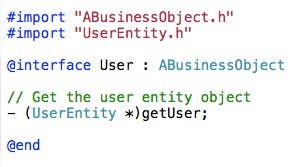 |
| Figure 3 - The User.h file |
Notice the getUser method only returns a single UserEntity object rather than an NSMutableArray. That's because there is only one user record for this app.
- Now click on the User.m file in the Project Navigator. At the bottom of the code file you can see the getUser method implementation shown in Figure 4.
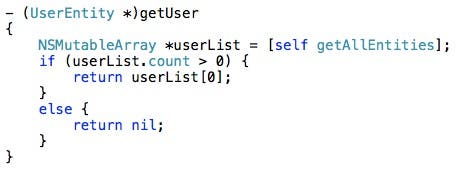 |
| Figure 4 - The getUser method |
As you can see, we are still using the getAllEntities method that we have used elsewhere in other business objects in this app. But the code then checks if any UserEntity objects are returned from this method (userList.count > 0), and if so, returns the first record in the array. Otherwise, the method returns nil (nothing). If you have ever wondered how to create a method that returns a single record from Core Data, this is it!
Implementing the User and UserEntity Classes in the Settings Scene
Now that we know more about the User and UserEntity classes, let's use them in the Settings scene.
- In the Project Navigator, select the SettingsViewController.h file.
- Add the import statement and propery declaration shown in Figure 5.
 |
| Figure 5 - Add the import statement and user property declaration |
- In the Project Navigator, select the SettingsViewController.m file, and add the import statements and instance variable declaration shown in Figure 6 (don't forget to add the curly braces surrounding the instance variable).
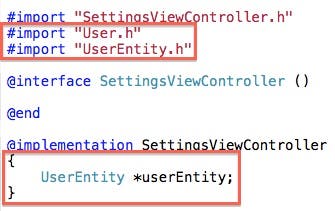 |
| Figure 6 - Add the import statements and userEntity instance variable. |
- In the viewDidLoad method, add the code shown in Figure 7.
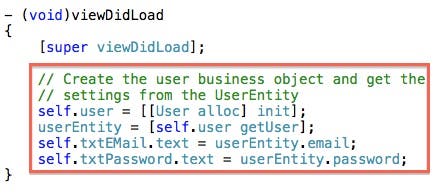 |
| Figure 7 - Add this code to the viewDidLoad method. |
This code creates an instance of the User class and stores it in the user property. Next, it calls the user object's getUser method and stores the resulting UserEntity object in the userEntity instance variable. Finally, it grabs the email and password values from the object properties and stores them in the email and password text fields.
Adding Edit Mode to the Settings Scene
As I mentioned in my previous post, as it stands right now it's too easy for the user to accidentally change their email address and password. It makes sense to add an Edit button that the user must click before they can change these settings. Let's do that now.
- In the Project Navigator, select the MainStoryboard.storyboard file and then scroll to the Settings scene.
- Drag a Bar Button Item from the Object Browser in the bottom-right corner of the Xcode window and drag it to the right side of the Settings scene's navigation bar until you see the rounded rectangle appear (Figure 8) and then let go of your mouse button. This adds the button to the navigation bar.
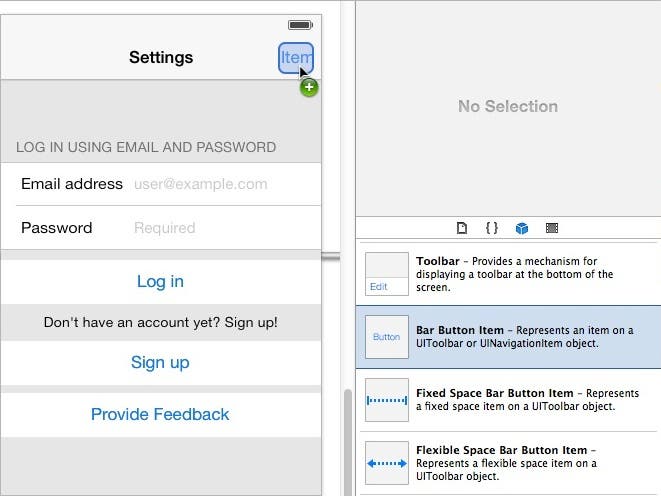 |
| Figure 8 - Add a Bar Button Item to the right side of the navigation bar. |
- With the bar button item still selected, go to the Attributes Inspector (third button from the right in the Inspector toolbar) and set the Title to Edit. The button should now look like Figure 9.
 |
| Figure 9 - The Edit button |
- To prevent the user from changing the email address and password before they click the Edit button, select the text field in the Email address cell and deselect the User Interaction Enabled checkbox towards the bottom of the Attributes Inspector. Afterward, do the same to the text field in the Password cell.
- Since we don't want the user to click the Log In button unless there are valid email address and password credentials, click on the Log In button in the design surface, and then go to the Attributes Inspector and uncheck the Enabled button. This turns the text of the button gray as shown in Figure 10.
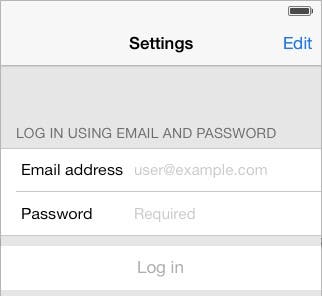 |
| Figure 10 - The Login button is disabled. |
- Now we need to create an action method that gets fired when the user taps the Edit button. To do this, click on the Edit button in the Settings scene to select it. Next, display the Assistant Editor by clicking the center button in the Editor button group at the top right of the Xcode window. This should display the SettingsViewController.h file. If it doesn't, select the file in the Assistant Editor's jump bar.
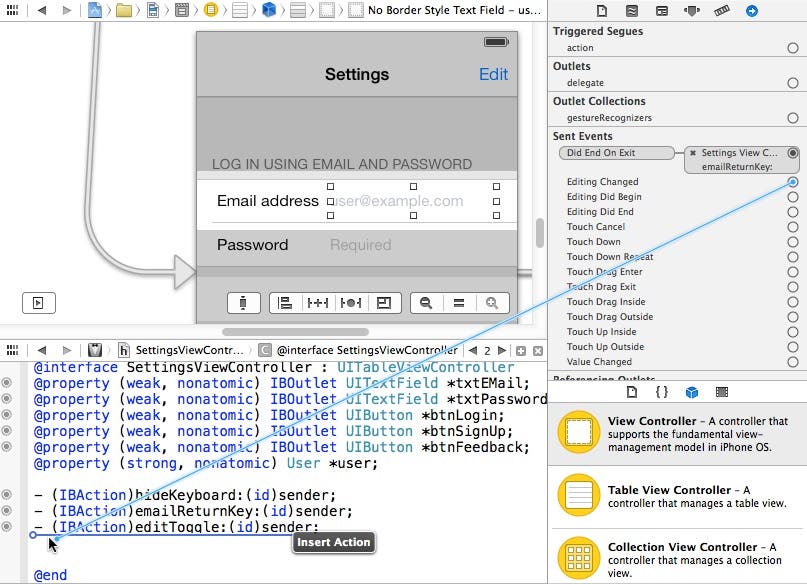
- Next, go to the Connections Inspector (the button on the right in the Inspectors toolbar) and click the connection well to the right of the selector action. Drag your mouse down into the SettingsViewController.h file above the closing @end statement until you see the Insert Action popup as shown in Figure 11.
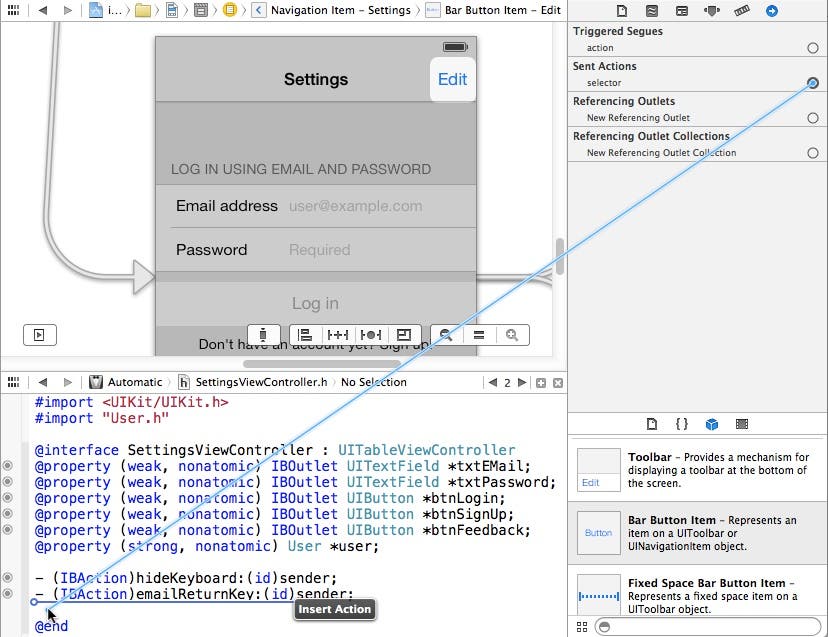 |
| Figure 11 - Create an action method for the Edit button. |
- In the Create Connection popup, set the Name to editToggle and then click the Connect button. This adds a new editToggle: method to the header file as shown in Figure 12.
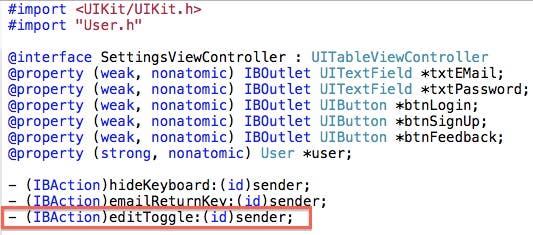 |
| Figure 12 - The editToggle: method declaration |
- Before implementing the editToggle: method, go to the Project Navigator and click the SettingsViewController.m file. Near the top of the code file add the isEditMode instance variable shown in Figure 13.
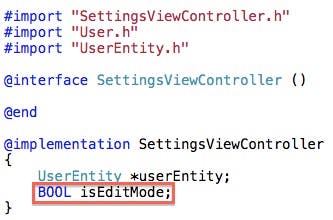 |
| Figure 13 - The isEditMode instance variable |
- Now add the code shown in Figure 14 to the editToggle: method.
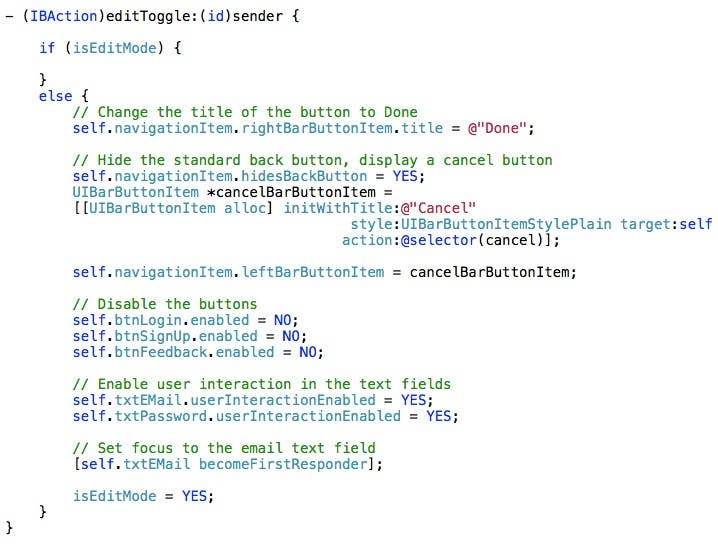 |
| Figure 14 - Add code to the editToggle: method |
This code first checks if the scene is currently in edit mode. If it is, nothing happens because we don't have any code in the first part of the if statement yet. If the scene isn't in edit mode, here are the main steps performed by this code:
- Changes the text of the button from Edit to Done
- Hides the standard "back" button and displays a Cancel button in its place
- Disables the Login, Sign Up, and Feedback buttons
- Enables the text fields in the Email address and Password cells
- Sets focus to the Email address text field
- Sets the isEditMode flag to YES
Testing the Edit Button
Let's take a break from building the app and test what we have done so far.
- Click Xcode's Run button, and when the app appears in the Simulator, click the Settings & Feedback option. You should see the scene shown in Figure 15.
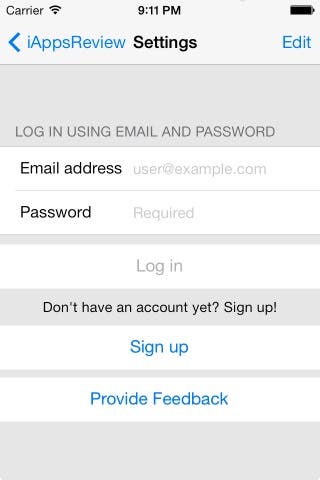 |
| Figure 15 - The Edit button at run time |
Notice the Edit button on the right side of the Navigation bar and the iAppsReview "back" button on the left side. If you try to click in the Email address or Password text fields, there is no response, and the Log In button is disabled.
- Click the Edit button and the scene should change as shown in Figure 16.
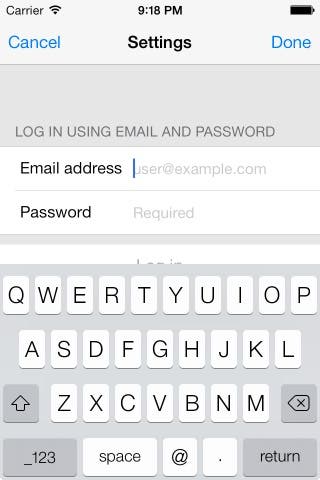 |
| Figure 16 - The Settings scene in edit mode |
The Edit button text changes to Done, the iAppsReview "back" button text changes to Cancel. In addition, the Email address text field has focus and can now be edited as evidenced by the appearance of the keyboard. Nice!
- We haven't added the Done button logic yet, so to close the app in the Simulator, go back to Xcode and click the Stop button.
Adding Logic to the Done Button
Ultimately, the Edit button and Done button are one in the same. The text of the button is simply changed based on whether or not the scene is in edit mode. So, to add logic that fires when the user taps the Done button, we need to add code to the same editToggle: method you worked with earlier.
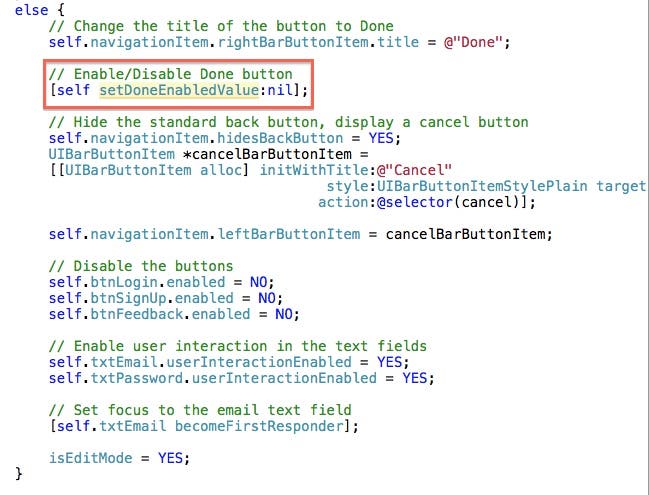
- This time, add code to the first part of the if statement as shown in Figure 17 (note that you will temporarily get an error on the last line of code until you complete the next step).
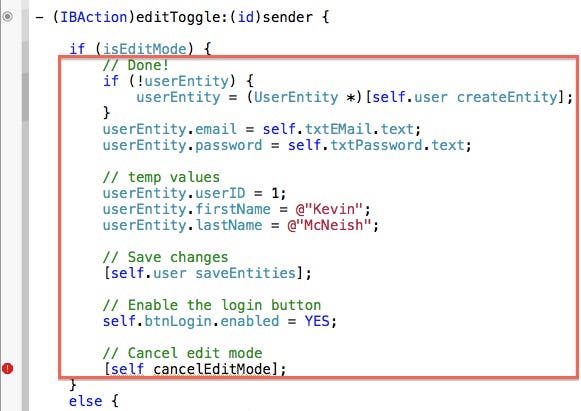 |
| Figure 17 - Add code to the if statement. |
Here are the main steps performed by this code:
- Checks if the UserEntity object exists (it will if the user record has already been created. If not, a new UserEntity object is created.
- The email and password text is taken from the text fields and stored in the properties of the UserEntity object.
- In the next three lines of code, temporary values are stored in the userID, firstName, and lastName properties of the entity. We will change this code at a later date to add this information, but for now, we'll just set default values (feel free to add your own name instead of mine!)
- Next, a saveEntities message is sent to the User business object. This saves the UserEntity to the database.
- The Login button is enabled
- A cancelEditMode message is sent to the view. You're getting a compiler error because we haven't created this method yet.
- Now add the cancelEditMode method shown in Figure 18.
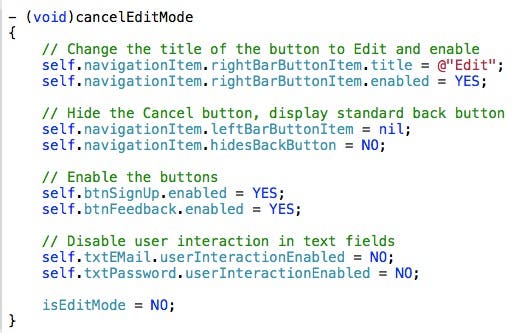 |
| Figure 18 - The cancelEditMode method |
I broke this code out into a separate method because it needs to be reused elsewhere as you will see in just a bit. Here are the main steps performed by this code:
- Changes the title of the Done button to Edit and enables the button
- Hides the Cancel button and displays the standard iAppsReview "back" button
- Enables the Sign Up and Feedback buttons
- Disables user interaction in the email and password text fields
- Sets isEditMode to NO
Testing the Done Button
Now let's see how the Done button functionality works at run time.
- Click the Start button in Xcode and when the app appears in the Simulator, navigate to the Settings scene.
- Click the Edit button to put the scene in edit mode.
- Enter an Email address and press tab.
- Enter a Password. As you enter the password, notice each character is automatically hidden after you type it.
- Click the Done button and the scene's appearance should change as shown in Figure 19.
 |
| Figure 19 - Finished with edit mode |
As you can see, the keyboard is hidden, the Done button changes back to an Edit button, and the Cancel button changes back to the iAppsReview button. At this point you can't click in the Email address or Password text fields, but you can click the Log in button (although it doesn't do anything right now).
- To prove to yourself that the settings you specified were actually saved to the database, go back to Xcode and click the Stop button, and then click the Run button and navigate back to the Settings scene, where you can see your email address and password. When you're finished marveling at your handiwork, go back to Xcode and click the Stop button again!
Enabling and Disabling the Done Button
As it stands right now, as soon as you click the Edit button and the scene goes into edit mode, you can immediately click the Done button without having entered an email address or password. Obviously this isn't desirable, so let's fix this problem.
- Scroll to the bottom of the SettingsViewController.m file and add the isLoginReady method shown in Figure 20.
 |
| Figure 20 - The isLoginReady method |
This code returns YES if there is text in both the Email address and Password text fields. This isn't very robust checking. We would normally add code that checks for a valid email address and we would add rules for acceptable passwords. We'll do this in a future post, but for now, we'll just check for any character in both text fields.
- Now we need to create an action method that can be called from both text fields when the user types a character. To do this, go to the Project Navigator, select the MainStoryboard.storyboard file and click on the Settings scene to select it. If the Assistant Editor isn't already displayed, click the center button in the Editor button group. If the SettingsViewController.h file isn't displayed in the Assistant Editor, go to the jump bar and select it.
- Click on the Email address text field to select it, and then go to the Connections Inspector (the button on the far right in the Inspector toolbar). Click on the connection well to the right of the Editing Changed event and then drag down into the SettingsViewController.h file just above the closing @end declaration. When you see the Insert Action popup (Figure 21), release your mouse button. The Editing Changed event fires for a text field whenever the user adds or deletes a character.
 |
| Figure 21 - Create a new action method for the Email address text field. |
- In the Create Connection popup, set the Name of the action method to setDoneEnabledValue and then click the Connect button. This adds a method declaration to the header file.
- Now let's connect the Password text field to the same action method. In the design surface, click the Password text field to select it. Go to the Connection Inspector, and click the connection well to the right of the Editing Changed event. Drag your mouse down to the setDoneEnabledValue action method and when you see the Connect Action popup appear, release your mouse button.
- Now let's implement the new setDoneEnabledValue method. To do this, go to the Project Navigator and click on the SettingsViewController.m file to select it. Scroll to the bottom of the code file and add the code shown in Figure 22.
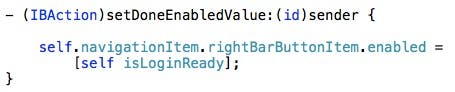 |
| Figure 22 - Implement the setDoneEnabledValue method. |
This code passes the isLoginReady message to the view controller and stores the returned Boolean value in the Done button's enabled property. If both the email and password text fields are filled in, then the button is enabled, otherwise it's disabled.
- To complete our logic, we need the setDoneEnabledValue: method to fire when the user first enters edit mode (Done can be enabled/disabled based on whether an email address and password have already been entered). To do this, add a call to the setDoneEnabledValue: method to the editToggle: method as shown in Figure 23.
 |
| Figure 23 - Add a call to the setDoneEnabledValue: method. |
Adding Logic for the Cancel Button
- Scroll to the bottom of the SettingsViewController.m file and add the cancel method shown in Figure 24.
 |
| Figure 24 - The cancel method |
This code performs the following main steps:
- Restores the email address and passwords to their original values
- Sends a cancelEditMode message to the view controller (I told you we would reuse this logic!)
Normally we connect a method to a button using the Connection Inspector as we did for the Edit / Done button. How does the Cancel button know to call this method when it's tapped? If you look back at the code you added to the editToggle: method's else statement, you will see the code shown in Figure 25.
 |
| Figure 25 - Registering the cancel method with the Cancel button |
This code creates the Cancel button. Notice the action: argument value is set to @selector(cancel). This is the code that tells the Cancel button to call the cancel method when it's tapped. When you compile a project in Xcode, the names of all methods are converted to a unique identifier. In Objective-C, the @selector directive gets the unique id of the specified method so that it can be called at a later date.
The Final Test
Now you're ready to run the final test on the edit mode functionality of the Settings scene.
- In Xcode, click the Run button. When the app appears in the Simulator, navigate to the Settings scene.
- Click the Edit button to put the scene in edit mode.
- Delete all characters in either the Email address or the Password text fields (or both for that matter). The Done button should become disabled. Type characters in both text fields and the Done button should become enabled.
- Click the Cancel button and the information you deleted should be restored.
Conclusion
It took a little bit of effort, but now you have a Settings scene that allows you to edit settings directly in a table view. Along the way you have learned how to create an edit mode for a scene, and how to manage the buttons in the navigation toolbar. There's not a lot of information written about how to perform these tasks in Apple's documentation or elsewhere on the web, so you definitely want to keep track of this post for when you need it in the future!