Do you have an idea for an app but lack the programming knowledge to begin building it? In this weekly blog series, How To Unleash Your Inner App Developer, I will take you, the non-programmer, step by step through the process of creating apps for the iPhone, iPod Touch, and iPad. Join me each week on this adventure, and you will experience how fun turning your ideas into reality can be! This is Part 9 of the series. If you're just getting started now, check out the beginning of the series here (this post has been updated to Swift 1.2 iOS 8, and Xcode 6.3.)
In my previous post, I taught you how to write your very first line of code. In the process, I touched on the concept of calling methods in Swift. In this post, we're going to take a closer look at the important concept of calling methods, and we will also work on converting the prototype iAppsReview into a fully-functional app.

Reviewing Terminology
When you're a newcomer to programming, the terminology can be a bit overwhelming. To help you out, let's review some of the important terms you learned in the past few posts. As you review each term, use Figure 1 as a visual reference point.
- Framework - A set of tools you can access from within your app. For iOS app development, Apple provides Cocoa Touch, which is a set of frameworks (some of which are shown on the left side of Figure 1) that each provide functionality and services for your app. The Foundation Framework shown in the center of Figure 1 contains core functionality required by all iOS apps.
- Class - A class is like a blueprint that defines the attributes and behavior of objects. For example, the UITextField class shown on the right side of Figure 1 is part of the Foundation Framework and is the blueprint for all text-field objects in your app.
- Property - Defines a characteristic of a class. Classes usually have several properties. For example, the UITextField class has properties such as background, font, and text.
- Method - Defines the behavior of a class. A method groups one or more lines of code that are executed as a unit. Classes usually have several methods. For example, the UITextField class has methods such as clearButtonRectForbounds:, drawTextInRect:, and editingRectForBounds:.
- Object - A class that has "come to life." You can create multiple objects from a single class. For example, the bottom-right corner of Figure 1 shows three text-field objects created from the UITextField class.
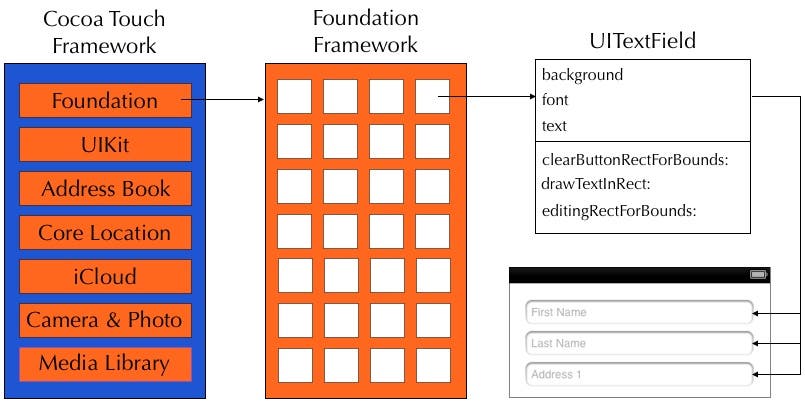 |
| Figure 1 - An overview of frameworks, classes, properties, methods, and objects |
As depicted in Figure 2, you call the stringByAppendingString: method on the myString object, and it returns an appended string.
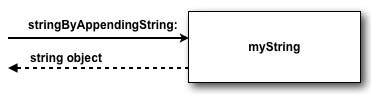 |
| Figure 2 - Calling the stringByAppendingString: method on a string object |
The Anatomy of a Method Call
Figure 3 illustrates the anatomy of a method call.
 |
| Figure 3 - The anatomy of a method call |
The key things to note:
- A method call begins by specifying the name of the variable containing a reference to the object you are calling the method on.
- A period, or dot (.) follows the variable name, which is why this is often called "dot syntax."
- Following the dot is the name of the method you want to call on the object.
- The method name is followed by an open and closed parentheses.
- Within the parentheses, you include any data or arguments you are passing to the method.
Figuring Out How to Call a Method
In writing code for your app, you are going to call many methods on many Cocoa Touch framework objects. You will use a wide variety of classes and objects, and need them to perform specific tasks for you. Maybe you need to send a text message, find the user's current location, or get the current user's high score in a game. It's one thing to figure out which class and method to call; it's another hurdle to figure out how to call that method.
First, you need to know that Swift has two main types of methods—instance methods and type methods. Instance methods are called on instances of an object—meaning you create an object from a class, and then call a method on the object. In contrast, type methods beong to the class or type itself, meaning you call the method on the class directly, without creating an instance of the class.
Calling Instance Methods
Here are the main steps for calling an instance method on an object:
- Create the object on which you are calling the method.
- If there is a return value:
- Create a variable to hold the return value (you can name it whatever you want).
- Type "=" to store the return value into the variable.
- Type the name of the variable that holds a reference to the object you are calling the method on.
- Type a period, and then, the name of the method to be called.
- Type a left parenthesis "(".
- If there are any arguments
- Type the first argument value.
- If there is a second argument, press tab to accept the parameter name and colon, then type the argument value.
- Do the same for any additional arguments.
- Type a right parenthesis ")" to complete the statement.
You can refer back to these steps any time you need to call a method on an object.
Steps for Calling a Class Method
Here are the main steps for calling a method on a class:
- If there is a return value:
- Create a variable to hold the return value (you can name it whatever you want).
- Type "=" to store the return value into the variable.
- Type the name of the class you are calling the method on.
- Type a period and then the name of the method to be called.
- Type a left parenthesis "(".
- If there are any arguments:
- Type the first argument value.
- If there is a second argument, press tab to accept the parameter name and colon, then type the argument value.
- Do the same for any additional arguments.
- Type a right parenthesis ")" to complete the statement.
These steps are very similar except you don't need to create an object from a class, and you call the method o the class itself, rather than on an object.
Interpreting Apple's Documentation
Apple provides documentation for all of the classes in the Cocoa Touch framework. I'm going to teach you how to interpret this documentation so you can know how to call methods on objects and classes.
Figure 4 shows Apple's documentation for the NSString class's stringByAppendingPathExtension: method.
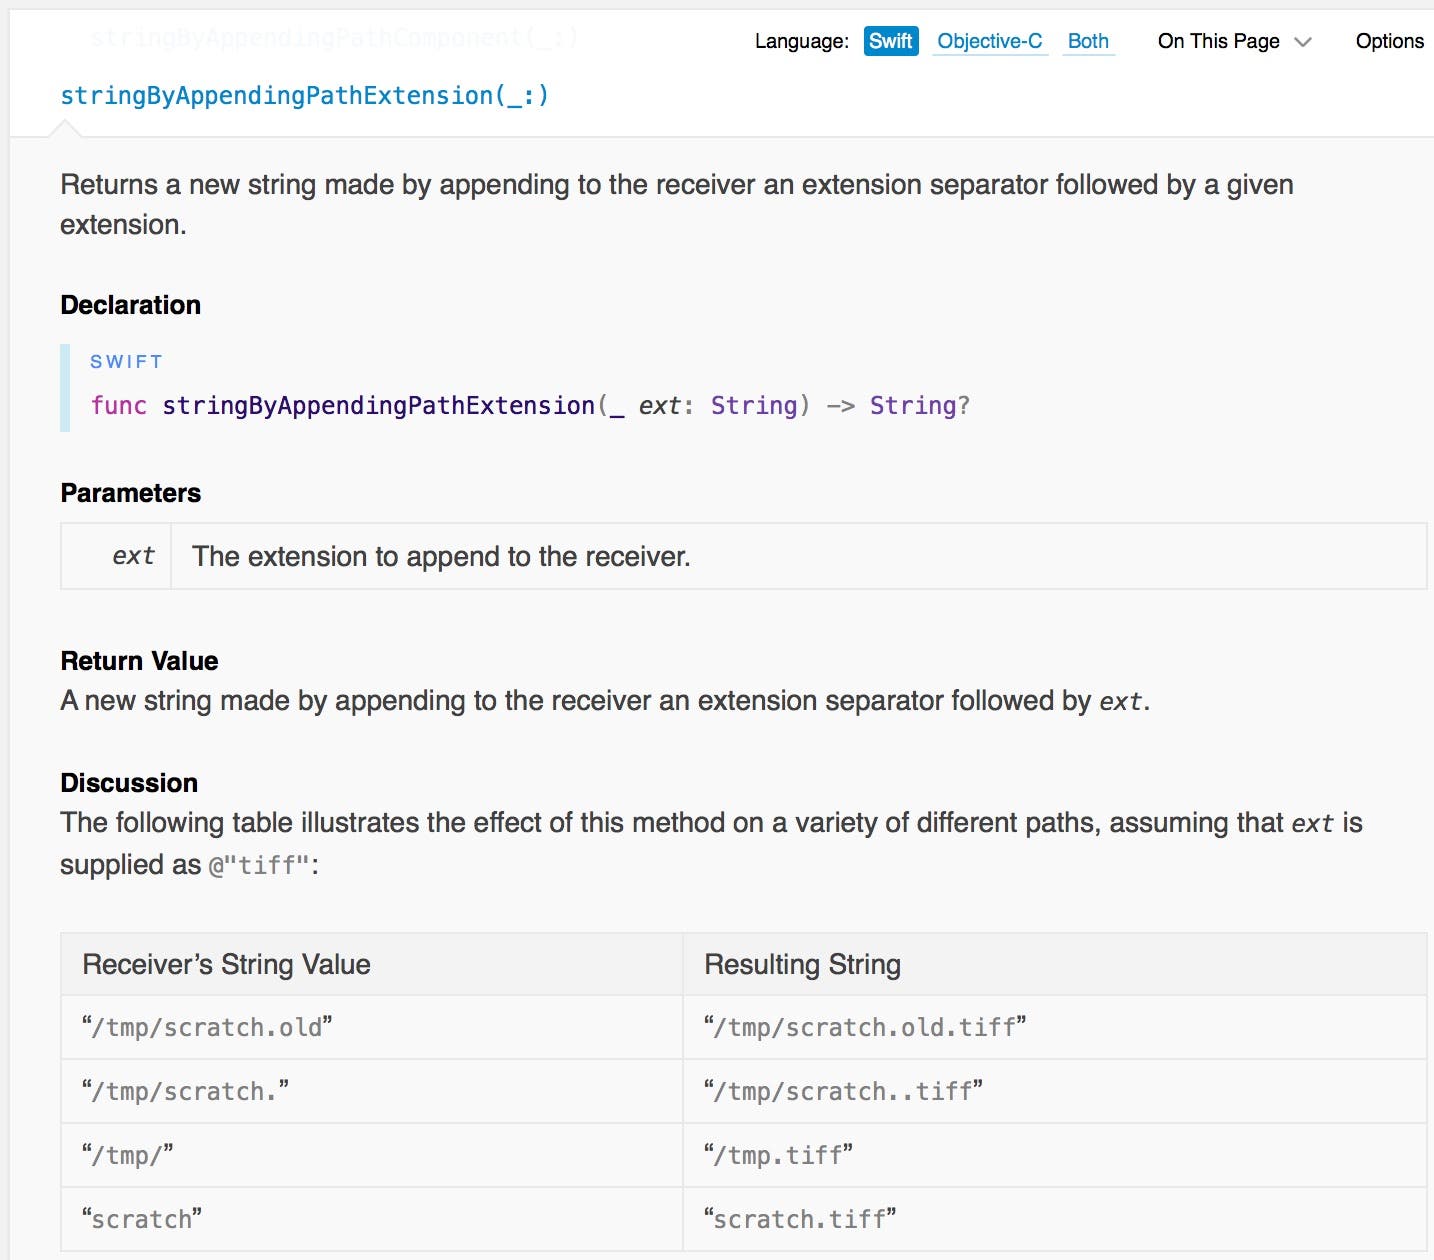 |
| Figure 4 - stringByAppendingPathExtension: documentation |
At the top of Figure 4, the description says "Returns a new string made by appending to the receiver an extension separator followed by a extension." This means that when you call the stringByAppendingPathExtension: method on a string object (the receiver) the string object appends the extension you passed as an argument to its own internal string value and returns the resulting string to you.
Directly below this description, the documentation describes the stringByAppendingString: method. This is known as the method signature:
func stringByAppendingPathExtension(_ ext: String) -> String
Here are the key things to note:
- The keyword func when not preceded by the class keyword indicates this is an instance method.
- stringByAppendingPathExtension: is the name of the method
- The method accepts a single parameter whose type is String
- The value following the -> symbol indicates the type of the return value. In this case, it indicates this method returns a value of type String.
You often see the terms argument and parameter used interchangeably. An argument is a piece of data that you pass to a method. A parameter is a part of the method declaration that dictates the argument(s) to be passed to the method. In short, arguments appear in method calls, parameters appear in method declarations.
Now let's take a look at Apple's documentation for a type method. Figure 5 shows the documentation for the redColor: class method of the UIColor class.
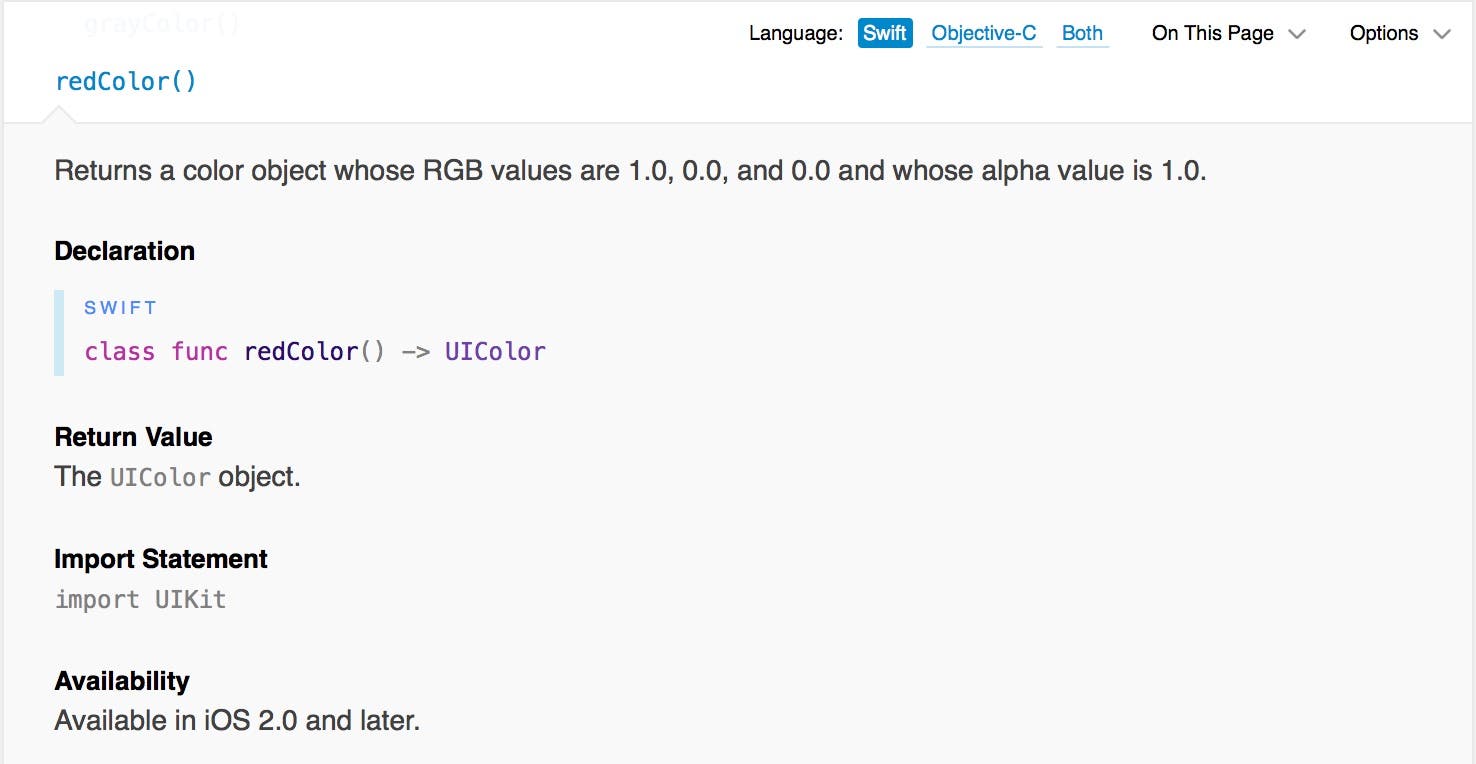 |
| Figure 5 - redColor: documentation |
As mentioned in the description, this method returns a color object with RGB values for the color red. Here are the key things to note:
- The class keyword is used in Swift to indicate that a method is a class or type method.
- redColor: is the name of the method.
- The method accepts no parameters.
- The value following the -> symbol indicates the type of the return value. In this case, it indicates this method returns a value of type UIColor.
As we continue in this blog series, you will see many different method signatures, but the information in this post should help you decipher a wide variety of instance and type methods.
Let's Call Some Methods—Hiding the iOS Keyboard!
Now that I've laid out the basics calling methods in Swift, let's go back to iAppsReview and add some functionality to the app by adding method calls.
Note: To follow the instructions in this post, you must first download the latest version of iAppsReview from this link. If you run into trouble while following the steps in this post, you can get the completed (so far) version of iAppsReview from this link.
Our first job is to fix the Write Review scene so the keyboard is hidden when the user taps the background or taps the return key (in the text field only). Remember, when adding custom code for a scene, there are three key steps in the process:
- Add a new view-controller class to the project.
- Associate the new view-controller class with the storyboard scene.
- Add custom code to the new view-controller class.
We will perform each of these steps in the next sections.
Adding a New View-Controller Class to the Project
In the following steps, we are going to add a new class named WriteReviewViewController based on UIViewController to the project.
- Open the iAppsReview project in Xcode.
- In the Project Navigator on the left side of the Xcode window, click on the FeedbackViewController.swift file. This causes the new class files you are going to create in the next steps to be listed in the Project Navigator directly below this file.
- Select File > New > File... from the Xcode menu. This displays the New File dialog (Figure 6).
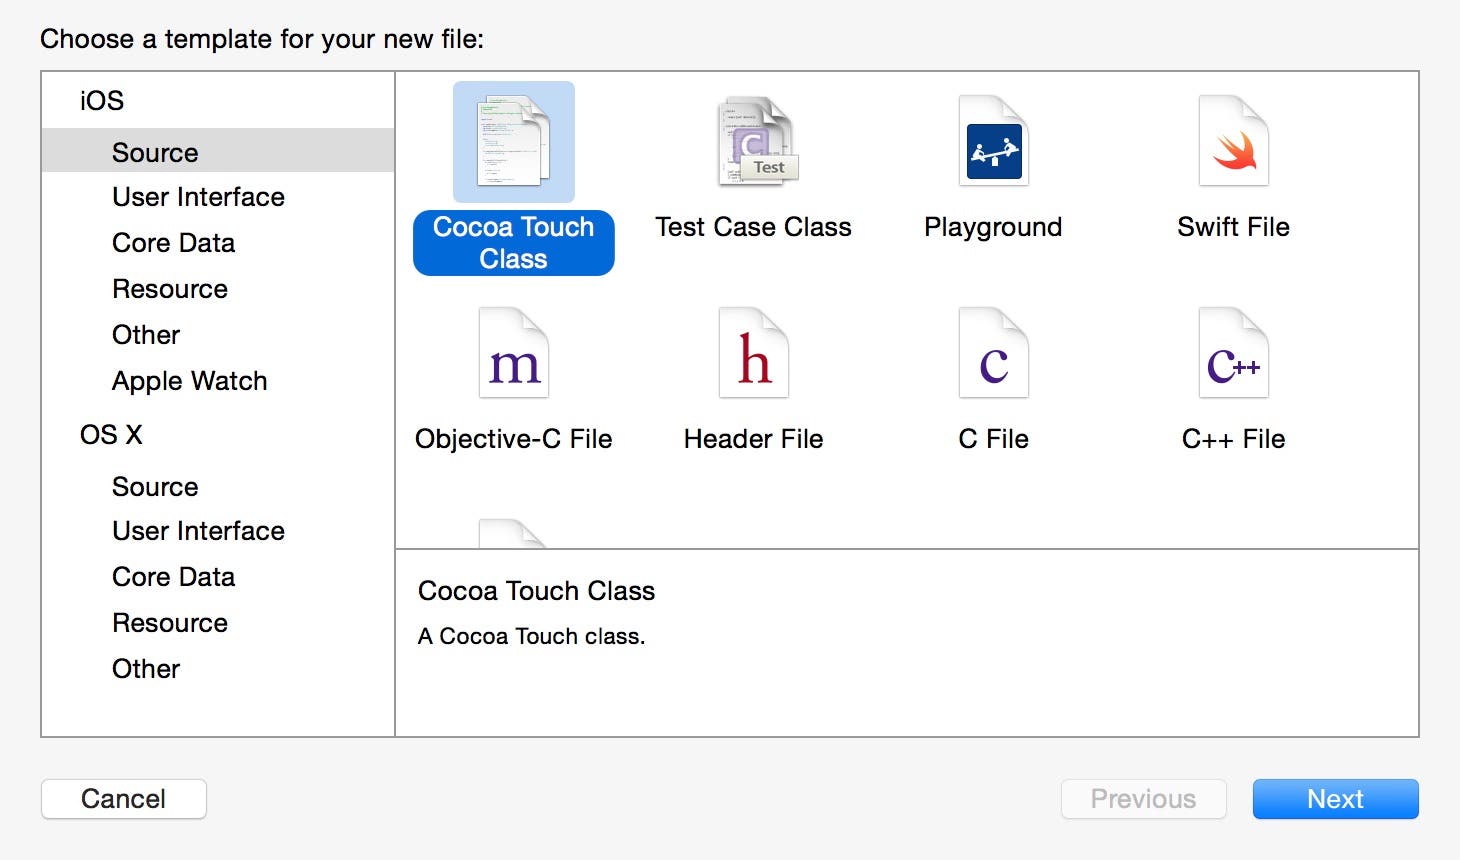 |
| Figure 6 - Select Source and Cocoa Touch Class in the New File dialog. |
- On the left side of the dialog, under the iOS section, select Source. In the panel on the right, select Cocoa Touch Class and then click Next. This displays the second step of the New File dialog (Figure 7).
 |
| Figure 7 - Create a WriteReviewViewController class based on UIViewController. |
- In the Subclass of box, enter UIViewController (if it's not already selected) and then, in the Class text field, add the prefix WriteReview to name the class WriteReviewViewController. Make sure the Language is set to Swift.
- Click the Next button to display the Save File dialog.
- Click the Create button to create the new view-controller class and save it in the project's root folder. After a few seconds, you will see the new file in the Project Navigator (Figure 8).
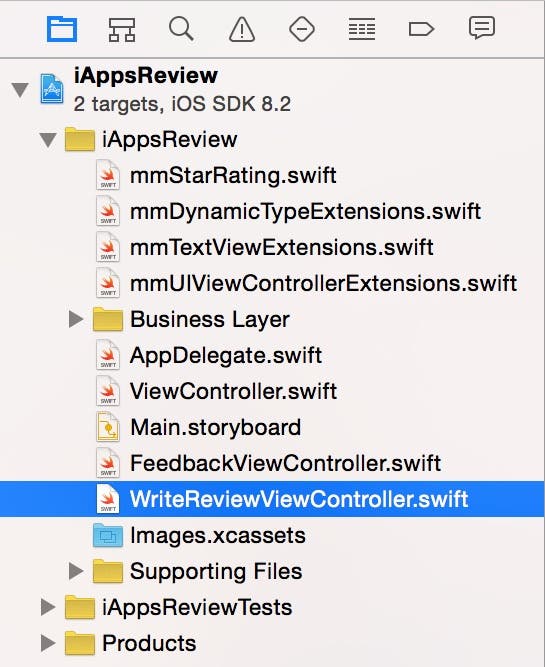 |
| Figure 8 - The new view-controller files in the Project Navigator |
- There is one other important change you need to make. Even though we made this new view controller a subclass of UIViewController, ultimately, because the Write Review scene contains a table view, we need to make it a subclass of UITableViewController instead (even though the table view contains a single, static cell). I didn't have you choose UITableViewController as the subclass in the New File dialog, because when you do this, Xcode adds a lot code to the view controller that is not necessary for a static table view.
So, to change the superclass of the new view controller, go to the Project Navigator and select the WriteReviewViewController.swift file and change the superclass to UITableViewController as shown in Figure 9.
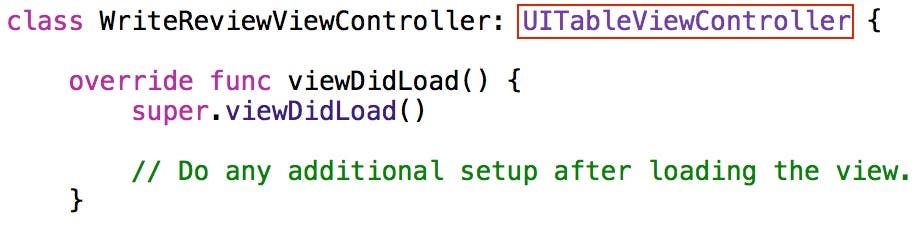 |
| Figure 9 - Change the superclass to UITableViewController. |
That's it! Now you're read to associate the view controller with the Write Review scene.
Associating the WriteReviewViewController With the Write Review Scene
Now that you have created the new WriteReviewViewController class, it's time to associate it with the Write Review scene.
- In the Project Navigator, select the Main.storyboard file.
- Click on the scene dock at the top of the Write Review scene to select the scene's view controller.
- Go to Xcode's Identity Inspector by clicking the third button from the left in the Inspector toolbar as shown in Figure 10. In the Class combo box, enter WriteReviewViewController. If after typing the first few characters, Xcode does not auto-fill the combo box with the class name, exit Xcode, relaunch Xcode, and then try it again.
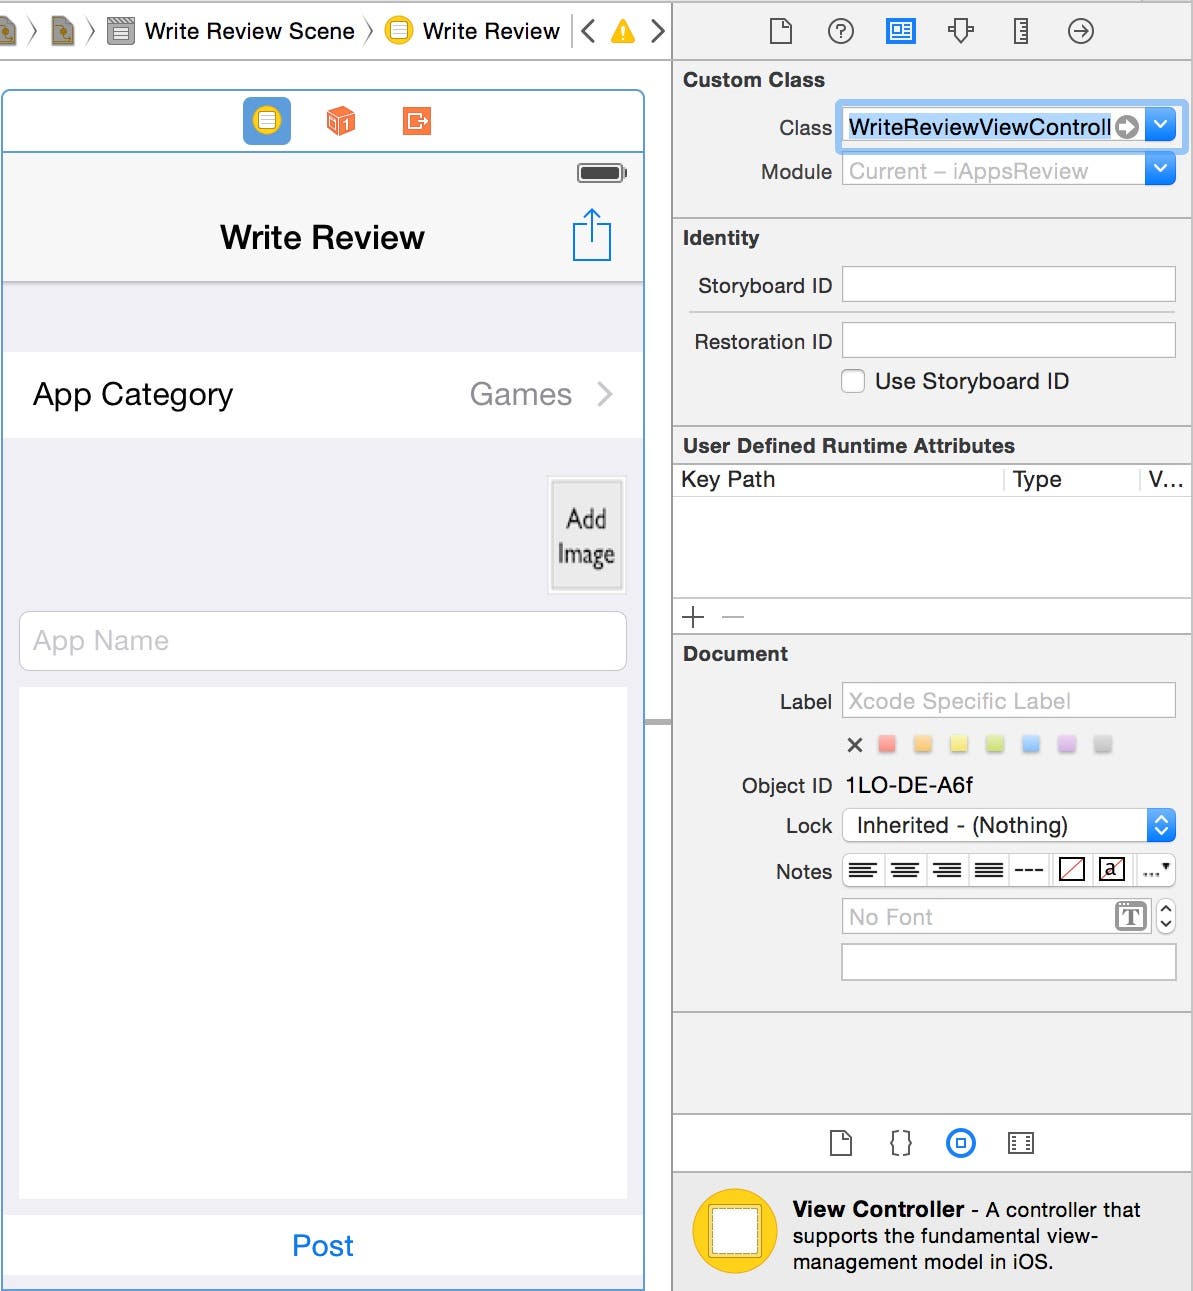 |
| Figure 10 - Set the view controller's class to WriteReviewViewController. |
Adding Custom Code to the View Controller
Adding custom code to the new view controller is usually the third step in the three key steps for adding custom code to a scene. In my previous post, Xcode generated a new action method for us when we dragged from a connection well in the Connections Inspector down into the view-controller header file.
However, when you are adding code to a view controller that you think you may need in other apps (or even in other view controllers within the same app), you should consider putting it in a place where it can be accessed by multiple view controllers. This is definitely the case with the functionality that we are looking to add to the Write Review scene. Any scene that contains a text field or a text view will need the functionality to automatically hide the keyboard. This is where the mmUIViewControlleExtensions.swift file comes in. If you take a look at Figure 8, you can see I have added this code file to the project.
This class contains code that I find helpful in the apps that I create (feel free to use these in your own projects). Select the mmUIViewControllerExtensions.swift file in the Project Navigator and you will see the backgroundTouched: and textFieldReturn: methods shown in Figure 11.
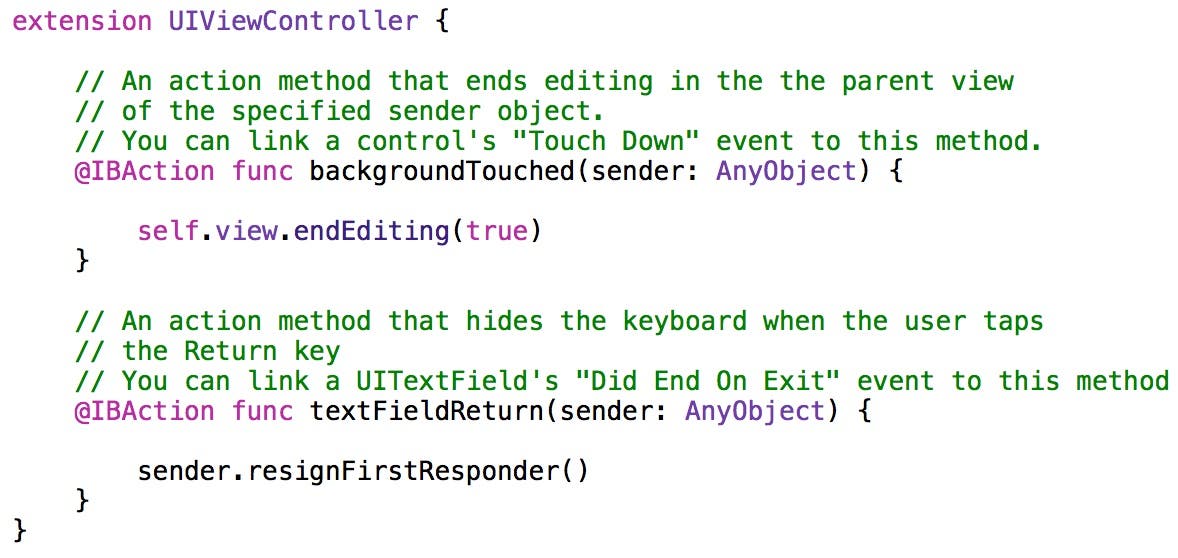 |
| Figure 11 - backgroundTouched: and textFieldReturn: methods of the mmUIViewControllerExtensions |
This is a special kind of Swift class known as an extension. Extension are a powerful tool that allows you to add methods to an existing class. In this case, the Cocoa Touch UIViewController class doesn't do everything we need it to (such as hide the keyboard when the user taps return on the keyboard or touches the background). We'll cover extensions in more detail in a later post, but for now, just know that extensions allow you to add the functionality you need to the UIViewController class.
Notice the comments that describe how each method in the extension is used. These are the kinds of comments you want to write for your own custom methods. They describe exactly how the method can be used. Also notice these methods are flagged as action methods (IBAction). That means you can easily connect these methods to user-interface control events.
So what do we have to do to use these methods in the WriteReviewViewController class? By virtue of the fact that the mmUIViewControllerExtensions file is included in the project, all view controllers in the project automatically "inherit" these extension methods.
Before we connect these action methods to user-interface controls, let's take a look at the actual code that has been inherited. As shown in Figure 11, the textFieldReturn: method contains a single line of code, which makes a method call! Check this code out for a minute and see if you can figure out what it does.
How did you do? I find a diagram can really help visualize what's going on, so I've added one in Figure 12. In the object-oriented programming world, this type of diagram is known as a sequence diagram because it shows the sequence of method calls (I've modified the formal sequence diagram syntax slightly to make it easier to read).
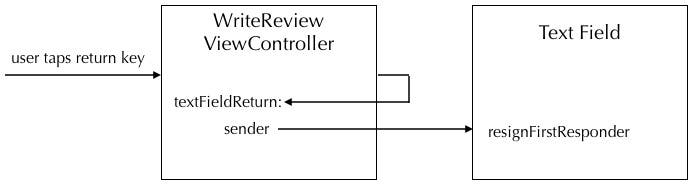 |
| Figure 12 - The textFieldReturn: sequence diagram |
As shown in Figure 12, when the user taps the return key in the keyboard, the textFieldReturn: action method is automatically executed. The text field object that currently has focus is passed to this method in the sender parameter. Then the resignFirstResponder method is called on the text field object. This causes the text field to lose focus and the keyboard is automatically hidden.
Directly above the textFieldReturn: method is the backgroundTouched: method shown in Figure 11. Again, this is a single line of code that makes a method call. Take a moment to figure out what this method does.
Notice that rather than calling a method on the sender object, this code calls a method on self. Remember, self refers to the class that contains the code, which in this case, is the WriteReviewViewController class. Every view controller has a view property that references the view that is associated with the view controller. So, this code calls the endEditing: method ob the WriteReviewViewController's view.
As shown in Figure 13, when the user taps the view background, the backgroundTouched: action method is automatically executed. From within this method, the endEditing: method is called on the view, which causes the keyboard to be dismissed.
 |
| Figure 13 - The backgroundTouched: sequence diagram |
That's it! Your view controller possesses the action methods it needs.
Connecting User-Interface Controls to Action Methods
Now you're ready to connect user-interface controls to the view controller's action methods.
- In the Project Navigator, select the Main.storyboard file.
- In the Write Review scene, click on the App Name text field to select it.
- With the text field selected, go to the Connections Inspector by clicking the button on the far right in the Inspector toolbar (Figure 14).
- Next, click in the connection well to the right of the Did End On Exit event and drag over to the view controller icon located in the scene dock at the top of the Write Review scene (the Did End On Exit event fires when the user taps the return key on the keyboard.)
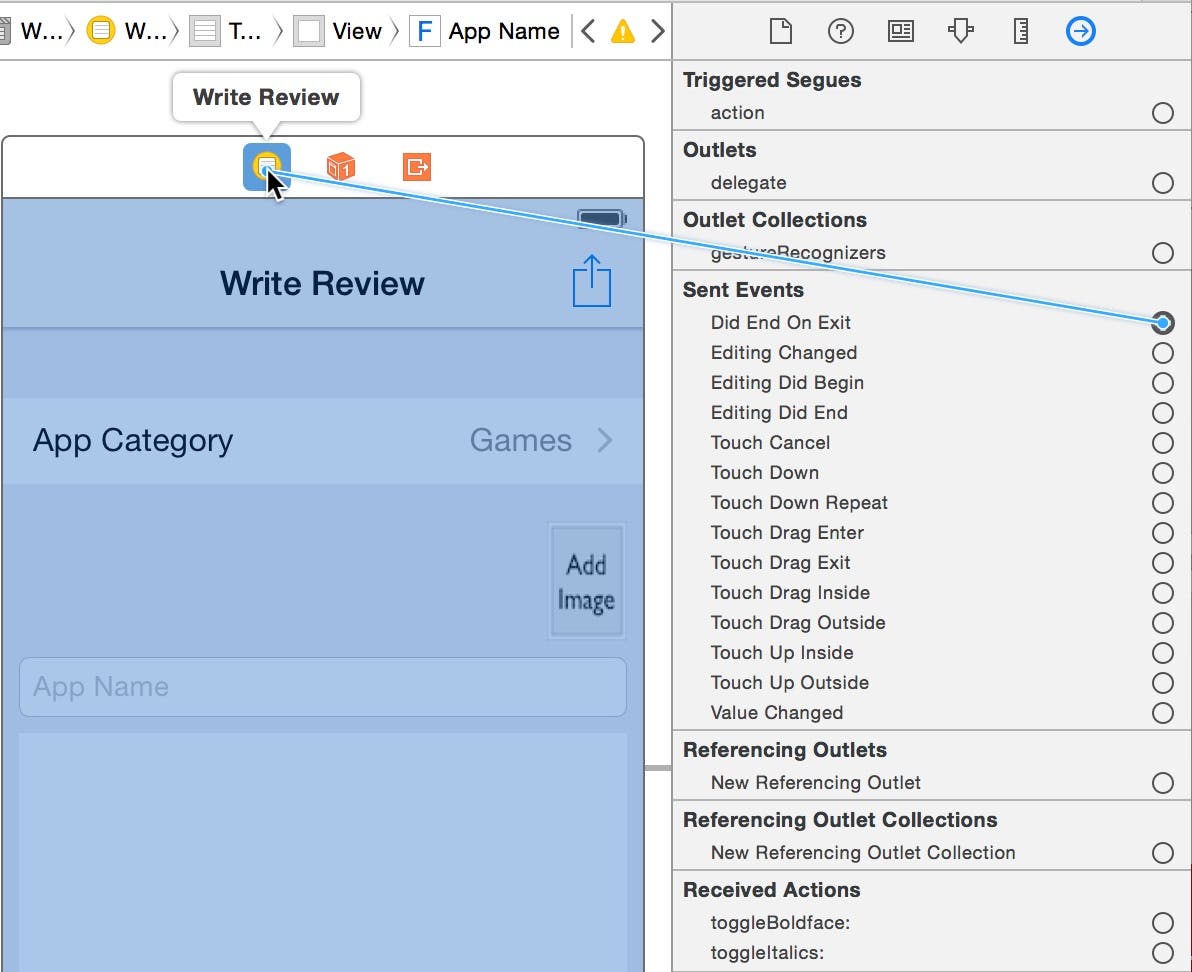 |
| Figure 14 - Create a connection from the Did End on Exit event. |
- Let go of the mouse button to display the connection popup menu. Select the textFieldReturn: action method from the popup menu (Figure 15).
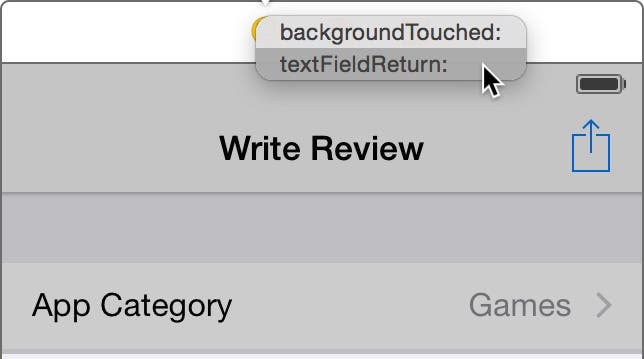 |
| Figure 15 - Select textFieldReturn: from the popup menu. |
- Now you're ready to connect to the backgroundTouched: action method. iOS views do not have an event that automatically fires when the user touches the background of a view. So, to capture this action from the user, you need to add a gesture recognizer to the scene. The iOS gesture recognizer classes make it easy for you to capture and respond to a variety of gestures from your users. The Tap Gesture Recognizer recognizes single or double taps, as well as taps with multiple touches.
Drag a Tap Gesture Recognizer from the Object Library and drop it on the background of the Write Review scene as shown in Figure 16.
 |
| Figure 16 - Add a Tap Gesture Recognizer to the Write Review scene. |
- This displays a Tap Gesture Recognizer icon in the scene dock. Click on this icon (Figure 17) and then go to the Attributes Inspector (the third button from the right in the Inspector toolbar) and uncheck the Cancels touches in view option. This allows other controls in the view to receive taps.
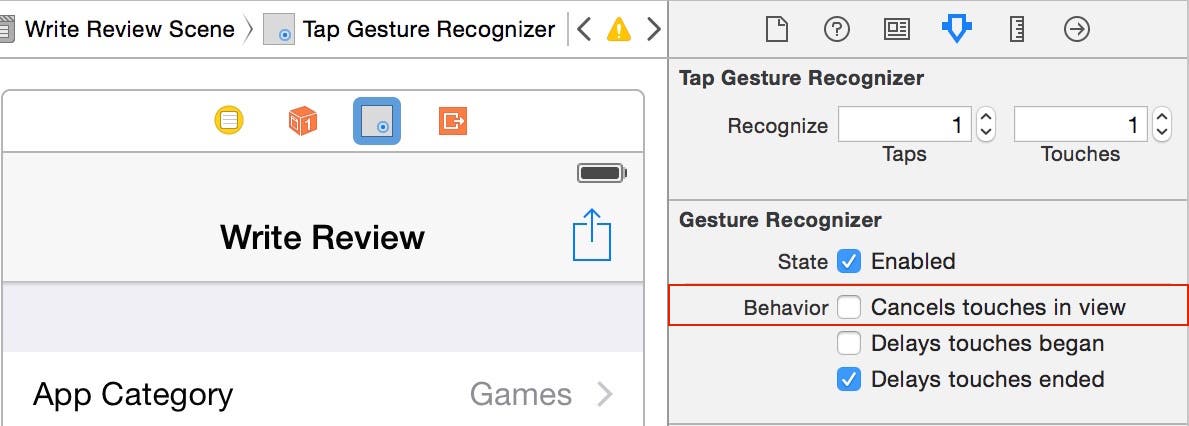 |
| Figure 17 - Uncheck the Cancels touches in view option. |
- With the gesture recognizer still selected, go to the Connections Inspector (the button on the far right in the Inspector toolbar). Under the Sent Actions section, click on the connection well to the right of the selector action and this time drag over to the view controller icon located on the left side of the scene dock as shown in Figure 18.
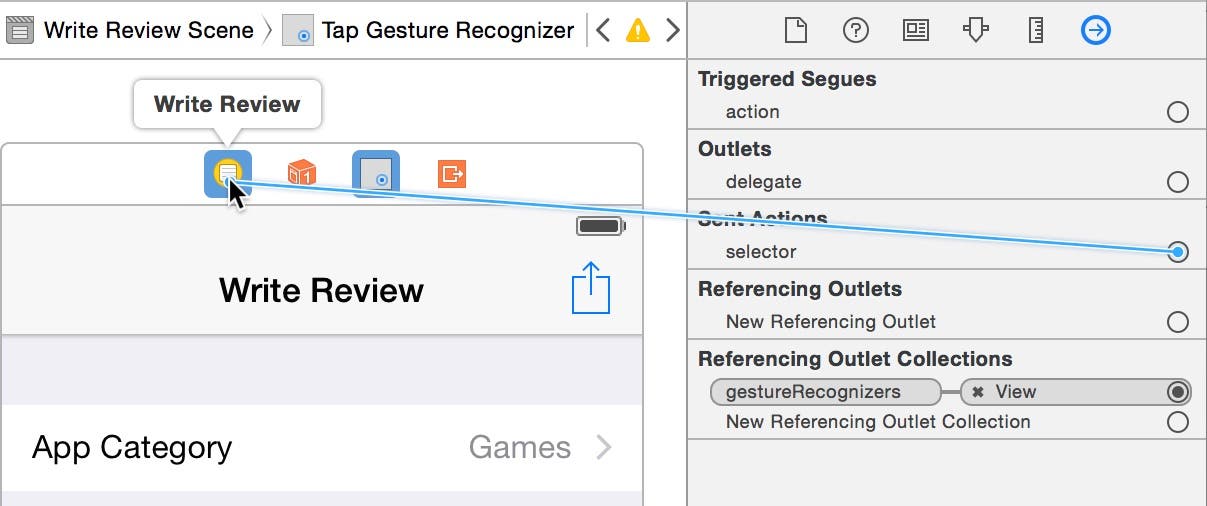 |
| Figure 18 - Create a connection from the gesture recognizer's selector. |
- Let go of the mouse button to display the connection popup menu. Select the backgroundTouched: action method from the popup menu (Figure 19).
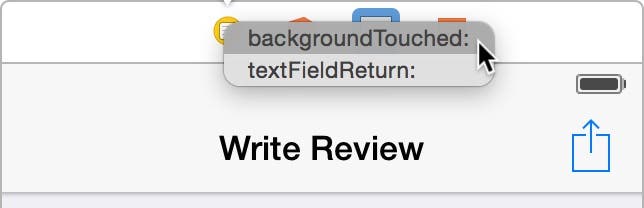 |
| Figure 19 - Select backgroundTouched: |
Now the Write Review scene is ready to be tested!
Testing the Write Review Scene
Follow these steps to test the new "hide the keyboard" functionality.
- Click Xcode's Run button.
- When the app appears in the Simulator, click the Write a Review cell to display the Write Review scene.
- Click in the App Name text field and the keyboard should appear as shown in Figure 20.
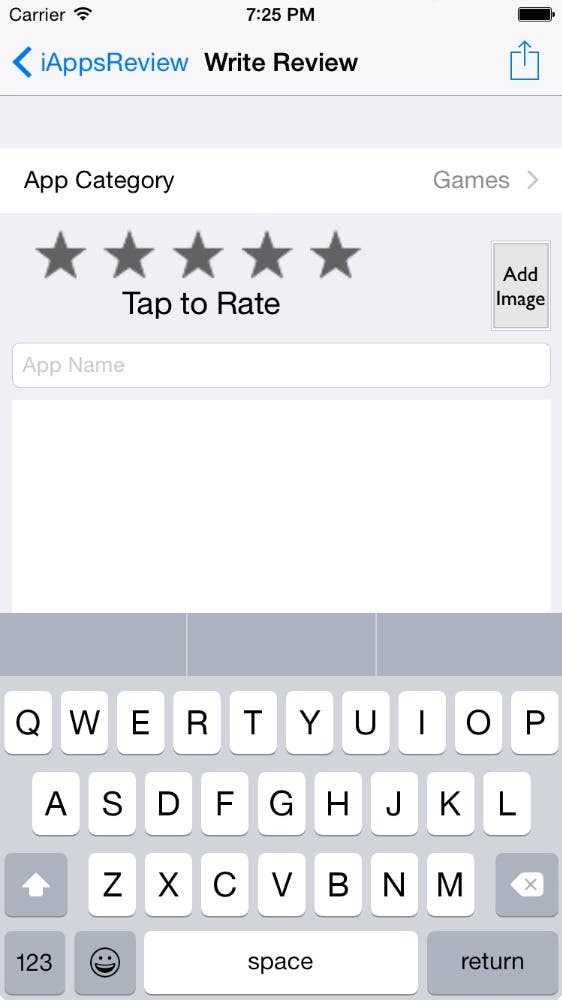 |
| Figure 20 - The keyboard appears when you click in the App Name text field. |
- Click the keyboard's return button, and the keyboard should be dismissed!
- Next, click in the text view (the large white user-interface control below the text field). This redisplays the keyboard.
- Clicking return at this point only adds a new, empty line in the text view (as it should). However, if you click on the background of the view, the keyboard should be dismissed.
Conclusion
We covered a lot of conceptual ground in this post. Once you have mastered calling methods in Swift, it goes a long way toward your goal of becoming an app developer. As usual, I recommend you read through this post again until terms such as instance method, type method, argument, parameter, and return value become more familiar. In my upcoming posts, we will move the app forward more quickly now that you understand the important concept of calling methods.