Do you have an idea for an app but lack the programming knowledge to begin building it? In this weekly blog series, How To Unleash Your Inner App Developer, I will take you, the non-programmer, step by step through the process of creating apps for the iPhone, iPod Touch, and iPad. Join me each week on this adventure, and you will experience how fun turning your ideas into reality can be! This is Part 8 of the series. If you're just getting started now, check out the beginning of the series here (this post has been updated to Swift 1.2, iOS 8 and Xcode 6.3.)

In my previous post, I mentioned Swift, the language of iOS Apps, is an object-oriented programming language. This means when you write code, you are mostly interacting with objects—both visual and non-visual. Working with an object-oriented language is a great advantage for non-programmers who want to learn programming. In this post I'll talk about these advantages, and we'll even get you to write your first lines of code!
A Voyage of Discovery
One of the biggest advantages of object-oriented programming is discoverability—a measure of how easy it is to discover, or find the code you need to perform a particular task.
As mentioned in my previous post, Apple provides dozens of Cocoa Touch frameworks that provide a wide variety of services, which you can access from within your app. Within these frameworks are thousands of classes that provide the specific services you need. It's unreasonable to study all these classes before writing your first line of code. Instead, you should learn about classes as you have a need for them within your app.
So, when you need to perform a particular task, you must discover which Cocoa Touch class will help you get the job done. For example, let's say you have an app with a text field for the user's first name and another text field for the user's last name as shown in Figure 1. When the user taps the Done button, how can you display a welcome message that combines the first and last names together (for example, "Welcome, Steve Jobs"?
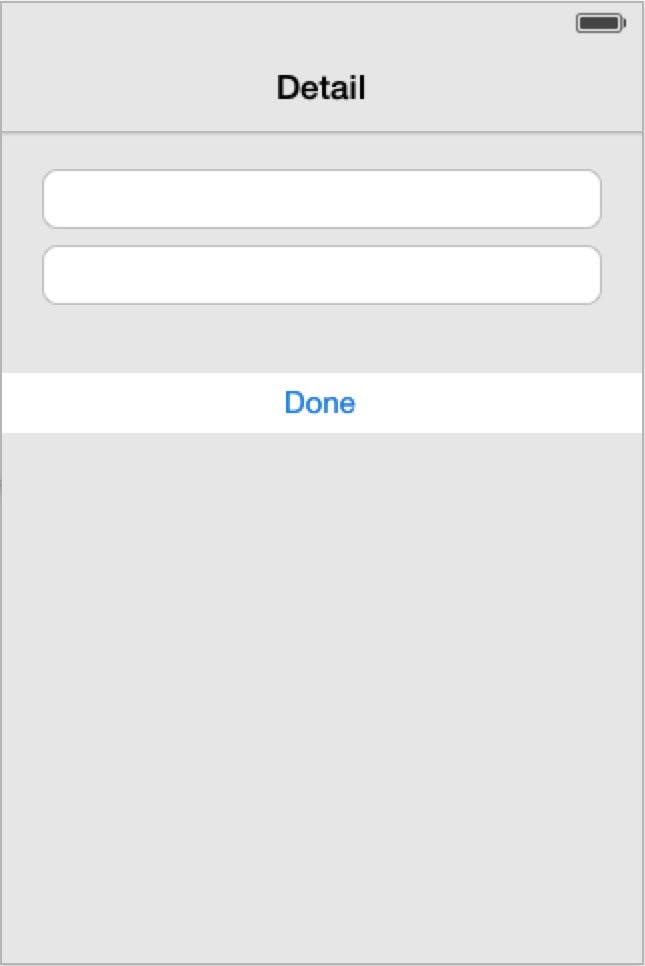 |
| Figure 1 - First and last name text fields |
It takes just a bit of research to discover that the Swift language has a String class (which gets some of its functionality from the Cocoa Touch Framewor's NSString class) that lets you perform a wide variety of tasks on a set of characters (known in programming jargon as a string). You will find that you can append multiple strings together using the plus sign. For example, the following code combines the first name, a space and the last name together to create a single string:
var fullName = firstName + " " + lastName
Once you learn about the String class, a whole world of string manipulation is opened up to you. The following table lists a few of the tasks you can perform using the String class. The column on the left lists the tasks you can perform and the column on the right lists the String methods you can use to perform each task.
| Task | Methods |
|---|---|
| Checking for an empty string |
isEmpty() |
| Dividing strings |
substringFromIndex: |
| Finding characters and substrings |
rangeOfString: |
| Identifying and comparing strings |
hasPrefix: |
| Changing case |
lowercaseString: |
You don't need to know how all of these methods work right now. I just wanted to give you a sense of the kind of services available in the String class.
Object orientation is "the gift that keeps on giving." As you discover new classes, each one opens a world of functionality to you.
Understanding Inheritance
One of the pillars of object-oriented programming is inheritance. This term refers to the concept that a class can be based on, or inherit attributes (properties) and behavior (methods) from another class.
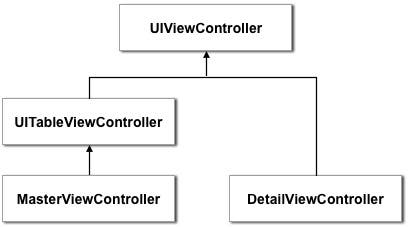
For example, in the class diagram shown in Figure 2, the arrow pointing from the UITextField class up to the UIControl class indicates the UITextField class inherits from the UIControl class.
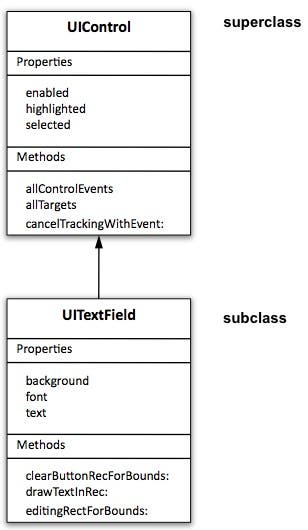 |
| Figure 2 - UITextField inherits from UIControl. |
Because of this relationship, the UITextField class inherits the UIControl class's enabled, highlighted, and selected properties as well as all its methods. In this relationship, UIControl is the superclass of UITextField, and UITextField is the subclass of UIControl.
Class inheritance can go much further than just one level. For example, Figure 3 shows the UITextField's heritage traced all the way to the top level. UITextField inherits from UIControl, which inherits from UIView, and so on, all the way up to NSObject, which sits at the top of the inheritance chain. As you walk the inheritance chain the other way, from top to bottom, each class adds new properties and methods, which are inherited by the class below it.
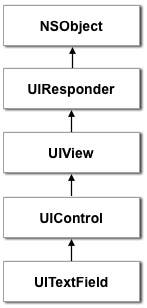 |
| Figure 3 - UITextField's full inheritance chain |
In Swift, a class can only have one superclass, but it can have zero, one, or more subclasses. For example, UIControl has several subclasses, three of which are shown in Figure 4. This makes sense because UITextField, UIButton, and UISlider are all user-interface controls. Swift's inheritance allows Apple to create the UIControl class, and put attributes and behavior into it that are common to all user-interface controls. New subclasses can be created that inherit these attributes and behavior from UIControl, and then new attributes and behavior can be added to the subclass that specialize the class to be a text field, button, slider, and so on.
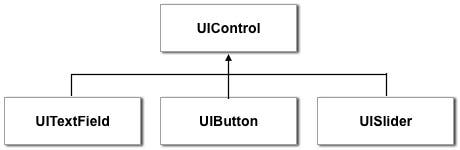 |
| Figure 4 - Classes can have zero-to-many subclasses. |
Inheritance and View Controllers
One of the places you will encounter inheritance is with your project's view controllers. When you create a new iOS project, Xcode automatically adds view-controller subclasses to your project. For example, if you create a Master-Detail app Xcode adds MasterViewController and DetailViewController classes to your project as shown in Figure 5.
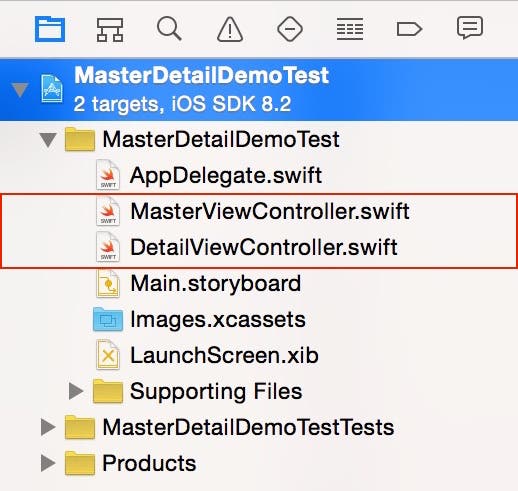 |
| Figure 5 - MasterViewController and DetailViewController classes |
As you can see in Figure 6, MasterViewController is a subclass of UITableViewController, which is in turn a subclass of UIViewController. The DetailViewController class is a direct subclass of UIViewController. This tells you that the MasterViewController class has been specialized to work with iOS table-view controls and the DetailViewController class has not.
 |
| Figure 6 - View-controller class hierarchy |
As you build iOS apps, you will spend much time modifying view-controller classes so it's important to understand how the properties and methods of the view-controller superclasses work. As you work with view controllers and other classes in practical situations, the concept of class inheritance will make even more sense.
Configuring the Feedback Scene
I find there's nothing quite like performing a task yourself to help understand a new concept, so let's do that now. To follow the steps outlined in this section, you need to download a new version of the iAppsReview project by clicking this link.
- Open the new version of the iAppsReview project in Xcode;
- In the Project Navigator on the left side of the Xcode window, select the MainStoryboard.storyboard file. This displays the storyboard in the center of the Xcode window;
- Scroll to the bottom-right corner of the storyboard and you will see the scenes shown in Figure 7.
|
|
| Figure 7 - The update iAppsReview project contains a new Feedback scene. |
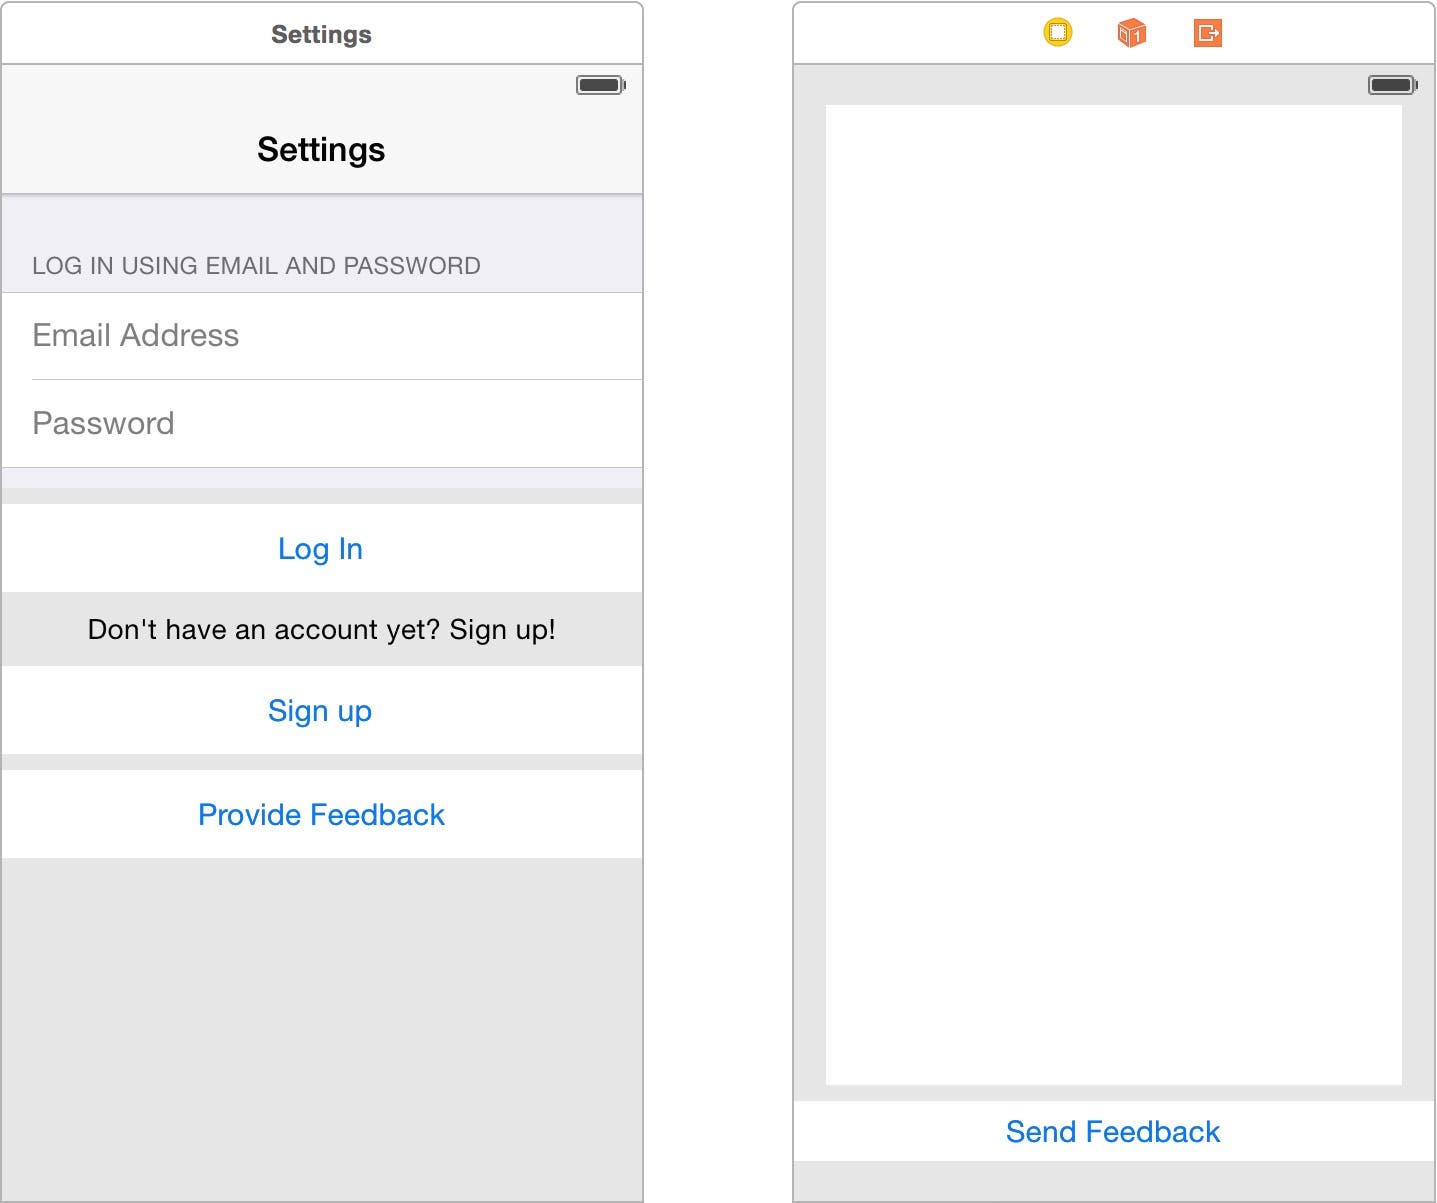
Notice the new Feedback scene in the bottom-right corner of Figure 7. This new scene allows the user to enter their feedback about the iAppsReview app and click the Send Feedback button to post the feedback online. I find it's critical to have a place where users can provide feedback within your app. If you don't provide a place for them to give feedback here, they will post all complaints in the iTunes reviews section for your app, and give your app a low rating while they're at it!
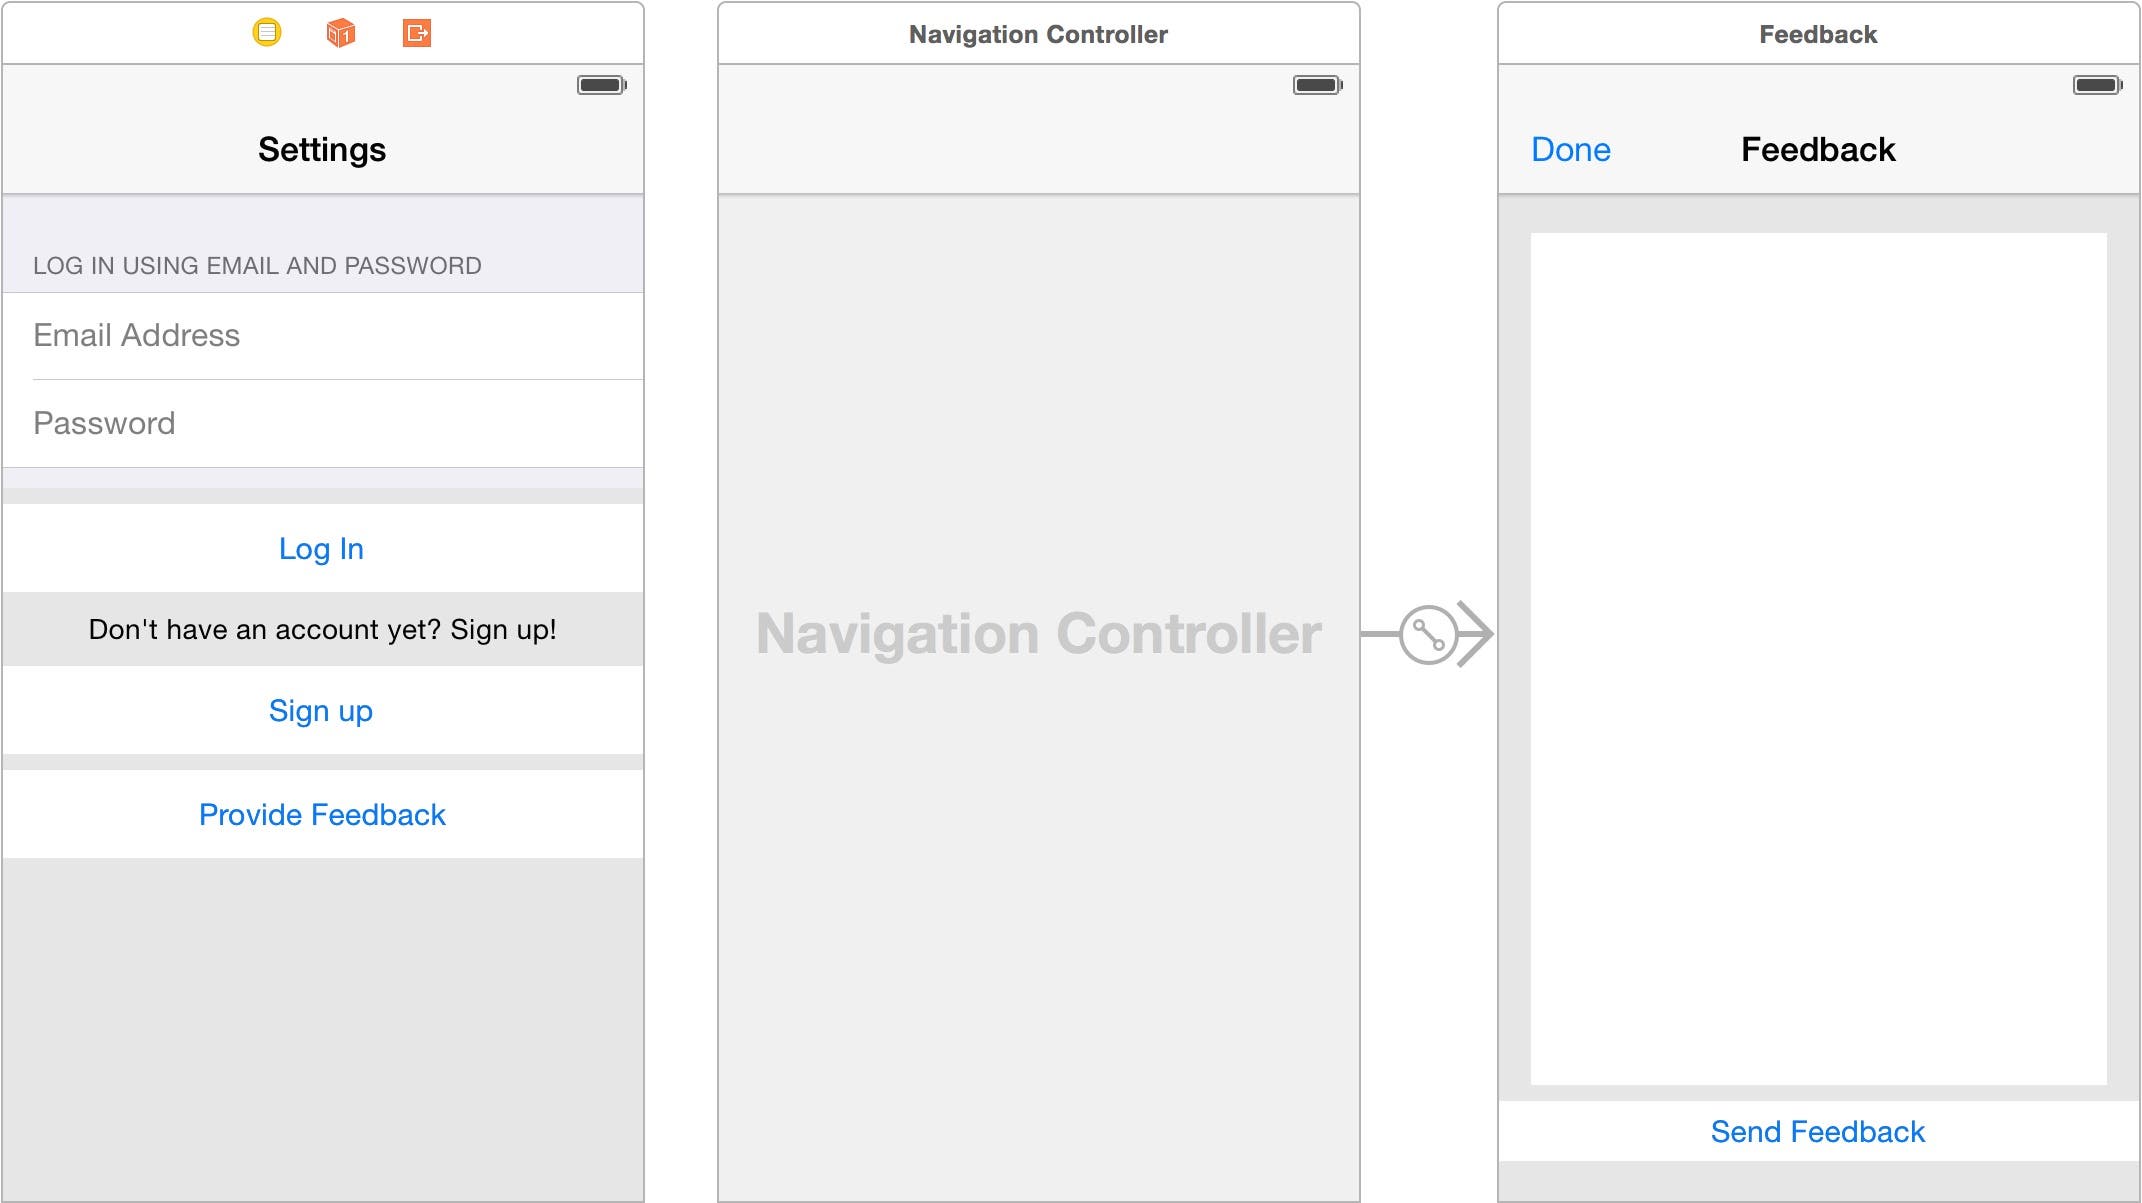
- As it stands right now, there is no connection between the Settings scene and the Feedback scene. I left the segue out intentionally so you can experience how to create a modal segue. However, before doing this, I'd like you to notice there is no navigation bar at the top of the Feedback scene. All the scenes you have worked so far haven't had a navigation bar until you created a segue to that scene, and then one was added automatically. However, when you create a modal segue, a navigation bar is not automatically added for you. The easiest way to add a navigation bar to a modal scene is to embed it in a navigation controller.
To do this, select the Feedback scene in the storyboard by clicking in the scene dock at the top of the scene. Next, go to the Editor menu and select Embed In > Navigation Controller. This adds a navigation controller to the storyboard that is connected to the Feedback scene, and it also adds a navigation bar to the top of the Feedback scene (Figure 8).
 |
| Figure 8 - Embed the Feedback scene in a navigation controller. |
- Now let's change the text of the navigation bar button from Done to Cancel. To do this, double-click the Done button to put it in edit mode, then type the text Cancel and press return.
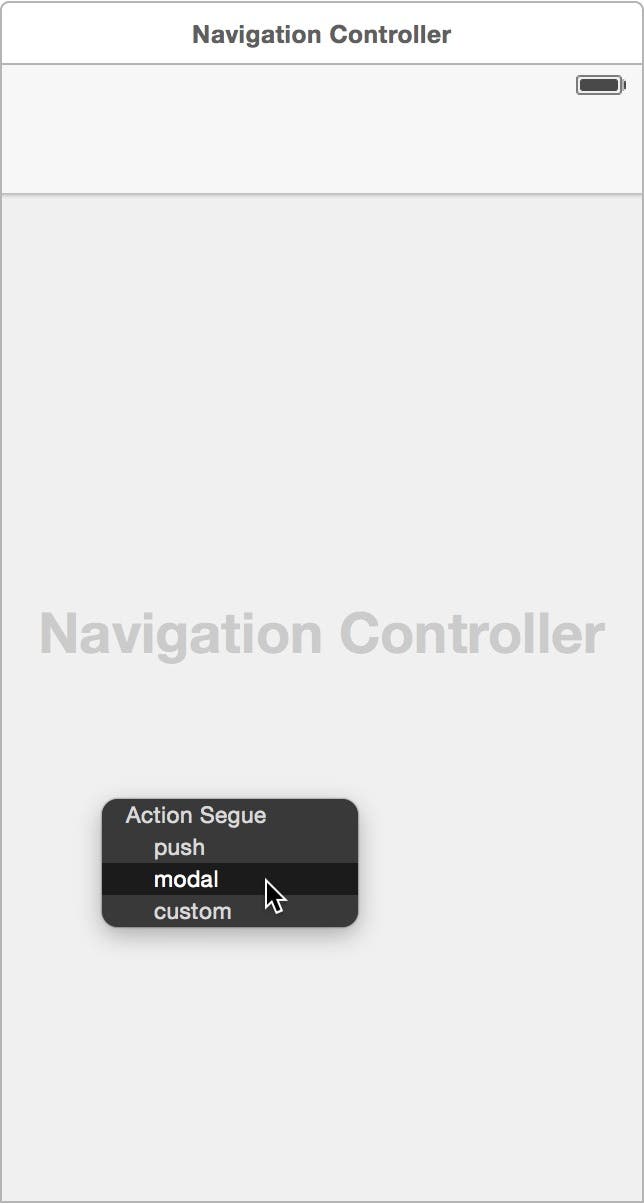
- Now you're ready to create the segue. To do this, go to the Settings scene, hold the Control key down, click on the Provide Feedback button and drag over to the new Navigation Controller scene. When the Navigation Controller scene is highlighted in blue, let go of the mouse button to display the segue popup. Select the modal option from the popup as shown in Figure 9. This creates a new segue between the two scenes.
 |
| Figure 9 - Select modal from the segue popup. |
- Now let's configure the segue. To do this, first select the new segue in the design surface, which displays a blue highlight on the Provide Feedback button (Figure 10) because it is the user-interface control that triggers the segue. Next, go to the Attributes Inspector and change the Transition to Cover Vertical as shown in Figure 10. This option causes the Feedback view to rise up from the bottom of the screen when the user taps the Send Feedback button at run time;
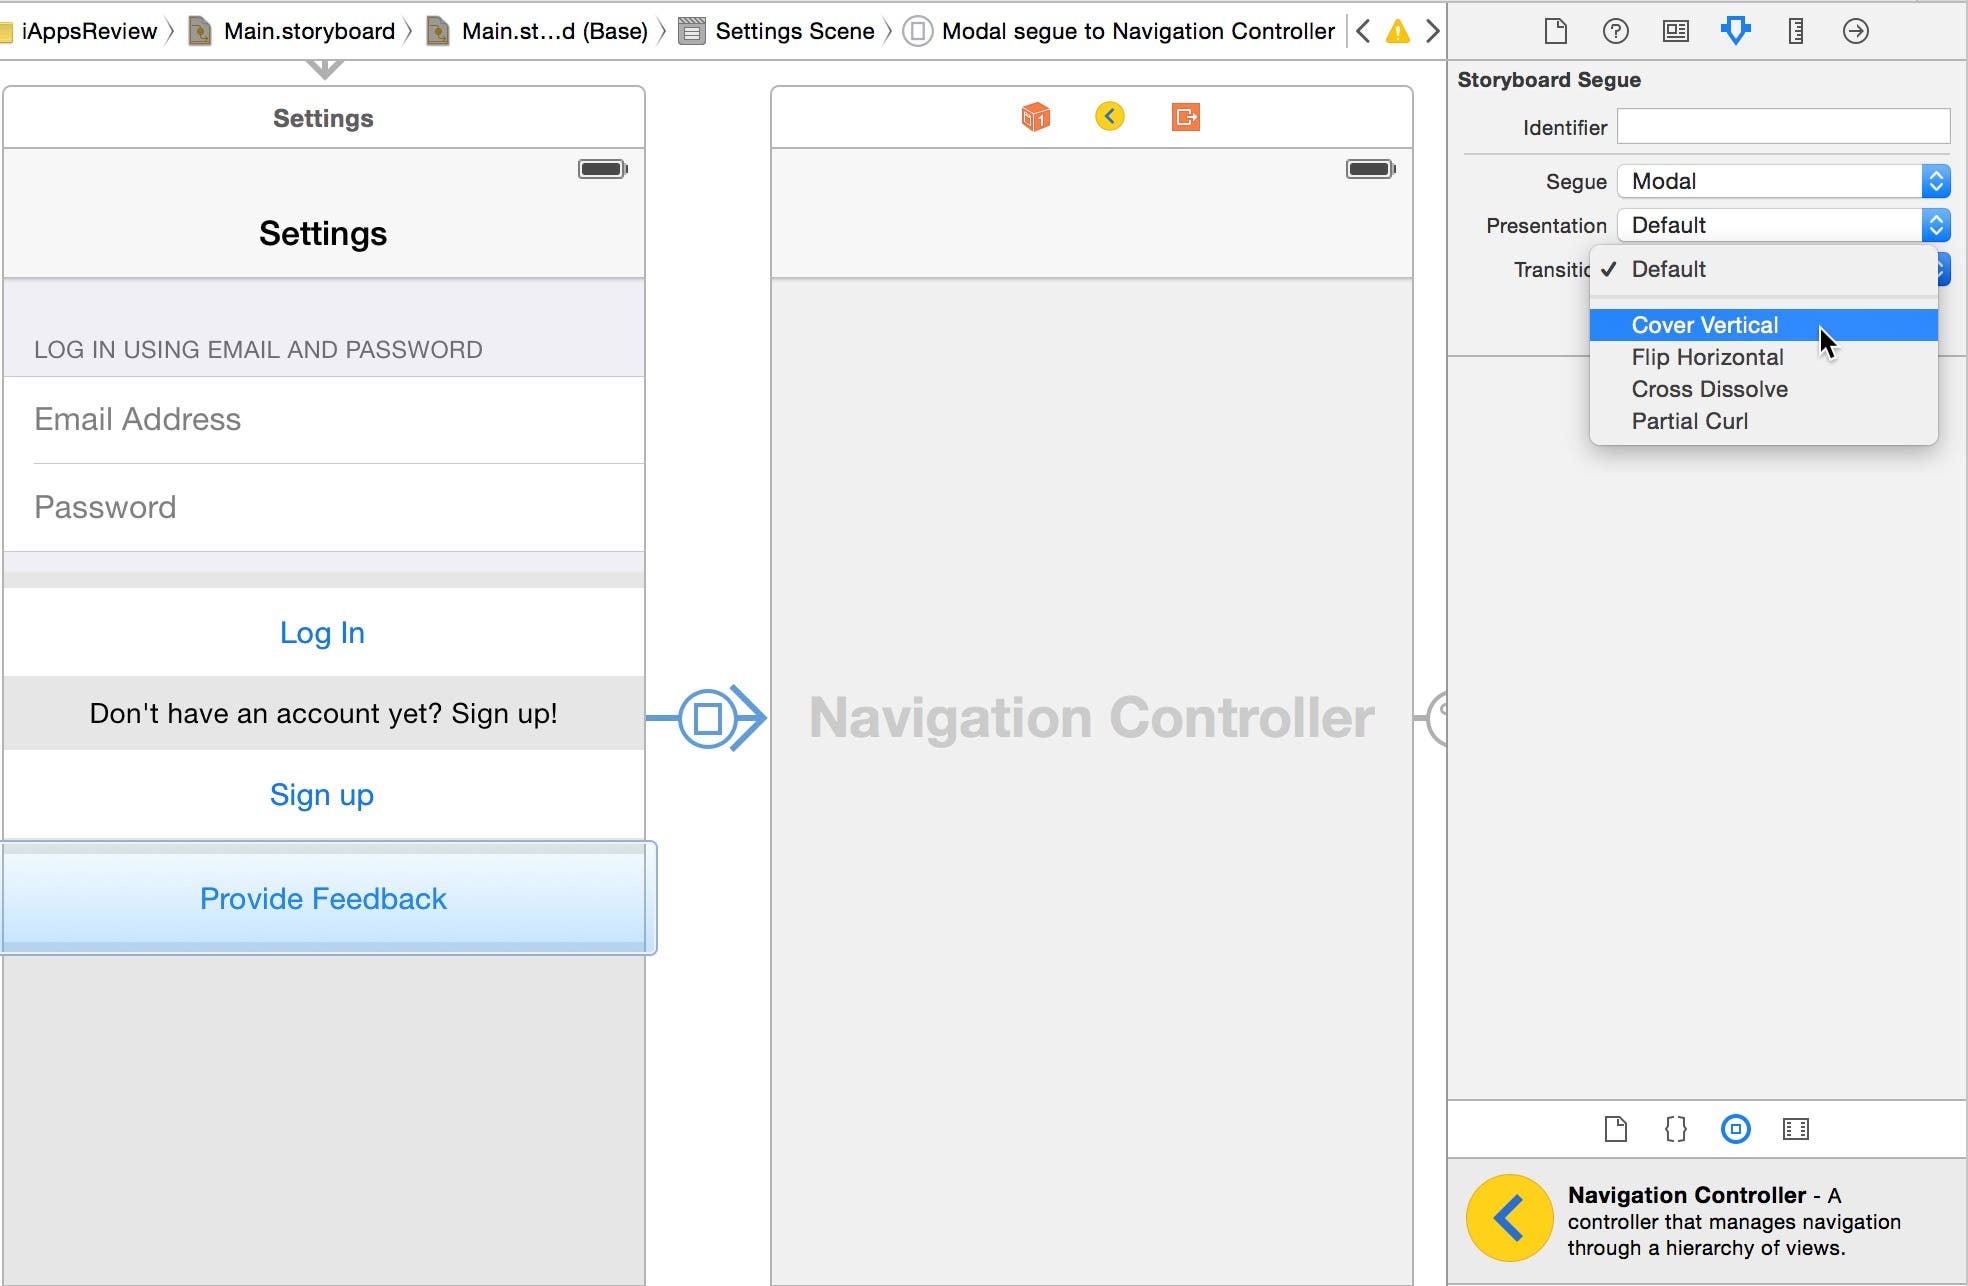 |
| Figure 10 - Change the segue's Transition attribute to Cover Vertical. |
- OK, let's give it a try. Press Xcode's Run button, and when the app appears in the Simulator, select Settings & Feedback, and then click the Provide Feedback button. You will see the Feedback view pop up from the bottom of the screen.
- Now click the Cancel button. You may have expected the Feedback view to slide down and disappear into the bottom of the screen, but notice nothing happens when you click the button. We don't get this default behavior because we had to manually create the navigation bar and Cancel button. In order to close the Feedback view, we need to write some code, which we will do in just a bit.
- Go back to Xcode and click the Stop button to stop the app from running in the Simulator.
Three Steps to Custom Code
Whenever you need to perform a custom action associated with a particular scene (such as dismiss the Feedback view), you need to write some code. Where do you put this code? In a custom view controller you create specifically for that scene. There are three key steps involved in this process:
- Add a new view-controller class to the project.
- Associate the new view-controller class with the storyboard scene.
- Add custom code to the new view-controller class.
We will perform each of these steps in the next sections.
Adding a New View-Controller Class to the Project
Follow the steps below to add a new view-controller class to the iAppsReview project.
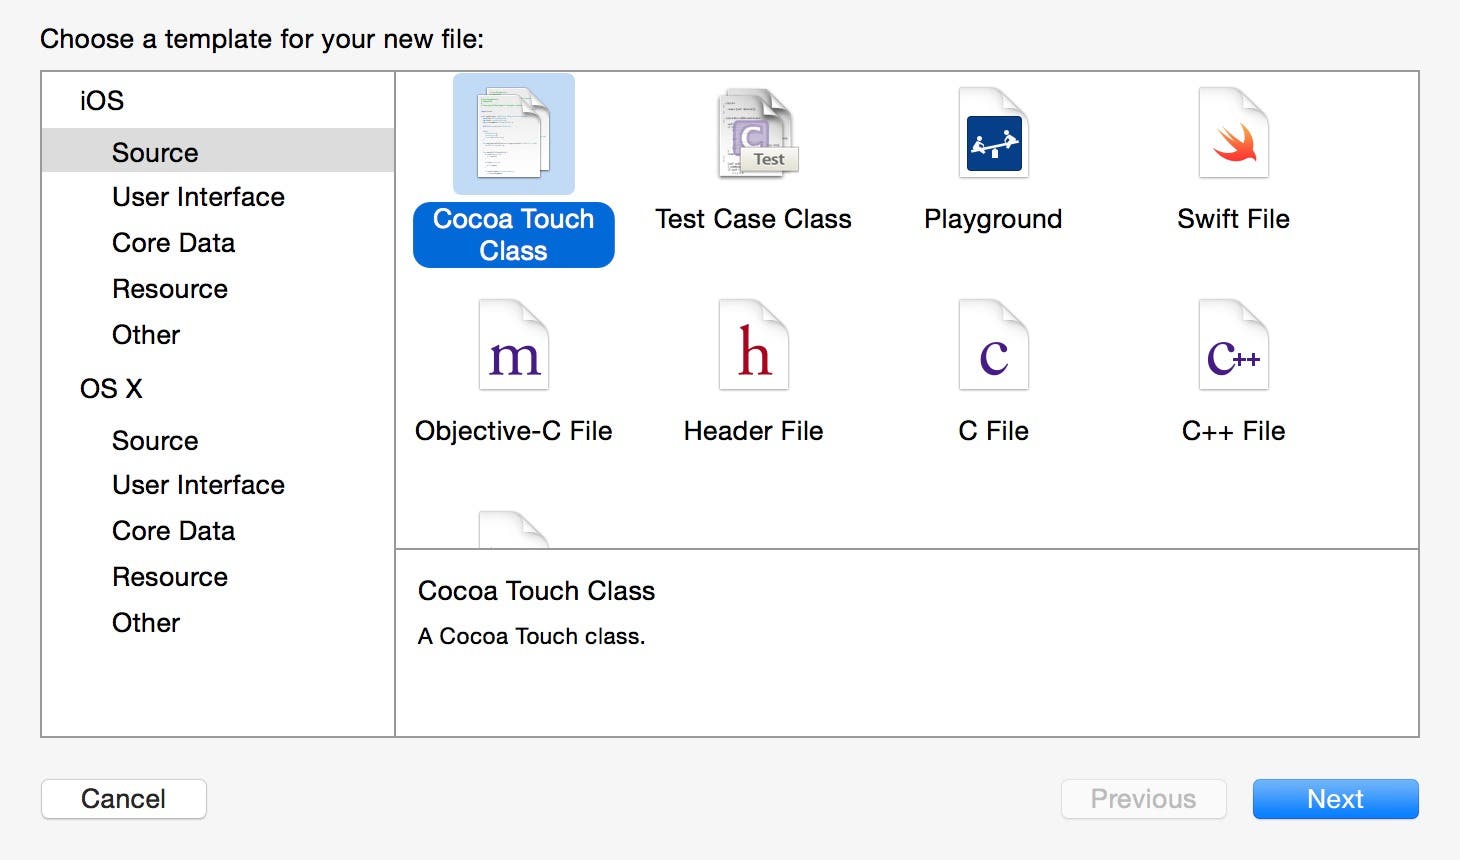
- In the Project Navigator, select the Main.Storyboard file. This causes the file you are about to create to be added below the storyboard. Next, select File > New > File... from the Xcode menu. This displays the New File dialog shown in Figure 11.
 |
| Figure 11 - Select Source and Cocoa Touch Class in the New File dialog. |
- On the left side of the dialog, under the iOS section, select Source. In the panel on the right, select Cocoa Touch class and then click Next. This displays the second step of the New File dialog as shown in Figure 12.
 |
| Figure 12 - Create a FeedbackViewController class, based on UIViewController. |
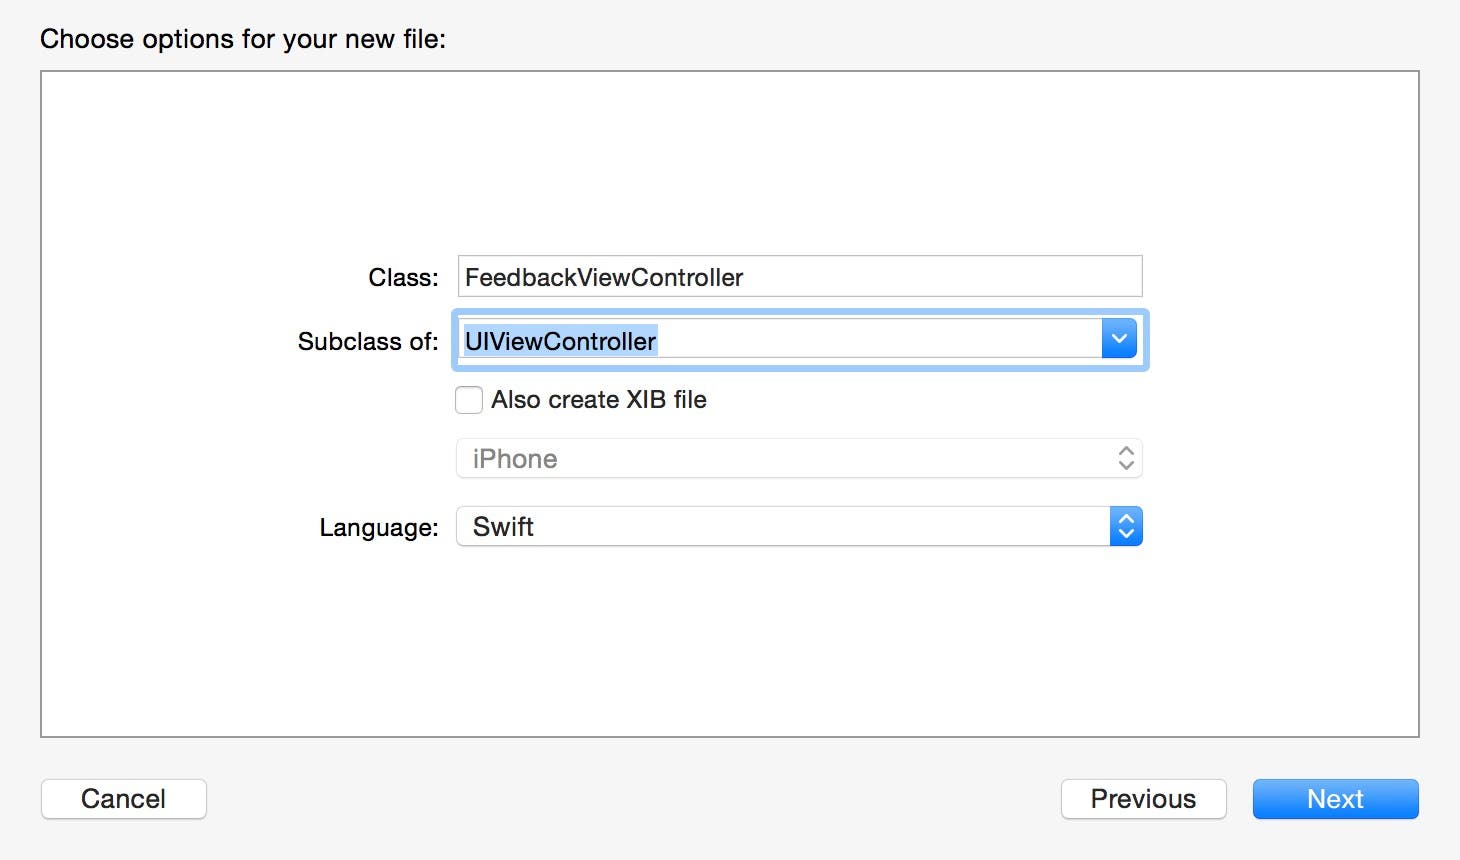
- In the Subclass of box, enter UIViewController. This indicates the new class you are creating is based on, or inherits from the UIViewController class. I like to specify this selection first because it prefills the Class box with the text ViewController.
- Next, in the Class text field, add the prefix Feedback in front of the ViewController class to name the class FeedbackViewController. I like to name the view controllers based on the scene with which they will be associated. Since this view controller will be associated with the Feedback scene, FeedbackViewController is a great name.
- Click the Next button. This displays the Save File dialog as shown in Figure 13.
 |
| Figure 13 - The Save File dialog |
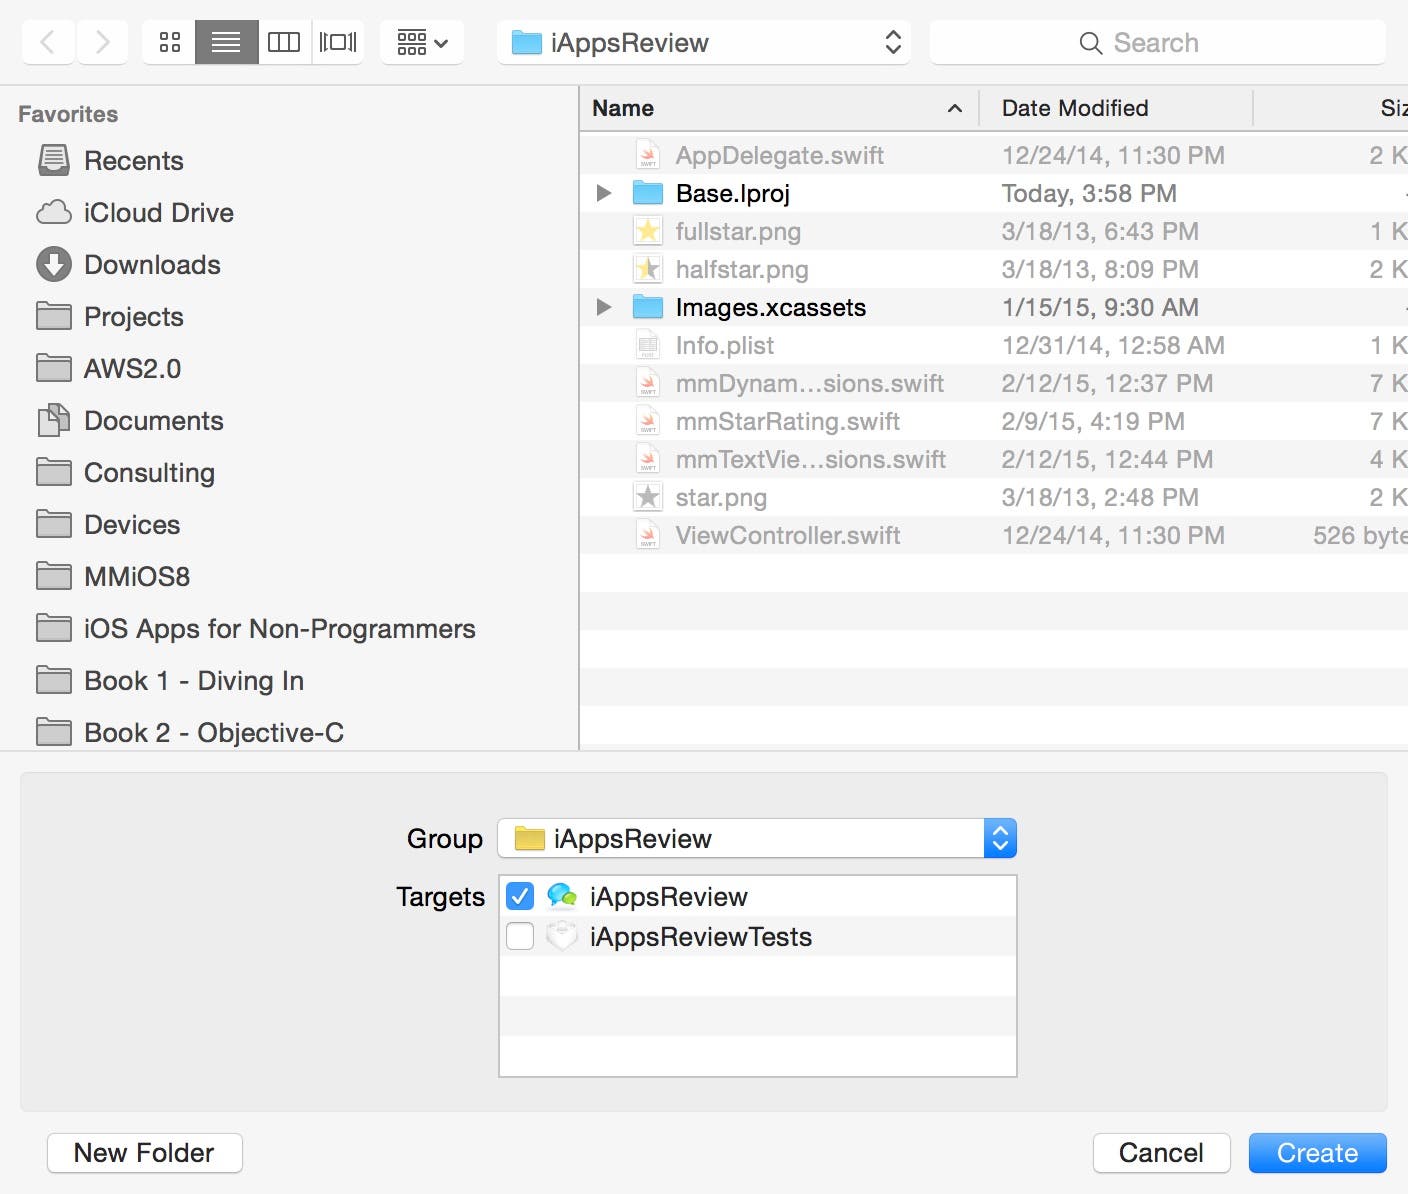
- Click the Create button to create the new view-controller class and save it in the project's root folder. After a few seconds, you will see a new files in the Project Navigator as shown in Figure 14.
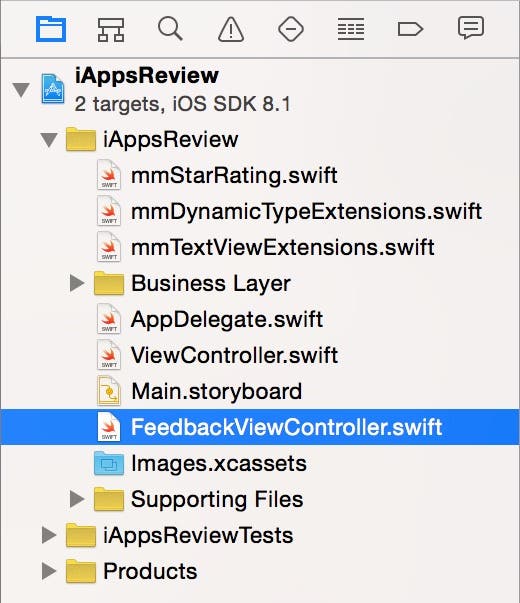 |
| Figure 14 - The new view-controller files in the Project Navigator |
Notice that a FeedbackViewController.swift file has been added to the project. This is a class file that contains properties and methods that can be accessed by other classes.
- Select the FeedbackViewController.swift file in the Project Navigator. The code within is shown in Figure 15.
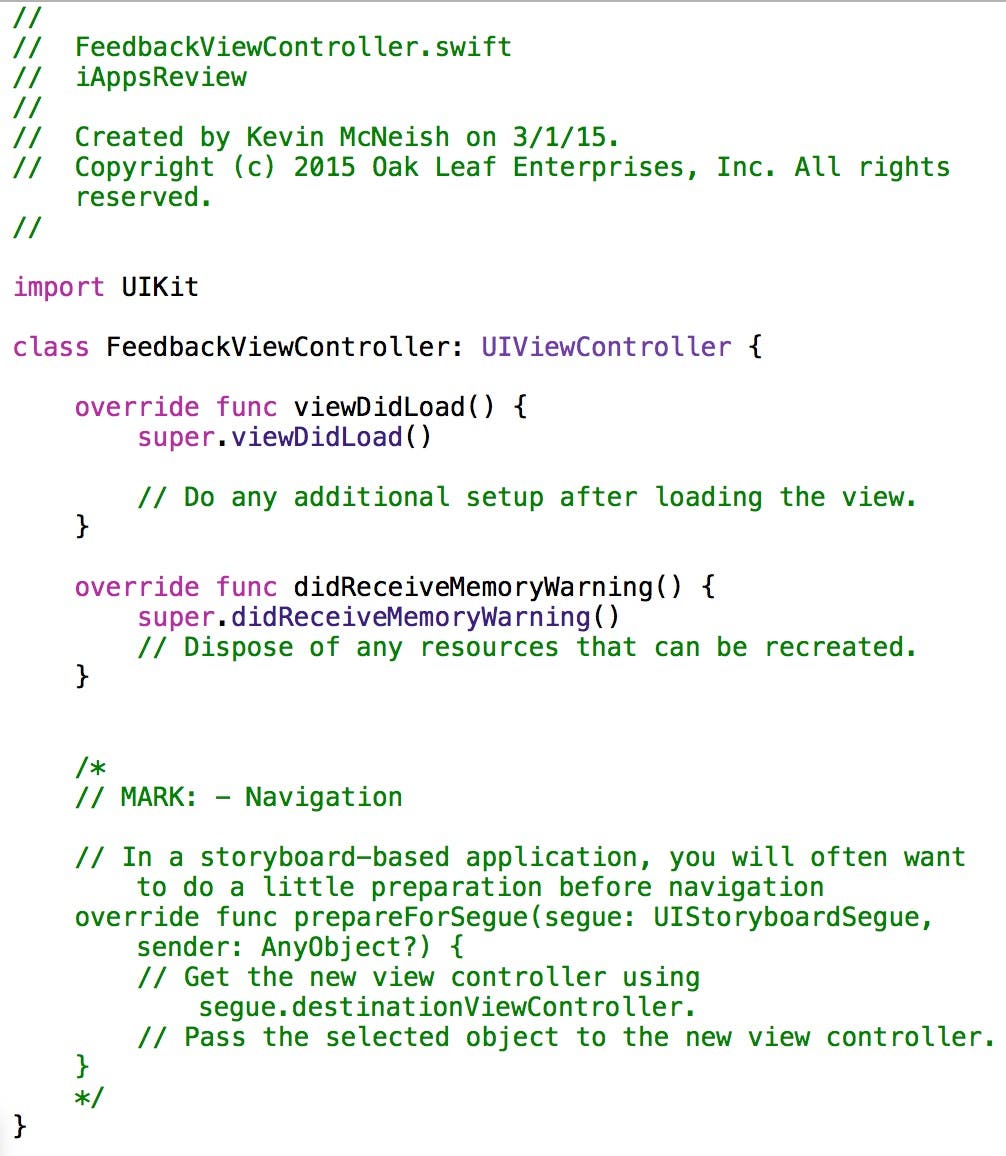 |
| Figure 15 - The code contained within the FeedbackViewController.swift file |
Here are some important points to note:
- The text in green at the top of the file and towards the bottom are comments. In Swift, comments are used for documentation purposes. Comments are not code and are therefore not executed by an iOS app.
- Directly below the comments, at the top of the file, is an import statement which we will discuss in a future post.
- The actual class interface definition begins with the class directive and ends with the closing right curly brace ( } ).
- The file declares the class name, in this case, FeedbackViewController.
- The file declares the class heritage. In this case, UIViewController is the superclass of FeedbackViewController.
- There are two methods in this file:
- viewDidLoad
- didReceiveMemoryWarning
- It's common for a new code file to have methods like this contained within it when you first create a class. These methods are placed here for your convenience because they are common places where you can add custom code.
- The left curly brace ( { ) marks the beginning of the method's code. The right curly brace ( } ) marks the end of a method's code. When you add code to a method, you must always make sure the code you add is between these two curly braces!
You will learn much more about method declarations in a future post. I just wanted to hit the highlights for now.
Associating the FeedbackViewController With the Feedback Scene
Now that you have created the new FeedbackViewController class, it's time to associate it with the Feedback scene.
- In the Project Navigator, select the Main.storyboard file.
- Click on the scene dock at the top of the Feedback scene. When the blue line appears around the scene (Figure 16), it indicates you have selected the scene's table view controller.
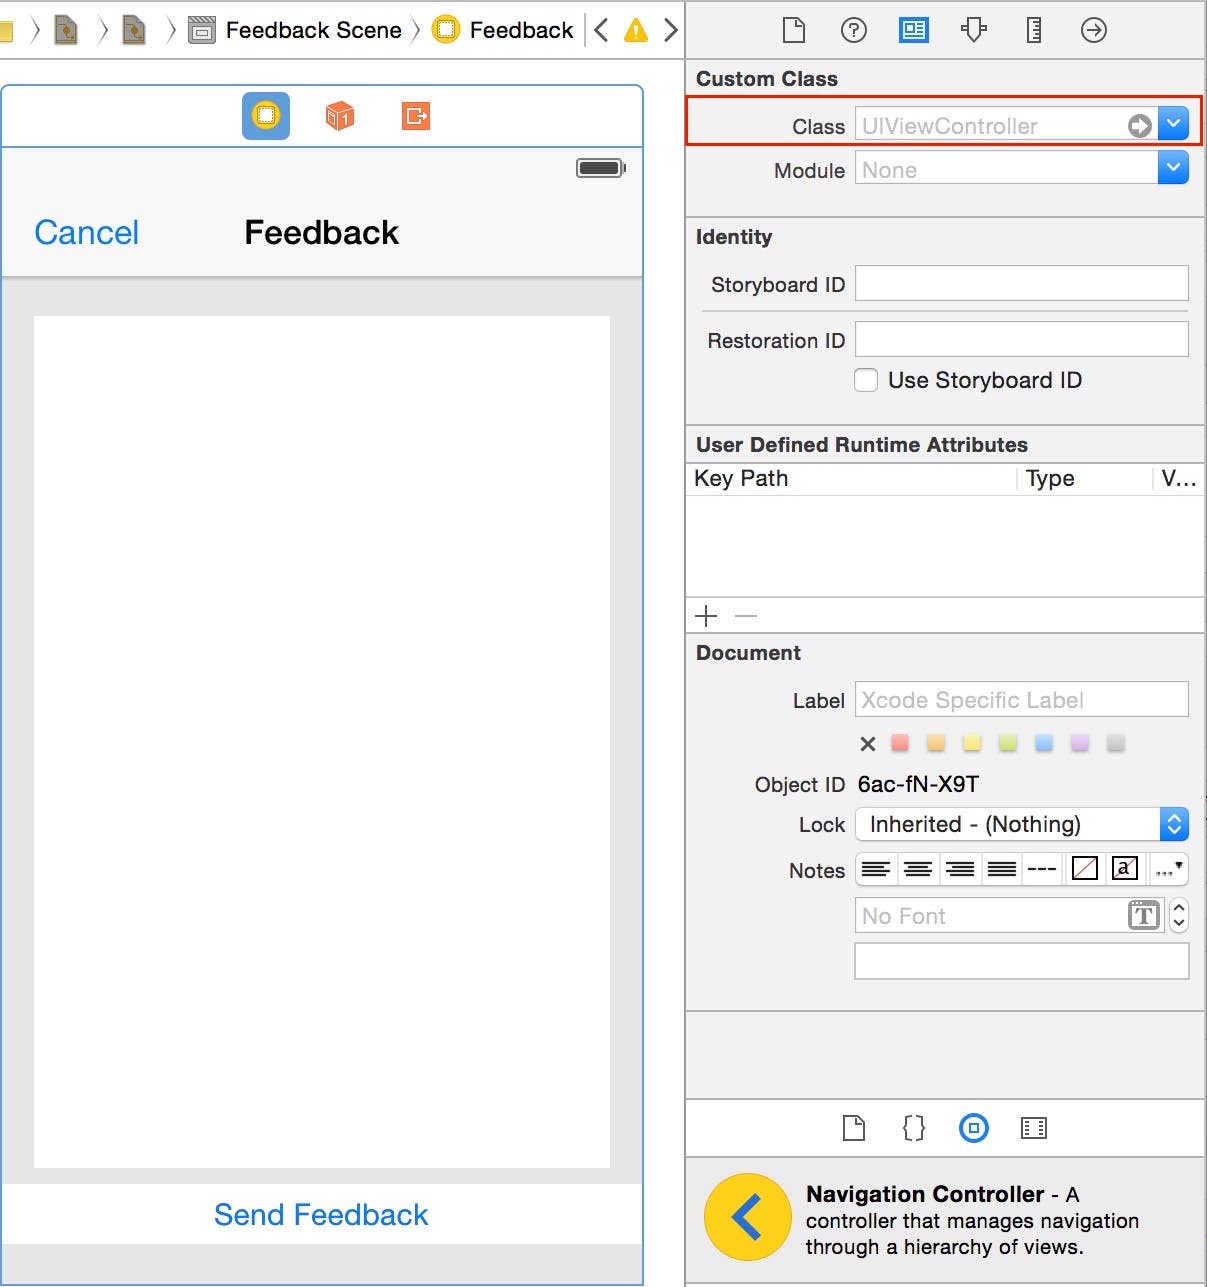 |
| Figure 16 - Viewing the Class of a view controller |
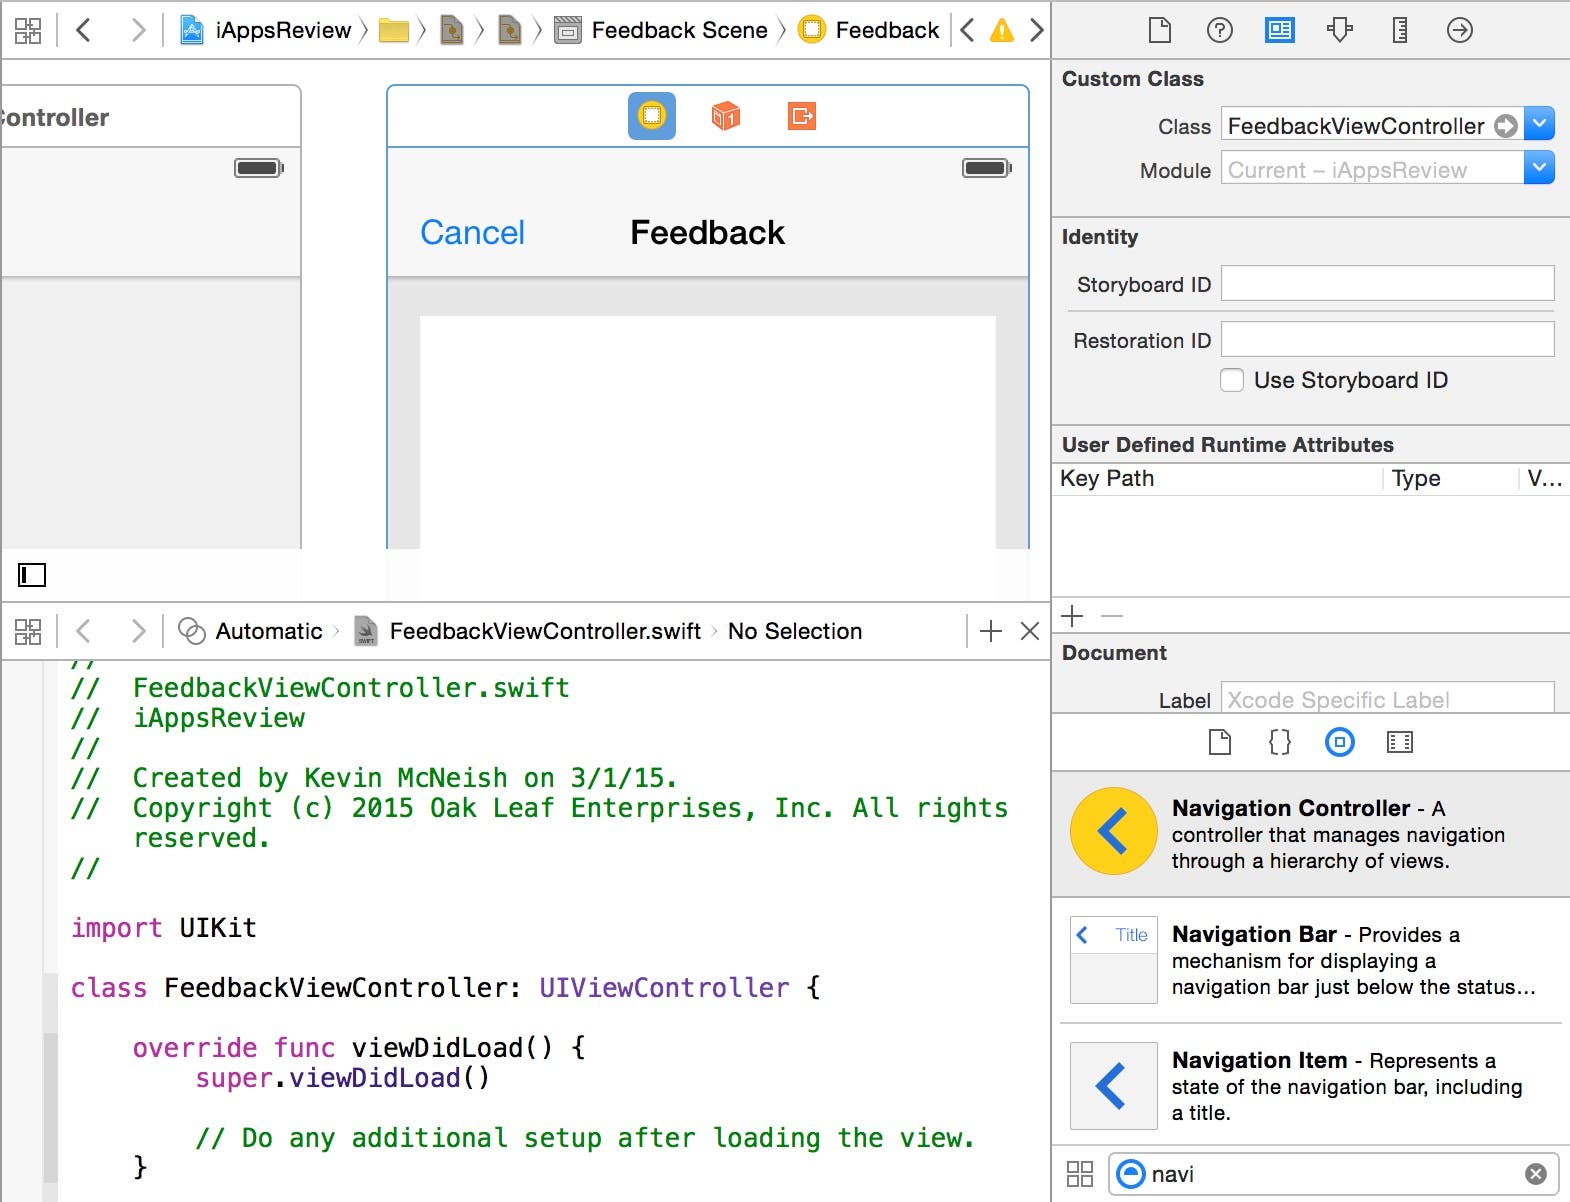
- Go to Xcode's Identity Inspector by clicking the third button from the left in the Inspector toolbar as shown in Figure 16. Notice that, by default, the Class of the view controller is set to UIViewController. This means that at run time, when the Feedback scene is loaded, a view controller object is created from the UIViewController class to manage the Feedback scene. This works great for a prototype app, but now that we want to write some custom code associated with this scene, we need to change the Class to our custom view controller.
- In the Identity Inspector's Class combo box, enter FeedbackViewController. As soon as you start typing the first few letters, Xcode should automatically fill in the class name FeedbackViewController. However, due to a bug in Xcode, this doesn't always happen. If the class name doesn't auto-fill, make sure you enter FeedBackViewController with the exact upper/lower case letters shown here.
Adding an Action Method to the FeedbackViewController Class
Now that you have associated the FeedbackViewController class with the Feedback scene, you're ready to write some custom code. This is where Xcode comes to the rescue. Xcode can actually write some of the code for you, as you will see in this section!
- With the Feedback scene's still selected go to the top right of the Xcode window and click the center button in the Editor button set (Figure 17).
 |
| Figure 17 - Select the Assistant Editor button. |
Doing this displays the FeedbackViewController.swift code file in the Assistant Editor as shown in Figure 18. The Assistant Editor's job is to display files associated with the file you currently have open in the standard editor. Because you associated the FeedbackViewController class with the Feedback scene in the previous section of this post, when you click the Assistant Editor button, it automatically opens the FeedbackViewController.swift file.
Note: If the Assistant Editor doesn't below the storyboard, in the Xcode menu, select View > Assistant Editor > Assistant Editors on Bottom.
 |
| Figure 18 - The FeedbackViewController.swift file is displayed in the Assistant Editor. |
If the FeedbackViewController.swift file does not automatically appear in the Assistant Editor, check the toolbar at the top of the Assistant Editor. If it says Manual as shown in Figure 19, click the section of the toolbar that says Manual, and then select Automatic > FeedbackViewController.m from the popup menu.
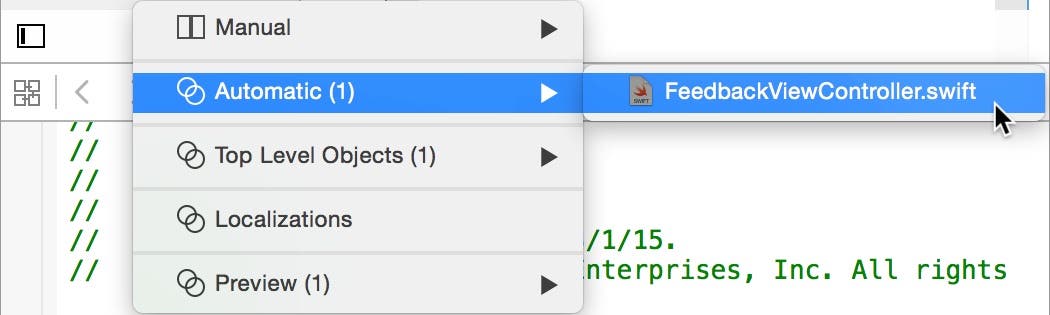 |
| Figure 19 - Select Automatic > FeedbackViewController.swift. |
- Click on the Cancel button in the navigation bar at the top of the Feedback scene to select it.
- Next, go to the Connections Inspector by clicking the button on the far right of the Inspector toolbar (Figure 20). The Connections Inspector allows you to connect user-interface controls with method code in a scene's associated view controller.
- Now we're going to have Xcode help us create an action method. An action method is a method that is executed at run time in response to a user's action, such as tapping a button. In the Connections Inspector under the Sent Actions section, click on the empty circle to the right of the selector action (known as a connection well) and drag down into the FeedbackViewController.swift file just above the viewDidLoad method declaration until you see the Insert Action popup shown in Figure 20. The blue line that appears between the connection well and the code file reinforces the concept that you are creating a connection between the Cancel button and the FeedbackViewController code file.
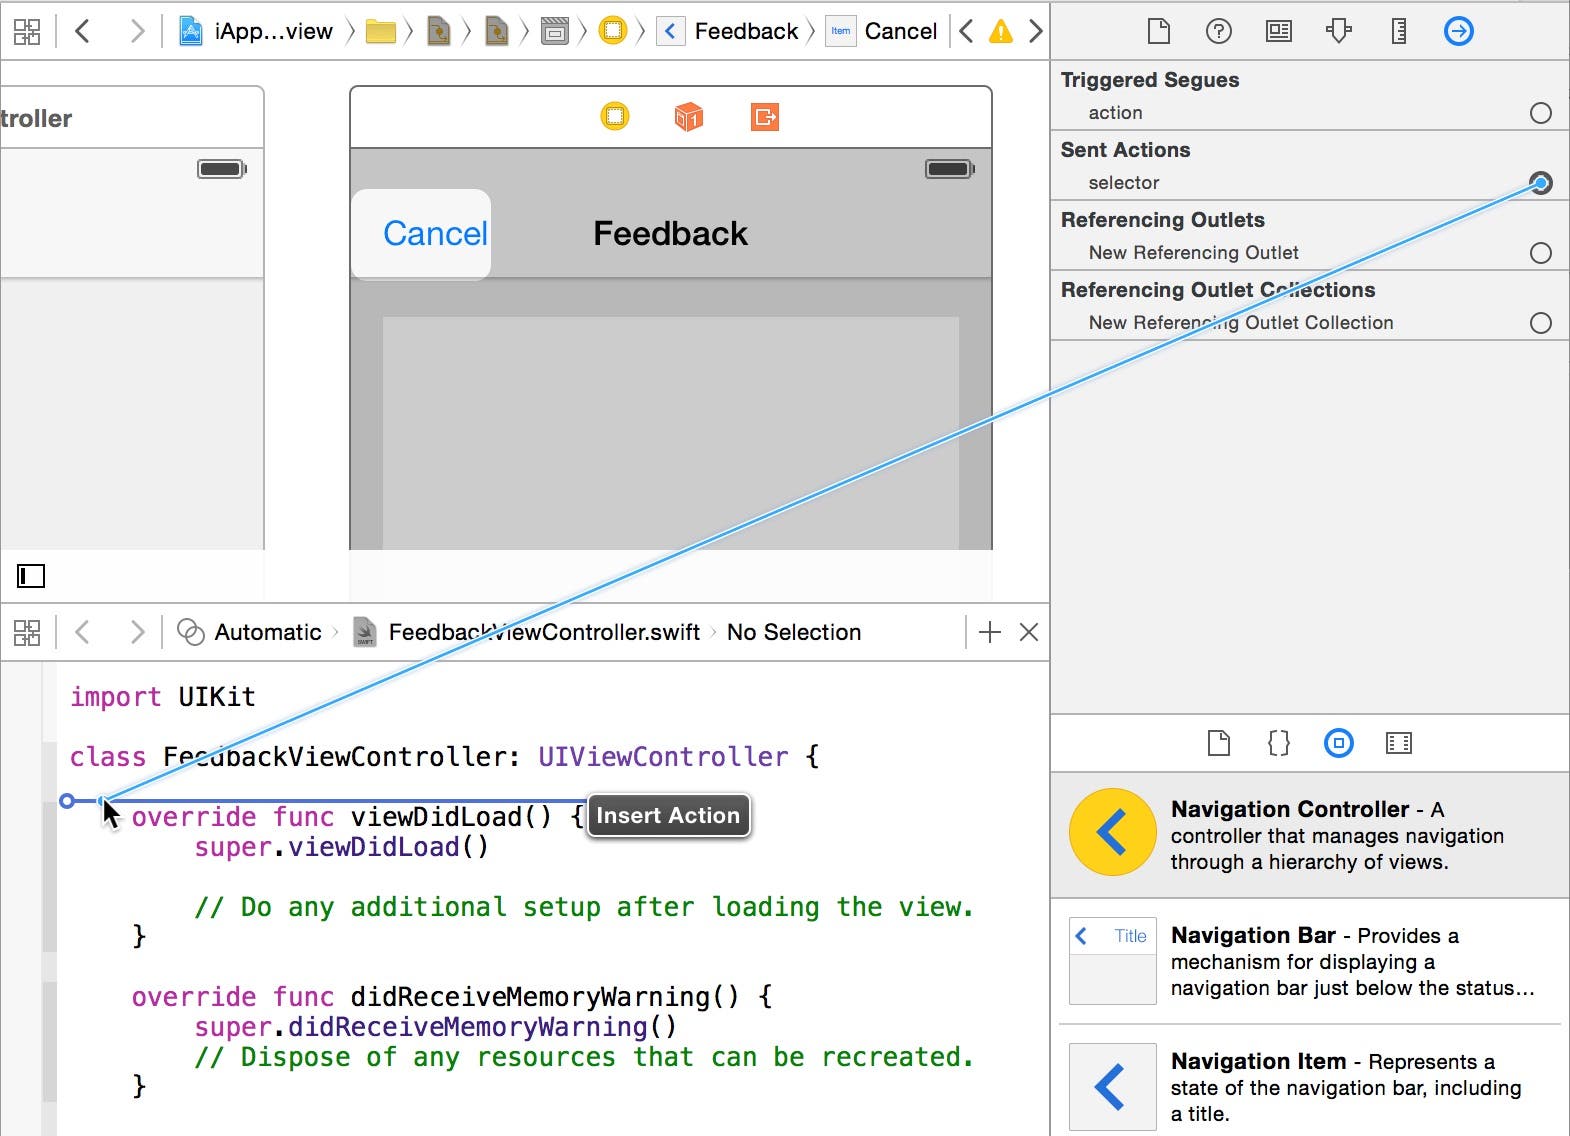 |
| Figure 20 - Create an action method. |
- When you see the Insert Action popup, let go of the mouse button to display the Connection popup shown in Figure 21. This popup allows you to specify the name of the action method to be created.
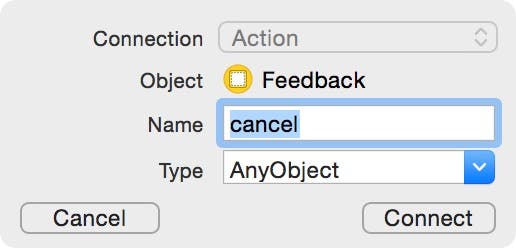 |
| Figure 21 - The Connection popup |
- In the Connection popup's Name box, enter cancel as the name of the method to be created (Figure 21) and then click the Connect button. This creates a new method declaration in the FeedbackViewController.swift file as shown in Figure 22. Again, we'll cover more in-depth information on method declarations later in this series, but for now, you just need to know that Xcode has automatically declared a new method named cancel: in the FeedbackViewController code file. The IBAction keyword indicates that this is an Interface Builder action method.
 |
| Figure 22 - The new cancel: method declaration |
- Notice the connection well to the left of the new cancel method. The circle has a dark grey center, indicating the method is connected to a user interface control. To see which use interface control a method is connected to, you can simply hover your mouse pointer over the connection well, and the associated user interface control is highlighted in the design surface as shown in Figure 23.
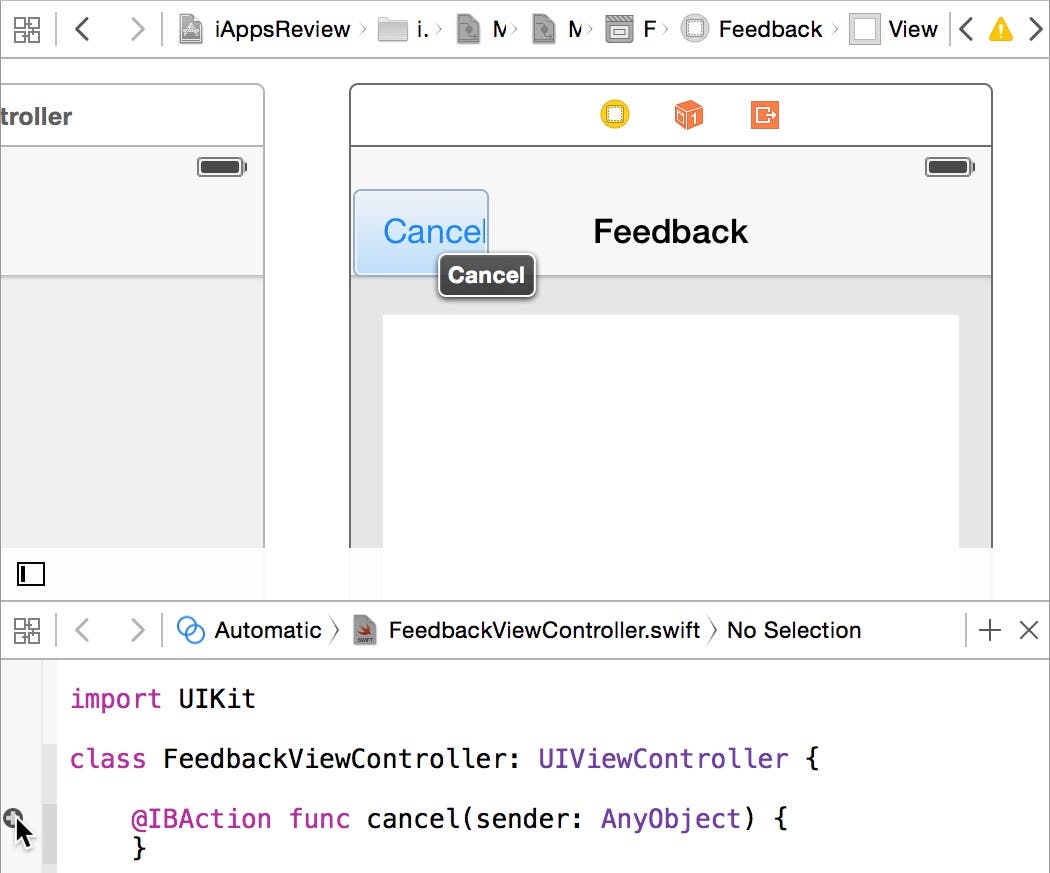 |
| Figure 23 - Hover over an action method's connection well to see the user-interface control it's connected to. |
You an also view the connection to the cancel: method in the Connection Inspector. As shown in Figure 24, you can see that the Cancel button (the object that is currently selected in the design surface) is connected to the cancel: method in the Feedback View Controller.
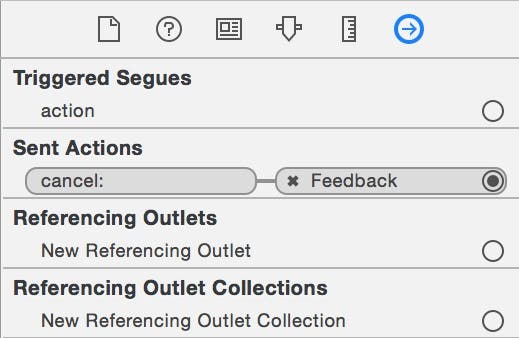 |
| Figure 24 - The Connections Inspector shows the Cancel button's connection to the cancel method. |
- You are finished with the Assistant Editor, so you can hide it by clicking the Standard Editor button on the left side of the Editor button group as shown in Figure 25.
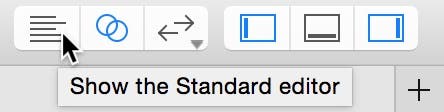 |
| Figure 25 - Select the Standard Editor button. |
- Next, in the Project Navigator, select the FeedbackViewController.swift file to display it in the Code Editor.
Let's Write Some Code!
As it stands right now, there is no code in the cancel method (between the curly braces), so if you were to run the app in the Simulator, clicking the Cancel button still wouldn't do anything. Fortunately, all you need to do is add one line of code to this method to hide the Feedback view.
- To do this, click to the right of the left curly brace on the first line of the method, and then press the return key twice. This creates an empty line where you can begin typing the code. I'm going to take you step-by-step through the mechanics of entering this code and then we'll talk about what the code does.
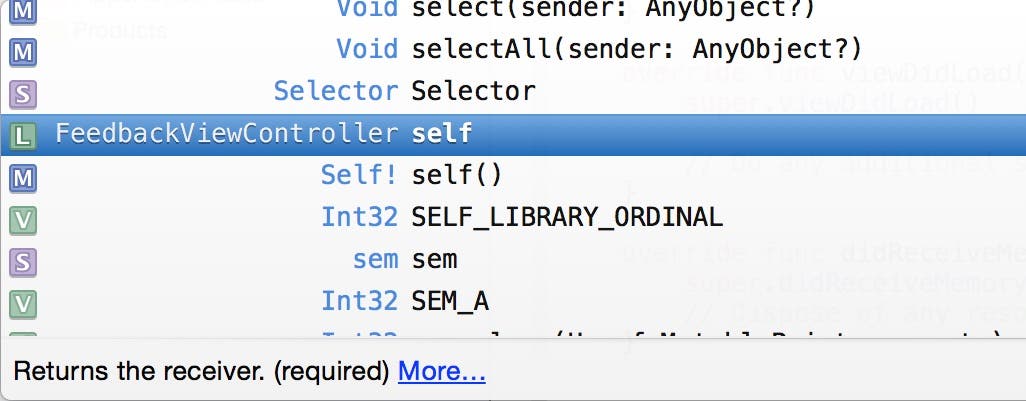
- Type a left square bracket, and then type the letters se as shown in Figure 26. As soon as you do this, Xcode displays a Code Completion popup that helps you write code. Based on the characters you type, it provides its best guess as to what you need to complete a code statement. As it turns out, Xcode guessed correctly—you were typing the word self. In this context, self refers to the class in which you are typing the code—in this case, the FeedbackViewController class. As you will learn in just a bit, our ultimate goal with this code is to call a method on the FeedbackViewController, telling it to dismiss itself. A method is a block of code that performs a particular task.
 |
| Figure 26 - Xcode's Code Completion helps you write code. |
- Press return to have Xcode automatically enter the full text of the word for you. If the Code Completion popup goes away, then just press the escape key to bring it back. When you press return, Xcode adds the letters lf to complete the word self (Figure 27).
 |
| Figure 27 - Code Completion completes the keyword self. |
- Next, hit the space bar and then type the letters dis. When you do this, the Code Completion popup appears as shown in Figure 28.
 |
| Figure 28 - Code Completion appears for the "dis" characters you typed. |
The second method displayed in the list in Figure 28, dismissViewControllerAnimated:completion:, sounds exactly like the method that we want the FeedbackViewController to execute. At the bottom of the Code Completion popup, there is a short description of the currently selected method, and there is even a More... link you can click to find out more about the method. Use your up and down arrow keys to select the dismissViewControllerAnimated:completion: method in the list.
- Press the return key to select the method. When you do this, Code Completion adds the code template shown in Figure 29.
 |
| Figure 29 - The dismissViewControllerAnimated:completion: method template |
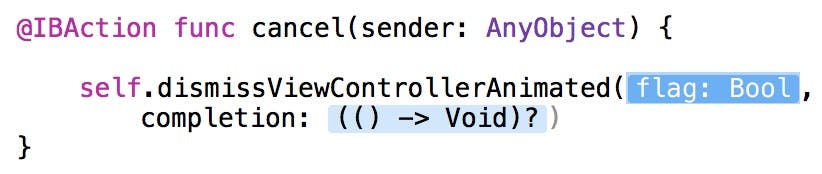
Notice the sections of code highlighted in blue—flag: Bool and (() -> Void)?. These are placeholders in which you need to enter Swift code. When you call a method on an object, you often pass additional information known as arguments to further specify the behavior you want from the method being called. These placeholders are where you enter the additional arguments.
Currently, focus is set to the flag: Bool placeholder. When you see this type of placeholder, you can type either true or false. In this case, you are specifying whether you want the FeedbackViewController dismissed with an animation (so it slides back down through the bottom of the screen), or whether you want it to simply disappear from view. We want to include the sliding animation, so type the word true for the argument value as shown in Figure 30.
 |
| Figure 30 - Type true in the flag: Bool placeholder. |
- Next, press the tab key to move to the (() -> Void)? placeholder. This placeholder provides an opportunity for you to pass code that you want to be executed after the view controller has been dismissed. In this case, we don't need to do anything afterwards, so just type the keyword nil as shown in Figure 31, which indicates you don't want to do anything afterwards.
 |
| Figure 31 - Type nil in the ^(void)completion placeholder. |
To review, this code calls references the FeedbackViewController (self) telling it to run the dismissViewControllerAnimated:completion: method. A true argument is passed indicating the view controller should be animated as it is dismissed, and a nil is passed as the completion argument, indicating no further action is necessary after the view controller is dismissed.
Watching the Magic Happen
Now you're ready to see your first line of code in action as outlined in the following steps.
- Click Xcode's Run button.
- Click the Settings & Feedback row, and when the Settings view appears, click the Provide Feedback button, which displays the Feedback view.
- Click the Cancel button, and the Feedback view should slide down through the bottom of the screen.
Congratulations! You have successfully written and executed your first Swift code!
Conclusion
If all of this seems like a lot to take in, I recommend re-reading this post until the concepts of inheritance, messages, arguments, and methods become clearer for you. You can download the completed (so far) version of iAppsReview at this link.
In my next post we will dive even further into these different concepts as we continue to write code that turns our iAppsReview prototype app into a real-world app.