Swift Programming 101: Enhance Your Apps With External Displays


How would you like to extend the surface area of your app's user interface exponentially? How would your users react if you added multiple display devices to your app, each containing different content? All of this is possible by using an iOS feature many developers are not aware of—external displays.
In this post, I'm going to show you how to use Swift along with Xcode to generate external display output that enhances the user experience. I'm not talking about simply mirroring the iOS display, but showing different content that augments what's being displayed on your iOS device. This is an extremely useful feature for every category of apps including business apps and games (imagine an external monitor showing a larger picture of an avatar's location in a world while the iOS device shows close-up detail).
To follow along with this post, download the ExternalScreenDemo sample app from this link.
iOS and External Displays
Apple provides a variety of adapters for connecting an iOS device to an external TV, project, or display. You can find out more about these adapters at this link.
By default, apps simply mirror their output to an external display. It takes a specially designed app to display other content to an external monitor. That's where you, the app developer, come in!
Running the Sample App
Let's take the ExternalScreenDemo sample app for a test run.
- Open the ExternalScreenDemo project in Xcode.
- In the Scheme control located in the upper-left corner of the Xcode window, select one of the iPhone Simulators (the app also works in the iPad simulators, but leaves you less room on your screen to view the external screen output).
- Click Xcode's Run button.
- When the app first appears in the Simulator, it displays a map, and asks permission to access your location while you use the app (Figure 1). Since this is a Simulator, and not a real iOS device, you're not really giving permission for the app to access your physical location. By default, the Simulator uses Apple headquarters at 1 Infinite Loop, Cupertino, CA as your location.
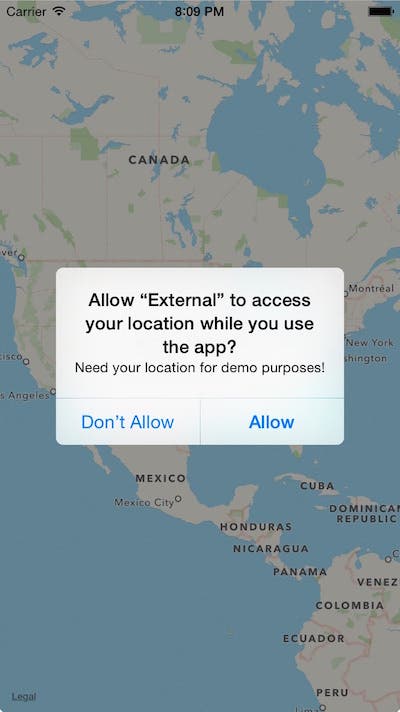 |
| Figure 1 - The sample app asks to access your location. |
- Click Allow. When you do this, the map zooms in on Apple headquarters (Figure 2).
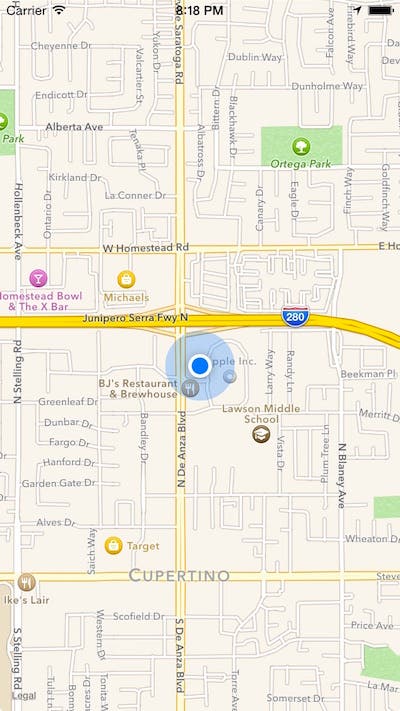 |
| Figure 2 - The map is zoomed in. |
- That's it. A very simple app. Now go back to Xcode and click the Stop button.
Adding External Video Support to the Sample App
Now you're ready to add support for external video to the sample app.
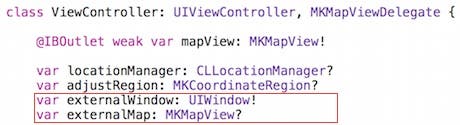
- In the Project Navigator, select the ViewController.swift code file.
- Add the following two properties to the top of the code file.
- To save you the trouble of typing many lines of code, I've added code that has been commented out to the sample project. Let's uncomment the code now and then we'll take a closer look at it afterward. First, select the following code in the viewDidLoad method by clicking and dragging from the first commented line down to the last commented line:

- With the code highlighted, press Command+/ to uncomment this block of code. Note that you will see a few compiler errors along the way until you finish uncommenting all of the code blocks.
- Next highlight the last line of code in the mapView:didUpdateUserLocation: method, and then press Command+/ to uncomment it:
![]()
- Finally, highlight the following two methods, and then press Command+/ to uncomment them:
At this point, you should be able to build the project without any errors.
- Click Xcode's Run button. When the app appears in the Simulator, it looks the same as before. Now let's turn on the simulated external screen.
- Go to the Simulator's menu and select Hardware > External Displays > 1024 x 768. This displays a large black rectangle.
- Why don't you see anything displayed in the external display? Because it wasn't available when the app first launched. We'll fix this in just a bit. For now, go back to Xcode and click the Stop button, then click the Run button again. Now you should see a zoomed-out version of the map in the simulated external display (Figure 2). For a mapping app, this is a great use of an external display. The map on the iPhone is zoomed in to show street details and the map on the external display provides is zoomed out to provide context of the user's location.
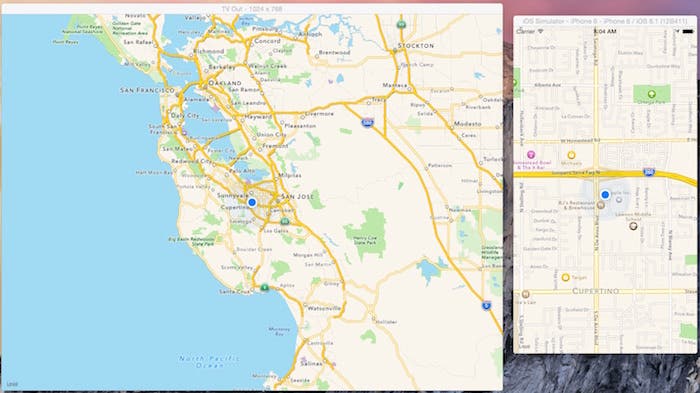 |
| Figure 2 - The external display shows a zoomed-out version of the user's location. |
Let's take a look at the code that makes this work.
Go back to Xcode and click the Stop button. Next, check out the following code in the viewDidLoad method:
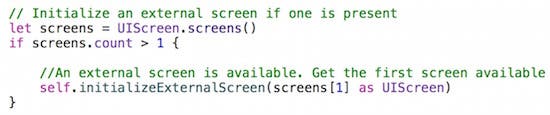
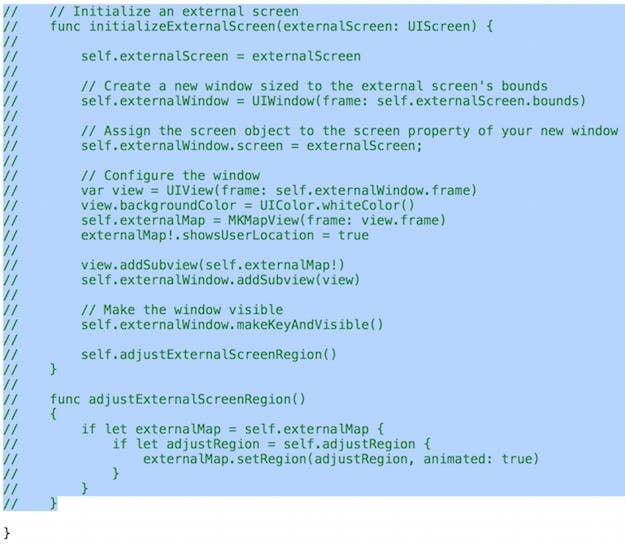
This code calls the screens method of the UIScreen class which returns an array of screens. If there is more than one screen (screens.count > 1), it indicates an external display is available. The code then calls the following initializeExternalScreen method, passing a reference to the external display:
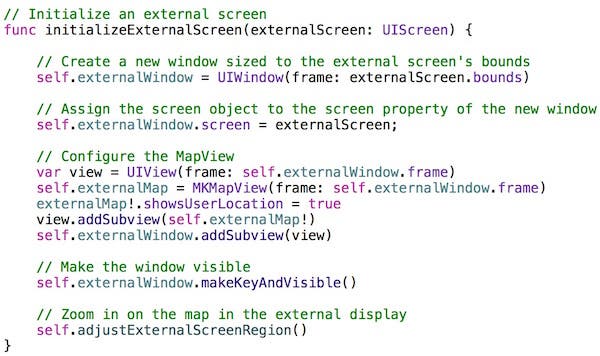
This code creates a new window the size of the external screen, then stores a reference to the external screen in the window's screen property. Next, it configures the MapView and then makes the window visible by calling its makeKeyAndVisible method.
The last line of code calls the adjustExternalScreenRegion method:

Detecting External Display Connect and Disconnect
Now you're ready to enhance the existing code to detect when an external display is connected or disconnected. This allows external displays that are connected when the app is already running to be detected and updated.
- Add the following lines of code to the viewDidLoad method:
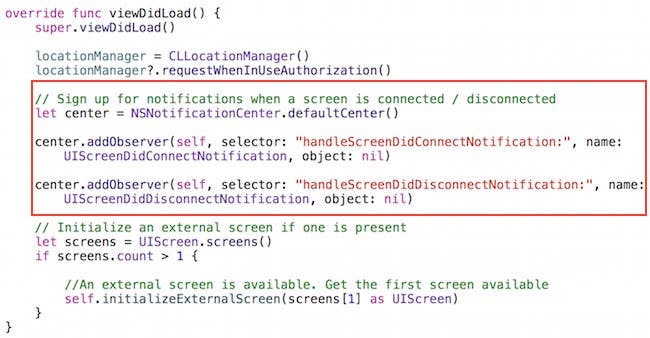
This code registers with NSNotificationCenter to be notified of the following events:
- UIScreenDidConnectNotification - Indicates an external display has been connected
- UIScreenDidDisconnectNotificiation - Indicates an external display has been disconnected
Notice the selector arguments passed to the addObserver method of NSNotificationCenter are strings:
- "handleScreenDidConnectNotification:"
- "handleScreenDidDisconnectNotification:"
These arguments tell NSNotificationCenter to call these methods when an external display is connected /disconnected. In Swift, you can pass in a string literal wherever a Cocoa Touch API expects to receive a selector, and the string is automatically converted to a selector for you.
- Now lets add these two methods before the closing curly brace of the view controller:
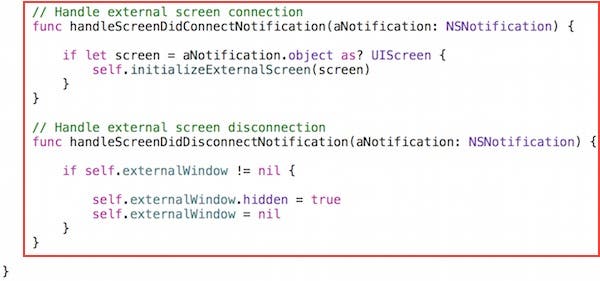
The first method calls initializeExternalScreen when a new external display is connected. The second method hides the external display and sets it to nil when it is disconnected.
Let's give it a try! We'll disable the external display, run the app, and then turn on the external display to make sure our notification code is working properly.
- Press Command+Tab to go back to the Simulator.
- In the Simulator menu, select Hardware > External Displays > Disabled. This closes the simulated external display window.
- Go back to Xcode and click the Run button to launch the app in the iPhone Simulator.
- In the Simulator menu, select Hardware > External Displays > 1024 x 768. This fires the connect notification, which executes the handleScreenDidConnectNotification method and displays the map in the external display!
- Try connecting and reconnecting the external display to see that the notifications are working properly.
In case something went wrong along the way, you can download the completed project at this link.
Conclusion
If you're interested in getting your app noticed, features such as external display can be a real boost. As you can see, the Cocoa Touch Framework makes it easy to enhance your apps using this great feature with little effort, and huge rewards.

Kevin McNeish
Kevin McNeish is author of the new book “Learn to Code in Swift” as well as the “iOS App Development for Non-Programmers” book series (www.iOSAppsForNonProgrammers.com), winner of the Publishing Innovation Award. Kevin is also an award-winning app developer, software architect, and conference speaker in the U.S. and abroad. He has spent much of his career making difficult concepts easy to understand. Follow Kevin on Twitter: @kjmcneish.
 Rhett Intriago
 Olena Kagui

 Leanne Hays
 Michael Schill

 Rachel Needell
 Amy Spitzfaden Both