Swift Programming 101: Mastering Protocols and Delegates (Part 1)


Protocols are a powerful, advanced tool that help make your apps easier to design and extend. They define standard behavior in classes that are not necessarily related. Protocols used together with delegates allow you to create classes with a well-balanced load of responsibilities.
Protocols are a powerful feature used throughout the Cocoa Touch Framework, so it's important to get a solid grasp of the subject. They are a great tool in helping create apps that are easy to extend. Protocols are equivalent to interfaces in languages such as Java and C#.
Outside the software world, a protocol is defined as:
The established code of behavior in any group, organization, or situation.
This definition isn't far off the mark when it comes to Swift's protocols. They define standard behavior that can be adopted by classes, structures, and enumerations.
There are two main ways you can add common behavior to classes in Swift—class inheritance and protocols.
The left side of Figure 1 depicts using class inheritance to define standard behavior. Subclasses inherit the behavior defined in the superclass. The right side of Figure 1 depicts using a protocol to define standard behavior. Classes that adopt the protocol are guaranteed to implement the behavior defined in the protocol. This is a great option for adding common behavior to classes not in the same inheritance chain, or for enumerations and structures, which can't be subclassed.
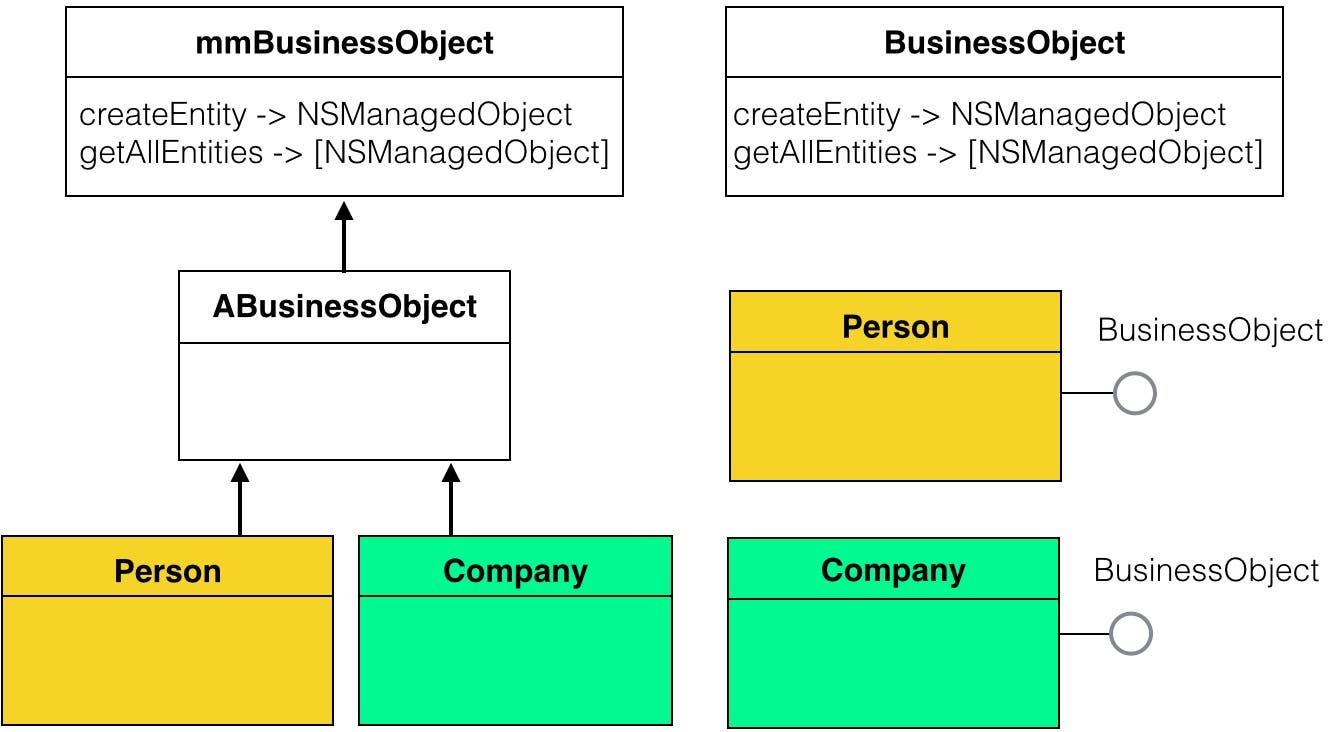 |
| Figure 1 - Adding common behavior with class inheritance and protocols. |
One of the most common uses of protocols in the Cocoa Touch Framework is related to user-interface controls. One example of this is the picker view control.
Picker views can contain single or multiple components as shown in Figure 2.
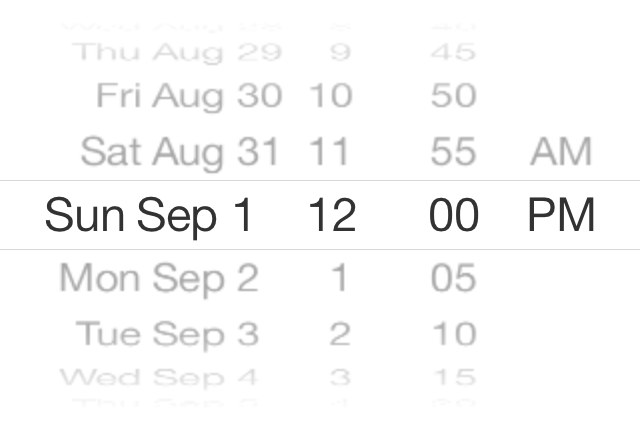 |
| Figure 2 - A picker view can have multiple components. |
The UIPickerView control works together with a data source and a delegate object to fill its rows and respond to user selection. In fact, the UIPickerView class has both a dataSource and a delegate property containing a reference to these objects (Figure 3). As a bonus, when you learn how data source and delegate objects work with picker view, you are also learning how they work with other controls such as table views and collection views.
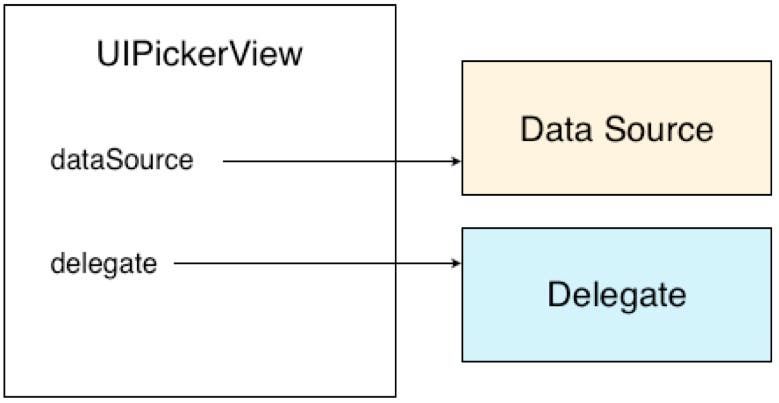 |
| Figure 3 - A UIPickerView has a data source and delegate. |
The data source object tells the picker view how many components, or columns are in the picker and how many rows are in each component.
The delegate provides help constructing each row in the picker view and responds to the user selecting an item. In object-oriented programming, a delegate is an object that performs a task for another object—which is definitely true in this case.
The beauty of the design in Figure 3 is that any object can act as the data source or the delegate. You just store the objects you want to use in the picker view's dataSource and delegate properties, and at designated times, the picker view calls specified methods on the data source and delegate object. You can even have the same object act as both the data source and the delegate. (This is actually a common practice, as you shall see in a bit.)
What methods does the picker view call on each of these objects? How can you guarantee the objects specified in the dataSource and delegate properties have the methods that the picker view needs? The answer is protocols.
The UIPickerViewDataSource protocol declares methods required by an object that wants to act as a data source for the picker view. In turn, the UIPickerViewDelegate protocol declares methods required by an object that wants to act as a delegate for the picker view. Let's take a closer look at each of these protocols.
UIPickerViewDataSource Protocol
The UIPickerViewDataSource protocol declares these methods:
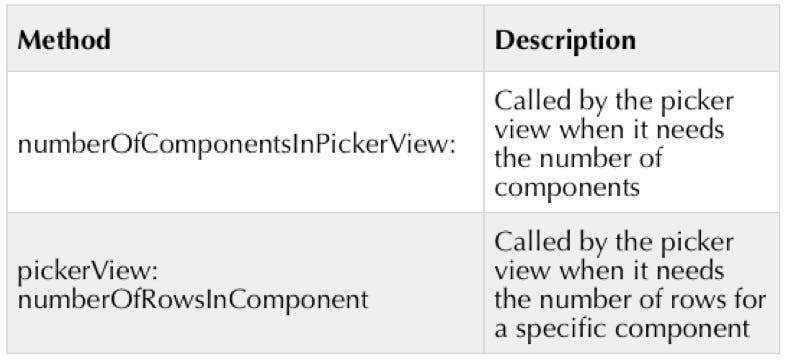
Both methods in this protocol are required, so any object that wants to act as a data source for a picker view must implement these two methods.
UIPickerViewDelegate Protocol
The UIPickerViewDelegate protocol declares these methods:
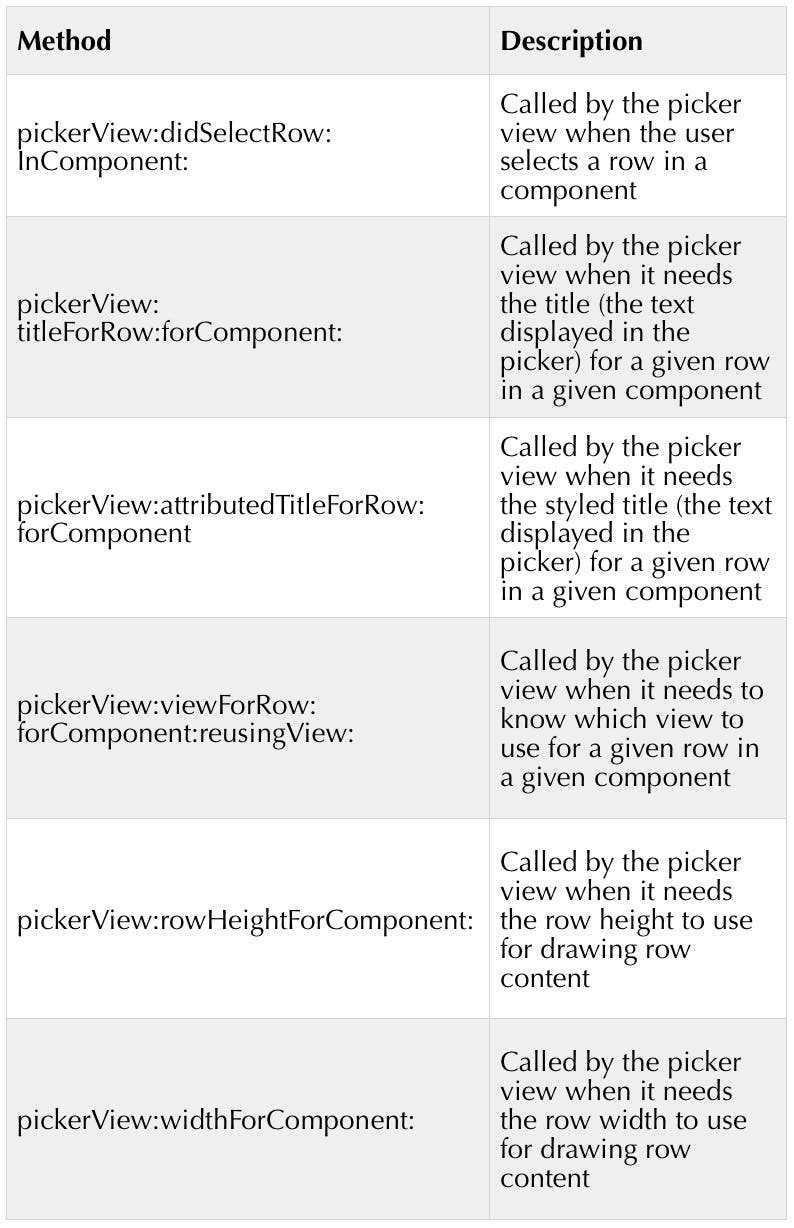
None of the methods in the UIPickerViewDelegate protocol are marked "required," but your picker view won't work well without implementing the most commonly used methods:
- pickerView:titleForRow:forComponent:
- pickerView:didSelectRow:inComponent:
pickerView:titleForRow:forComponent: returns a title for the specified row and component. The second method, pickerView:didSelectRow:inComponent:, provides a place where you can put code to respond to a user selecting an item in the picker view.
Adopting Protocols
A class adopts a protocol to indicate that it implements all the required methods and often some of the optional methods, too. Rather than a separate object acting as the data source and delegate, Figure 4 shows a common iOS convention whereby a view controller adopts both protocols for the picker view.
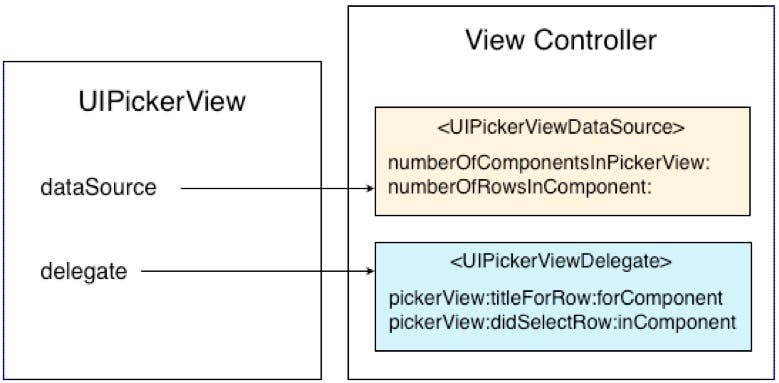 |
| Figure 4 - A view controller often implements UI control protocols. |
A class can declare that it adopts specific protocols. In the following code, the ViewController class adopts the UIPickerViewDataSource and UIPickerViewDelegate protocols:

The protocols adopted by a class are listed after the superclass declaration and separated by commas.
Protocols Step by Step
So you more fully grasp the use of protocols, let's write code from scratch that fills a picker view and responds to the selection of an item in the picker view. To follow along, download the sample code project from this link.
- Open the ProtocolDemo sample code project.
- In the Project Navigator, drill into the ProtocolDemo node and select the Main.storyboard file. You should see the scene displayed in Figure 5.
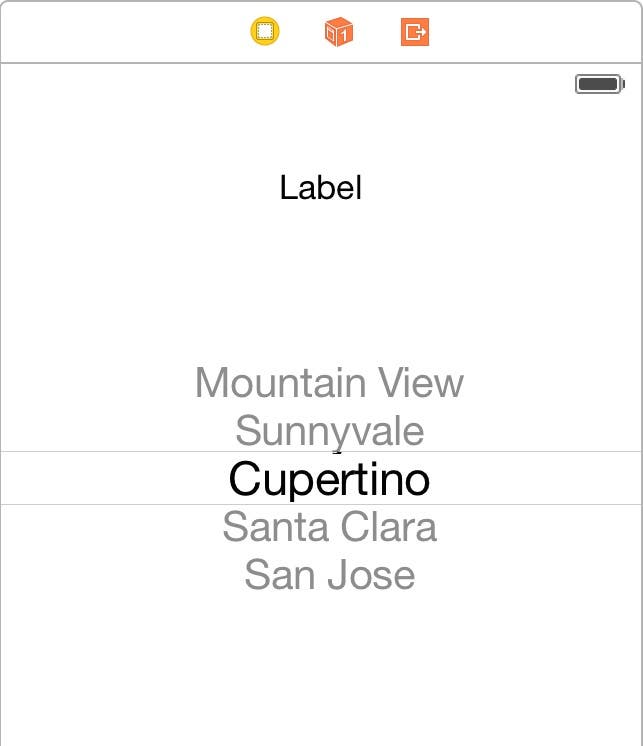 |
| Figure 5 - The picker view on a storyboard scene. |
Currently, no code in the ViewController class is associated with the picker view, although there are properties you can use to reference the picker view and label. There is also a fifaWinners array containing the last four FIFA World Cup winners, which you will use to fill the picker view.
Now you need to create a data source and delegate for the picker view. Remember, it's common for the associated view controller to act as the data source and delegate. This means it needs to adopt both the UIPickerViewDataSource and UIPickerViewDelegate protocols.
- Select the ViewController.swift code file in the Project Navigator and change the class declaration to:

When you add the protocols, you will immediately see a compiler error, Type 'ViewController' does not conform to protocol 'UIPickerViewDataSource'. This is exactly right. You have declared that the ViewController class implements the picker view protocols, but without adding the methods yet.
Let's get rid of this error by implementing the methods of the UIPickerViewDataSource protocol.
- At the top of the ViewController.swift file, directly below the declaration of the fifaWinners array, add the following methods:
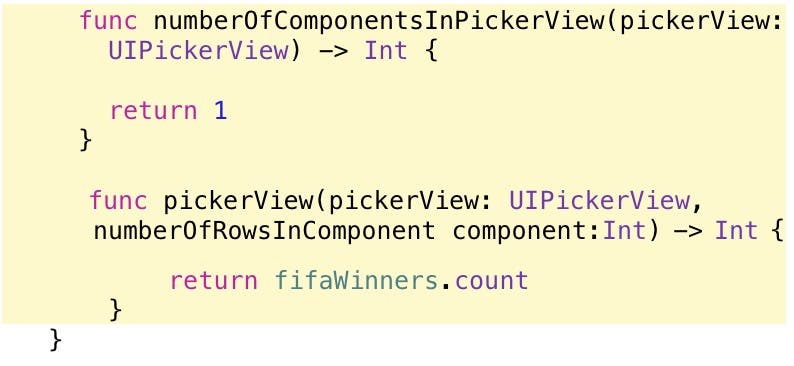
As soon as you add this code, the error disappears, even though you haven't implemented both protocols. This is because you are not required to implement the UIPickerViewDelegate methods (although you will).
The numberOfComponentsInPickerView:pickerView: method returns 1, because you only want one column, or component, in the picker view.
The pickerView:numberOfRowsInComponent: method returns the count of items in the fifaWinners array. Since only one component is in the picker view, the component parameter is ignored.
- Now let's implement the UIPickerViewDelegate protocol. In the ViewController.swift file, directly below the methods you just added, add these two new methods:
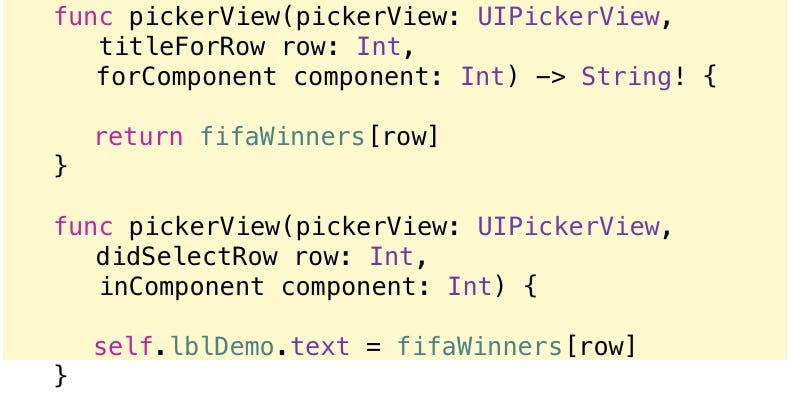
The pickerView:titleForRow:forComponent: method returns the item from the fifaWinners array using the currently selected picker view row as an index.
The pickerView:didSelectRow:inComponent: method automatically executes when a user selects an item from the picker view. It gets the text of the currently selected picker view row from the fifaWinners array and stores it into the text property of the label at the top of the view.
Now you have implemented the methods for both protocols, press the Run button to run the app in the Simulator. Oddly enough, the picker view is empty (Figure 6)!
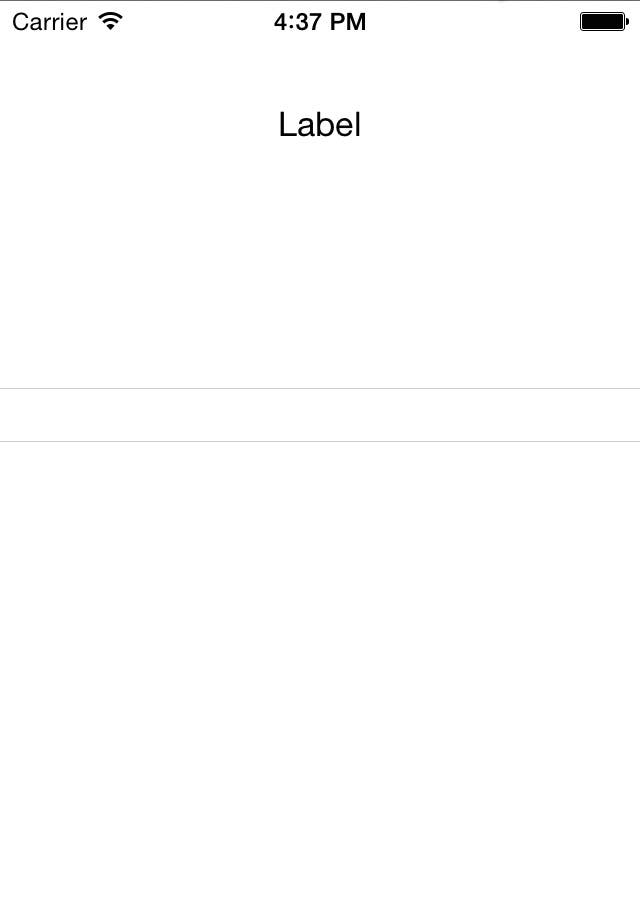 |
| Figure 6 - The picker view is empty! |
I intentionally had you "forget" to set these properties, because this is something you will often forget to do in your day-to-day app development. Now you can see what a picker view looks like at run time when its dataSource and delegate properties are not set!
- First, let's look at the dataSource and delegate properties. Go back to Xcode and click the Stop button. Select the Main.storyboard file in the Project Navigator to display the storyboard in the design surface.
- Select the picker view by clicking on it.
You can view the dataSource and delegate properties in Xcode's Connections Inspector, located in the Utilities panel on the right side of the Xcode window. If Xcode's Utilities panel is not visible, click the far-right button in the View button group at the top of the Xcode window (the Utilities panel is visible if this button is depressed as shown in Figure 7).
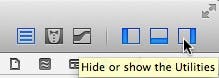 |
| Figure 7 - Show the Utilities panel. |
In the Utilities panel, view the Connections Inspector by selecting the button on the far right (Figure 8).
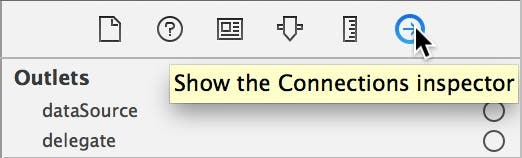 |
| Figure 8 - Show the Connections Inspector. |
The picker view's dataSource and delegate properties are at the top of the Inspector. Notice the circles to the right of the properties. These are called connection wells. When they are empty, the properties are not connected to anything. Let's connect the picker view's dataSource and delegate properties to the view controller.
- In the storyboard file, hold the control key down, and click the picker view. Still holding the control key, drag up to the View Controller icon in the scene dock (Figure 9).
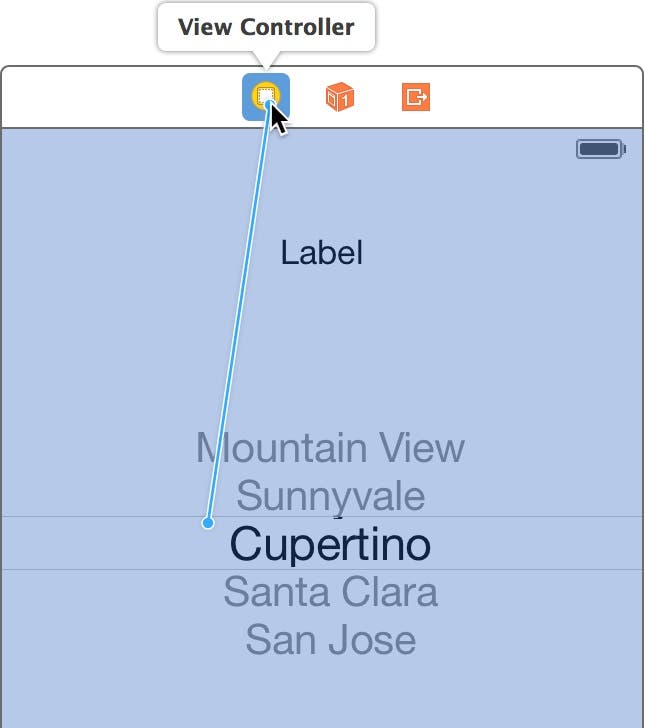 |
| Figure 9 - Control+Drag to the view controller icon. |
- When you see the View Controller popup appear, let go of the mouse button and control key and you will see the Outlets popup (Figure 10).
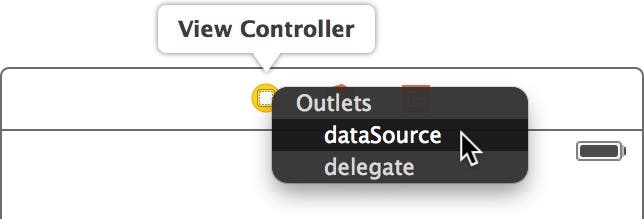 |
| Figure 10 - Select the dataSource outlet. |
- Select the dataSource outlet by clicking on it. You will see the small View Controller icon flash, indicating the connection has been made.
- Next, Control+Drag again between the picker view and the View Controller icon. Notice the small white dot to the left of the dataSource outlet, indicating that it has already been selected. This time, select the delegate outlet (Figure 11).
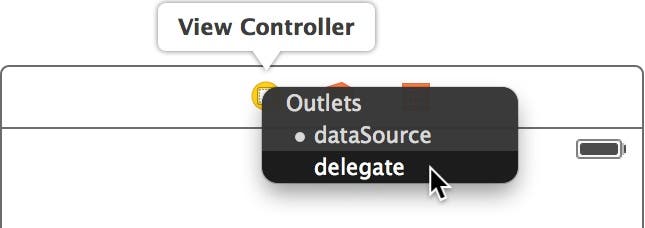 |
| Figure 11 - Select the delegate outlet. |
Now look at the Connections Inspector and you can see both the dataSource and delegate outlets are connected to the View Controller, and the connection wells are no longer empty (Figure 12).
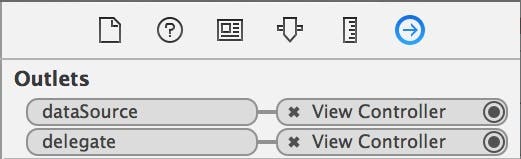 |
| Figure 12 - The dataSource and delegate outlets are connected to the view controller. |
- Let's see how these new connections work at run time. Click Xcode's Run button. When the app appears in the Simulator, you can see the picker view contains a list of FIFA teams (Figure 13).
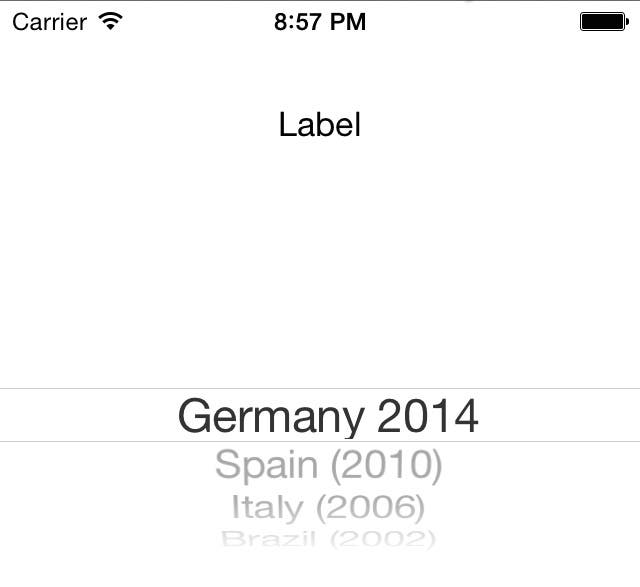 |
| Figure 13 - The FIFA teams displayed at run time |
- Select an item from the list. When you do, the pickerView:didSelectRow:inComponent: method is automatically called and the selected item is displayed in the label's text property (Figure 14).
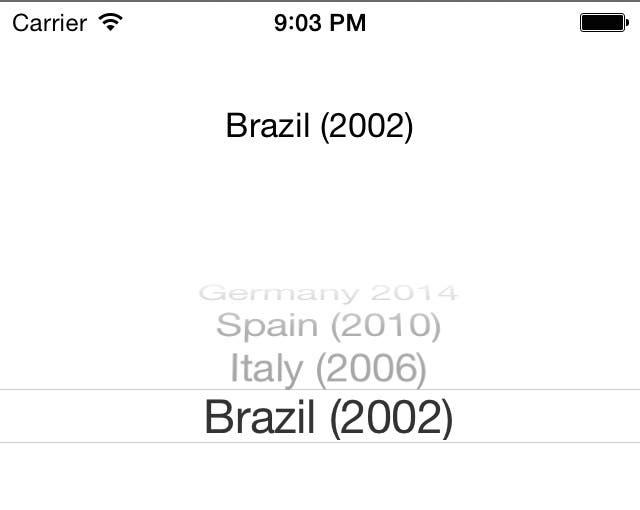 |
| Figure 14 - The selected team appears in the label. |
The pattern of using protocols in conjunction with the picker view is a common approach you will many times with different user-interface controls in iOS.
Declaring Your Own Protocols
Now that you understand the basics of how to use protocols that have been declared in the Cocoa Touch Framework, in Part 2 of this post you will learn to declare your own custom protocols and see real-world situations where they can be used in your iOS apps!

Kevin McNeish
Kevin McNeish is author of the new book “Learn to Code in Swift” as well as the “iOS App Development for Non-Programmers” book series (www.iOSAppsForNonProgrammers.com), winner of the Publishing Innovation Award. Kevin is also an award-winning app developer, software architect, and conference speaker in the U.S. and abroad. He has spent much of his career making difficult concepts easy to understand. Follow Kevin on Twitter: @kjmcneish.

 Olena Kagui

 Nicholas Naioti
 Leanne Hays
 Rhett Intriago
 Rachel Needell
 Susan Misuraca
 Kenya Smith
 August Garry
 Brian Peters