How to Reverse Image Search on Your iPhone

Leanne puts her love of troubleshooting and repair to use managing our Ask an Expert Facebook group and has authored hundreds of how-to, Apple news, and gear review articles.
Learn More Leanne puts her love of troubleshooting and repair to use managing our Ask an Expert Facebook group and has authored hundreds of how-to, Apple news, and gear review articles.
Learn MoreWhat to Know
- You can do a reverse image search on iPhone using any browser.
- To do a reverse image search on iPhone, you will need to give access to Google Lens.
- Reverse image search to find an image's original source, learn its copyright status, and track copyright violations.
There are many reasons why someone may want to perform a reverse image search on iPhone. You can discover a lot about an image when you do this, including what the image is, where it's located, the original source, other websites using it, and much more.
Note
Before you begin, make sure you know how to save or copy an image on your iPhone.
How to Reverse Image Search on iPhone Using Chrome
Although Safari is the default browser on iPhones, many users enjoy using Chrome to do their web browsing. If Chrome is your preferred app, here's how to do a reverse image search on your iPhone. For this example, we will be searching an image saved to the Photos app.
- Open the Google Chrome app.

- Go to Google.com.

- Tap the little camera in the search field. This is how you access the Google Lens. When you first use this feature, you will need to grant Chrome access to your photo library.

- You can either take a photo of something in front of you, or you can search for an image already saved to your camera roll. To take a picture of something in front of you and then search, tap the shutter button.

- To search an image already in your camera roll, tap the Library button.

- From here, you can scroll through your photos and tap the image you want to search for.

- Resize the part of the image that Google is searching for by dragging the white corners.

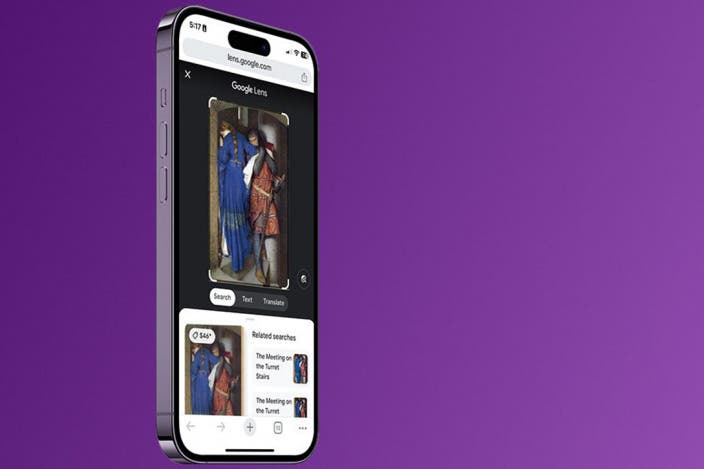
- Now, you will see Google's results matching that image. Scroll through and tap the links to find further information about your photo.

Now you know how to do a free reverse photo lookup using Google Chrome! You can also do the same thing using other browsers, but some of the steps may look a little different based on which browser you use.
How to Google Reverse Image Search Using Safari
You can do a Google reverse image search with Safari in much the same way as in Chrome. If you are using Safari to reverse image search, open images.google.com in Safari. Then:
- Open Safari.

- Go to Google.com.

- Tap the little camera button. This will automatically open the Google Lens.

- Tap the white magnifying glass icon to search with your camera.

- Resize the part of the image that Google is searching for by dragging the white corners.

- Now, you will see Google's results matching that image. Scroll through and tap the links to find further information about your photo.

- Tap the black photo icon to open your screenshots and other photos.

- Tap Allow access to allow Google Image Search to access your photo library.

- You can select Limit Access or Allow Full Access.

There you have it. Now you know how to search by image and how to reverse image search! If you enjoyed this tutorial, you might want to check out how to delete frequently visited sites on the iPhone Safari app next! For more tips like this, such as how to photo search by location on your iPhone, sign up for our free Tip of the Day newsletter.
FAQ
- Can I find food names and recipes from an image search? Yes, you can use Apple's Visual Look Up to find food names and recipes from photos.
- Can Apple Visual Intelligence also find information and links from screenshots? Yes, you can highlight areas of screenshots to look up products, text, and ask Chat GPT questions about images on screen.
- What else can Apple Intelligence do? You can use Apple Intelligence to change the tone of your writing, clean up backgrounds of your photos, and more.

Leanne Hays
Leanne Hays has over a dozen years of experience writing for online publications. As a Feature Writer for iPhone Life, she has authored hundreds of how-to, Apple news, and gear review articles, as well as a comprehensive Photos App guide. Leanne holds degrees in education and science and loves troubleshooting and repair. This combination makes her a perfect fit as manager of our Ask an Expert service, which helps iPhone Life Insiders with Apple hardware and software issues.
In off-work hours, Leanne is a mother of two, homesteader, audiobook fanatic, musician, and learning enthusiast.
 Olena Kagui
 Rhett Intriago


 Amy Spitzfaden Both

 Leanne Hays
 Rachel Needell

 August Garry