9 Hidden Ways to Use LiDAR: iPhone’s Secret Weapon

In the last 10 years, Olena has been published in dozens of publications internationally and written hundreds of how-to articles and complex guides about Apple products, software, and apps.
Learn More In the last 10 years, Olena has been published in dozens of publications internationally and written hundreds of how-to articles and complex guides about Apple products, software, and apps.
Learn MoreWhat to Know
- LiDAR sensors accurately measure distances between objects.
- Light Detection and Ranging can be used to improve low-light photography, create realistic 3D scans, and virtually try on glasses.
- The Pro models of the iPhone 12, 13, 14, and 15 have a LiDAR sensor.
LiDAR makes it possible for self-driving cars to detect their surroundings, but it also has many benefits for iPhone users. iPhones with LiDAR sensors take significantly better low-light photos and portraits. LiDAR also allows iPhones to measure distance accurately, scan 3D objects and 360° spaces, and use augmented reality apps.
What Is LiDAR?
LiDAR stands for Light Detection and Ranging and is mainly used for measuring distances via a pulsed laser. It is the same technology that helps self-driving cars detect their surroundings. Other purposes for LiDAR are to sense depth better to take improved Portrait mode photos, cinematic video, and spatial video.
LiDAR also plays a vital role in 3D scanning and augmented reality. Now that Apple has the Vision Pro, LiDAR on iPhones and iPads can be used to create content for it, such as spatial video. The LiDAR camera scanner is the black circle on the back of your iPhone. There is also a smaller black LiDAR sensor next to the front camera. So if you've ever wondered what the iPhone camera black dot is, the answer is LiDAR. To learn more about your iPhone, sign up for our free Tip of the Day newsletter.
9 Ways to Use LiDAR on iPhone & iPad
LiDAR sounds like an abstract concept, so it is best explained with some practical examples of how it actually works and benefits everyday users. Below are nine ways to use the iPhone LiDAR scanner.

1. Take Better Low-Light Photos
Low-light photography has always been a struggle for photographers even when using Night mode. The reason that Night mode has been so much better in the recent Pro-model iPhones is LiDAR's ability to detect the distance between the phone lens and your subject. This can speed up the autofocus, which improves all photographs but is especially advantageous in low-light scenarios. It can also improve the quality of portrait photos because it more accurately distinguishes between the subject and background.

2. Capture Spatial Video for Vision Pro
Whether or not you are in the market for a Vision Pro, if you have an iPhone 15 Pro or Pro Max running iOS 17.2 or later, you are able to capture spatial video. Spatial video is three-dimensional and can be viewed on mixed-reality, VR, and/or AR headsets. It uses LiDAR's sensors and lasers to determine depth. If a Vision Pro is out of your budget, you can always try spatial video out on a Meta Quest 2 or other third-party headsets.

3. See How Furniture Looks in Your Home
LiDAR has a lot of practical uses, such as making sure that furniture fits and looks good in your home. The free IKEA app and other companies will sometimes offer a 3D view of furniture in your home. This feature uses LiDAR sensors in your phone to scan the space in your room and allows you to “place” the furniture virtually. Not only can this be used to confirm that the piece of furniture physically fits, but you can also walk around to see how it looks in your room from various angles.

4. Measure Distance & Length with Accuracy
You no longer need a ruler or tape measure to determine the length of something or the distance between two objects in your home. The Measure app is a free app that comes pre-installed on your iPhone and can be used to take various measurements. It is easy to use and lets you measure between two or more points; you can see them on your display even if you move around.
It can be tricky to get the hang of at first, but as long as you position your starting point correctly, you should get a pretty accurate reading. There are third-party measurement apps out there, but I prefer this free, simple, and ad-free one already on my iPhone. Now you know how to use Measure on iPhones (and iPads)!

5. Have AI Describe What Your Camera Sees
Apps such as Seeing AI (Free) use LiDAR to better describe whatever your camera sees. It can be used to identify your friends, describe objects and scenes, count currency, etc. This app is designed for people who are blind or have impaired vision. However, it can be useful to identify objects or currency that you don't recognize or want to have described auditorily.

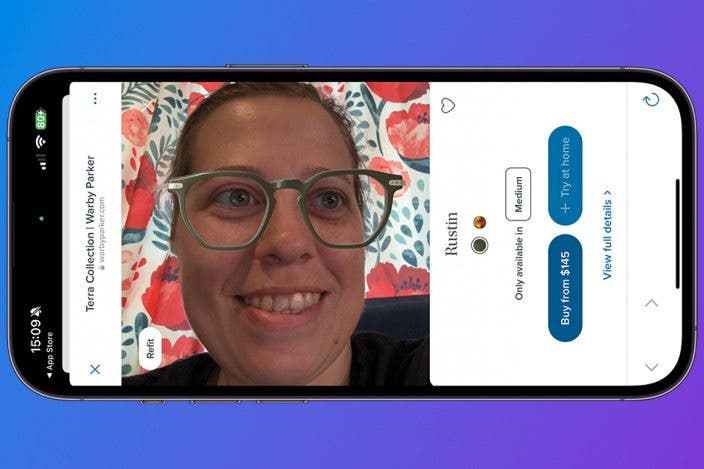
6. Try on Glasses without Leaving Your Home
There are some things that are tough to buy online, such as glasses. But companies like Warby Parker created a virtual way to try them on. Thanks to LiDAR, you can use the Warby Parker (free) to see how a pair of glasses will look on you, and then you can order directly through the app. Other companies are starting to offer virtual try-ons for glasses and other accessories.

7. Scan 3D Models of Objects
Apps such as Scaniverse (free) use LiDAR to scan the world. It is a fun way to record real-world objects and spaces and create high-quality 3D models of them. For most people, this can be a fun way to capture something in 3D instead of just taking a photo or video. The models can be compared to 3D photos on Facebook or 360-degree videos on YouTube. Gamers and 3D designers can export these scanned models to popular 3D formats such as FBX, OBJ, USDZ, and LAS. They can also be viewed in augmented reality.

8. Create a 360° Scan of Your Surroundings
Similar to scanning an object, LiDAR makes it possible to scan the area around you. Canvas: LiDAR 3D Measurements (free) is an amazing app, especially if you are an architect. It allows you to scan a space in three dimensions, and it is as easy as taking a video of your room/home. These scans can then be turned into CAD models that you can edit or be used for accurate measurements.

9. Play Augmented Reality Games
Even if phone games are not your cup of tea, I highly recommend that you try an AR game because they truly are like nothing you've experienced before. There are many to pick from, ranging from AR Robot (free), which is a simple game where robots fight on real surfaces in your home. There are also more complex games such as ARia's Legacy - AR Escape Room (free) or Alice in Wonderland AR quest (free). One of my favorites is Defend It! AR (free), which has robots breaking into your living room (through your walls). There's even Angry Birds AR: Isle of Pigs (free) that lets you play in your home, on your daily commute, or in other public areas. Just be careful and be mindful of your surroundings so that you don't get hurt or get in anyone's way.
I hope you now have a better understanding of LiDAR and enjoyed trying some of these iPhone 3D scanner apps mentioned above. It sounds like a complicated technical feature, but it mostly just enhances your iPhone or iPad's amazing photo capabilities and distance/depth measurements. Since there is nothing for you to do to turn LiDAR on and off, you don't have to worry much about it. Just keep in mind that keeping your subject close will result in the best low-light photography on compatible iPhones and iPads.
FAQ
- What does LiDAR stand for? LiDAR stands for Light Detection and Ranging. It also helps to sense depth better to take improved Portrait mode photos, cinematic video, and spatial video.
- Which iPhones have LiDAR? The Pro models of iPhone 12 and newer have LiDAR.
- How does LiDAR work? LiDAR has a laser that emits light waves that bounce off of nearby objects in order to measure distance, depth, etc.

Olena Kagui
Olena Kagui is a Feature Writer at iPhone Life. In the last 10 years, she has been published in dozens of publications internationally and won an excellence award. Since joining iPhone Life in 2020, she has written how-to articles as well as complex guides about Apple products, software, and apps. Olena grew up using Macs and exploring all the latest tech. Her Maui home is the epitome of an Apple ecosystem, full of compatible smart gear to boot. Olena’s favorite device is the Apple Watch Ultra because it can survive all her adventures and travels, and even her furbabies.
 Rhett Intriago
 Olena Kagui

 Hal Goldstein
 Susan Misuraca
 Leanne Hays
 Amy Spitzfaden Both
 Cullen Thomas
 Rachel Needell
 Nicholas Naioti