How to Back Up a Mac: 3 Easy Ways to Save Your Data & Which is Right for You
Which is better: Time Machine or iCloud? What about third-party Mac backup software? We cover the ins and outs of how to back up your Mac.

Erin has years of experience in writing, editing, research, and coaching, bringing strong communication expertise and a passion for Apple technology to iPhone Life.
Learn More Erin has years of experience in writing, editing, research, and coaching, bringing strong communication expertise and a passion for Apple technology to iPhone Life.
Learn MoreBacking up your data is crucial to prevent the loss of important files, photos, and other data on your device should something happen to it. You never know when a cup of coffee will spill or another accident will make your computer unusable. We'll show you the best ways to back up your Mac and how to use each method.
How Much Storage Space Do I Need to Back Up My Mac?
If you're using an external storage device for Time Machine or manual external Mac backups, Apple estimates that you'll need about twice as much available storage space as the capacity on your Mac.
If you're not backing up all of your data, you could certainly get away with a little less, but it's still better to err on the side of caution and get more storage where possible.
If you're using iCloud for backups, you'll need to make sure you have enough storage for everything you want to sync, plus as much extra as you think you'll need for more files, photos, and other items you want to store. If you need more, an Apple One bundle may help you save money on your storage and other subscriptions if you subscribe to multiple Apple services. Otherwise, you can always just add more iCloud storage with an iCloud-only plan.
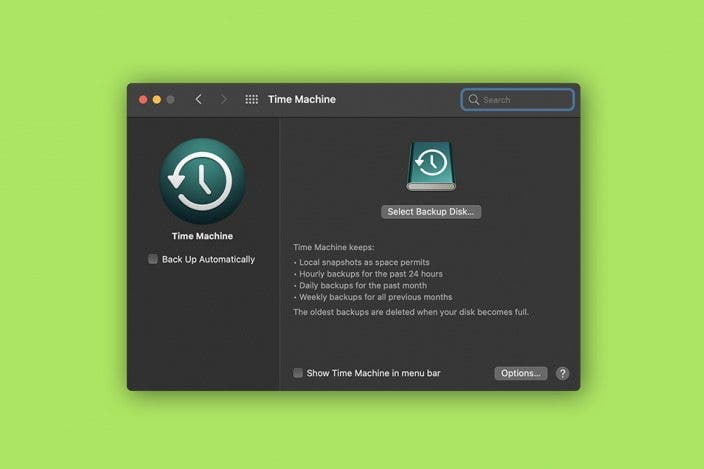
What Is Time Machine Backup for Macs?
Time Machine is an Apple feature that comes pre-installed on your Mac. It's simple to use and can back up your Mac automatically, including files, photos, email, apps, music, and more. The benefit of this method is that it's extremely simple and requires almost no knowledge of the inner workings of your computer. It's essentially as easy as plug and play once initial setup is complete.
Time Machine backs up your data at regular intervals: every hour of the last 24, every day of the last month, and every week of every month before that. When your external storage is full, the older backups will be deleted to make room for the newer ones. Because of its simplicity and how extensive the backups are, this may be the best way to back up your MacBook or Mac.
The major drawback to this method is that you have to have an external hard drive that's large enough to hold all of your Mac backups, and it has to remain connected for as long as you want automatic backups to continually occur, or you'll need to disconnect and reconnect it on a regular schedule. If you're thinking of buying an external hard drive for this purpose, it's best to consult Apple's list of compatible external hard drives before doing so.
Time Machine vs. iCloud: Which Is Better?
This is choice you'll want to make based on a variety of factors. Here's a simple way to visualize it, and below we'll go into a bit more detail on the comparison.
| iCloud | Time Machine | |
|---|---|---|
| Hardware | No external drive needed. | External drive required. |
| Storage Space | Enough to back up the data you select from all of your devices, plus a little extra. | Apple recommends about 2x as much as your Mac. |
| Ease of Use | Automatic, simple to enable, disable, and customize | Can be automatic, but the drive would need to remain connected. Simple to set up, use, and customize. |
| Cost | More affordable in the short term, but could be more expensive in the long run. 5 GB free, additional storage for a low monthly fee. | Depends on the cost of your external hard drive, but less affordable up front than iCloud. No ongoing fee for the service, but you will need to factor in the cost of replacing the drive if that becomes necessary with age. |
| Previous Data Versions | Keeps things current, so you don't have access to previous versions of documents and other data | Backs up previous versions, so if you need to restore an older version of a document you can. |
Benefits & Drawbacks of Time Machine Backups
The primary drawbacks to Time Machine are that it requires an external drive, which can be an expensive up-front cost, and it is a physical storage device. If something happens to your drive (lost, stolen, hurricane, tidal wave, whatever), your data will be damaged or lost along with it. If you want Time Machine to run automatic backups on a preprogrammed schedule, you'll have to leave it plugged in to your computer, which puts it at the same risk of environmental danger as your computer.
One big benefit of Time Machine, though, is that it will back up everything, including things like your Mac settings and other data that isn't included in iCloud backups. If your computer was completely destroyed, you could use Time Machine to restore your data onto a new computer, whereas with iCloud you'd only have access to the data that's synced to the cloud.
Additionally, the fact that Time Machine also backs up the files you are syncing to iCloud means that if you accidentally delete something from iCloud, you can get it back via your Time Machine backup. That is, unless you enable Optimize Mac Storage in your iCloud backup settings, in which case certain files may be saved only to iCloud and not on your local drive, so Time Machine wouldn't be able to back them up, since it mirrors what's on your local drive.
Benefits & Drawbacks of iCloud Backups
The best thing about iCloud is that it keeps your selected data synced across all of your devices. This means that if something temporary happens to your computer and you simply need quick access to a file, you can do that on your iPhone or iPad without having to find another computer to plug your external hard drive into just to see your Time Machine backup data.
The problem is, iCloud will only save the most current version of synced data, so you won't be able to access previous versions or recover deleted files once iCloud has synced those changes. Also, as mentioned above, iCloud is also not a solution that will back up all of your data. If something happened to your computer, iCloud will help you recover files that you opted to sync to the cloud, but not local Mac data that wasn't part of your iCloud backup.
You can see why the choice between Time Machine and iCloud is a tough one. Many people actually opt to do both, though, and if you already have a hard drive and don't mind paying a buck or two each month for extra iCloud storage, it's really not a bad idea. The benefits of each are unique enough that they can both serve a purpose.
How to Use Time Machine to Back Up a Mac
For best results, make sure your Mac is connected to power before beginning the process of performing backups.
- Plug in your external hard drive.
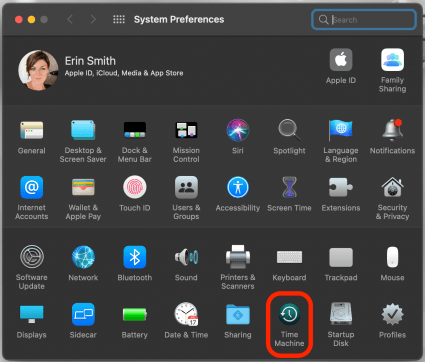
- Click the Time Machine icon on the menu bar.

- If you don't see it, open System Preferences.

- Now click Time Machine.
- Click Select Backup Disk.

- Select your external drive.

- If you want to encrypt your backups, check the box next to Encrypt backups.
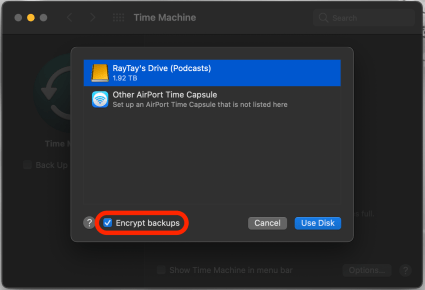
- Click Use Disk.

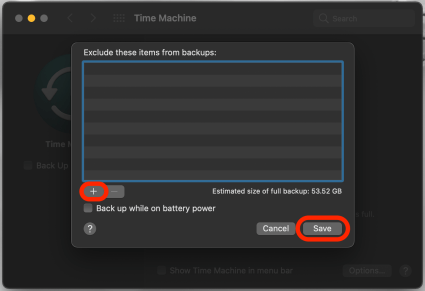
- Now you can click Options to select which items you want to exclude from backup, if any.
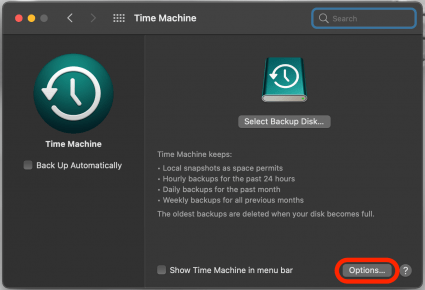
- Click the plus icon and select the files you want to exclude.
- Click Save when finished.
- While you're in the Time Machine preferences menu, you can check or uncheck the box next to Show Time Machine in menu bar according to your preference.
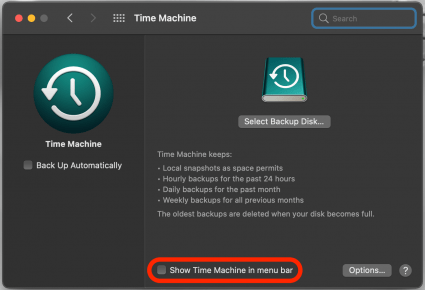
- You can also check or uncheck the box next to Back Up Automatically to enable or disable that setting.

If you decide to also perform a manual backup using this method, you can click on Time Machine in the menu bar and select Back Up Now.
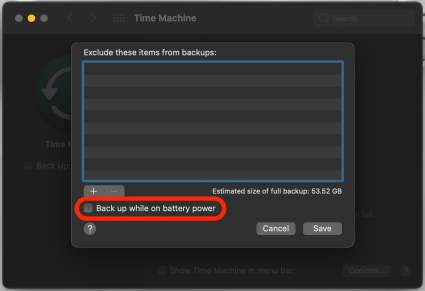
Within the Options menu you can also elect to continue backups even when your computer is on battery power, but this process uses quite a bit of battery, so it's not recommended unless it's necessary, or if you know you won't stay disconnected from power for long.
So how long does a Time Machine backup take? Well it varies based on how much data is being backed up, but the first backup will almost always take the longest. You can continue using your computer while you back it up, though. It just may run a little more slowly than you're used to.
Back Up a Mac to iCloud
If you have access to enough space on iCloud to back up your Mac, this is a great option. Many users prefer this because it doesn't require an external hard drive, and it allows access to your Mac's files from other Macs, your iPhone, or an iPad if needed.
The primary drawback here is that Mac backups often require quite a lot of storage space, so if you don't already pay for additional iCloud storage, you may need to do so. Many users opt for an Apple One bundle to save money on their subscriptions (including iCloud storage), so this may be a good choice if you're thinking of using this method. On the other hand, if you're like me and you don't have much that you need to back up, you may be able to simply use the iCloud storage space you already have access to!
How much storage is free with iCloud? Well when you sign up, you get 5 GB of storage for free. Beyond that, you'll need to sign up for a plan that includes the extra amount you believe you'll need.
Here's how to back up a Mac to iCloud:
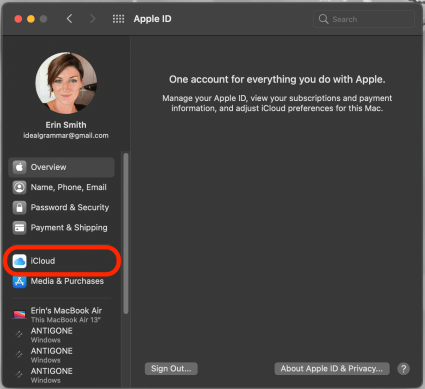
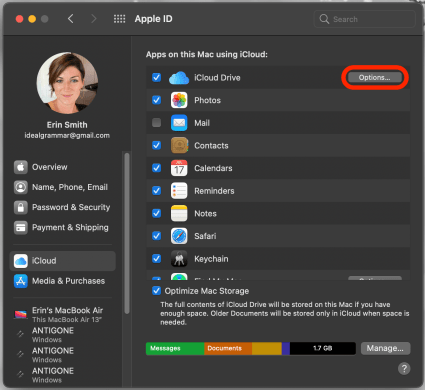
- Open System Preferences on your Mac.
- Click on Apple ID.

- Click on iCloud.
- Check the box next to iCloud Drive by clicking on it if it's not already checked.
- Click on Options next to iCloud.
- Select all file types you want to back up to iCloud by clicking the boxes next to them.
- Click Done.
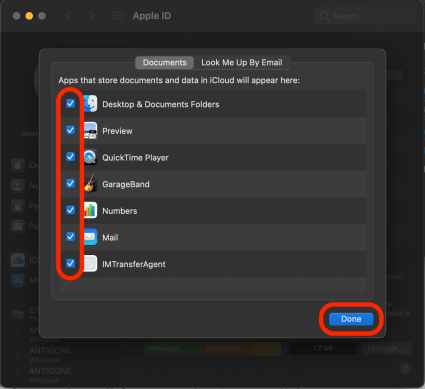
- You can now close out of the window.
Now when you open Finder you'll see the iCloud Drive folder on the left. You can go into this folder as needed to move documents in and out, and to make sure you have backups for any files you're concerned about. For more tips on backing up your Mac to iCloud, read this.
Related: How to Back Up Your iPhone to Your Computer
Use a Third-Party Mac Backup Software
Many developers provide software, some free and some paid, that can allow users to back up their Macs. Some of these services get better reviews than others, so it's best to read reviews for ease of use and ongoing access to files. Another consideration with third-party providers is that you'll need to ensure that your Mac and its current software are both supported on the Mac backup service you're interested in.
Other Mac Backup Alternatives
If you're interested in backing up only certain files or file types, that process may be simpler. For example, if you're looking to back up only your music or your photos, you may be able to do so with a flash drive and simply use Finder to drag files onto the drive. This process can be painstaking, but it works!
Users who want cloud-based access to their music can also consider subscribing to Apple Music, which would give them access to their iCloud Music Library from compatible Apple devices.
Another solution is to use something like Dropbox or Google Drive, where you can copy your documents to a private (or shared with friends and family) web-based storage location.
We hope this article has shown you how to back up your Mac in a way that will benefit you and your lifestyle most.

Erin MacPherson
Erin is a Web Editor for iPhone Life and has been a writer, editor, and researcher for many years. She has a degree in communication with an emphasis on psychology and communication, and has spent many of her professional years as a coach in various business and specialty fields. Erin officially joined the ranks of iPhone and Apple users everywhere around nine years ago, and has since enjoyed the unique and customized feel of Apple technology and its many gadgets. When she’s not working, Erin and her son enjoy outdoor adventures, camping, and spending time with their eclectic collection of pets.

 David Averbach
 Olena Kagui
 Amy Spitzfaden Both
 Leanne Hays
 Rachel Needell


 Susan Misuraca
 Rhett Intriago


 Linda Ruth