How to Back Up iPhone to Computer—2 Easy Ways

Jim Karpen has been writing about technology since 1994 and brings decades of experience with Apple products, along with a Ph.D. in literature and writing.
Learn More Jim Karpen has been writing about technology since 1994 and brings decades of experience with Apple products, along with a Ph.D. in literature and writing.
Learn MoreWhat to Know
- You can back up your iPhone to your Mac using Finder or to your PC using iTunes.
- Connect to your computer using a cable, then open Finder on a Mac or iTunes on a PC.
- Select your iPhone, view your backup options, and get started.
Apple recommends having both an iCloud backup and a local backup, and we agree! Backing up your iPhone is incredibly easy, and having both makes it more convenient and more secure. Here’s how to back up your iPhone to your computer.
How to Back Up iPhone & iPad to Your Computer
A local backup, kept on your computer, is available when you don't have an internet connection, but could be lost if you lose or damage your computer. If you are backing up temporarily to prepare your iPhone for trade in or to sell it, this is a great option. For comparison, an iCloud backup is kept in the cloud where it is safe from hard drive failures or lightning strikes, but where you need an internet connection to access it. By contrast, you don’t need an internet connection to back up your iPhone to your computer. You just need your charging cable, your computer, enough storage space, and a little time.
How to Back Up iPhone to Mac
If you have a Mac, you can easily create a local backup of your iPhone or iPad. You can even encrypt the backup so that no one can access the data without a password. For more on keeping your data secure, be sure to sign up for our free Tip of the Day newsletter. So, how do you back up your iPhone to a Mac?
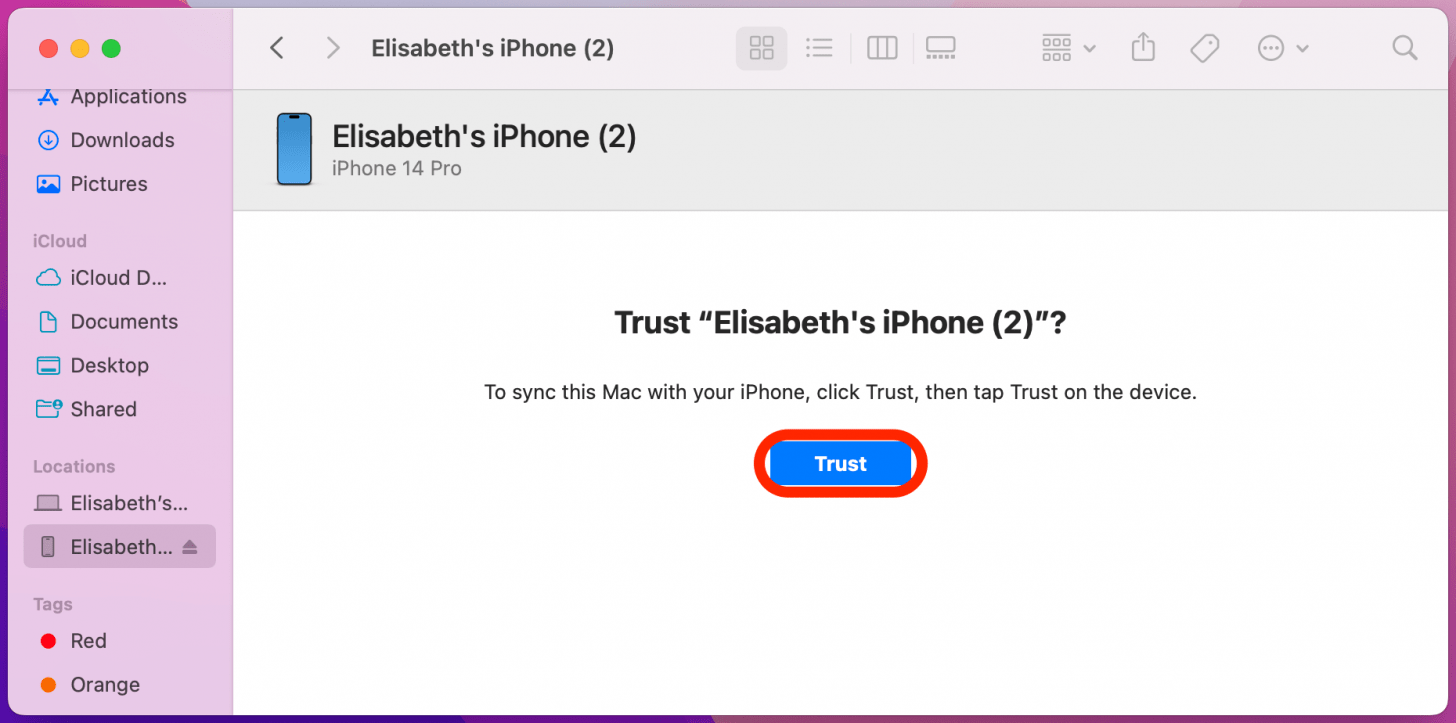
- Connect your iPhone to your computer using the charging cable and click Allow to allow access. You will also need to unlock your iPhone and tap Trust when prompted. You can connect via Wi-Fi if you have connected with a USB cable before and established it as a trustworthy connection.

- Open a Finder window, and under Locations in your sidebar, click on your iPhone.

- Click Trust.
- If you have previously backed up a different iPhone to your computer, but not the iPhone you are currently using, you may see a special screen welcoming you to your new iPhone. Select Set up as new device and then click Continue. If you don't see this screen, skip to step six.
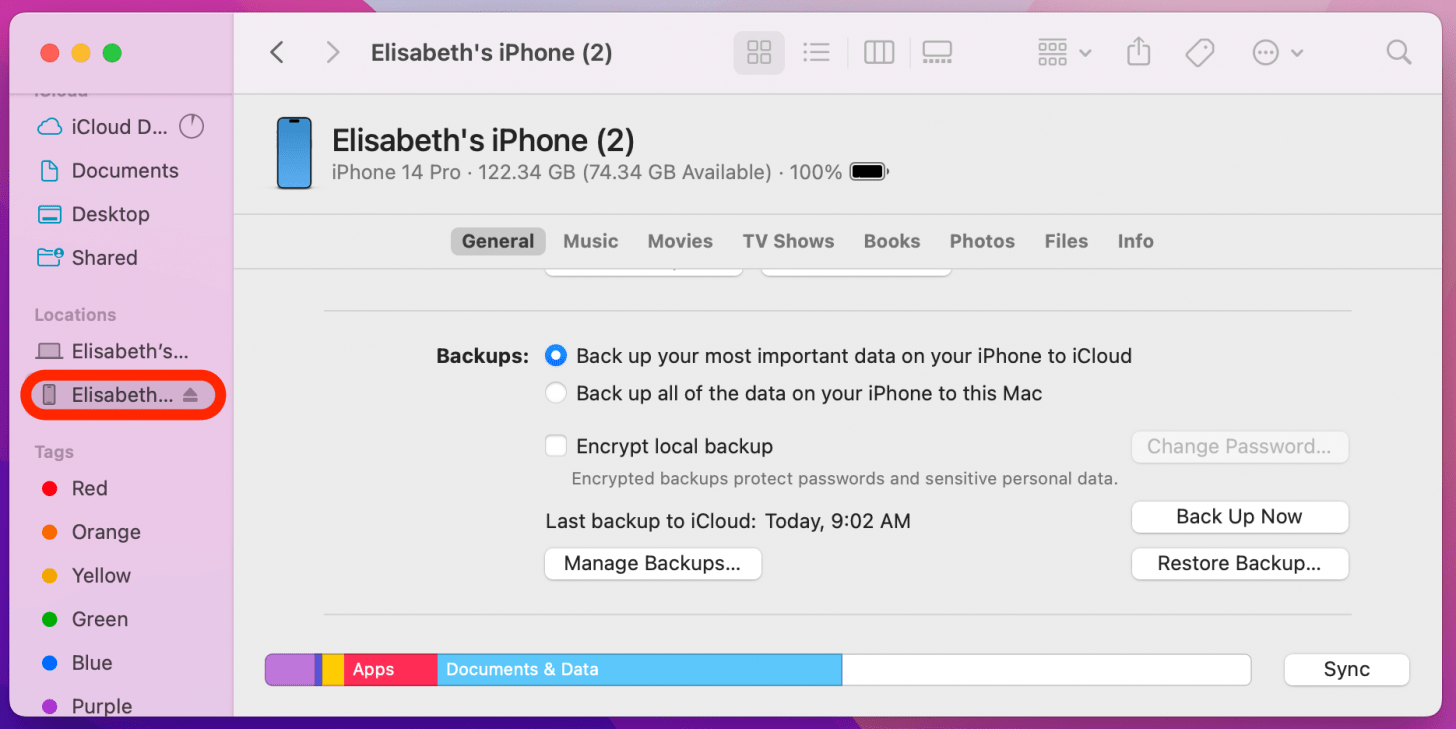
- Make sure you are on the General tab.
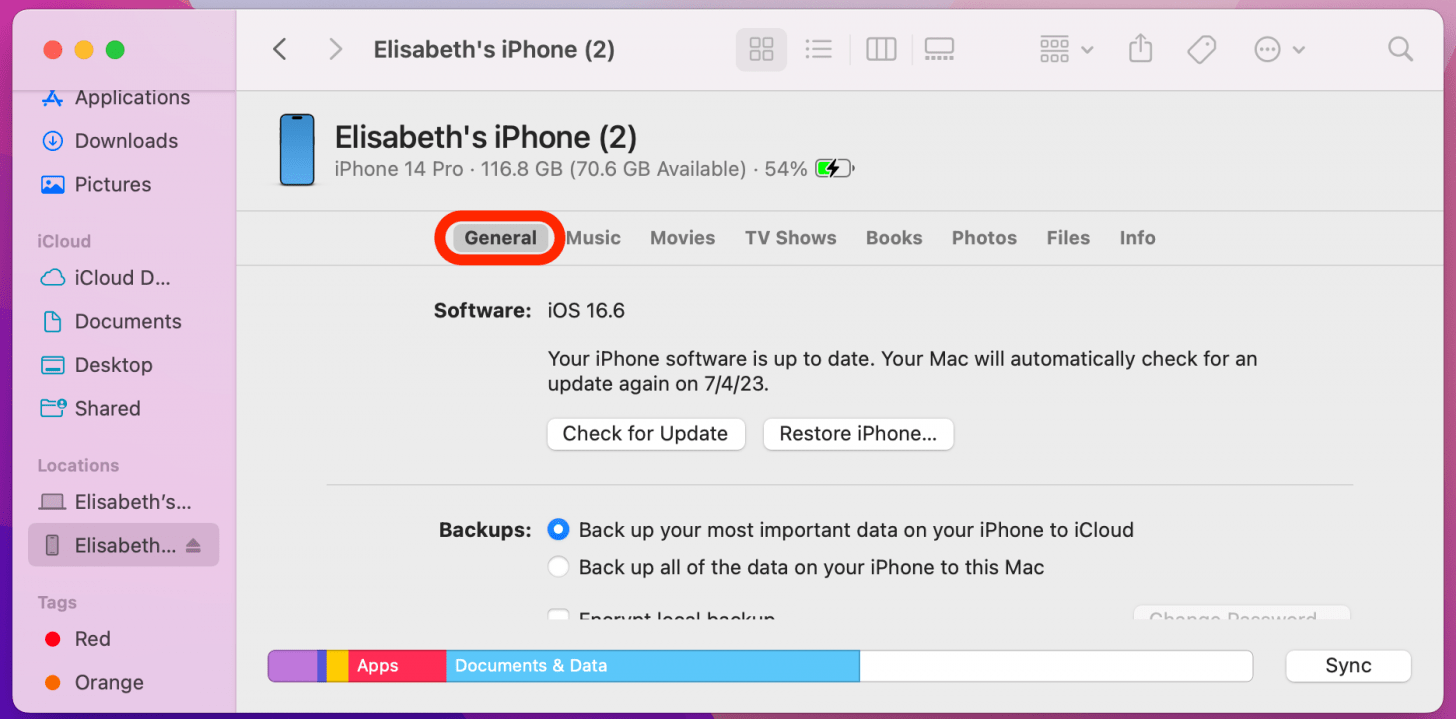
- In the Backups section, you will see two options: Back up your most important data on your iPhone to iCloud, and Back up all of the data on your iPhone to this Mac. This changes the automatic backup procedure:
- The iCloud option automatically backs up your data at regular intervals to the iCloud, using your iPhone's internet connection. It's pretty much hands-off, usually working when you're asleep.
- The Mac option will automatically begin a backup of your iPhone whenever it is connected to the Mac computer.
- Selecting the Mac option disables the iCloud option, and vice versa. You can do it either way; but if you aren't sure, I'd recommend keeping it set to the iCloud option. You don't need to change this setting to do a manual local backup. For that, keep following this guide.

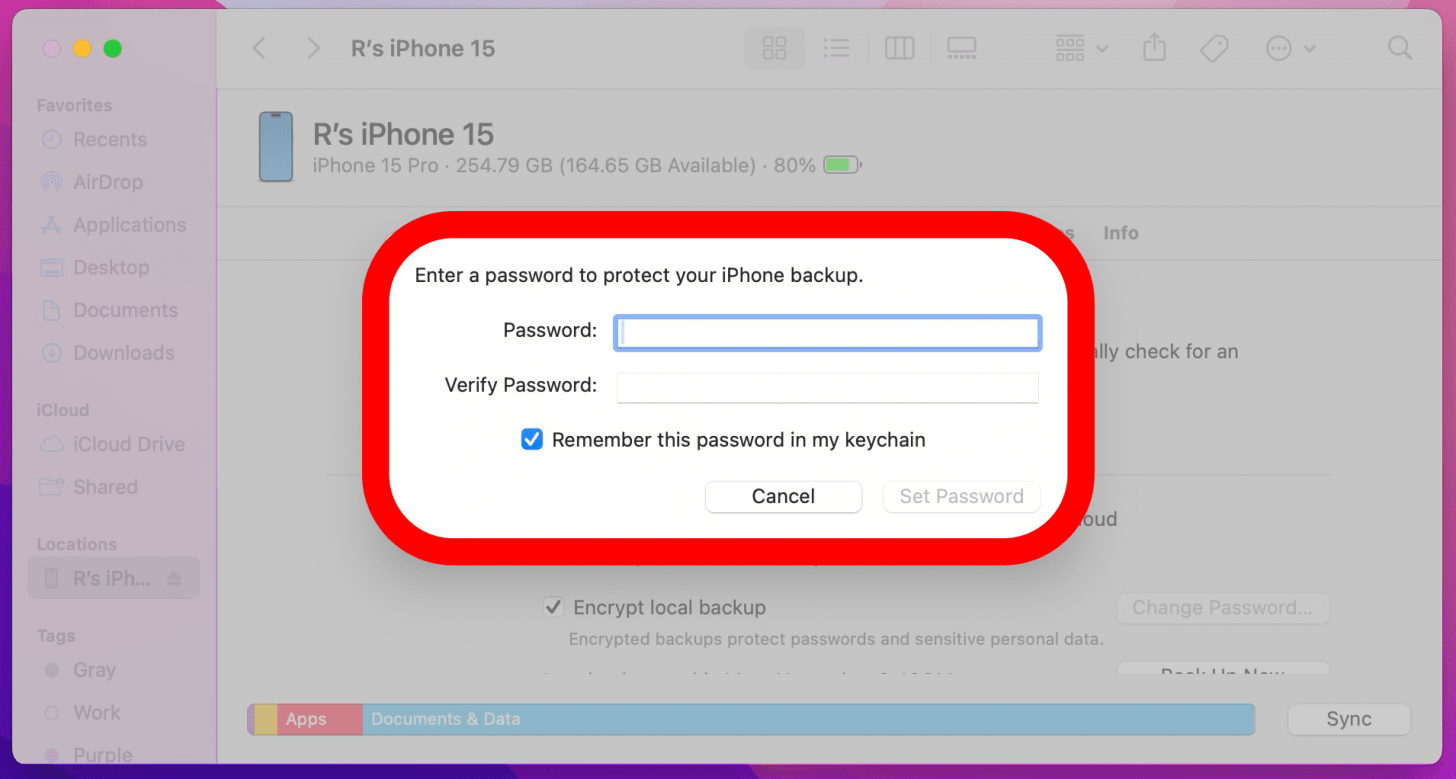
- Your iPhone backup will not include Health and Activity data unless you check Encrypt local backup. If you do, then a popup will immediately ask you to set a password for your backup. Be sure to set one you can remember, because there is no way to recover a lost password for one of your iPhone backups. If you don't need or want to include your Health and Activity data, then you can skip this step, and create a local backup that is not encrypted.
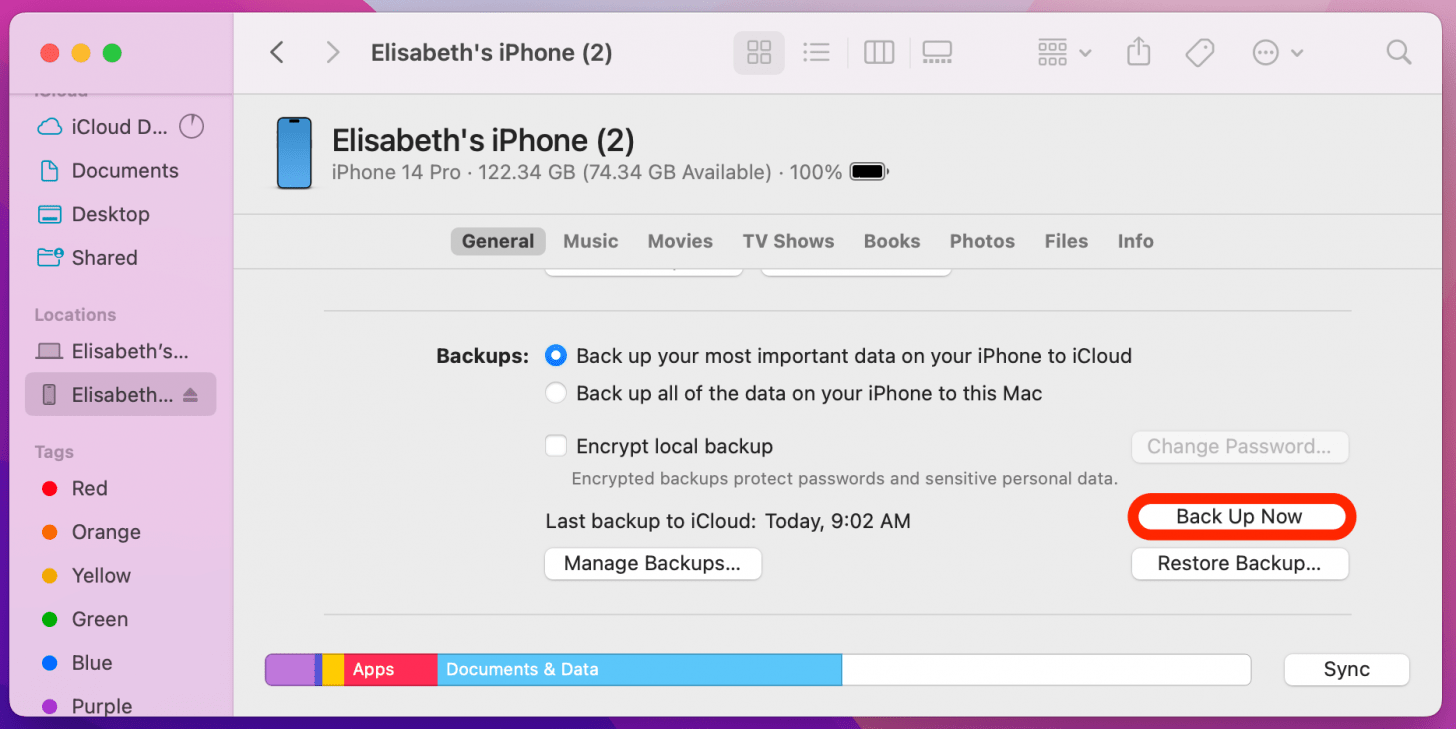
- Click Back Up Now to initiate a manual, local backup of your iPhone to your Mac. This will not interfere with your automatic backup settings or change them.
- Watch the status indicator next to your iPhone in the sidebar. Don't unplug your iPhone until the process is complete!
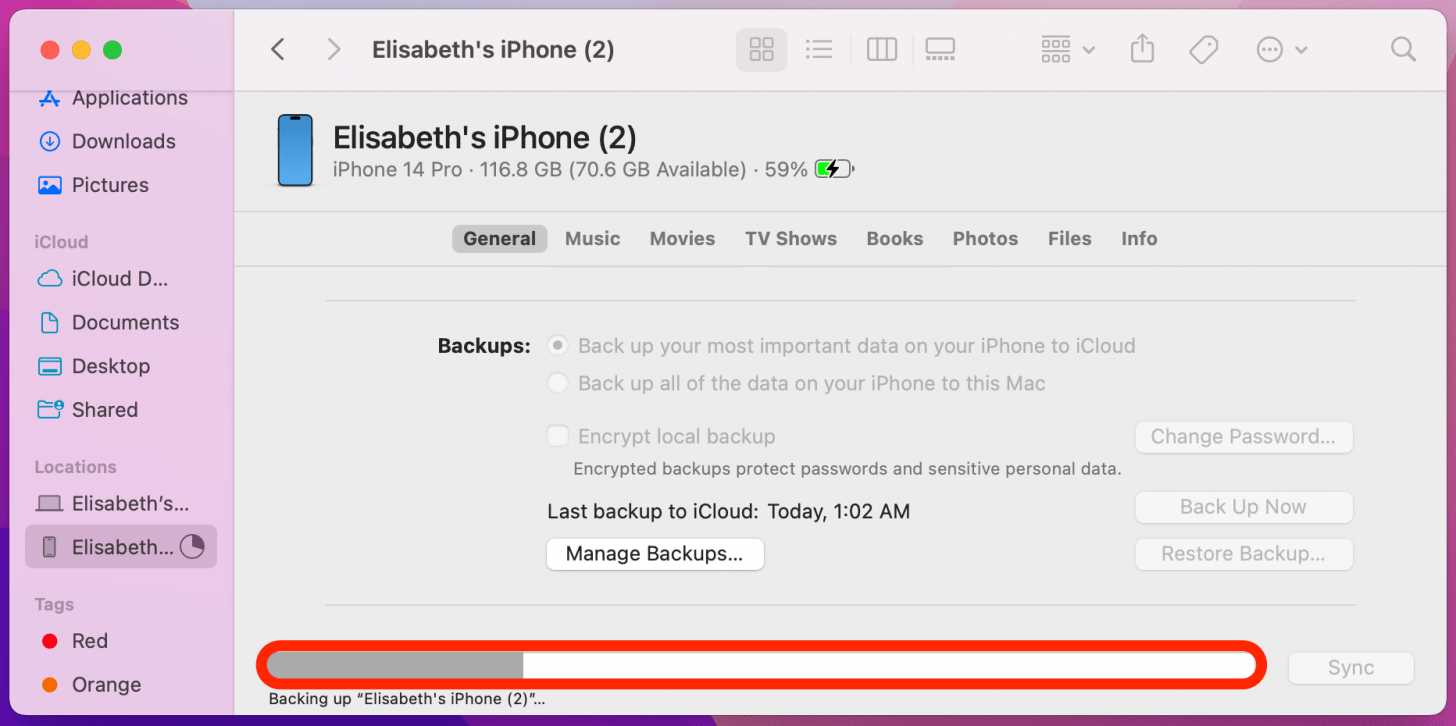
- When the status indicator finishes, you'll see that you can safely eject your iPhone. You're finished!
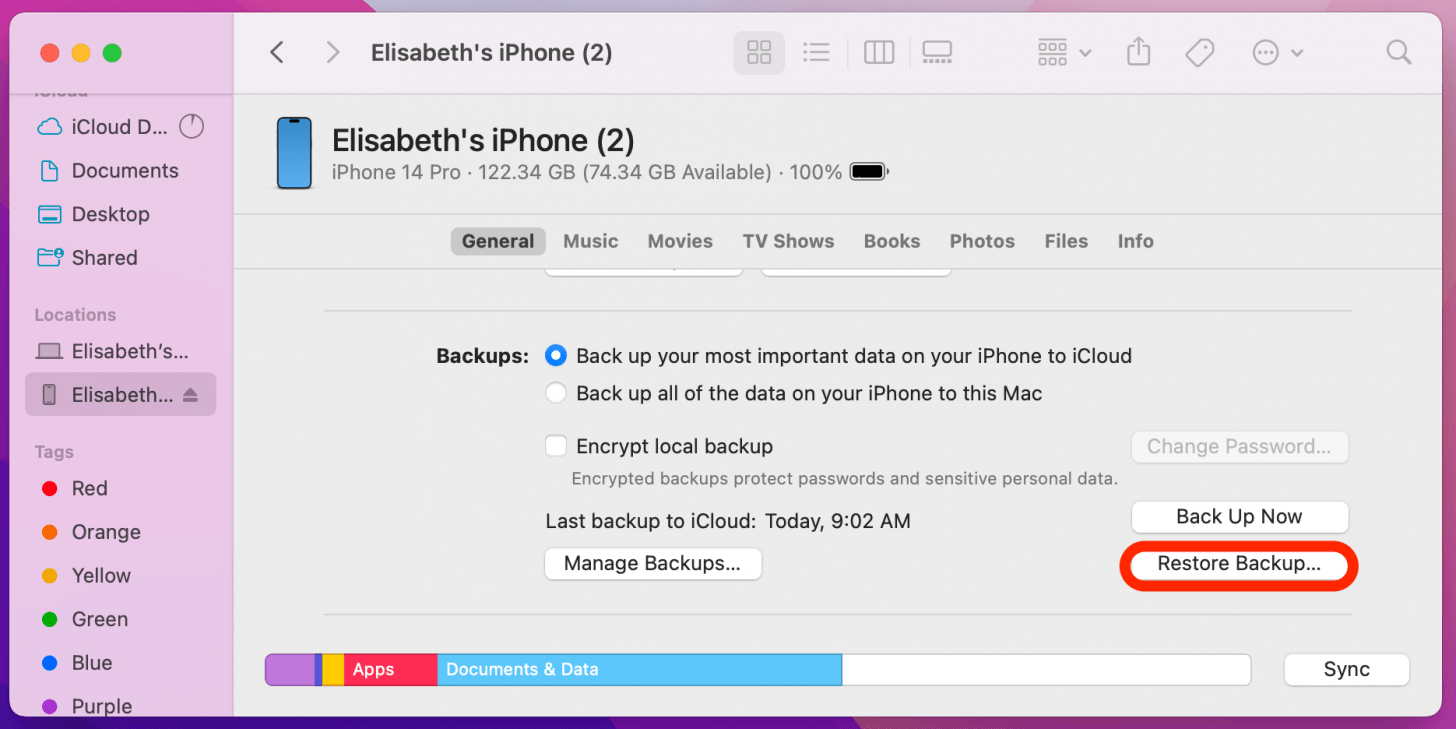
- When you need to restore your iPhone from a local backup, simply click the Restore Backup button on this screen.
How to Back Up Your iPhone to a PC using iTunes
To back up your iPhone or iPad to your Windows PC, you first need to have the iTunes software installed. You can download iTunes from the Microsoft Store. Here's how to backup an iPhone with iTunes:
- Open iTunes on your PC and connect your iPhone to your computer using the charging cord. You will also need to unlock your iPhone and tap Trust when prompted.
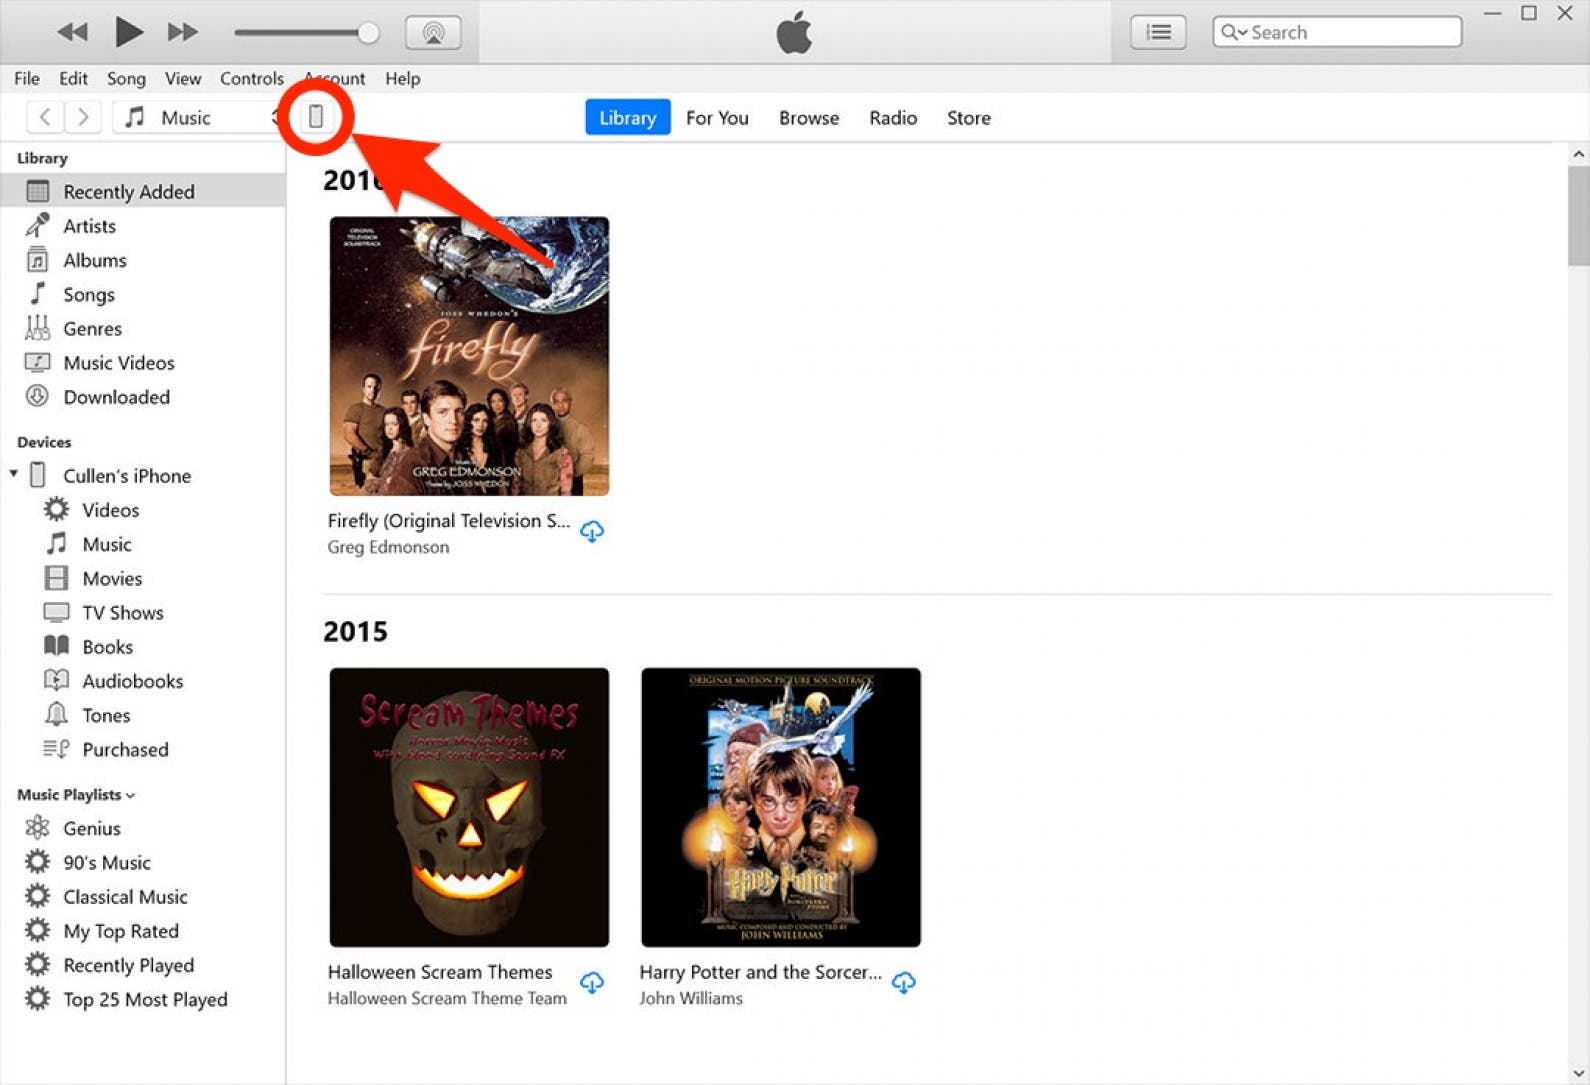
- In iTunes, locate the tiny icon for your iPhone or iPad, found in the upper left section of iTunes. Click the icon.
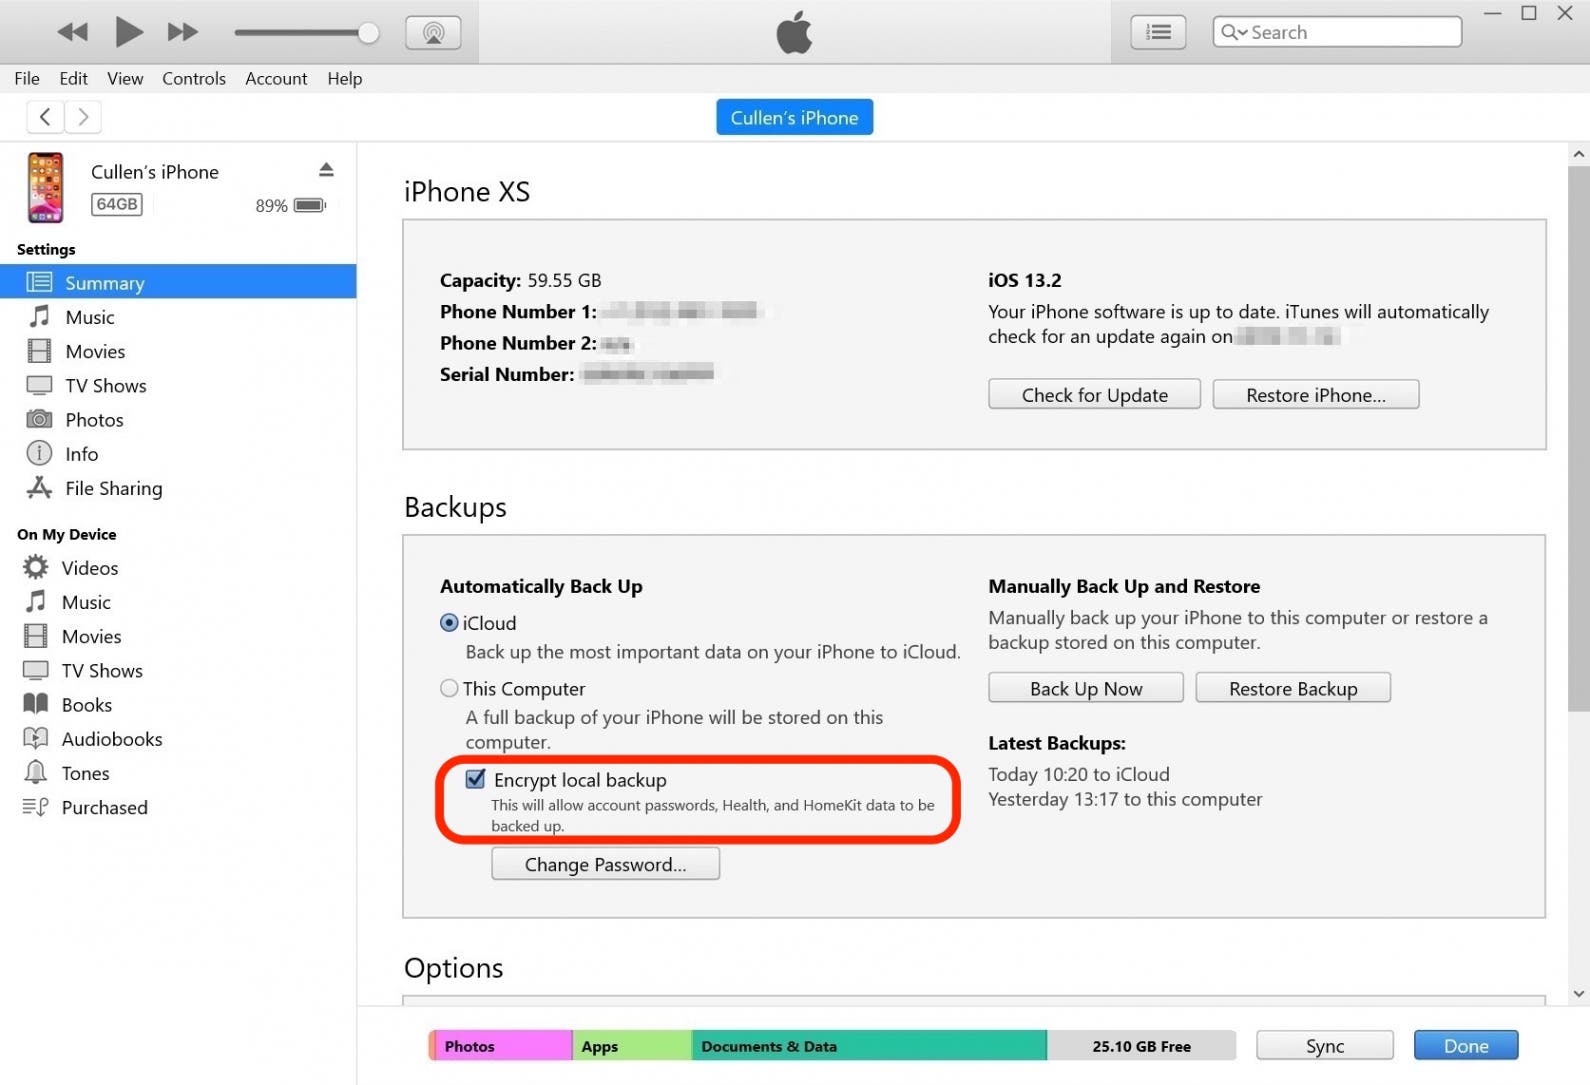
- Here you’ll see options for backing up your iPhone. In the section titled Automatically Back Up you will see two options: iCloud, and This Computer. This changes the automatic backup procedure:
- The iCloud option automatically backs up your data at regular intervals to iCloud, using your iPhone's internet connection. It's pretty much hands-off, usually working when you're asleep.
- The This Computer option will automatically begin a backup of your iPhone only when it is plugged into the Windows computer with a cable.
- Selecting the This Computer option disables the iCloud option, and vice versa. You can do it either way, but if you aren't sure, I'd recommend keeping it set to the iCloud option. You can still manually make a local backup even if you use iCloud Backup.

- If you want your local backup to include your Health & Activity data, as well as sensitive data like passwords and HomeKit settings, you'll need to check the Encrypt local backup option. If you do, then a popup will immediately ask you to set a password for the backup. Choose a password you can remember, or make note of your password in a secure location, because there is no way to recover the password for an iPhone backup, should you lose it.
- Click Back Up Now to initiate a manual local backup of your iPhone on your Windows PC. This will not interfere with your automatic backup settings.

- Note the progress indicator at the top of the iTunes window. Don't unplug your iPhone until the process is complete!

- In the future, if you need to restore a backup, navigate back to this screen and click on Restore Backup.

FAQ
- How do you do a backup on your iPhone? If you do not have access to a Mac or PC, you can use iCloud Backup to back up your device. To do so, you just need to go into the Settings app, and tap your Apple Account at the top. From there, select iCloud, and then look for the iCloud Backup option. If you want to create a local backup of your device, you will need to connect it to a computer, as demonstrated above.
- How do I restore a backup on my iPhone? You can only restore your iPhone from an iCloud backup when setting up your device for the first time. If you have already set up your iPhone and want to restore your backup, you will need to erase your iPhone and start over from scratch.
- Can I restore my iPhone using a local backup? After backing up your iPhone to your computer, you can restore your iPhone from a backup made locally. If you are using a Mac, there will be an option to Restore iPhone in the Finder window. If you are using a PC, you will see the same option in iTunes when you click on your device.
Top Image Credit: Hadrian / Shutterstock.com


 Rhett Intriago
 Rachel Needell

 Olena Kagui


 Devala Rees