Unleash Your Inner App Developer Part 19: Core Data Wrap Up


Do you have an idea for an app but lack the programming knowledge to begin building it? In this weekly blog series, I will take you, the non-programmer, step by step through the process of creating apps for the iPhone, iPod touch, and iPad. Join me each week on this adventure, and you will experience how much fun turning your ideas into reality can be! This is Part 19 of the series. If you are just getting started now, check out the beginning of the series here (This post has been updated to Swift 1.2, Xcode 6.3, and iOS 8).
Now that you have learned the basics of Core Data and have learned how it works behind the scenes, we're going to finish implementing the main pieces of Core Data in the iAppsReview project and show you how to distribute a pre-populated database with your apps. You can download the project we have created so far from this link.
I recommend you follow the steps outlined in this post for the best learning experience, but if you run into a snag, you can download the completed project from this link.
Migrating Changes to the Data Model
As you have already learned, when you run your app for the first time after creating an entity data model, a SQLite database is automatically created for you. As you build your app, you will make many changes to the entity data model by adding new entities and attributes to the model, just as you have done in this blog series.
If you don't have any data in the database that you want to save, you can simply delete the app from the Simulator and the database will automatically be recreated the next time you run the app. However, if you don't want to delete the database and its data, if you make a change to the entity data model and then try to run your app again, you will get the following Core Data error at run time:
The model used to open the store is incompatible with the one used to create the store.
To avoid this error, you need to migrate the data to the new data model. However, to do this (and this is critical) you must make a new version of your data model before making any changes to it! Having a "before" and "after" version of the data model allows Core Data to compare the two models, note the differences, and migrate the data to the new format. We don't need to do this with the iAppsReview data model, but I'll show you how for future reference.
To make a new entity data model, select the model file in the Project Navigator, then select Editor > Add Model Version... from Xcode's menu. This launches the New Model Version dialog where you can enter the Version name of the new model. I like to add incrementing numbers to the Version name as shown in Figure 1.
 |
| Figure 1 - Making a new model version |
This adds a new node under the data model in the Project Navigator (Figure 2).
 |
| Figure 2 - A new node is added under the data model |
Notice there is a green check mark next to the older version of the model. This indicates the "current" version of the model. To make the new version of the model current, go to the File Inspector (by clicking the first button on the left in the Inspector toolbar on the right side of the Xcode window) and in the Model Version section, set Current to the new version of the model (Figure 3).
 |
| Figure 3 - Set the Current model version |
There is a second step you need to perform to get Core Data to migrate your exiting data. However, when you use the mmBusinessObject class as a wrapper around Core Data, this step is already performed for you.
To see the code that does this, in the Project Navigator, expand the Business Layer group and then select the mmBusinessObject.swift file. Scroll down to the persistentStoreCoordinator method and you will see the following code:
 |
This code sets the NSMigratePersistentWtoreAutomaticallyOption to true. This tells Core Data to automatically migrate the database to the new data model.
Note that this technique only works for certain types of changes to your data model such as:
- Add, delete, or rename an entity.
- Add, delete, or rename an attribute.
- Change an attribute from non-optional to optional.
- Change an attribute from optional to non-optional (as long as you provide a default value).
- Add, delete, or rename a relationship.
For a complete list of everything you can change and still perform a lightweight migration, as well as how to migrate more complex changes, check out Apple's Help topic Core Data Model Versioning and Data Migration Programming Guide.
Including a Pre-Populated Database With Your App
Often, you need to include a database with your app that is pre-populated with data. For example, in iAppsReview, it would be nice to include a pre-populated list of app categories that the user can access without having to first download the list from the web. This is extremely easy to do using the mmBusinessObject Core Data wrapper class.
The first step involves adding the SQLite database file to the project. Let's do that now as outlined in the following steps.
- Download the iAppsReview.sqlite database file I have created for you from this link.
- Open the iAppsReview project in Xcode.
- In the Project Navigator, right-click the Supporting Files group and select Add Files to "iAppsReview"... from the popup menu.
- On the left side of the dialog under Favorites, select Downloads, and then in the right side of the dialog select iAppsReview.sqlite. Make sure the Copy items if needed option is selected, and then click the Add button. This adds the iAppsReview.sqlite file to the project as shown in Figure 4.
 |
| Figure 4 - The iAppsReview.sqlite database file included in the project |
This database you just added to the project contains a list of all app categories. However, this is not the database that is used by the app in the Simulator (or an a device) at run time. When the app first starts up, it checks to see if an iAppsReview.sqlite file already exists in your app's Documents folder. If it doesn't exist, a copy is made of the iAppsReview.sqlite file in your app and placed in your app's Documents folder.
- To see the code that does all of this, in the Project Navigator, select the mmBusinessObject.swift file and check out the code located near the top of the persistentStoreCoordinator method:
 |
The first line of code checks if the copyDatabaseIfNotPresent property is true, and if it is, it gets the app's Documents directory. The next section appends the name of the database to get the full path to the database file.
The last section checks if the database already exists, and, if it doesn't, copies the SQLite database file from your app's root folder to the Documents folder.
- To get this logic to kick in, all you have to do is set the copyDatabaseIfNotPresent property to true in the init method of your ABusinessObject class. Select the ABusinesssObject.swift in the Project Navigator and you can see the line of code has already been added for you:
 |
- If you have been following along in this series, the iAppsReview.sqlite database already exists in the Documents folder for the app on your development machine. We need to delete the existing iAppsReview database file so that a new database is created from the iAppsReview.sqlite database file you just added to the project.
The easiest way to delete the database file is to completely remove iAppsReview from the Simulator. If the Simulator is not currently running on your machine. Click Xcode's Run button to run the App in the Simulator. Next, click the Simulator Home button or select Hardware > Home from the Simulator menu. Next, click and hold on the iAppsReview app icon in the Home screen until the app icons begin to wiggle. Next, click the X in the upper left corner of the icon. When the confirmation dialog appears (Figure 5), click the Delete button.
 |
| Figure 5 - Remove iAppsReview from the Simulator. |
To finish the deletion process, click the Home button again or select Hardware > Home from the Simulator menu.
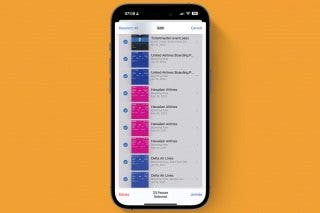
- Go back to Xcode and click the Run button. When the app appears in the Simulator, select the Write a Review option and then select the App Category row in the Write Review scene. This should display all of the app categories as shown in Figure 6. This indicates that the code that copies the database is working!
 |
| Figure 6 - All app categories are displayed in the App Category scene. |
At this point you won't see a check mark next to any of the items in this list because we haven't enhanced the table view to allow users to select a category. We'll address this in an upcoming post.
Saving Reviews
As it stands right now, you can create a review and even share it on social networks, but once you leave the app, the review is lost because it is not stored in the database.
By way of reminder, Figure 7 shows the Write Review scene as it appears at run time.
 |
| Figure 7 - The Write Review scene |
Here are a few things to note:
- When the user taps the Post button, we want to save the review to the database on the Simulator or iOS device (we will eventually post the review on the web but we'll do that later in the series when we cover web services).
- Just as the Share button at the top right of the navigation bar is disabled until the user enters a valid review, we also need to enable and disable the Post button.
- Since the user cannot currently change the app category, we will just use the hard-coded Games category for now.
Enabling and Disabling the Post Button
With these things in mind, let's move the app forward and add the ability to save reviews. We'll start by adding functionality that enables and disables the Post button.
- In the Project Navigator, select the Main.storyboard file.
- At the top-right of the Xcode window, select the center button in the Editor button group to display the Assistant Editor.
- In the storyboard, click on the Write Review scene's status bar to select the scene. This should display the WriteReviewViewController.swift file in the Assistant Editor. If it doesn't, click the Manual segment in the jump bar at the top of the Assistant Editor and select Automatic > WriteReviewViewController.swift from the popup menu.
- Next, hold the control key down, click on the Post button and drag your mouse down below the list of properties in the WriteReviewViewController.swift file as shown in Figure 8.
 |
| Figure 8 - Creating an outlet for the Post button |
- When you see the Insert Outlet, Action, or Outlet Collection popup, let go of your mouse button and the control key to display the Create Outlet popup (Figure 9). In the Name text box, enter btnPost and then click Connect to create a new outlet property.
 |
| Figure 9 - Name the outlet btnPost. |
- Now let's create an action method for the Post button. First go to the Connections Inspector (the button on the far right in the Inspector toolbar).
- Click in the connection well (the small circle) to the right of the Touch Up Inside event and drag your mouse pointer down below the list of methods in the WriteReviewViewController.h file as shown in Figure 10.
 |
| Figure 10 - Create an action method for the Post button. |
- When you see the Insert Action popup, release your mouse button and the control key to display the Create Connection popup (Figure 11). In the Name text box enter postReview and then click the Connect button to create the action method;
 |
| Figure 11 - Name the action method postReview. |
- We don't need the Assistant Editor right now, so go to the top of the Xcode window and click the button on the left in the Editor button group to hide the Assistant Editor.
Now let's enhance the app so the Post button gets enabled/disabled in tandem with the Share button.
- In the Write Review scene, click on the Post button to select it. Afterwards, go to the Attributes Inspector (the third button from the right in the Inspector toolbar) and under the Control section, uncheck the Enabled check box (Figure 12). This causes the button to be disabled by default at run time;
 |
| Figure 12 - Disable the Post button. |
- It's standard in iOS apps to set the color of a button's text to gray when it's disabled. To do this, go to the Attributes Inspector, and change the State Config setting to Disabled (Figure 13). This allows you to specify attributes of the button when it is in a disabled state. Now go to the Text Color setting and select Light Gray Color from the list;
 |
| Figure 13 - Specify the Text Color of the button when it is disabled. |
- Now let's add the code that enables and disables the Post button at run time. In the Project Navigator, select the WriteReviewViewController.swift implementation file. Scroll down in the file until you see the two methods shown in Figure 14.
 |
| Figure 14 - The methods that contain an isReadyToShare message call |
We created these methods earlier in this series. They contain code that calls the isReadyToShare method and stores the return value in the Share button's enabled property. We could add one new line of code to each method that sets the enabled property of the Post button, but in this case we are going to create a new method that contains these two lines of code that enable/disable the buttons and then call that new method from each of these existing methods.
- Next, make the code changes highlighted in red in Figure 15. These changes create a new enableDisableControls method that sets the enabled property of the Share and Post buttons. You also change the code in the appNameChanged: and textViewDidChange: methods to make call to the new enableDisableControls method.
 |
| Figure 15 - Make the code changes highlighted in red. |
It's always a good idea to test your code when you add new functionality to your app. So click the Run button in Xcode, and when the app appears in the Simulator, click the Write a Review row. At this point, the Share button and Post buttons should both be disabled as shown on the left side of Figure 19.
Enter an App Name and write a short comment. Afterwards, dismiss the keyboard by clicking on the background of the scene. You should see the Share and Post buttons enabled as shown on the right side of Figure 16.
 |
| Figure 16 - The Share and Post buttons at run time |
Saving Reviews
Now we're ready to add functionality to the app to save reviews. This involves using the AppReview and AppReviewEntity classes you have already created.
- Select the WriteReviewViewController.swift file in the Project Navigator and add the property declaration shown in Figure 17 near the top of the file. This property is adorned with the lazy modifier. This causes the Review object instantiation to be delayed until the first time the review property is accessed. If the user never saves their review, then the Review object never needs to be created.
 |
| Figure 17 - Add a review property. |
- Now add the code shown in Figure 18 to the postReview method.
 |
| Figure 18 - Add code to the postReview method. |
The first line of code sends a createEntity message to the review business controller and stores the new object in the reviewEntity constant.
In the next three lines of code, hard-coded values are stored in the categoryID, userID, and isPosted attributes of the ReviewEntity object. As we enhance the app in future blog posts, we'll come back and replace these hard-coded values with real values.
Next, the code retrieves values from the user interface controls and stores then in attributes of the entity.
Afterwards, the saveEntities method is called on the review business controller and the ReviewEntity is stored in the database.
The last line of code calls the popViewControllerAnimated: method on the app's navigation controller. This causes the app to navigate back to the main iAppsReview scene.
Testing the Saving of ReviewEntity
Now you're ready to test the new code to see if it works.
- Click Xcode's Run button. When the app appears in the Simulator, select the Write a Review option.
- Select a rating, specify an App Name, comments, and optionally select an image from the Photo Album.
- Click the Post button and the app should return to the main iAppsReview scene.
- Go back to Xcode and click the Stop button.
Since we haven't set up the Read Your Reviews option yet, how can you tell if the save actually worked? You can do so by directly viewing the database.
- Launch the Firefox browser.
- From the Firefox menu, select Tools > SQLite Manager.
- In the SQLite Manager toolbar, click the Open Database button and navigate to the iAppsReview database file as described in my previous post.
- On the left side of the dialog under the Tables node, select the ZREVIEWENTITY node. On the right side of the dialog, you should see the ReviewEntity record shown in Figure 19!
 |
| Figure 19 - The new ReviewEntity record |
Conclusion
Now that you have learned how to retrieve, create, and save entities using Core Data, in my next post we're going to move on to the important topic of displaying lists of data using table views. This will allow us to see a list of reviews that you have written from within the app.

Kevin McNeish
Kevin McNeish is author of the new book “Learn to Code in Swift” as well as the “iOS App Development for Non-Programmers” book series (www.iOSAppsForNonProgrammers.com), winner of the Publishing Innovation Award. Kevin is also an award-winning app developer, software architect, and conference speaker in the U.S. and abroad. He has spent much of his career making difficult concepts easy to understand. Follow Kevin on Twitter: @kjmcneish.

 Ravi Both
 Olena Kagui

 Rhett Intriago
 Rachel Needell


 Amy Spitzfaden Both
 Leanne Hays