Unleash Your Inner App Developer Part 20: Displaying Lists of Data


Do you have an idea for an app but lack the programming knowledge to begin building it? In this weekly blog series, I will take you, the non-programmer, step by step through the process of creating apps for the iPhone, iPod touch, and iPad. Join me each week on this adventure, and you will experience how much fun turning your ideas into reality can be! This is Part 20 of the series. If you are just getting started now, check out the beginning of the series here (This post has been updated to Swift 1.2, Xcode 6.3 and iOS 8).
So far in this series, you have learned just enough about table views to get through some basic exercises. In this post, I'll cover some of the basics by way of review, and then we will take a deep dive into the world of managing lists of data with table views.
It's very important that you have a clear understanding of the information in this post, because the same pattern is used for other user interface controls such as collection views and picker views.
Understanding Table Views
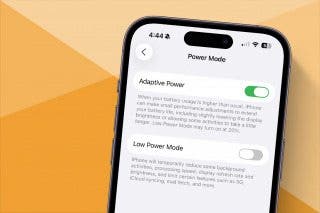
Table views are used to display lists of data in iOS apps. If you have an iOS device of your own, you have used table views frequently since they are found in most of Apple's built-in apps such as Settings (Figure 1), iTunes, Photos, Mail, Weather, and Contacts.
 |
| Figure 1 - A table view in the Settings app |
iOS table views are based on the UITableView class. They are the View in the Model-View-Controller design pattern. Table views are designed to display large sets of data and are configurable to look any way you want as evidenced by the wide range of appearances for table views used in the built-in iOS apps.
There are three main table view styles—plain, indexed, and grouped—as shown in Figure 2.
 |
| Figure 2 - Plain, indexed, and grouped table views |
Each item in a table view is a row and a table view contain an unlimited number of rows. Each row is one column wide and, when using the built-in styles, can contain an image, text, and accessory icon, such as the disclosure indicator (the gray arrow) shown on the right side of the cells in the Plain image in Figure 2.
Each division of a table view is a section. If you have no divisions, you have only one section. For example, in Figure 2, the Plain table view has just one section, the Indexed table view has twenty six sections (A-Z) and the Grouped table view has two sections.
The iOS table view is extremely fast at run time even when scrolling through thousands of items. How does it accomplish this? Regardless of the number of items in a list, the table view only contains enough cells to display the items visible in the view, plus a few additional cells for items that will soon become visible. So, even though you may have thousands of songs on the your device, there are only a dozen or so active cells containing song information in the iTunes app's table view at any given time. As cells are scrolled out of view, they are instantly reused to display other content.
Filling a Table View with Data
So, how do you fill a table view with data? Some table views are static, so you can create static cells at design time just as we did in iAppsReview. However, it's more usual for table views to be dynamically filled at run time as we did in my last several posts on Core Data.
In iOS apps, dynamically filled table views don't fill themselves with data. They get their data from a data source object—specifically, an object that implements the UITableViewDataSource protocol. This object is usually an instance of the UITableViewController class, which implements this protocol and was designed by Apple specifically to work with table views (we'll discuss Swift protocols more fully in a future post, but for now you just need to know that a protocol defines a standard set of behavior that classes can adopt and implement.) In this context, the phrase table view controller makes sense, because it controls how a table view is filled with data. You can also think of a table view controller as a factory that produces cell objects at the request of the the table view.
As you have already learned, rather than putting code that retrieves entities directly in a view controller, we instead put the code in a business controller, and then call the business controller methods from the view controller. Ultimately, you still need to be familiar with the standard table view controller methods because you need to know the methods in which you should place calls to business controllers.
As shown in Figure 3, the UITableViewDataSource protocol contains three key methods that are used to fill a table view with data:
- numberOfSectionsInTableView:
- tableView:numberOfRowsInSection:
- tableView:cellForRowAtIndexPath:
It's up to you to create a custom table view controller for your table view and add code to each of these three methods that interacts with a business controller.
 |
| Figure 3 - A table view makes calls to table view controller methods, which in turn call methods in a business controller. |
At run time, before a table view is displayed, it passes message calls to the table view controller in the order shown in Figure 4.
 |
| Figure 4 - The calling sequence of the UITableViewDataSource methods |
Here is an overview of what each method does:
- numberOfSectionsInTableView: is called by the table view first. This method returns the number of sections in the table view. In the example in Figure 4, there are three sections in the table view, so this method returns 3. After calling this method, the table view then adds the specified number of sections to itself.
- tableView:numberOfRowsInSection: is called by the table view once for each section. This method returns the number of rows in the specified section. In the example in Figure 4, this method is called three times because there are three sections in the table view. Each time the table view calls this method, it passes a section number, starting with zero, one, and then two. In this example, the method returns the following row count for each section:
- 2 for section 0
- 1 for section 1
- 3 for section 2
In the table view in Figure 4, the number of rows in each section is fixed. Often, the number of rows is determined dynamically at run time. For example, in the iTunes app, the number of songs in a list is determined by the number of songs stored on your iOS device.
- tableView:cellForRowAtIndexPath: is called by the table view once for each visible (or about to become visible) cell in the table view. This method returns a table view cell object for the specified section and row. In the example shown in Figure 4, the method is called for:
- Section 0, row 0
- Section 0, row 1
- Section 1, row 0
- Section 2, row 0
- Section 2, row 1
- Section 2, row 2
In this way, a table view is dynamically filled with items at run time.
Using Business Controllers
In the last several posts, you used business-controller objects to retrieve entities to be displayed in table views. Figure 5 shows the big picture of how a table view controller uses the services of the AppCategory business controller object to fill an App Category table view.
 |
| Figure 5 - Table view controller and business controller collaboration |
Here are the details for each step. I highly recommend that you go over these steps several times until you fully understand how they work:
- In the table view controller's viewDidLoad method, an instance of the AppCategory business-controller object is created and stored in the appCategory instance variable.
- The table view controller then calls the getAllEntities: method of the AppCategory business controller, and stores the resulting AppCategoryEntity objects in the appCategoryList array variable.
- In its numberOfSectionsInTableView: method, the table view controller returns 1, since there is only one section in the table view.
- In the tableView:numberOfRowsInSection: method, the table view controller returns the count of AppCategoryEntity items stored in the appCategorytList array variable.
- In its tableView:cellForRowAtIndexPath: method, the table view controller retrieves an AppCategoryEntity object from the appCategoryList array by using the specified row number, and uses the entity to configure the cell it returns to the table view.
Hopefully, this diagram helps you understand more clearly the interaction between the table view controller and business controller.
Custom Table View Controllers
When you add a table view controller to a storyboard, as you did with most of the scenes in iAppsReview, even though you were initially creating a prototype app, an instance of UITableViewController was automatically created for you to manage the table views—even though the content of the table views was static. However, to provide dynamic content for the table views in these scenes, you have to create a custom table view controller for each scene.
Here are the basic steps you take to create a custom table view controller:
- Create a new subclass of UITableViewController (for example, AppCategoryViewController).
- Go to the storyboard, click on the status bar at the top of the scene you want to associate with the new view controller, then go to the Identity Inspector and change the Class of the table view controller to the class you created in the previous step.
For example, in Figure 6, the default UITableViewController class has been changed to a custom AppCategoryViewController class.
 |
| Figure 6 - Specifying a custom table view controller class |
If you find yourself in a position where you have created a custom view controller for a particular scene, but no data shows up in the table view, it may be that you have forgotten this second step!
Configuring Table View Cells
In Part 17 of this series, you added code to the tableView:cellForRowAtIndexPath: method of the AppCategoryViewController class that configured the cells in the table view. Let's take a closer look at that code to make sure you understand what's going on.
At run time, when a table view is being filled, it passes a tableView:cellForRowAtIndexPath: message to its associated table view controller once for each cell in the table view. Basically, the table view is requesting that the table view controller return a fully configured cell object for the the specified section and row.
Figure 7 provides an overview of the interaction between the table view and the table view controller when the tableView:cellForRowAtIndexPath: method is executed at run time.
 |
| Figure 7 - Configuring a table view cell at run time |
- The table view calls the table view controller's tableView:cellForRowAtIndexPath: method, passing an indexPath object. This indexPath object has section and row properties that indicate the section and row of the cell the table view is requesting from the table view controller.
- The table view controller calls back to the table view's dequeueResusableCellWithIdentifier: method, passing a CellIdentifier value.
When a user scrolls through a table view at run time, the cells that scroll off screen are added to a queue of cells that can be reused. When the table view's dequeueReusableCellWithIdentifier: method is called, the table view checks if there is a reusable cell with the specified identifier in the queue, and if so, it returns the cell. If there are no cells of that type in the queue, it returns a brand new cell of the specified identifier type.
- Next, the table view controller configures the cell returned from the table view. This usually involves code that sets the text of the labels in the cell as well as any accessory indicator.
- The table view controller returns the configured cell back to the table view, which adds the cell to the list.
Now that you have the high level overview, let's dive in and take a closer look at the code that you added to the tableView:cellForRowAtIndexPath: method of the AppCategoryViewController class as shown in Figure 8.
 |
| Figure 8 - The tableView:cellForRowAtIndexPath: code. |
- The first line of code calls the dequeueReusableCellWithIdentifier: method on the table view, passing the CategoryCell identifier. Remember that you set the Identifier of the App Category cell to CategoryCell in the storyboard at design time. This cell is used as a template for the cells it creates and passes back to the table view controller, or, if a cell of this type already exists in the queue, a reference to that cell is returned.
- This code gets a AppCategoryEntity object from the appCategoryList array using the indexPath parameter's row property. You need to get an AppCategoryEntity object so you can get the name of the category.
- This code actually configures the table view cell. It takes the value of the AppCategoryEntity's name property and stores it in the text property of the cell's main textLabel.
- The last line of code returns the fully configured cell object to the table view.
Conclusion
I know that the information in this post is a lot to take in, but it is essential that you understand these basic mechanics if you want to become a full-fledged app developer! If you have any questions feel free to post them in the comments and I'll answer them for you!

Kevin McNeish
Kevin McNeish is author of the new book “Learn to Code in Swift” as well as the “iOS App Development for Non-Programmers” book series (www.iOSAppsForNonProgrammers.com), winner of the Publishing Innovation Award. Kevin is also an award-winning app developer, software architect, and conference speaker in the U.S. and abroad. He has spent much of his career making difficult concepts easy to understand. Follow Kevin on Twitter: @kjmcneish.
Related Articles
2025 iPhone Life Buyer’s Guide: All the Best Gear on Sale for Cyber Week
 Susan Misuraca
 Rachel Needell
How to Open Tesla Doors on Model S, 3, X & Y Even without Power
 Olena Kagui

 August Garry

 Rhett Intriago

 Leanne Hays

 Amy Spitzfaden Both


 Hal Goldstein