What to Know
- Organize your photos into albums—search by date, location, theme, or more.
- Use the Photos app to automatically detect and delete duplicate photos to free up space.
- Manage the people album to keep your friends close and your enemies hidden.
Surprisingly, the best software for organizing photos on your iPhone is the free Photos app that comes with your phone. You may not realize it, but it truly gives you all the tools you need! I’ll walk you through an easy list of steps to get your photos and videos organized once and for all.
Jump To:
- Step 1: Organize Photos on iPhone Into Easy to Navigate Albums
- Step 2: Manage the People Album & Tag or Merge Contacts
- Step 3: Make Photo Slideshows & Erase People from Photo Memories
- Step 4: Automatically Delete Duplicate Photos to Free Up Space
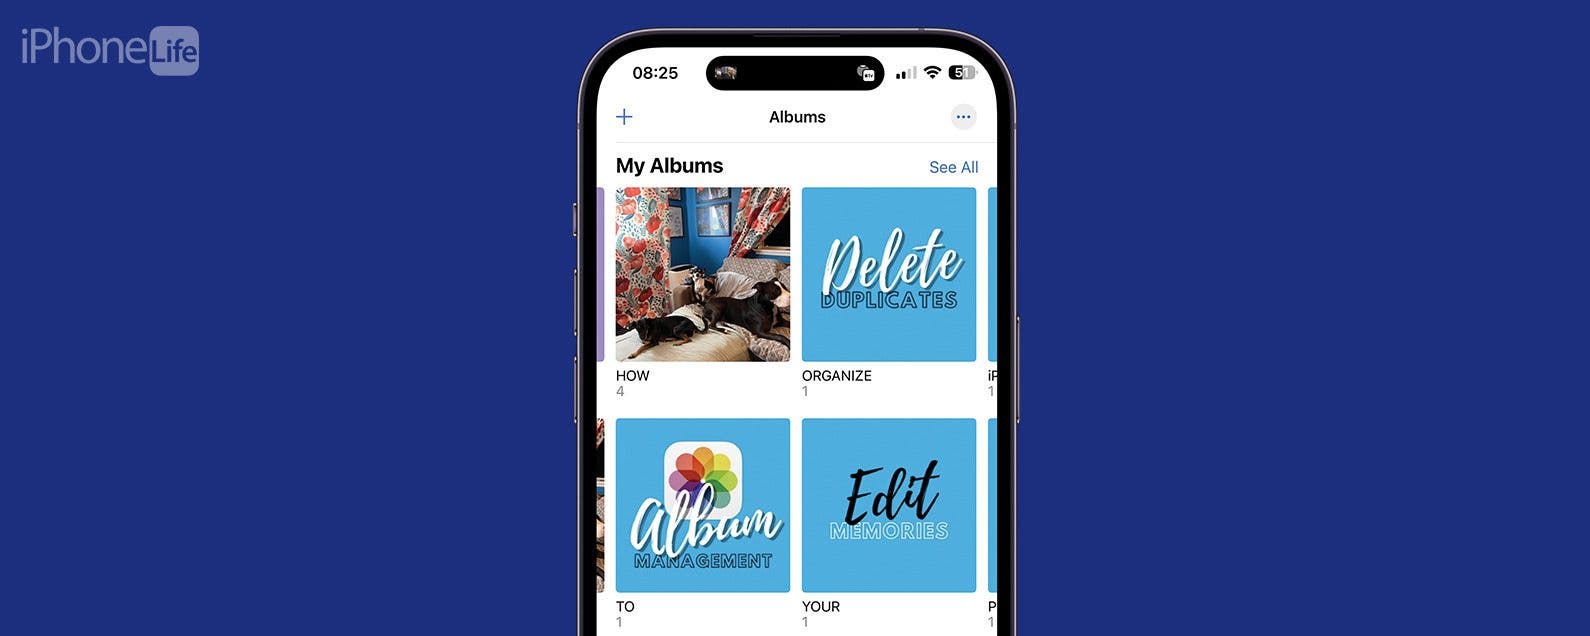
Organize Pictures on Your iPhone the Quick & Easy Way
Organizing your photos makes it easier to navigate and enjoy all your precious memories. I'll take you through four simple steps that can help you create the photo collection of your dreams.
Step 1: Organize Photos on iPhone Into Easy to Navigate Albums
Sorting your photos into albums is incredibly useful and you can approach this in many different ways. I will teach you how to create new albums and give you tips on how to look up photos to add them to your albums by date, place, or theme. I'll also teach you how to remove photos, move them between albums, and share the album with others.

- Create a photo album on your iPhone by opening the Photos app and tapping Albums. Then, in the top left corner, tap the + icon and select New Album.
![Create a photo album on your iPhone.]()
- Enter a name for your album and tap Save.
![Enter a name for your album and tap Save.]()
- You will now be able to select photos to add to the album. If you wish for the album to remain empty and add photos later, tap Cancel. To select photos now, simply tap on them and see the blue checkmark appear. You can select as many as you want or just one. If you select photos from various albums or scroll a lot, you can tap Show Selected to see all the photos you're about to add to the album. When you're ready, tap Add.
![To select photos, simply tap on them and see the blue checkmark appear. Tap Add.]()
- If you don't want to scroll, you can search for photos by using the search bar. Here you can type a date, location, item, animal, color, etc. You can even do combinations such as "flower Hawaii" or "ocean Chicago." Since I often post on social media, if I want to find a specific photo, I will look it up on Facebook or another platform to see the date I posted it and I will search for that specific date, including the year, to locate the photo.
![you can search for photos by using the search bar. Here you can type a date, location, item, animal, color, etc.]()
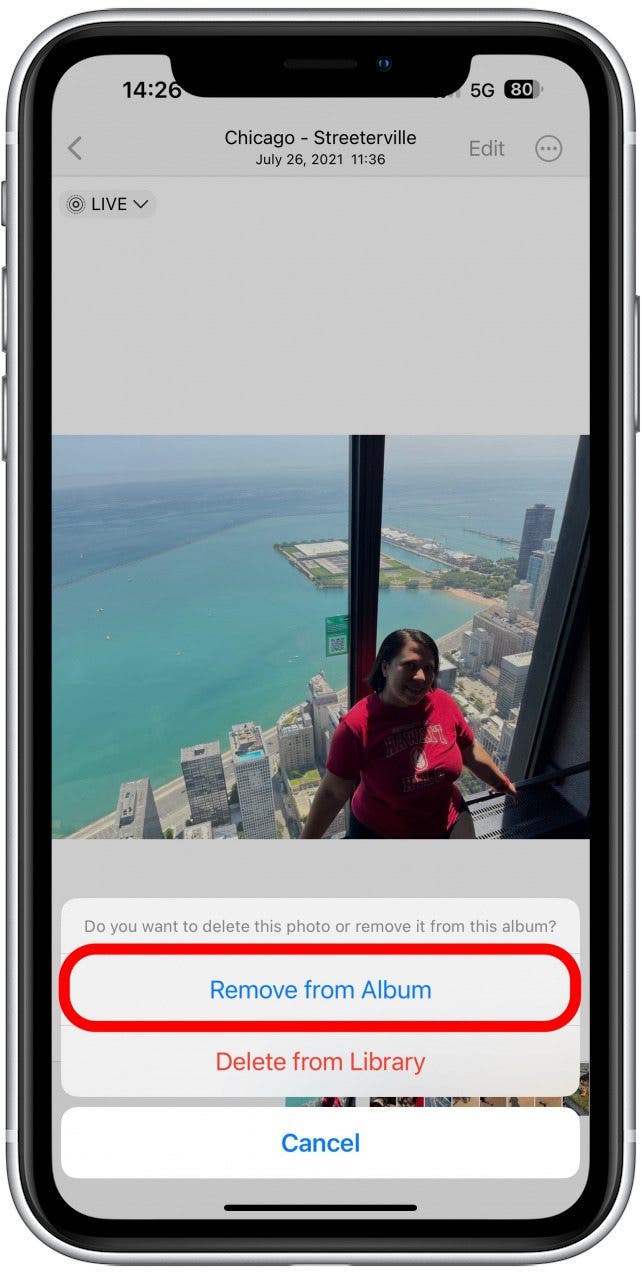
- If you've added a photo you wish to remove, tap the photo to open it and tap the trash icon at the bottom right of the screen. Select Remove from Album to delete it from just that album, or Delete from Library to remove it permanently, including from other albums and even Shared Photo Libraries.
![Select Remove from Album to delete it from just that album, or Delete from Library to remove it permanently]()
- To move an a photo to another album, you need to select the photos you wish to move within the album, tap the share icon at the bottom left of the screen, then select Add to Album. You will be able to select an album to copy them to and you'll get an option to create a new album. Once you move the photos, you will still need to delete them from the original album by following step 5.
![tap the share icon at the bottom left of the screen, then select Add to Album]()
- To share your album with others, open an album, tap the More menu, and select Share Photos.
![tap the More menu, and select Share Photos.]()
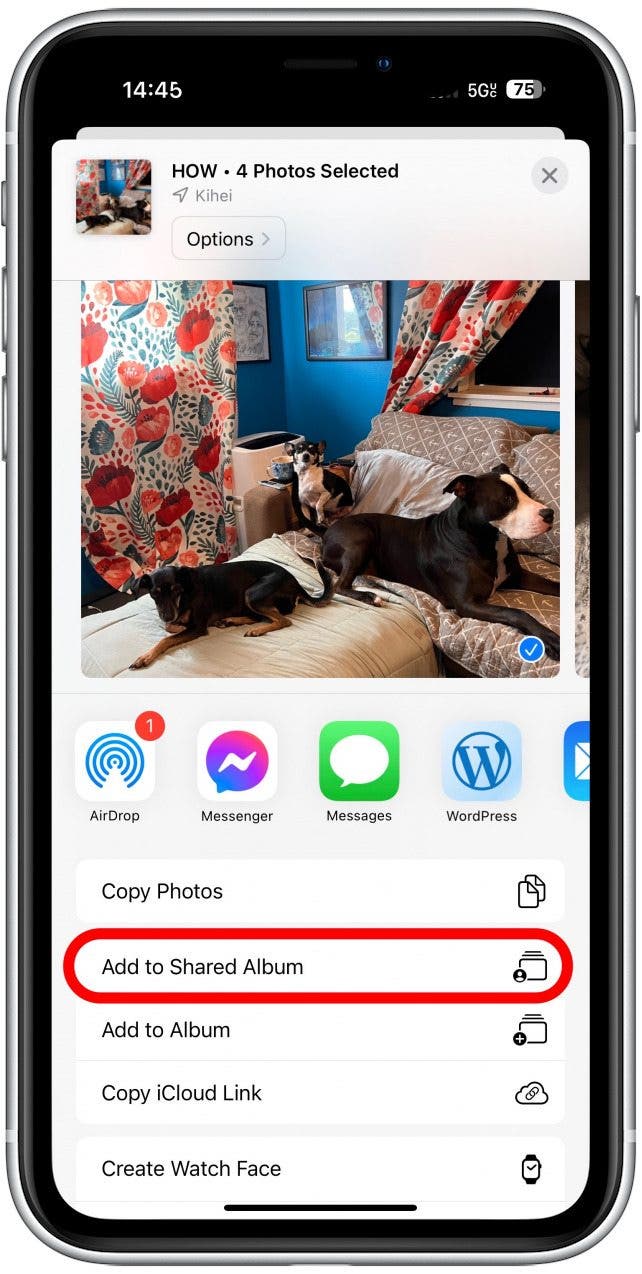
- Here you'll see several sharing options, including AirDrop and your recently used apps. You can also select Add to Shared Album.
![You can also select Add to Shared Album.]()
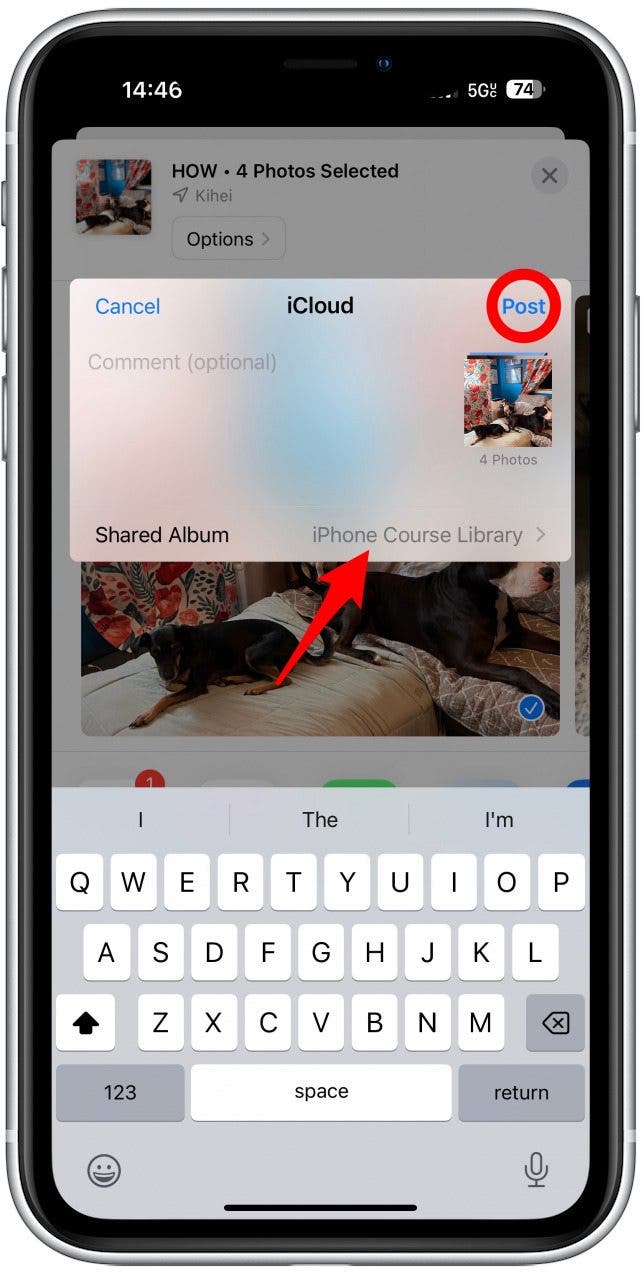
- Next to Shared Album you will see the name of one of your most recently used Shared Albums. If you select Post, the photos will be added to it. Plus, you can add an optional comment if you wish to explain or describe the photos.
![f you select Post, the photos will be added to it.]()
- If you want to create a new Shared Album, tap the gray name of your most recently used Shared Album. Name the album and tap Next. Add as many contacts as you wish to share the album via the plus icon and tap Next again. You'll see a recap of what you are about to do, just like in step 9, tap Post to share it.
![tap the gray name of your most recently used Shared Album. Name the album and tap Next.]()


Now you know how to create an album on iPhone, manage it, and share it with others! For more Photos app articles, subscribe to our free Tip of the Day newsletter.
Step 2: Manage the People Album & Tag or Merge Contacts
With iOS 16 you can create customized Photo Lock Screens that feature a specific person, which only works if you put in some work on your People album. This can also help improve your Memories by including more of your favorite people and omitting those associated with painful memories. But how does the People album work? The Photos app on your iPhone creates collections of people automatically using AI (Artificial Intelligence) to identify and distinguish between different faces. The process isn't perfect so sometimes the same person will be incorrectly identified as two or even three different people, or different people will be tagged as the same one. Sometimes a photo of a person won't recognize a person at all! Luckily, you can manually tag, untag, and manage your Photo album if this is important to you. Here's how:
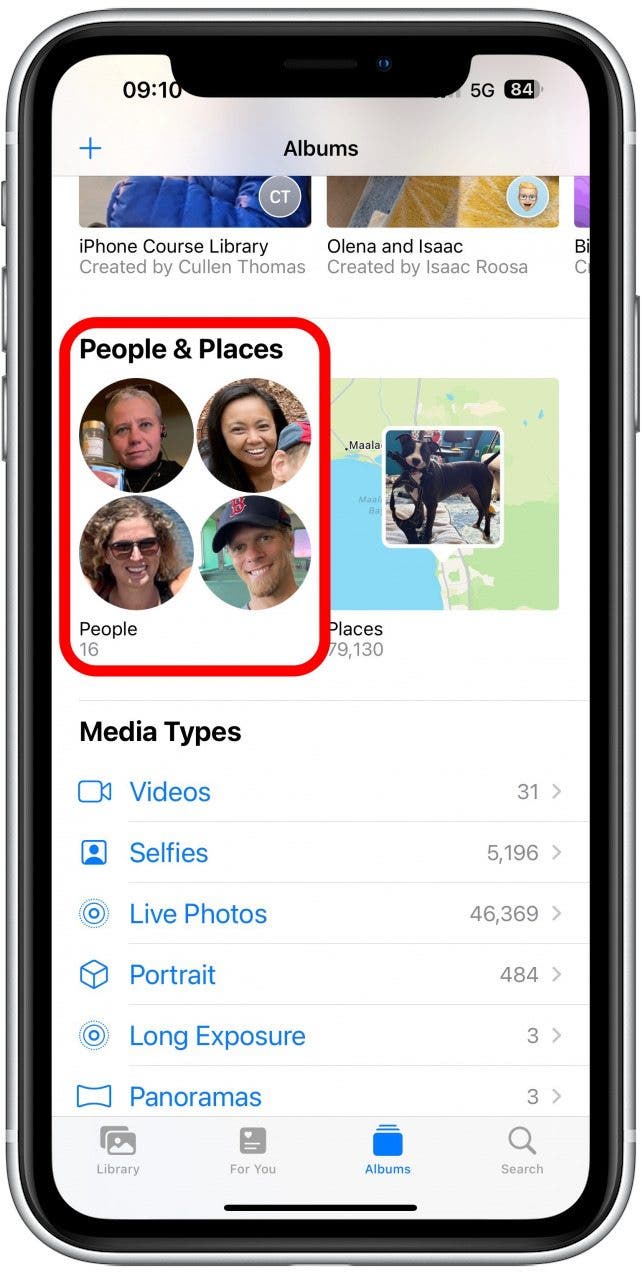
- Open the Photos app, tap the Albums tab, and scroll down to People & Places. Tap on People.
![Open the Photos app, tap the Albums tab, and scroll down to People & Places. Tap on People.]()
- If you haven't done this before or just transferred your iCloud photos to a new iPhone, you may see this message. You can dismiss it by tapping View People Album, but keep in mind that it will be more accurate if you complete the scan as instructed.
![You can dismiss it by tapping View People Album,]()
- If you've marked any people as favorites, you will see their pictures at the top of the screen in large circles. Tap the blue heart to unfavorite them.
![Tap the blue heart to unfavorite a person.]()
- Scroll down to see other suggestions. Tap the gray heart to favorite them.
![Scroll down to see other suggestions. Tap the gray heart to favorite them.]()
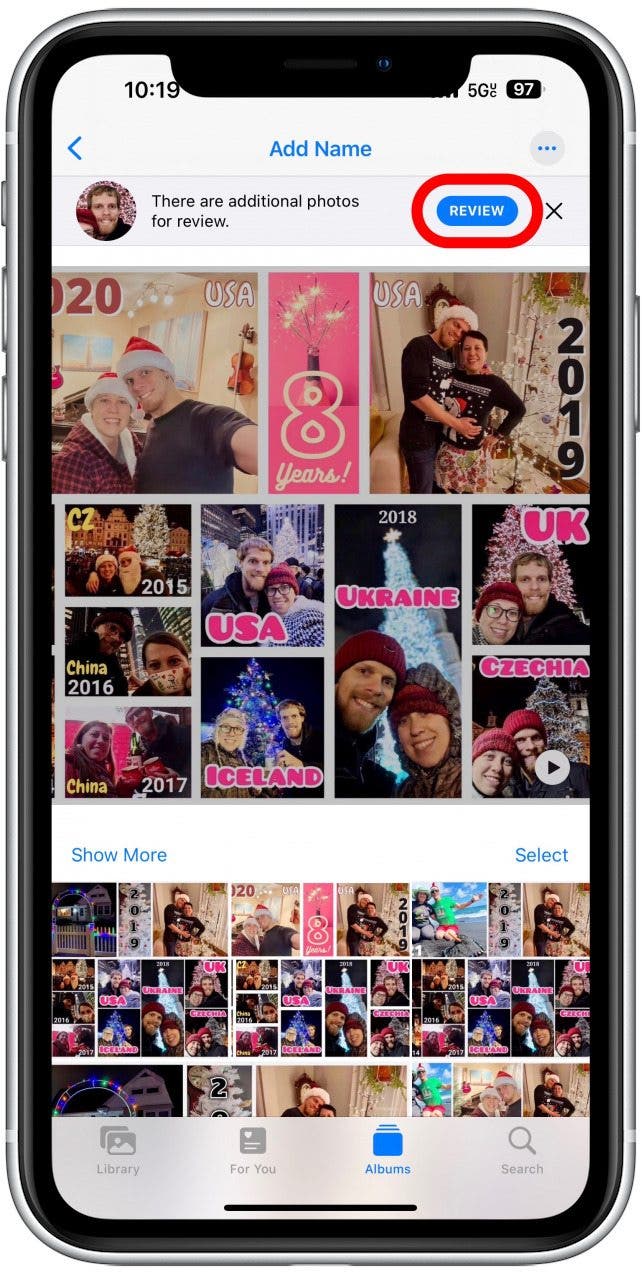
- If you see several different identifications for the same person, you can merge them. To do this, tap on the circle with their photo. If you see the option to review additional photos of this person, tap REVIEW.
![If you see the option to review additional photos of this person, tap REVIEW.]()
- Select or deselect the relevant photos, the blue circle with a checkmark indicates that the image is selected. An empty circle indicates that the image is not selected. Once you have picked out all the images of the right person, tap Done. In my case, since I already had this person named as a contact, doing this merged these photos with the previously confirmed ones.
![Once you have picked out all the images of the right person, tap Done.]()
- If you tap the More menu, you can share all the photos of this person, Add (Name) to Favorites, Create Photo Memory (which I'll review in the next section), Confirm Additional Photos, Review Confirmed Photos, Feature (Name) Less, and Remove (Name) from People. If you go through every contact and thoroughly review confirmed and additional photos, this will improve the accuracy of any future people identification and will make it easier for you to create Memories and Photo Lock Screens.
![tap the More menu]()
- To name or rename a contact, tap on them in the People album then tap their name at the top. Here you can make changes to spelling and capitalization, and even add emojis. Once you are done, tap Next. Then, tap Done to confirm.
![Once you are done, tap Next.]()
- If you look through the photos of that person and see a photo that isn't them or if you wish to untag it, tap the photo to open it. Then tap the i icon.
![Then tap the i icon.]()
- In the bottom left corner of the image, you'll see the person it is tagged as. There may be a question mark if your iPhone isn't sure about the identification. Tap it.
![In the bottom left corner of the image, you'll see the person it is tagged as. Tap it.]()
- From here you can view All Photos of the person, Review Confirmed Photos for improved accuracy, Feature Less, or tap This is Not (Name) if the tag isn't correct. This can also be done if the tag IS correct, but you don't want the image tagged if it is private. Follow these steps to tag a photo of a person or read this linked article for thorough steps on how to do this.
![If you want to "erase people from photos" by using the People album to hide these people]()


Now you know how to manage the People Album, tag and untag your contacts, and merge contacts if the Photos app AI tagged the same person as two or three different people.
Pro Tip
It is good practice to tap on each contact in your People album and review all additional and confirmed photos, as mentioned in Step 7. Doing this every once in a while will help keep your People album organized, which makes it easier to create amazing Memories and Photo Lock Screens!
Step 3: Make Photo Slideshows & Erase People from Photo Memories
You might not know this, but the Photos app on your iPhone automatically creates photo slideshows with music called Memories! You can view and edit the ones your iPhone creates, or you can manually create them yourself. Here's how to do it:
- You need a lot of photos to create a good slideshow, so I recommend picking an existing album,creating a new one, or selecting a person from your People album. Open the album and tap the More button.
![Open the album and tap the More button.]()
- Tap Play Memory Video.
![Tap Play Memory Video.]()
- The video will start playing, to edit it tap the video to see all your options. First tap the Music icon in the bottom left corner.
![First tap the Music icon in the bottom left corner.]()
- Swipe between different pre-set "moods" that will change the style and music of the slideshow. Tap in the middle of the screen to select it, and your new Memory will start playing.
![Swipe between different pre-set "moods" that will change the style and music of the slideshow.]()
- Tap the Music icon with a plus symbol.
![Tap the Music icon with a plus symbol.]()
- You'll be able to change to a different song by selecting something in your Music Library or to search for something new by tapping the Search icon.
![You'll be able to change to a different song by selecting something in your Music Library]()
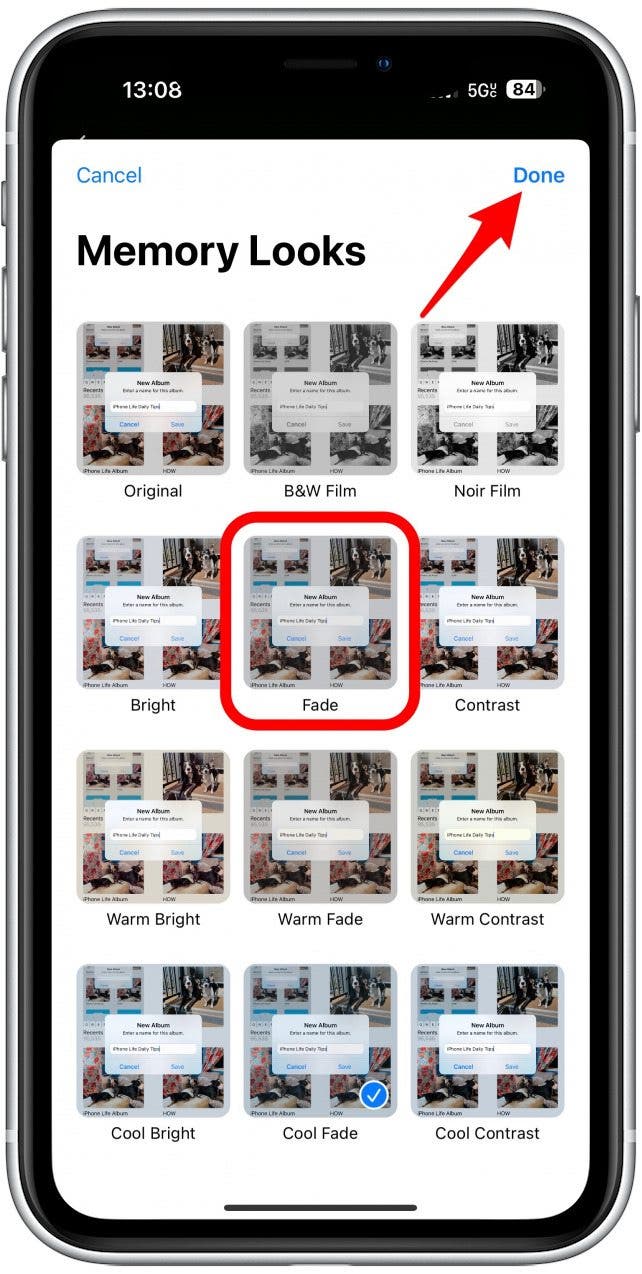
- Tap the Styles icon to change how all the photos in the Memory look.
![Tap the Styles icon to change how all the photos in the Memory look.]()
- Tap one to select it, then tap Done. This will not alter the actual images in the album.
![Tap one to select it, then tap Done.]()
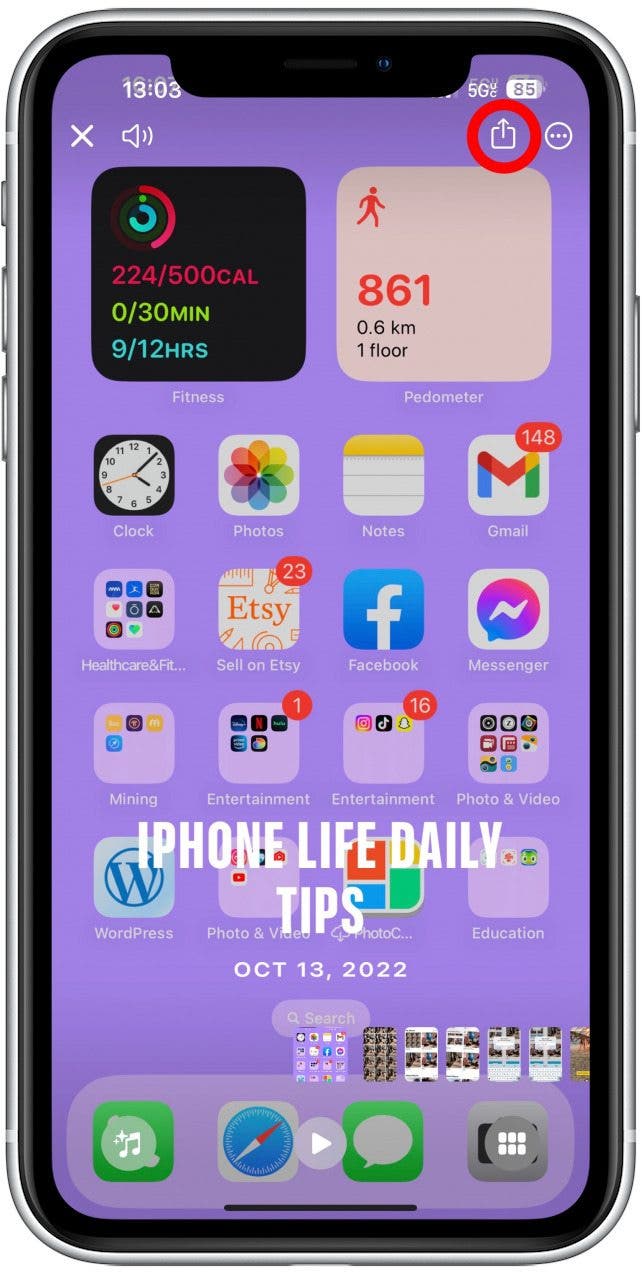
- To save share this Memory slideshow with others, return to the main editing screen (step 3) and tap the share icon.
![To save share this Memory slideshow with others, return to the main editing screen (step 3) and tap the share icon.]()
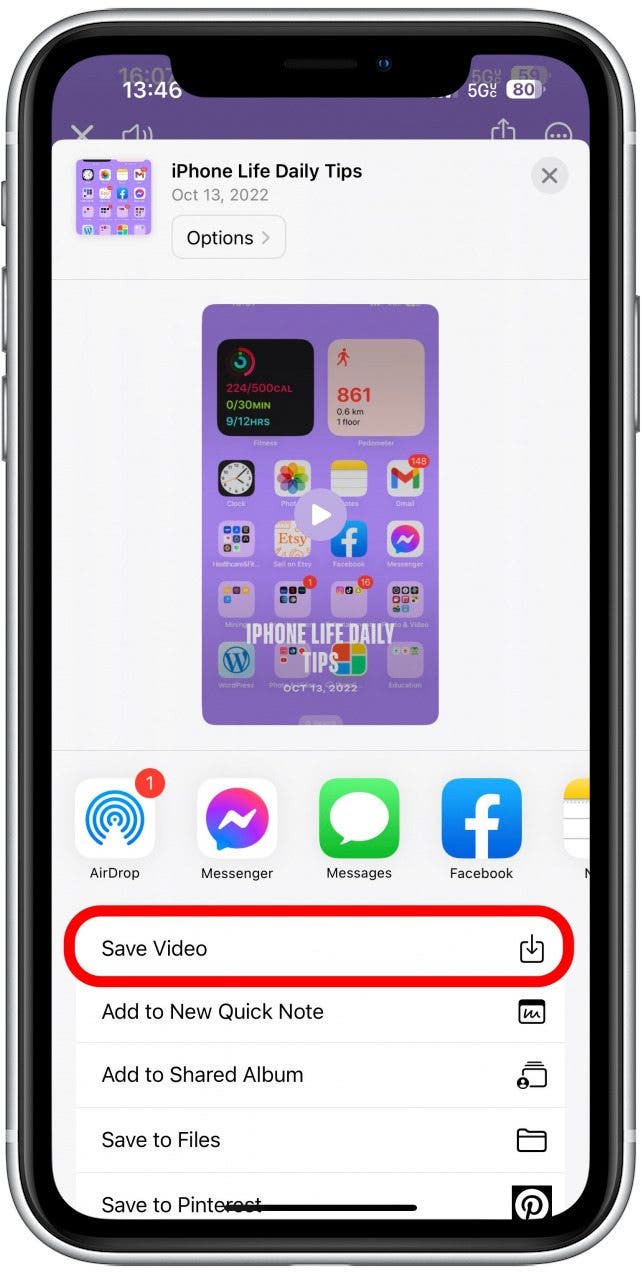
- Here you can select Save Video to save it to your photos app, or share it via AirDrop, Messages, or one of the other options in your Share sheet by tapping the appropriate icon.
![Here you can select Save Video to save it to your photos app, or share it]()
- If you want to "erase people from photos" in your Memories, Featured Photos, return to step 7 of the second section and select Remove (Name) From People. If you want to edit photos to manually erase a person from a photo, you'll either need a photo editing app with powerful AI tech like Lightleap by Lightricks (fees vary depending on subscription) or to do it yourself in Photoshop. If you want to hide someone temporarily, you can move all the photos of them to the Hidden album, which I'll discuss in the Step 6 section below.
![Tap This is Not (Name) if the tag isn't correct.]()


Now you know how to make a photo slideshow on iPhone with music and how to "erase" people from photo Memories.
Pro Tip
This is the easiest and most automated way to create a photo slideshow on your iPhone without downloading third-party apps. However, you will have more control if you find a third-party app that's designed for the purpose or use iMovie. These require a little more instruction and time but can look really cool once you master them!
Step 4: Automatically Delete Duplicate Photos to Free Up Space
Taking multiple photos to make sure you capture the moment or duplicating a photo so that you can make edits without ruining the original are good habits, but they clog up storage space. iOS 16 created a super easy process for deleting duplicate photos!
Warning
If you automatically select them all and merge them, your iPhone will pick the highest-quality image with the most data. This means that you may lose the edited versions, including any photos that were cropped or blured to hide sensitive information.
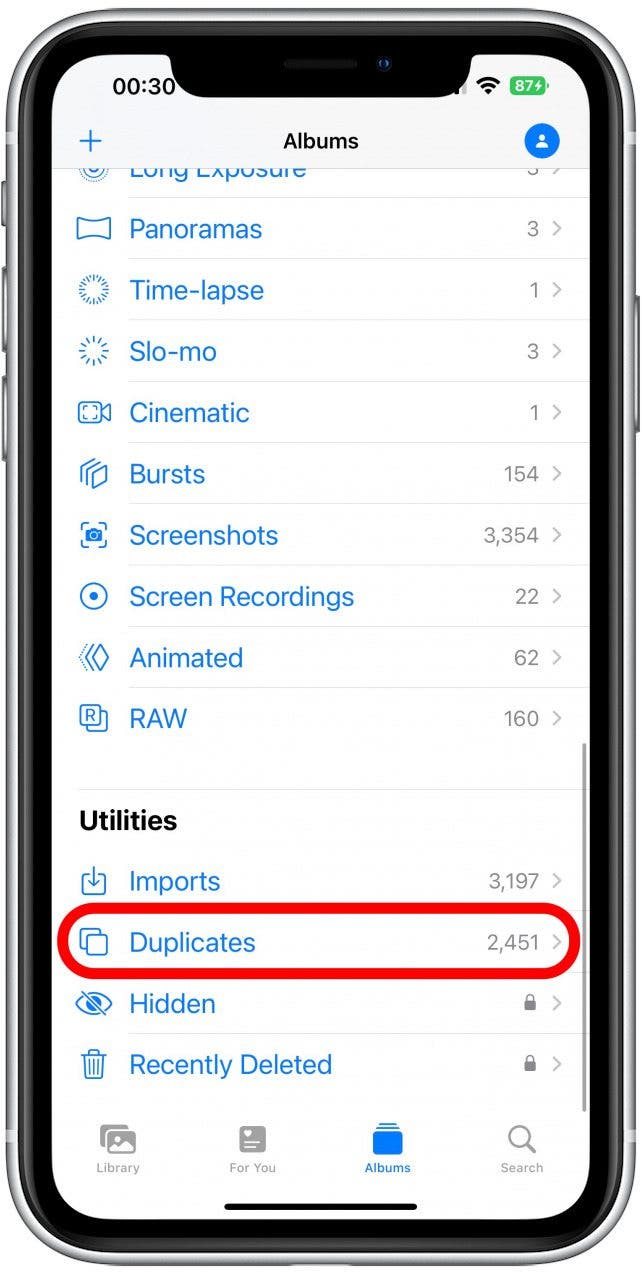
- Open the Photos app and tap Albums. If you were recently in an album, you may have to tap Albums multiple times until you see the main Albums menu. Scroll to the bottom, and under Utilities, tap Duplicates.
![Scroll to the bottom and under Utilities, tap Duplicates.]()
- Here you can go through them individually and tap on them, then tap the trash icon.
![Here you can go through them individually and tap on them, then tap the trash icon.]()
- You can also tap Select.
![You can also tap Select.]()
- Then tap Select All.
![Then tap Select All.]()
- Tap Merge. You’ll have to confirm that you wish to Merge the duplicates, leaving the highest quality and relevant data while moving the rest to Recently Deleted. If you do this, you can still access your Recently Deleted photos and move them back to your Photos app within 30 days of deletion, sometimes longer.
![Tap Merge.]()
- You can also go through individually and tap Merge to manually delete the duplicate.
![You can also go through individually and tap Merge to manually delete the duplicate.]()
- Finally, you can tap Select then go through and tap the photos which you wish to delete so that you have more control over what you are keeping.
![Finally, you can tap Select then go through and tap the photos which you wish to delete so that you have more control over what you are keeping.]()
- Tap the trash icon once you’ve selected the ones you wish to delete.
![Tap the trash icon once you’ve selected the ones you wish to delete.]()


Now that you're ready to get organized, feel free to share your favorite organization methods in the comments below. Next, learn how to make folders for photo abums on iPhone in the Photos app to take you organizing to the next level.