Swift Programming 101: Demystifying Swift's Initializers (Part 2)


In this second part of my two-part post on Demystifying Swift's Initializers, I explain the concepts of initializer chaining, two-phase initialization, and initializer inheritance using hands-on examples that walk you through some of these deeper concepts. You can read part 1 of this post at this link.
If you would like to follow along and perform the step-by-step instructions with this post (highly recommended) you can download the project we have completed so far at this link.
Initializer Chaining
Initializer chaining occurs when one initializer calls another initializer in the same class or in its superclass. In Apple's Swift documentation, there are three rules listed that govern initializer chaining. These three rules can be boiled down to one Golden Rule of Initializer Chaining:
When you instantiate an object, a designated initializer must be executed in every class in the inheritance chain.
For an example of this, check out the classes shown in Figure 1. ScientificCalculator is a subclass of Calculator, which in turn is a subclass of BusinessObject.
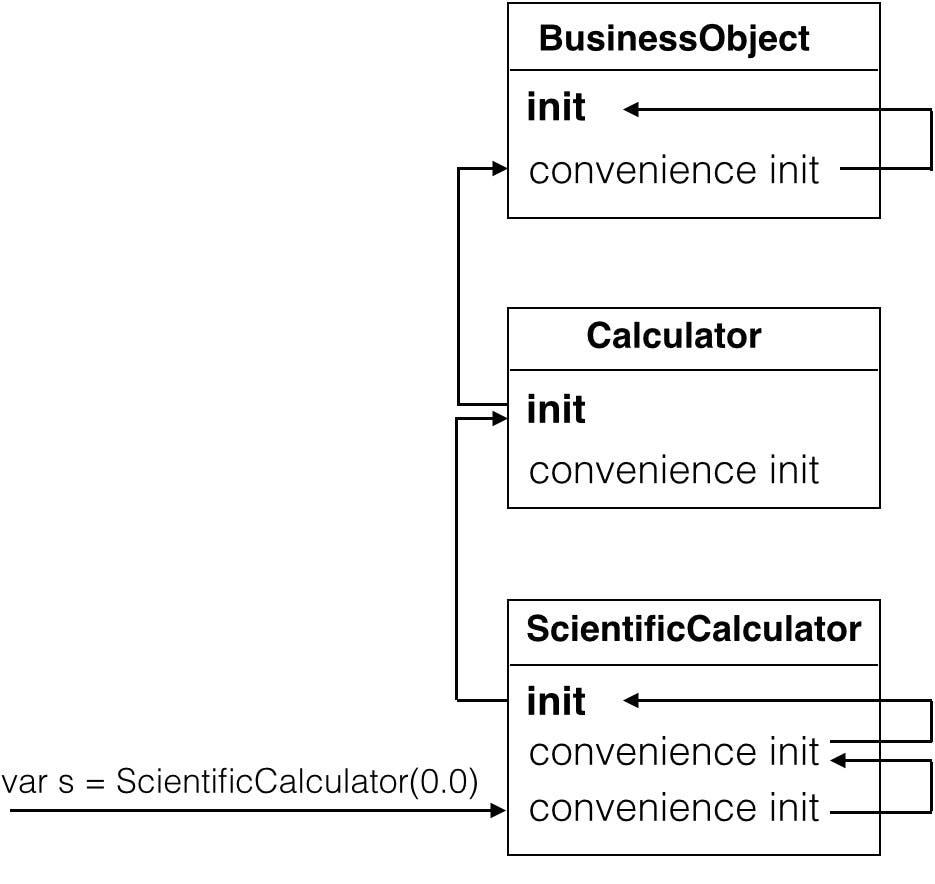 |
| Figure 1 - Initializer chaining in action |
The Golden Rule dictates that when you instantiate an instance of ScientificCalculator class, the designated initializer of each class (shown in bold) mut be executed. Figure 1 shows one possible path of initializer chaining, but regardless of the path, a designated initializer must be executed in every class in the inheritance chain.
Now let's take a look at Apple's three rules and see how they are really enforcing the one Golden Rule.
- Designated initializers must call a designated initializer from their immediate superclass - If you skip a level of inheritance, then you break the Golden Rule because one of the designated initializers in the inheritance chain would not be called.
- Convenience initializers must call another initializer available in the same class - If a convenience initializer called an initializer in a different class or didn't call another initializer in the same class, the designated initializer in that class would not be executed, breaking the Golden Rule.
- Convenience initializers must ultimately end up calling a designated initializer - If this rule is broken, then the designated initializer in the same class as the convenience initializer would not be executed.
Two-Phase Initialization
Swift's class initialization occurs in two phases. Figure 2 demonstrates these two phases when you instantiate an instance of the Translator class that is a subclass of the BusinessObject class (we'll change it so that it is in just a bit.)
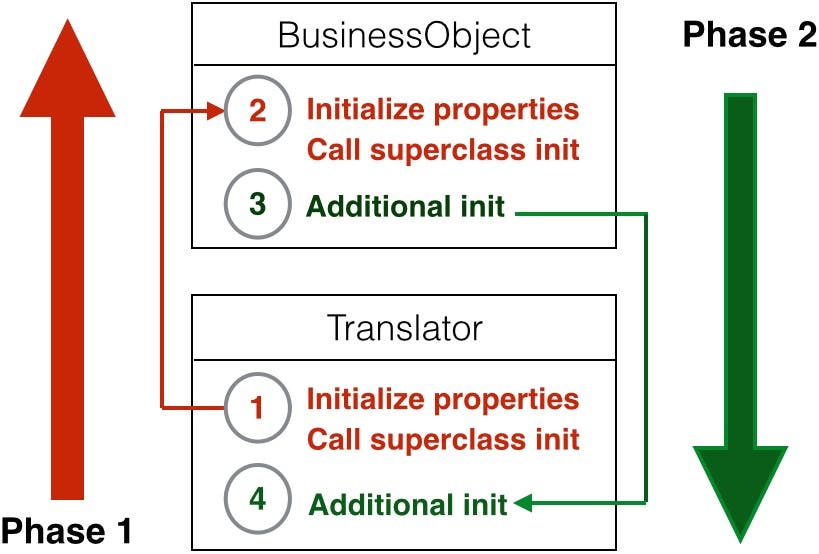 |
| Figure 2 - Two-phase initialization |
Here are the basic steps outlined in Figure 2:
- The Translator object's initializer is executed and its properties are initialized.
- The Translator object calls up to the superclass initializer and the BusinessObject properties are initialized.
- The BusinessObject's initializer can optionally perform additional initialization.
- Execution is transferred back to the Translator object's initializer, which can optionally perform additional initialization.
To help you fully understand how this two-phase initialization works, lets make the Translator class a subclass of BusinessObject and see how this affects its initialization.
- In the InitalizerDemo project, select the BusinessObject.swift file in the Project Navigator.
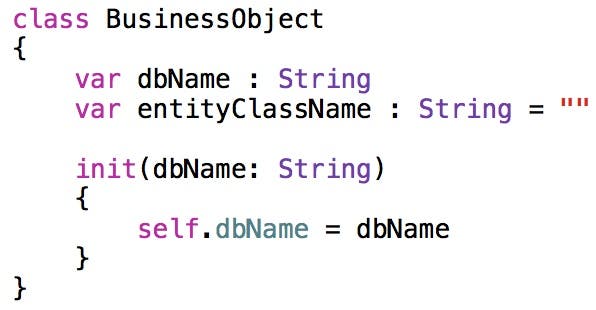
- Notice that the BusinessObject class has a dbName and an entityClassName property as well as a single designated initializer that accepts a dbName property:
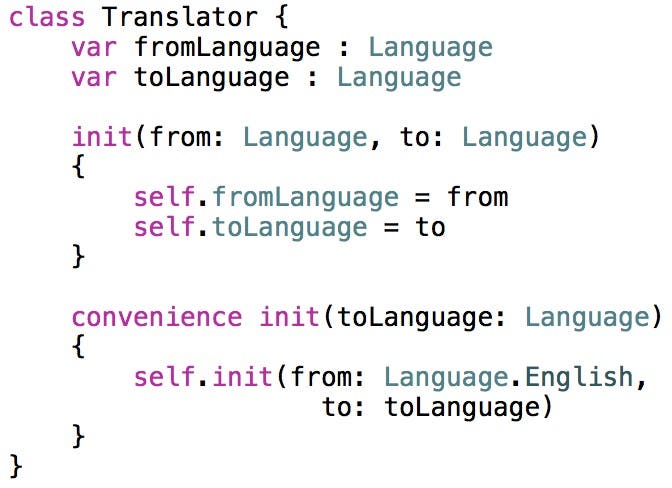
- Select the Translator.swift file in the Project Navigator. It has fromLanguage and toLanguage properties as well as a designated initializer and convenience initializer:
- Now let's create the inheritance relationship shown in Figure 3.
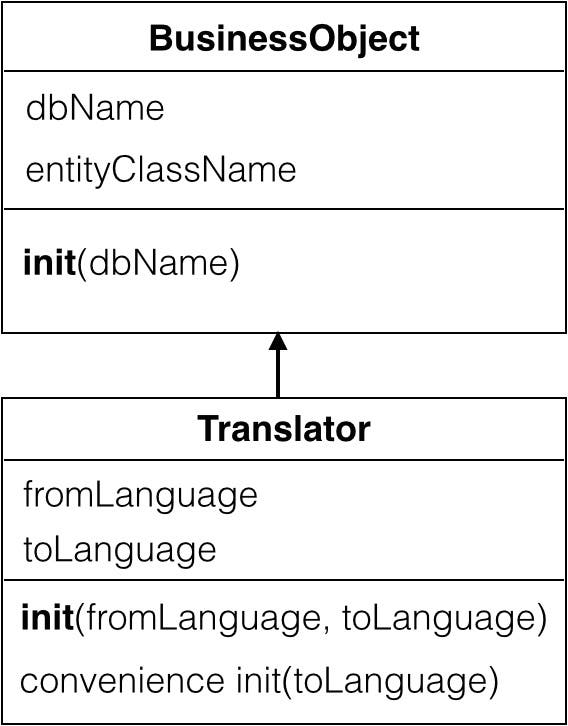 |
| Figure 3 - BusinessObject and Translator classes. |
To do this, add the following superclass declaration to the Translator class:

As soon as you specify this relationship, you're going to get a compiler error that states "Super.init isn't called before returning from init." To fix this problem, add the following call to the superclass initializer in the Translator class:
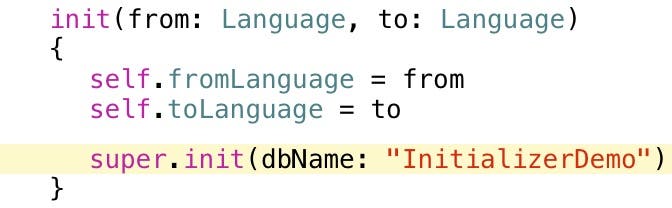
This code calls the BusinessObject class's designated initializer, passing a value for the dbName parameter.
Initializer Safety Checks
There are four basic safety checks performed by the Swift compiler to make sure Swift's two-phase initialization is set up properly in your custom classes. Let's take a look at each of these checks in the context of the Translator and BusinessObject relationship you have just set up.
Safety Check 1: A designated initializer must ensure that all of the properties introduced by its class are initialized before it delegates up to a superclass initializer.
The Translator class currently initializes both of its properties before it makes a call to super.init. If you comment out the code that initalizes the toLanguage property, you will see the compiler enforce Safety Check 1 as shown in Figure 4.
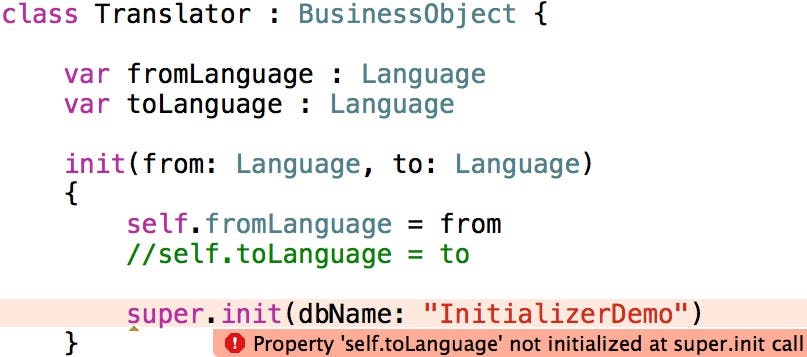 |
| Figure 4 - Calling super.init before initializing properties |
Safety Check 2: A designated initializer must delegate up to a superclass initializer before assigning a value to an inherited property.
The Translator class inherits the entityClassName property from the BusinessObject class. If you try to set the value of this property in the Translator's initializer before making a call to super.init, you will see the compiler enforce Safety Check 2 (Figure 5.)
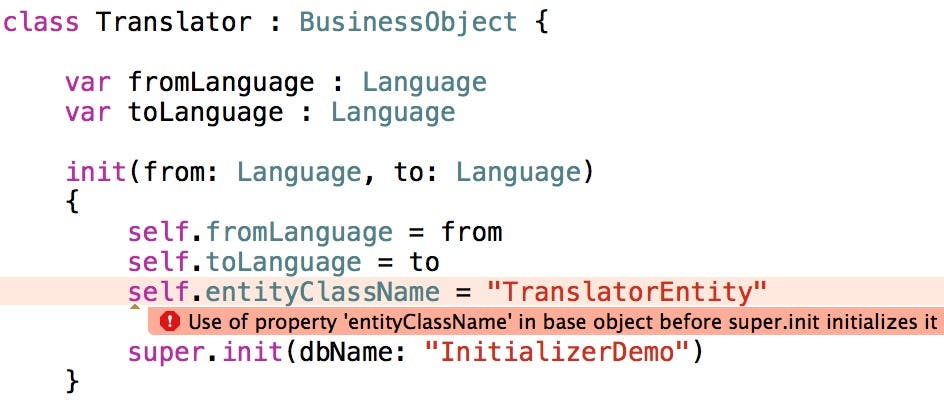 |
| Figure 5 - Initializing an inherited property before calling super.init |
Safety Check 3: A convenience initializer must delegate to another initializer before assigning a value to any property (including properties defined by the same class.)
If you add code to the Translator object's convenience initializer that sets the value of the fromLanguage property before calling the designated initializer, you will see the compiler enforce Safety Check 3 as shown in Figure 6.
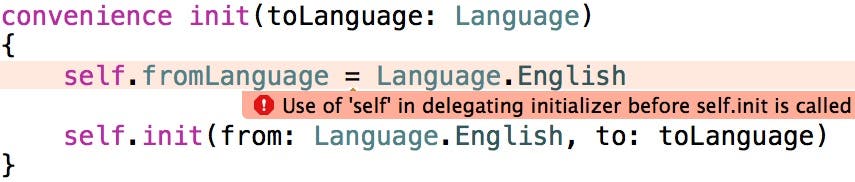 |
| Figure 6 - A convenience initializer assigning a value to a property before calling another initializer |
Safety Check 4: An initializer cannot call any instance methods, read the values of any instance properties, or refer to self as a value until after the first phase of initialization is complete.
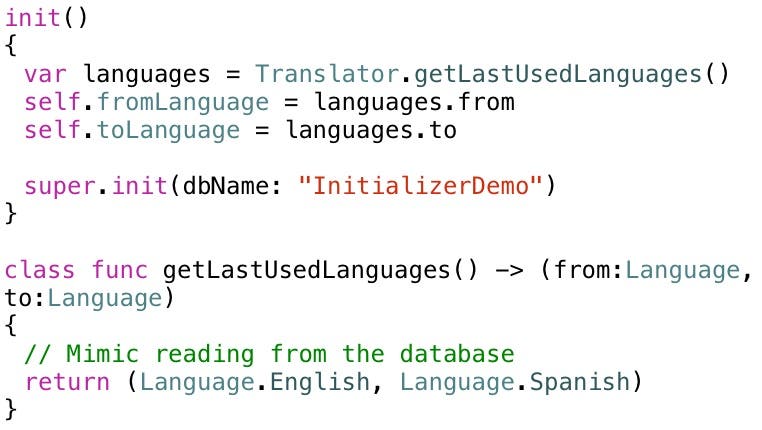
Add the following convenience initializer and instance method to the Translator class:

This convenience initializer first calls self.init, and then calls the getLastUsedLanguages instance method, which reads the previously used from/to langauges from a local database (we're just mimicking that here) and returns the languages in a tuple. The initializer then stores those values in the fromLanguage and toLanguage properties.
If you move the call to the instance method above the call to super.init, you would see the compiler enforce Safety Check 4 as shown in Figure 7.
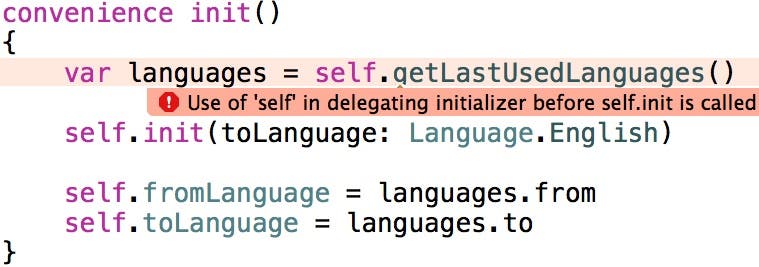 |
| Figure 7 - Calling an instance method before the first initialization phase is complete |
At times, you can get around this limitation by calling a class method rather than an instance method. To demonstrate this, change the convenience initializer and the instance method to the designated initializer and the class method shown here:
This gives the Translator class two designated initializers (which is perfectly legal) and allows the initializer to set the values of the fromLanguage and to Language properties in phase 1 of the initialization rather than waiting for phase 2.
Initializer Inheritance
Unlike regular methods, in Swift, initializers are only inherited by a subclass under specific conditions. Let's try a hands-on example to help you fully understand how this works. Since you are already familiar with the Translator class and its initializers, let's create a subclass of Translator to see how initializer inheritance works.
- Open the InheritanceDemo project in Xcode.
- Right-click the Translator.swift file in the Project Navigator and select New File... from the menu.
- On the left side of the New File dialog under the iOS section, select Source. On the right side of the dialog, select Swift File, and then click Next.
- In the Save File dialog, change the Name of the file to Subtranslator.swift and click the Create button. This adds the new code file to the Project Navigator.
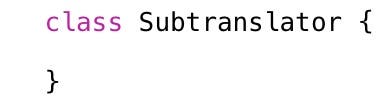
- Add the following class declaration with no superclass specified to the Subtranslator.swift file:
- With the Subtranslator.swift file selected in the Project Navigator, go to the File Inspector (the first button on the left in the Inspector toolbar) and select the InitializerDemoTests check box. This makes the Subtranslator class accessible to the unit test target.
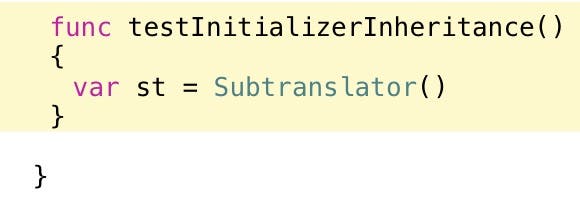
- Select the InitializerDemoTests.swift file in the Project Navigator and add the following test method before the closing curly brace of the class declaration:
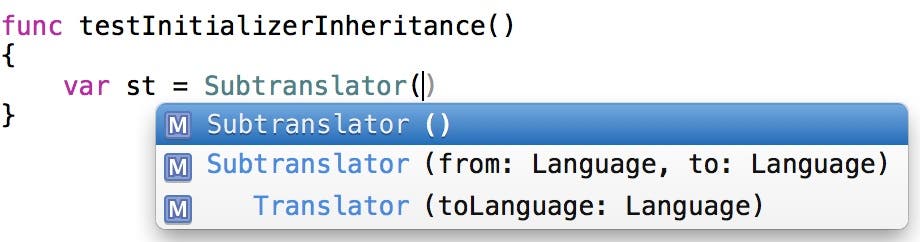
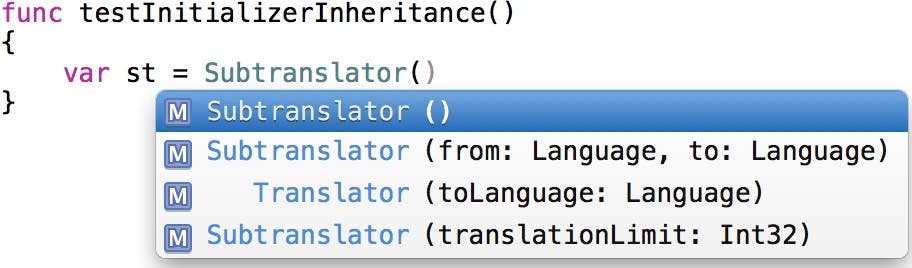
When you type the opening parentheses to invoke the Subtranslator initializer, notice there is only initializer shown in Code Completion as shown in Figure 8.
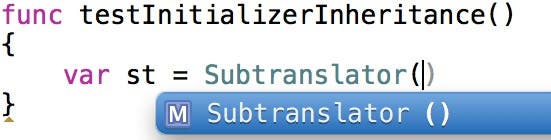 |
| Figure 8 - The default initializer |
This is the default initializer provided by Swift when you don't declare any initializers for a class.
Let's see what happens when we make Subtranslator a subclass of the Translator class.
- Add the following code to the Subtranslator.swift file's class definition:

- Press Command+B to build the project.
- Go back to the InitializerDemoTests.swift file and delete the parentheses in the code that creates the instance of the Subtranslator class. Afterwards, add the opening parentheses back in and you will see the list of initializer methods shown in Figure 9.
 |
| Figure 9 - Inherited initializers |
The first two initializers in the list are designated initializers inherited from the Translator class. That's because of Swift's first rule of initializer inheritance:
Rule 1: If your subclass doesn't define any designated initializers, it automatically inherits all of its superclass initializers.
We didn't declare any initializers in the Subtranslator class, so it inherited the designated initailizers from the Translator class.
The third initializer in the Code Completion list shown in Figure 6.13 is a convenience initializer. This initializer is also inherited from the Translator class because of Swift's second rule of initializer inheritance.
Rule 2: If your subclass provides an implementation of all of its superclass designated initializers—either by inheriting them as per rule 1, or by providing a custom implementation as part of its definition—then it automatically inherits all of the superclass convenience initializers.
The Subtranslator class inherited all of the Translator class's designated initializers, so it also inherited its convenience initializer.
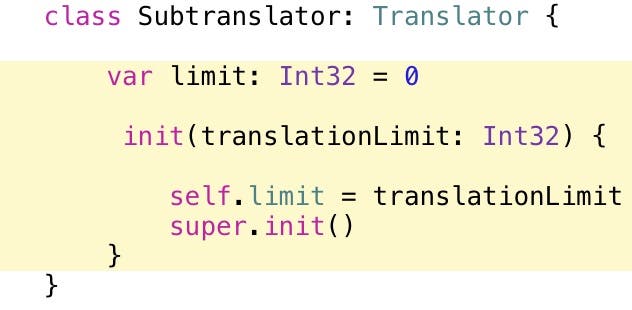
Now let's see what happens if we declare a designated initializer in the Subtranslator subclass.
- In the Subtranslator.swift file, add the following property and designated initializer:
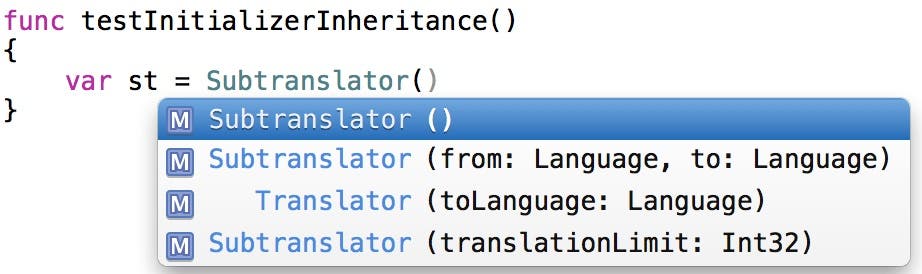
- Go back to the InitializerDemoTests.swift file and delete the parentheses in the code that creates an instance of the Subtranslator class. Afterwards, add the opening parentheses back in and you will see the list of initializer methods shown in Figure 10.
 |
| Figure 10 - No initializers are inherited. |
According to the rules of initializer inheritance, the Subtranslator class no longer inherits any initializers from the Translator class because it declares its own designated initializer.
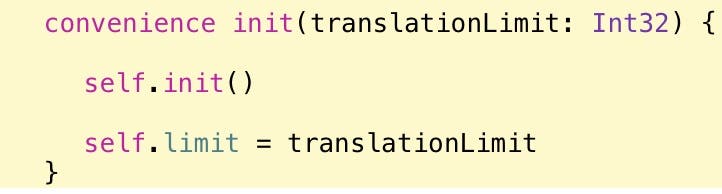
Let's change the Subtranslator class's designated initializer to a convenience initializer and see what happens.
- In the Subtranslator.swift code file, change the initializer to the following code:
- Now go back to the InitializerDemoTests.swift code file, delete the parentheses, add the opening parentheses back in, and you will see the list of initializers shown in Figure 11.
 |
| Figure 11 - The inherited initializers are back! |
From this, we learn that if a subclass only declares convenience initializers, it inherits all of its superclass initializers.
Overriding Initializers
As with regular Swift methods, if you override an initializer from a superclass, you use the override keyword and declare an initializer with the same parameters and types. Let's give it a try.
- In the Subtranslator.swift code file, add the following initializer overrides:

- Go back to the InitializerDemoTests.swift file and check out the initializers that now appear in the Code Completion list (Figure 12).
 |
| Figure 12 - Still inheriting the convenience initializers when manually overriding the designated initializers |
As you can see, the Subtranslator class still inherits the convenience initializers when it manually overrides the Translator class's designated initializers.
Another point to note about overriding initializers, is that a class can override a designated initializer and make it a convenience initializer instead. Doing this still allows the subclass to inherit the superclass convenience initializers.
Optional Properties and Constants
Optional properties automatically receive a value during initialization. You should declare a property as optional if it's allowed to have no value during initialization or at some later point.
Constant property values can be set during initialization, but they must have a definite value by the time the initialization process is complete. Constant values can only be set by the class in which they are declared. This means you can't modify the value of a constant property in a subclass.
Conclusion
That covers most of what you need to know about initalizing your custom classes! I hope this has demystified Swift class initialization for you. I recommend reviewing the information in both parts of this post as you create initializers for your own custom classes.

Kevin McNeish
Kevin McNeish is author of the new book “Learn to Code in Swift” as well as the “iOS App Development for Non-Programmers” book series (www.iOSAppsForNonProgrammers.com), winner of the Publishing Innovation Award. Kevin is also an award-winning app developer, software architect, and conference speaker in the U.S. and abroad. He has spent much of his career making difficult concepts easy to understand. Follow Kevin on Twitter: @kjmcneish.
Related topics
Related Articles
 Kenya Smith
 Rhett Intriago
 Amy Spitzfaden Both

 Rachel Needell

Apple Watch Always On Display: How to Turn Off & On

Most Useful Tesla Voice Commands List & How to Use Them Safely
 Olena Kagui
 August Garry
 Leanne Hays