Swift 101: Demystifying Swift's Initializers (Part 1)


Now that Apple has officially released Xcode 6 and the NDA has been lifted, it's time to dive deeper into Swift—Apple's new language for building iOS apps. Learning how to properly use initializers in Swift can be daunting at first. Swift's requirement that all stored properties in a class are initialized adds complexity to the initialization process. In the first part of this two-part post I'm going to demystify initializers as I provide a hands-on approach to learning how to best implement initializers in your custom classes.
When you create your own custom classes in Swift, you need to make sure that new objects instantiated from your custom class are properly initialized (ready to be used.) This usually involves making sure all stored properties have an initial value, as well as any other specialized setup your class may require.
In Swift, all stored properties must be initialized. They are not allowed to be in an unknown state. There are two main ways to store an initial value in a property:
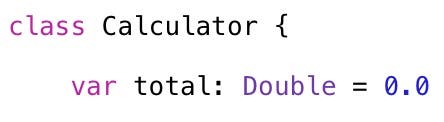
- In the property declaration - For example:
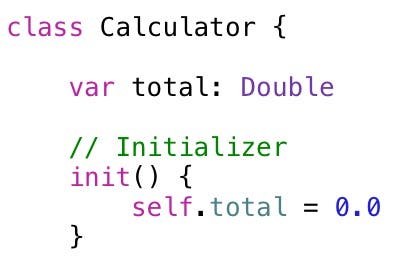
- In an initializer - For example:
In situations where the initial value of the property is always the same, you should choose the first option and initialize the value in the property declaration. This closely links the initialization of the property with its declaration, making your code more intuitive.
In cases where the initial value of a property changes, you should choose an initializer instead.
Initialization and Type Inference
If you store an initial value in a property's declaration, you don't need to specify the type of the property because Swift can figure out, or infer its type based on the type of the value you are storing in the property.
However, if you set the initial value of a property in an initializer, you must specify the property's type when you declare it.
Creating Initializers
Here are some of the basic rules governing initializers:
- Initializers in Swift are always named init.
- You don't use the func keyword when declaring an initializer.
- Initializers do not return a value.
- You can create several initializers for a single class that accept different parameters.
- If your class has a superclass, you must call one of its designated initializers from your custom initializer (more on that in just a bit.)
Initializer Parameters
You can create multiple intializer methods for your custom class that provide consumers of your class a variety of ways to initialize objects.
If you have a class that requires specific properties to be set by the app developer, you should absolutely create one or more initializers that allow those value to be passed in on initialization. This helps make your class self documenting.
To help you better understand how initializers work, let's create a Translator whose purpose is to translate phrases from one language to another (this will just be a mockup.) First, we will create the class with no initializers, and then we will improve it by adding an initializer with parameters.
To follow these step-by-step instructions, download the InitializerDemo sample project from this link.
- Open the InitializerDemo project located in the folder where you have downloaded it.
- Right-click the InitializerDemo group and then select New File... from the popup menu.
- On the left side of the Create File dialog under the iOS section, select Source.
- On the right side of the dialog, select the Swift File template, and then click Next.
- In the Save File dialog, change the Name of the file to Translator.swift, and then click the Create button This adds the Translator.swift file to the project.
- Add the following enumeration declaration at the top of the file below the import Foundation statement:
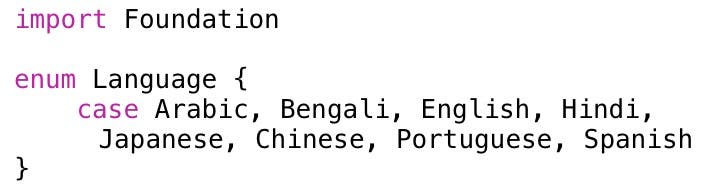
This enumeration declares all the languages the Translator class supports.
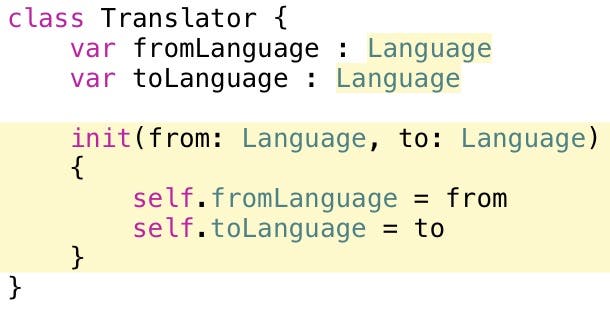
- Now add the following class declaration below the enumeration declaration:
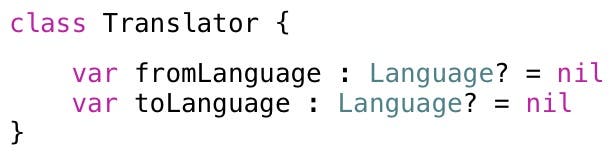
In this example, the main purpose of the Translator class is to translate phrases from one language to another. It can't perform any transalations without knowing the "from" and "to" languages. However, the fromLanguage and toLanguage properties are marked as optional. From a practical perspective, they are anything but optional!
Note: You don't need to explicitly set optional properties to nil, but I did this to get around a bug with the Swift compiler!
- Let's try to create an instance of this class from a unit test. To do this, with the Translator.swift file selected in the Project Navigator, go to the File Inspector (the first button on the left in the Inspector toolbar) and select the InitializerDemoTests check box as shown in Figure 1. This makes the class accessible to the unit test project.
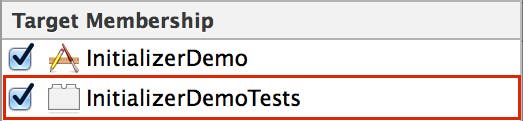 |
| Figure 1 - Select the InitializerDemoTests target membership |
- Under the InitializerDemoTests group in the Project Navigator, select the InitializerDemoTests.swift file.
- Add the following test method to the bottom of the code file above the closing curly brace of the class:
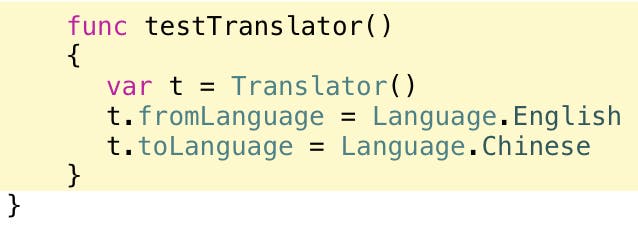
This is a bad design because it requires the developer to figure out for themselves that the fromLanguage and toLanguage properties must be set before the Translator object can be used.
Let's create a better design.
- Go back to the Translator class and remove the ? = nil after the Language type to indicate these properties are not optional. Afterwards, change the initializer as shown here:
This class now has a single initializer with from and to parameters of type Language.
- Press Command+B to build the project. You should now have one compiler error. To see what's causing the problem, select the InitializerDemoTests.swift file in the Project Navigator and you should see the error shown in Figure 2.
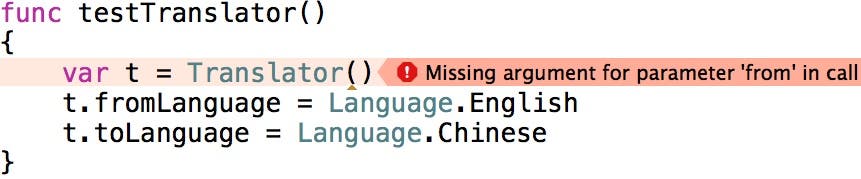 |
| Figure 2 - The "Missing argument" compiler error |
The complete text of the error states "Missing argument from parameter 'from' in call." Why are you getting this error?
If you don't specify a custom initializer for a class, behind the scenes, the Swift compiler adds a default initializer. That's why the code in the unit test that tries to use this default initializer fails.
In our example, this is exactly what we want! We want to force developers to pass the two necessary Language values when they create an instance of the class. Let's change the code to do that now.
- First, delete all the code inside the testTranslator method. Afterwards, add the following code:

When you type the left parentheses, Code Completion pops up offering the option shown in Figure 3.
 |
| Figure 3 - Code Completion for the custom initializer |
This makes it abundantly clear to a developer that they must specify the "from" and "to" languages when creating an instance of the Translator class.
- With the Code Completion template displayed (if it's not visible, press escape to redisplay it), press tab to move to the from placeholder and type Language.English. Press tab a second time to move to the to placeholder and enter Language.Chinese. Afterwards, press the right arrow key to have Swift auto-fill the closing parentheses for you. When you're finished, your code should look like this:
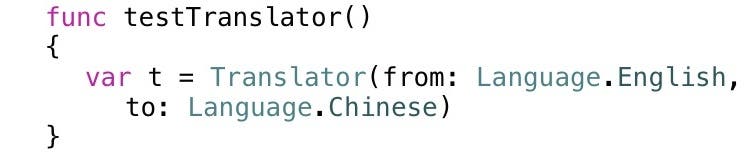
As you can see, Code Completion inserts the parameter names into the method call. This is mandatory. If you leave out these parameter names, you will get a compiler error!
This is not a true unit test, but I wanted you to experience calling different types of initializers.
Local and External Parameter Names
Local and external parameter names work a little different for initializers than for regular methods.
Since an initializer is always called init, you don't have the luxury of creating an initializer name that includes a description of the first parameter. Because of this, Swift provides an automatic external name that is the same as the local name for every parameter that you declare as can be seen in Figure 3.
If you want to declare an external name that is different than the local name, you use the same syntax as with regular Swift methods. For example, the following code declares a different external name for the from and to local parameter names:

In this example, declaring external parameter names changes the names of the parameters when you call the initializer as shown in Figure 4.
 |
| Figure 4 - The new external parameter names in action |
If you don't want to provide an external name for a parameter, simply insert an underscore before the local parameter name.
Designated and Convenience Intializers
Swift supports two main types of initializers—designated initializers and convenience initializers. Let's take a closer look at each so you can learn how best to initialize your custom classes.
Designated Initializers
A designated initializer is the main initializer for a class. It initializes all properties declared in the class, and is responsible for calling an initializer in its superclass (if it has a superclass.)
For example, in the Translator class, init:from:to: is the designated initializer because it initializes both of the properties that are declared in the class.
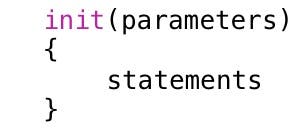
Here is the syntax of a designated initializer:
Every class must have at least one designated initializer. You can have more than one, but its more common to have just one.
Convenience Initializers
A convenience initializer is a secondary class initializer that typically accepts fewer parameters than a designated initializer, but then calls the designated initializer with defaults set for some of the parameters. Convenience initializers are optional, but they often make it easier for your classes to be instantiated.
Here is the syntax of a convenience initializer:
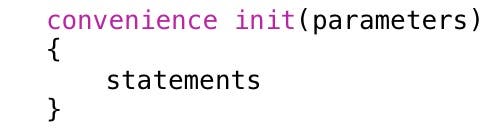
Let's create a convenience initializer so you can more clearly understand how they work.
- In the InitializerDemo project, select the Translator.swift file in the Project Navigator.
- Add the following new initializer to the Translator class:
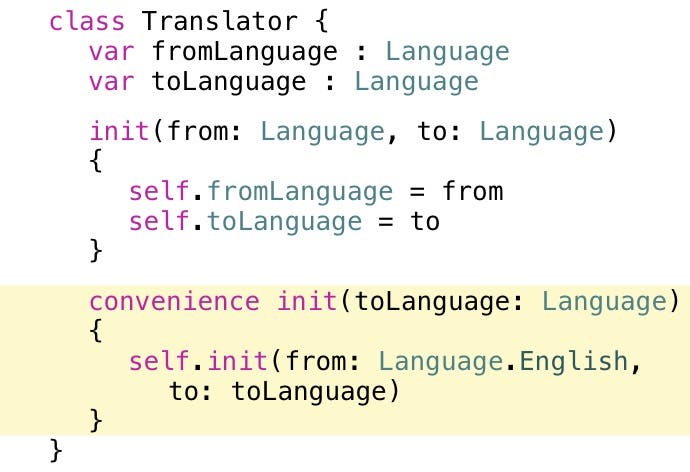
Here are some important points to note:
- The convenience keyword is used to mark the method as a convenience initializer.
- The convenience initializer calls the designated initializer in the same class, passing a default Language.English value as the first parameter and passing through its own toLanguage parameter as the second parameter.
- The convenience initializer allows you to instantiate the class by passing only one parameter to the initializer. For example:

- When you instantiate an instance of the class, Code Completion now lists both initializers as shown in Figure 5.
 |
| Figure 5 - Multiple initializers in Code Completion |
Conclusion
This post covers the bare essentials of initializers in Swift, and there is much more to learn! In my next post, I will discuss the topics "Initializer Chaining", "Two-Phase Initialization" and "Initializer Inheritance". Stay tuned!

Kevin McNeish
Kevin McNeish is author of the new book “Learn to Code in Swift” as well as the “iOS App Development for Non-Programmers” book series (www.iOSAppsForNonProgrammers.com), winner of the Publishing Innovation Award. Kevin is also an award-winning app developer, software architect, and conference speaker in the U.S. and abroad. He has spent much of his career making difficult concepts easy to understand. Follow Kevin on Twitter: @kjmcneish.
Related topics
Related Articles

Apple's Groundbreaking New Headset & Everything Else Announced at WWDC 2023
 Amy Spitzfaden Both
 Olena Kagui
 Rhett Intriago

 Hal Goldstein


 Rachel Needell