How to Record, Edit, & Share Recordings Using Voice Memos (Updated 2019)

Tamlin Day pairs a lifelong love of technology with a passion for teaching, bringing approachable Apple expertise to his work as a writer and educator at iPhone Life.
Learn More Tamlin Day pairs a lifelong love of technology with a passion for teaching, bringing approachable Apple expertise to his work as a writer and educator at iPhone Life.
Learn MoreThe Notes app is great for jotting done ingredients or creating a to-do list, but did you know that you can create and add recordings to a note using the Voice Memos app? That's just one of the many things you can do with the Voice Memos app. In this article, we'll cover how to create, edit, share, and save recordings made using the iOS Voice Memos app. Whether you're brainstorming an idea, recording a lengthy lecture, or sharing ideas with a friend, we'll teach you how to conquer every aspect of the Voice Memos app. Read on to learn all about how to record your thoughts using Apple's Voice Memos app.
The Voice Memos app on your iOS device is surprisingly comprehensive. Voice Memos lets you record, edit, trim, share, and save your recordings in all sorts of ways. I've broken down the different functions of the Voice Memos app to make this complicated subject easy to navigate.
- Recording Basics
- How to Record a Voice Memo
- How to Pause, Edit, & Resume a Recording Session
- How to Edit & Trim a Saved Memo
- How to Share a Voice Memo
- How to Create a Note Using Voice Memos
Recording Basics
Before you begin recording, you'll want to make sure you've optimized your environment. Fortunately, the mic on your iPhone, iPad, or Apple Watch is pretty good at picking up your voice. But, if you're recording on a crowded train or a windy day, you might run into a few hiccups. You may also want to learn how to turn on Talk to Text on an iPhone.
Here's how to get the most out of a recording session:
- If possible, make sure you are in a quiet space.
- Holding your phone closer to you when you speak will help your mic pick up your voice over the ambient sound.
- Be sure not to cover your microphone with your finger or your iPhone case.
- Cupping your hand around your mic as you speak will amplify your voice and cut out some of the ambient sounds.
How to Record a Voice Memo
Follow these basic steps to record a simple memo using Voice Memos:
- Open the Voice Memos app.
- Tap the red circle to begin recording.

- Tap the red square to stop your recording. Your voice memo will save automatically.

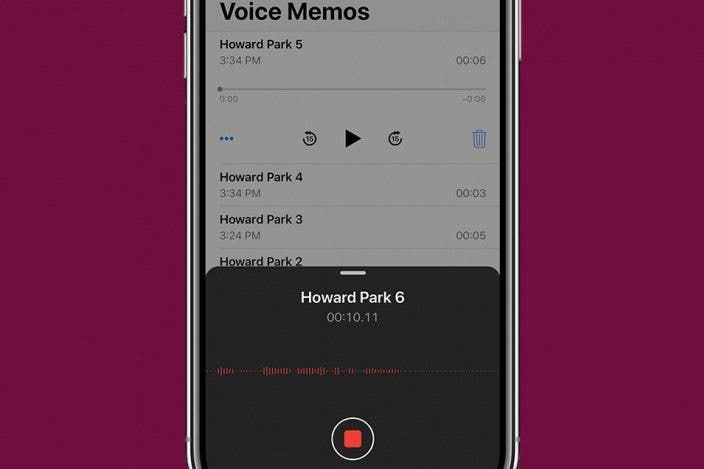
How to Pause, Edit & Resume a Recording Session
If you need to record a complicated memo, Voice Memos will let you pause, edit, and resume your memo during a recording session.
To use the advanced recording features in the Voice Memos app:
- If you want to pause during your recording, tap the white dash to expand the interface.

- Tap the pause button to pause your recording.
- Tap Resume to continue recording.


- You can scrub forward or backward in your recording to edit your voice memo by swiping your finger left and right in the area indicated below.

- You can also jump forward or backward fifteen seconds using the rewind/fast forward buttons.

- When you find the section you want to edit, tap Replace to edit your current Voice Memo.
- When you are finished recording, tap Done.


How to Edit & Trim a Saved Memo
If you want to make changes to an existing memo, the Voice Memos app has a great editing function that allows you to trim or replace existing audio.
To edit and trim a saved voice memo:
- Before you edit an existing recording, you might wish to make a duplicate. To make a duplicate, select the three dots below the memo you want to edit.
- Tap duplicate.


- To edit the duplicate, tap the three blue dots below the memo.
- Tap Edit Recording.

- From here, you can scrub forward or backward and make edits as described in the previous section.
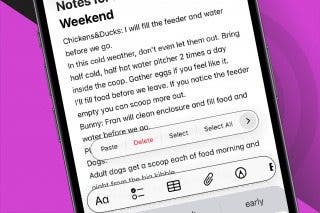
- To Trim a recording, tap the Crop icon in the top right corner.

- Scrub left or right in the area indicated below.
- When you have found the content you want to keep, use the edit bar in the bottom left to isolate that section and tap Trim.

- Alternatively, if you want to delete the selected section, tap Delete instead.

- You can tap Cancel at any time to back out and start over.
- When you finish your edits, tap Save.


How to Share a Voice Memo
Once you've finished recording your voice memo, you want to share it with a friend or save it to a cloud storage account.
To share an existing voice memo:
- Tap the three blue dots below the voice memo you want to share.
- Tap Share.

- From here, you can share the Voice Memo via AirDrop, Messages, Facebook, email, iCloud, etc.

How to Create a Note Using Voice Memos
If you want to add a voice memo to an existing note in the Notes app or create a new note for the Notes app using a Voice Memos recording, you can do that as well!
Here's how to convert or add a Voice Memos recording to your Notes app:
- Tap the three blue dots below the memo you want to share with the Notes app.
- Tap Share.
- Tap Add to Notes. From here, you can add text above your voice memo to include in a note.

- To add this recording to an existing note, tap Choose Note, then select the note you’d like to have attached to your voice memo.


- To create a new note, tap New Note.
- When you are finished, tap Back.
- Tap Save.


Tamlin Day
Tamlin Day is a feature web writer for iPhone Life and a regular contributor to iPhone Life magazine. A prolific writer of tips, reviews, and in-depth guides, Tamlin has written hundreds of articles for iPhone Life. From iPhone settings to recommendations for the best iPhone-compatible gear to the latest Apple news, Tamlin's expertise covers a broad spectrum.
Before joining iPhone Life, Tamlin received his BFA in Media & Communications as well as a BA in Graphic Design from Maharishi International University (MIU), where he edited MIU's literary journal, Meta-fore. With a passion for teaching, Tamlin has instructed young adults, college students, and adult learners on topics ranging from spoken word poetry to taking the perfect group selfie. Tamlin's first computer, a Radioshack Color Computer III, was given to him by his father. At 13, Tamlin built his first PC from spare parts. He is proud to put his passion for teaching and tech into practice as a writer and educator at iPhone Life.
Related topics
Related Articles

 Rhett Intriago
Updated Siri? A Major Redesign? Everything We Know about iOS 19
 Amy Spitzfaden Both
 Leanne Hays
Apple Spring Buyer’s Guide 2023, Yellow iPhone 14 & Apps for Learning Guitar
 Susan Misuraca
Is Apple Watch with Cellular Worth It? We Have the Answer

How to Pick the Best iPhone Case with Card Holder/Wallet
 Olena Kagui
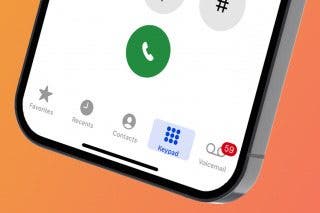
Quick Launch a Selfie with a Shortcut You Didn't Know Exists
 David Averbach
 Rachel Needell