Restricted! iPhone & iPad Parental Control with iOS 12


This will sound strange coming from someone who works for a tech publication, but I’ve been so worried about buying my daughter a cellphone that I’ve put it off until she was literally the last kid in her grade without one. What have I been worried about? Everything from the more minor things like screen addiction and gigantic data overages, to larger, 60 Minutes-level fears of her getting cyberbullied or meeting an online predator. Now, though, she’s almost 14 and will be in high school next year. I’ve come to the realization that it’s part of my job as a parent to ease my teenager into the technology that’s an everyday part of all our lives, rather than keeping her from it so she has to acclimate herself all at once when she’s old enough to purchase her own smartphone.
This weekend I marched myself out of the house and bought Arwydd her very own iPhone 6S, which I made sure can be upgraded to iOS 12. Why is it so important that the phone be compatible with Apple’s latest operating system? That’s because iOS 12 offers the most comprehensive package of curbs, restraints, and limits yet with a collection of parental controls called Screen Time. Screen Time not only helps parents keep apps and websites restricted, but also offers monitoring on how much time kids have spent, and in what applications and activities. In the past, I would have had to comb through an array of parental control apps, or even consider spy apps, an app lock app, or an iPhone tracker, but now that Apple has improved its parental control package I don't have to. In this article, I'll walk you through everything I've learned about iPhone parental controls (these work for the iPad as well) so you can use Screen Time, too.
Related: How to Set Up Family Sharin
Things to Do Before You Set Up iPhone Parental Controls
Screen Time is only offered with iOS 12 and later, so make sure you’ve updated the software on your child’s device, as well as your own. Next, you’ll need to set up Family Sharing. Once that’s complete:
- Open the Settings app on your iPhone or iPad.
- Scroll down to Screen Time and tap on it.

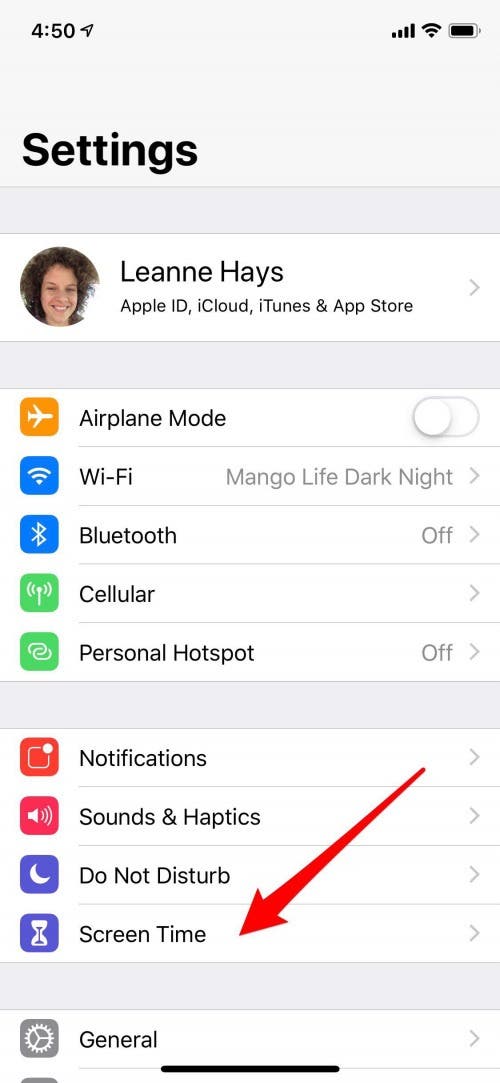
- You’ll see your child or children’s names under the Family heading; pick a kid to begin with and select their name.
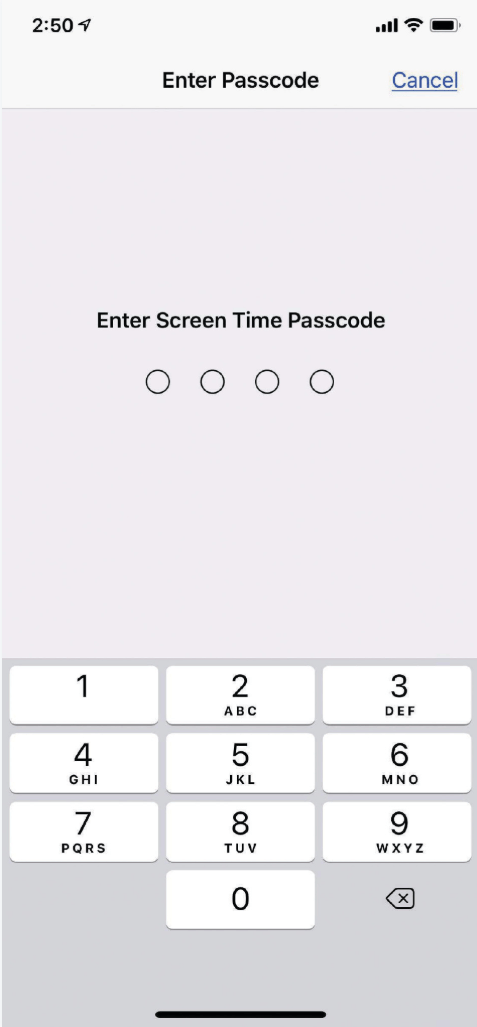
- You’ll have the option to Set a Screen Time Passcode; it’s essential to complete this step and make sure it’s a number your child can’t guess, otherwise they can go in and change the restrictions you set.

Set Downtime to Keep Phone Use Restricted at Bedtime
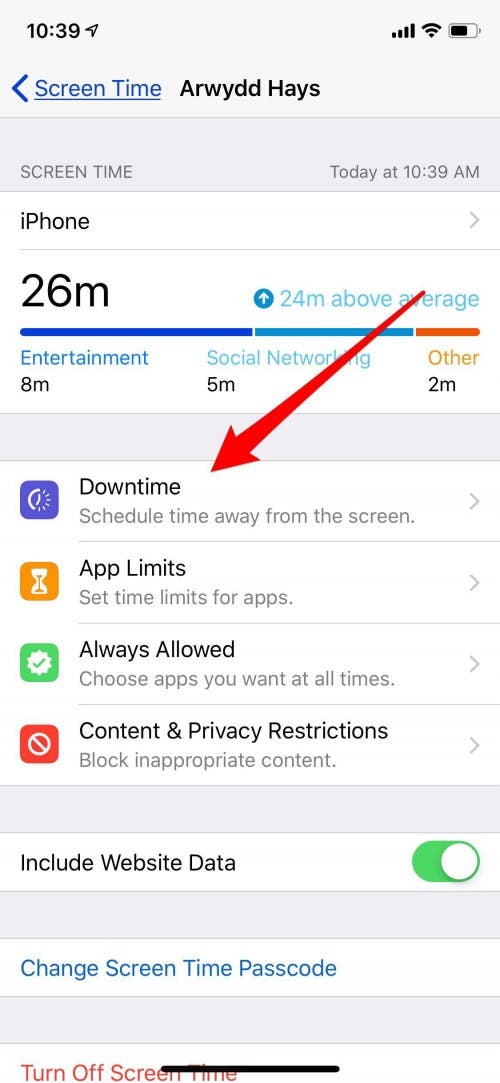
The first Screen Time setting I tackled was Downtime, which enabled me to choose a time of day when my daughter wouldn't be able to use apps besides Phone, Messages, and other apps I specified. To set this up:
- Tap Downtime in your child’s Screen Time menu.
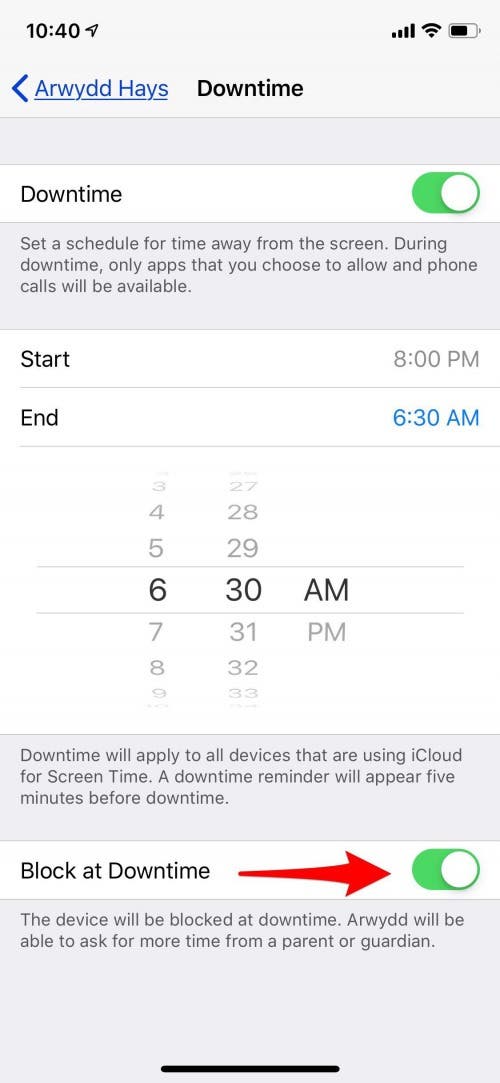
- Toggle on Downtime and pick a start and end time.

I chose 8 p.m. to 6:30 a.m., to give my daughter an uninterrupted block of time to get ready for bed and sleep without distractions from her phone. There’s also an option at the bottom of this section called Block At Downtime; toggle this on if you don’t want your child to have access to anything on the device unless they request and get approval from you.
Block Adult Sites & Other Inappropriate Content
After making sure my daughter isn't on her phone at all hours and missing sleep, my next priority was to block inappropriate content. To accomplish this:
- Tap on Content & Privacy Restrictions.
- Enter the Screen Time Passcode.
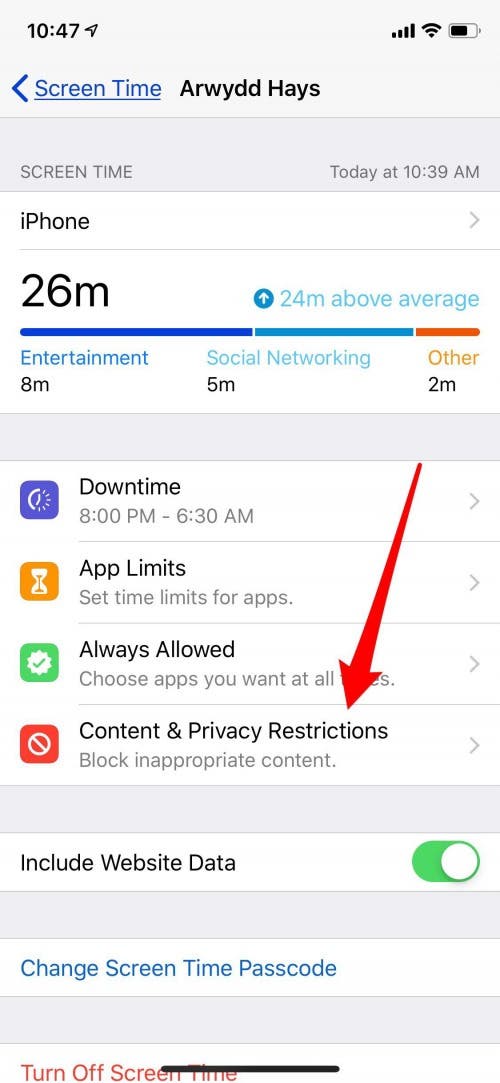

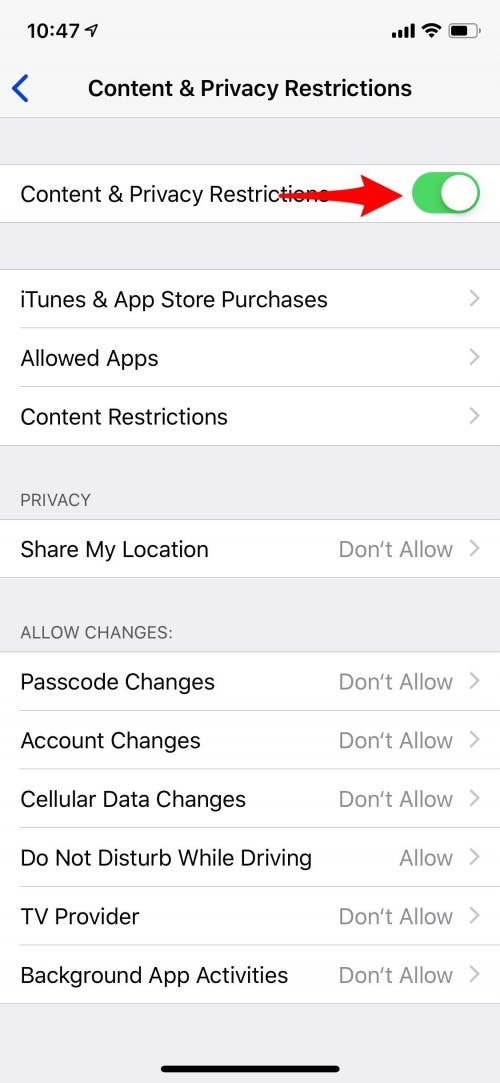
- Toggle on Content & Privacy Restrictions.
- Now you can go through each category of restrictions and set them as you see fit. I chose to set content to clean, with no adult websites and a PG-13 and TV-14 limit for movies and TV shows.

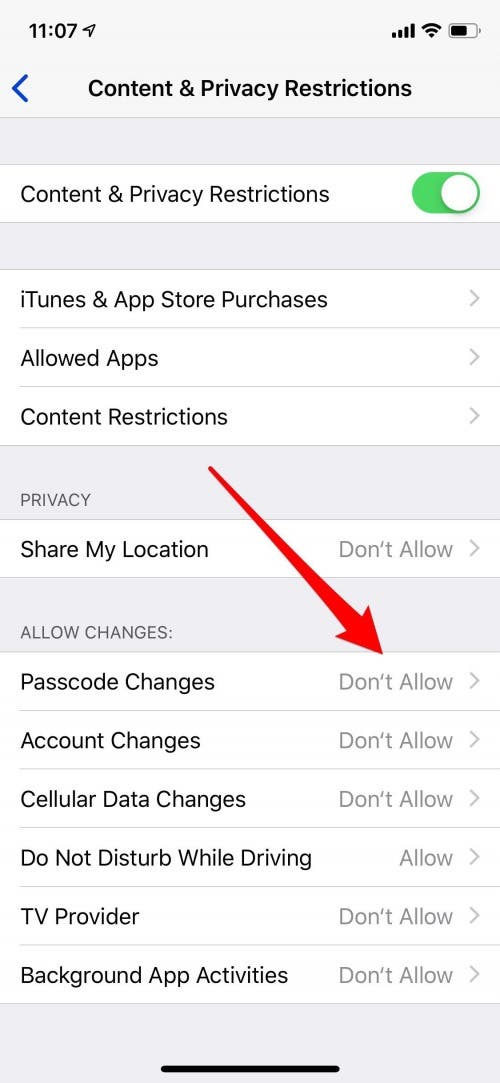
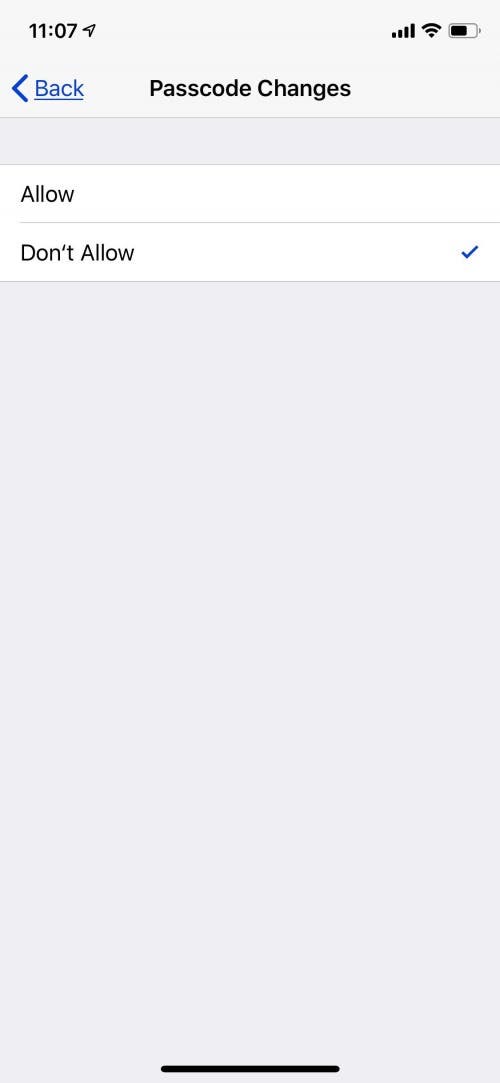
- To keep the boundaries you’ve set in place, be sure to disallow Passcode and Account Changes by tapping Passcode Changes, then Don't Allow.
Location Services
Also under Content & Privacy Restrictions, be sure to turn off Share My Location. This keeps app developers and advertisers from knowing your child’s location. I’ve always found this tracking to be invasive and creepy and have turned it off on my own devices except for essentials like Apple Maps.


Set an App Lock or Limit
With content set to appropriate levels, I moved on to app limits. It’s surprising how customizable these are; parents can allow a different amount of time for All Apps & Categories or set limits for each type of app. We can allow more or less time for different days of the week, and at the end of the allotted time kids are blocked from further app use until the next day, although they can ask for more. I picked one hour total for all apps during the school week and two hours for Saturday and Sunday.
- Tap on Content & Privacy Restrictions again, then enter your password.
- Now, tap on App Limits.
- Tap on All Add Limit.
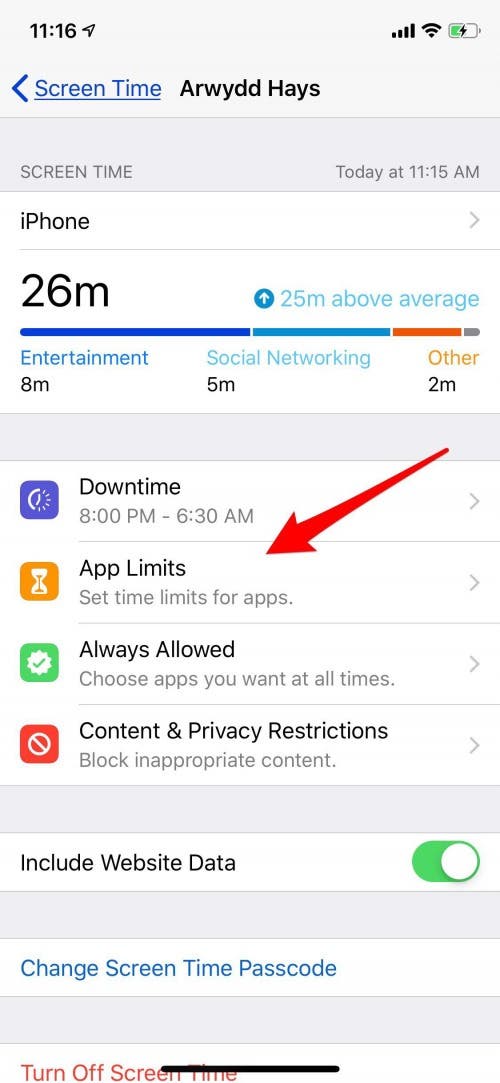

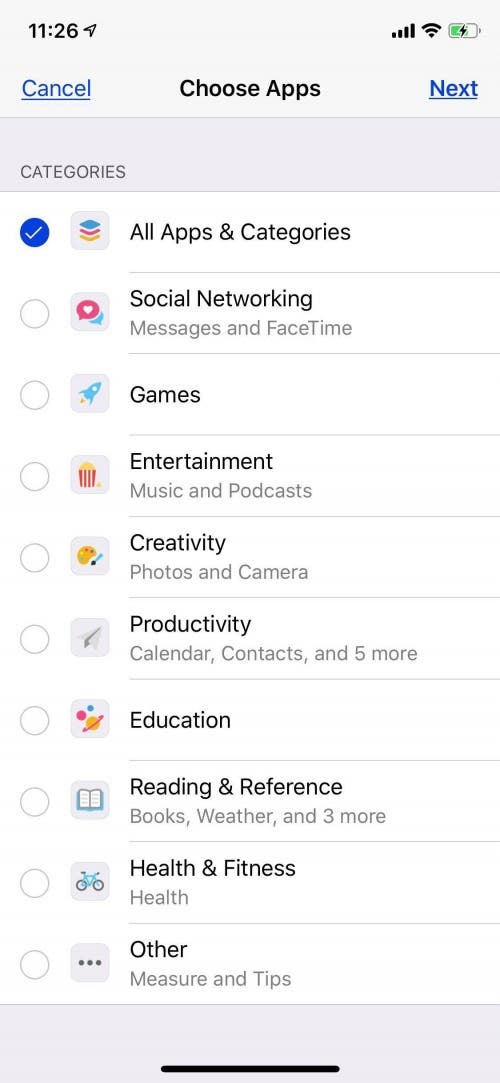
- From here you can add limits to All Apps & Categories, or single out specific types of apps to limit. Tap your choice, then Next, then customize your limit. If you'd like to add more restrictions, start the process over for each one, beginning with the Add Limit step.
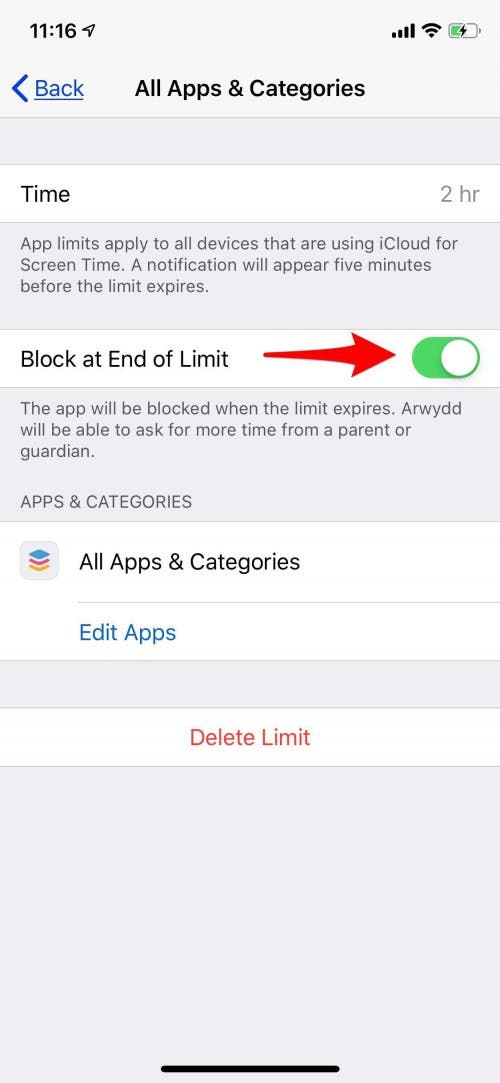
- Toggle on Block at End of Limit once you've set each limit so that your child can't keep using their phone without permission once they've used their allotted time.
Restrict iTunes & App Store Purchases
Remember, purchases are charged to the iTunes account of the Family Group leader (probably you), and these expenses can add up in a hurry. To prevent an unexpected bill, take the following steps:
- Tap on the Content & Privacy Restrictions tab again, then enter your passcode.
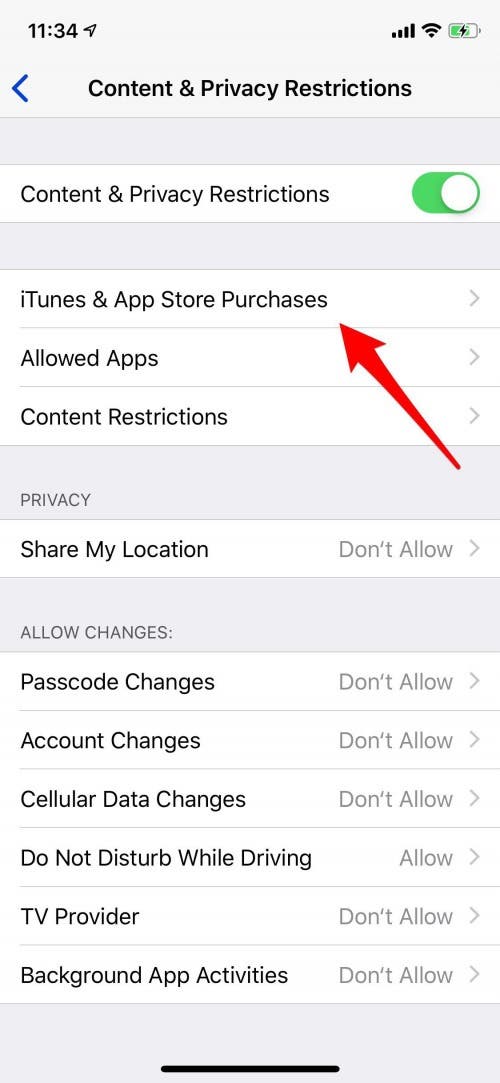
- Now, tap on the iTunes & App Store Purchases tab.
- From here you can decide whether or not to let your child install apps, delete apps, and make in-app purchases.
- Tap Always Require in the Require Password section to make sure permission is asked before making additional purchases.

Set Always Allowed Functions & Apps
Now that you’ve decided what you don’t want your kid to access on their device, it's time to choose the functions and apps that will work even during Downtime. Phone is the one app you can’t remove, but I don’t mind because in the case of an emergency we’d all want our kids to be able to call for help. I left Maps on in Always Allowed, too, in case my daughter ever gets lost that would be a truly useful tool for her to have.
- Tap on Always Allowed then enter your passcode.
- From here you can tap the plus sign in the green circle under Choose Apps to add an app you'd like your child to have unlimited access to.
- Tap the minus to remove an app from the Allowed Apps category.


How to Track Your Child's iPhone Activity
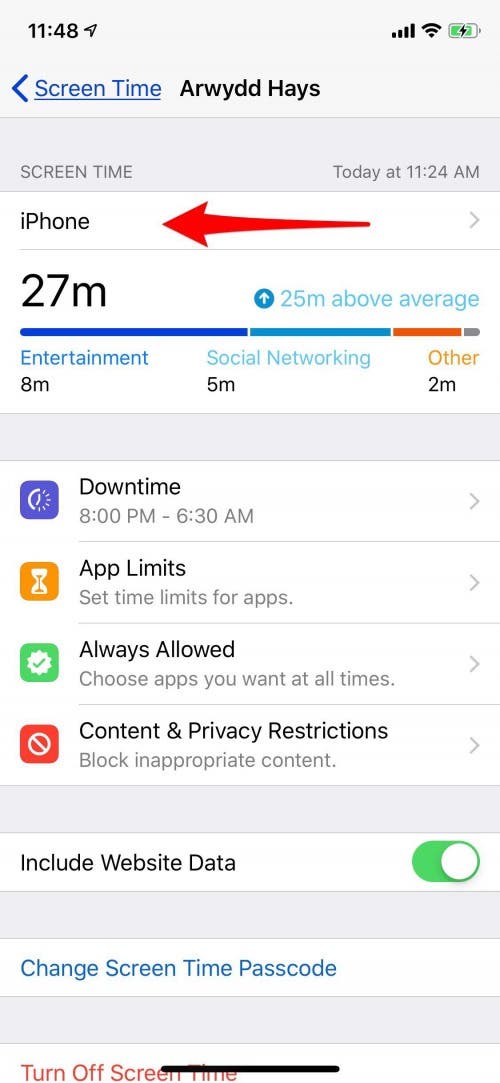
After setting all of your child’s Screen Time limits, their device will start collecting data about which apps they’ve used, as well as when and for how long. You can use this data to determine if the restrictions you’ve chosen are adequate, or if they need to be changed to work better for your kid and yourself. To find this information:
- Tap on the device you'd like to check up on at the top of your child's Screen Time page. If they have more than one device, there will be a category for each one.
- From here you'll be able to find information on the current day or the last seven days, including time used in specific categories and apps, and whether or not device usage is above, on, or below average.

How Are the Parental Controls Working So Far?
My daughter isn’t thrilled about the restrictions I’ve set, but she’s so happy to have a phone that she isn’t fussing too much. My grace period may wear off, though, and of course, we’ll need to revisit her limits as she gets older and more mature. As far as my satisfaction with the experience is concerned, I’m having to get used to my daughter constantly texting and FaceTiming her friends. So far, she’s accepted my reminders to step back into real life and get off the phone. I’ve been pleased overall with the Screen Time settings and how they’ve helped, but I didn’t realize that Arwydd would still be able to text as well as make calls during her Downtime. With that knowledge, I may need a plan to keep her phone downstairs after bedtime, so she doesn’t text late into the night when she should be sleeping. Ah, modern parenting...

Leanne Hays
Leanne Hays has over a dozen years of experience writing for online publications. As a Feature Writer for iPhone Life, she has authored hundreds of how-to, Apple news, and gear review articles, as well as a comprehensive Photos App guide. Leanne holds degrees in education and science and loves troubleshooting and repair. This combination makes her a perfect fit as manager of our Ask an Expert service, which helps iPhone Life Insiders with Apple hardware and software issues.
In off-work hours, Leanne is a mother of two, homesteader, audiobook fanatic, musician, and learning enthusiast.

 Rhett Intriago
 Olena Kagui

 Leanne Hays
 Susan Misuraca
 Rachel Needell



 Amy Spitzfaden Both
