How to Take a Screenshot on a Mac
Here's how to use a keyboard shortcut to take a screenshot on your iMac or MacBook.


Leanne puts her love of troubleshooting and repair to use managing our Ask an Expert Facebook group and has authored hundreds of how-to, Apple news, and gear review articles.
Learn More Leanne puts her love of troubleshooting and repair to use managing our Ask an Expert Facebook group and has authored hundreds of how-to, Apple news, and gear review articles.
Learn MoreWant to learn how to screenshot on your Mac using key combinations rather than your trackpad or mouse? Keyboard shortcuts work on the iMac and MacBook. Here's how to take a screenshot with keyboard shortcuts. Once you're done, you may want to learn how to organize your Mac's desktop to keep those screenshots in order!
Related: How to Back Up Your iPhone to a Mac without iTunes
We've already written about how to take a screenshot on any iPhone, how to take a full-page screenshot on an iPhone, and how to take a screenshot with Siri on your iPhone. For more great Max tutorials, check out our free Tip of the Day. Now, let's learn how to take a screenshot on your Mac (desktop or laptop), including the MacBook Air and MacBook Pro.
How to Use the Mac Screenshot Commands
If you're interested in learning another cool Apple computer tip, we can also show you how to change the default browser on your Mac!
For now, here's how to take screenshots on a Mac:
- To begin, find the area you want to screenshot on your Mac, then locate the Command (or Cmd) ⌘ and Shift ⇧ keys on your keyboard. My keyboard has a Command key on both sides of the Space Bar, and the Shift key at the lower-left corner.
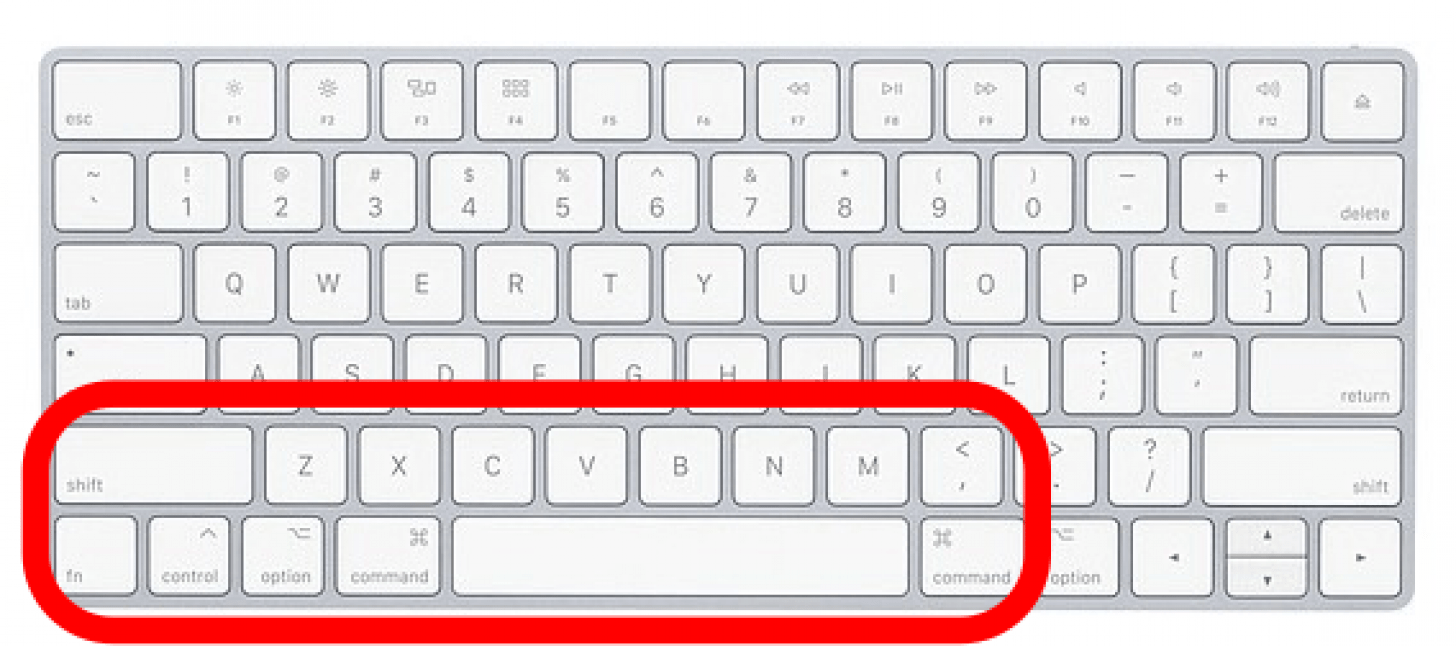
- To take a full-page screenshot, press and hold the Command key, then press and hold the Shift key, then press 3, then release all three.
- To screenshot one area of the screen, press and hold the Command key, then press and hold the Shift key, then press 4, then release all three. A plus-shaped snipping tool will appear; use it to outline the area to screenshot and release when finished to take the screenshot.
- For Macs running macOS Mojave and later, use Command-Shift-5 to open a menu of screenshot options that include the entire screen, a selected window or portion, where the screenshot is saved, a start timer, and even the option to screen record all or a part of your Mac screen.
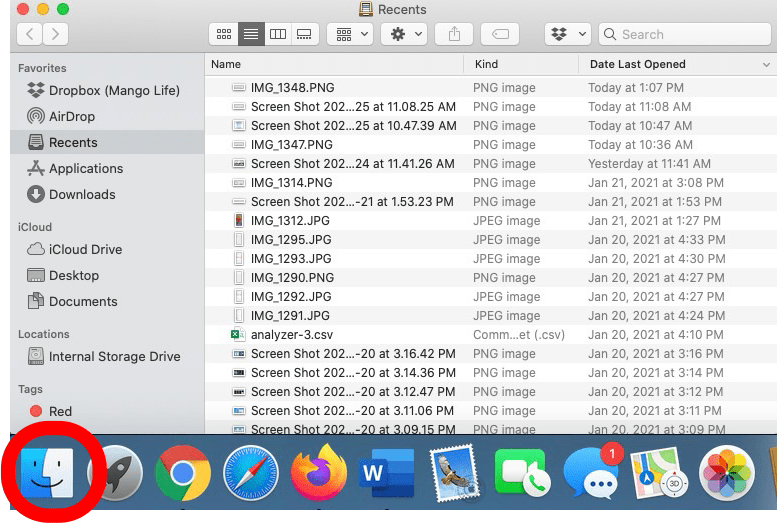
- To find your screenshot, open the Finder and look in Recents (unless you specified a different location using Command-Shift-5).
Now you know how to take a screenshot! Next, learn how to use the exit full screen shortcut on your Mac.

Every day, we send useful tips with screenshots and step-by-step instructions to over 600,000 subscribers for free. You'll be surprised what your Apple devices can really do.

Leanne Hays
Leanne Hays has over a dozen years of experience writing for online publications. As a Feature Writer for iPhone Life, she has authored hundreds of how-to, Apple news, and gear review articles, as well as a comprehensive Photos App guide. Leanne holds degrees in education and science and loves troubleshooting and repair. This combination makes her a perfect fit as manager of our Ask an Expert service, which helps iPhone Life Insiders with Apple hardware and software issues.
In off-work hours, Leanne is a mother of two, homesteader, audiobook fanatic, musician, and learning enthusiast.
Related Articles

 Olena Kagui
 Rhett Intriago
 Leanne Hays
FIXED: Why Does My Wallpaper Keep Disappearing on My iPhone?
 Amy Spitzfaden Both
 Rachel Needell

Apple Watch Always On Display: How to Turn Off & On

Security News: Voting Machine Defenses, The Internet Archive Hacked, and more
 Cullen Thomas

 August Garry