Unleash Your Inner App Developer Part 40: iBeacons Step By Step


Do you have an idea for an app but lack the programming knowledge to begin building it? In this weekly blog series, I will take you, the beginner app developer, step by step through the process of creating apps for the iPhone, iPod touch, and iPad. Join me each week on this adventure and you will experience how much fun turning your app ideas into reality can be! This is part 40 of the series. If you are just getting started, check out the beginning of the series here.
One of the hottest technologies to come out of iOS 7 is iBeacon. In case you haven't heard, iBeacon is Apple's trademark for what it calls "a new class of low-powered, low-cost transmitters that can notify nearby iOS 7 devices of their presence." This new technology solves one of the biggest problems with Location Services on iOS devices—pinpointing the location of a device when it's indoors. Unlike GPS technology that determines a device's absolute location in terms of latitude and longitude, the iBeacon technology measures a device's relative distance to an iBeacon in an established location. Since iBeacons work without the need for a WiFi or cellular connection, it makes them ideal for indoor use.
The initial raft of iBeacon-enabled apps have been in the retail space. For example, Apple installed iBeacons in various Apple stores during the December 2013 holiday season that allowed shoppers to more easily purchase items as well as notify them when their Apple devices were ready for pickup. As another example, Major League Baseball in the U.S has adopted iBeacon technology providing fans with maps, concessions information, video clips, and the ability to upgrade their seat.
Big iBeacon Improvements in iOS 7.1
With the release of iOS 7.1, Apple introduced iBeacon changes that drastically improved the technology for real-world apps.
One of the biggest changes allows iOS apps to receive iBeacon notifications even if the app is not currently running! This helps make the iBeacon experience far more seamless, since it doesn't require users to launch an app before receiving notifications. All they have to do is have the app installed on their iOS device.
Apple also made big speed improvements for iBeacons in iOS 7.1. Previously, it could take several seconds to a minute before an iOS device would detect that it left an iBeacon region. Now this happens instantaneously.
How iBeacons Work
iBeacons transmit a Bluetooth Low Energy (BLE) signal at regular intervals which can be detected by one of the following iOS devices that has Bluetooth 4.0 (aka Bluetooth Smart):
- iPhone 4S or later
- iPad (3rd generation) or later
- iPad mini or later
- iPod touch (5th generation) or later
Apple has also included Bluetooth 4.0 in newer Macs. To see which version of Bluetooth your Mac uses, check out this link. Bluetooth 4.0 is also available in non-Apple devices such as the Samsung Galaxy S3, Motorola RAZR, Windows Phone 8.1, and Google Glass. For a more complete list of Bluetooth 4.0 devices, check out this link.
As it's name suggests, Bluetooth Low Energy consumes very little energy. In fact, some beacons can transmit a signal for up to two years or more on a single battery. The typical range of a BLE device is about 70 meters, although this distance can decrease based on the environment in which the iBeacon is installed (due to absorption or defraction of the signal).
With each transmission, an iBeacon sends five main pieces of information:
- A prefix, which is a fixed value (specified by Apple) for all iBeacons
- A Universally Unique Identifier (UUID) that is usually unique to a specific iBeacon manufacturer
- A major identifier
- A minor identifier
- The transmission power of the beacon
To detect a signal from an iBeacon, your iOS device must have Bluetooth turned on, and you must have an app installed on your phone that knows how to search for that specific brand of iBeacon. This is good news. It means that users won't be bombarded with messages from random iBeacons.
Buying an iBeacon
Some of the more notable companies that have begun producing iBeacons are Estimote and Roximity.
Estimote iBeacons include a BLE transmitter, a 32-bit ARM processor with 256KB of flash memory, a temperature sensor and an accelerometer. They sell a developer package for $99 that includes three beacons. If you want just one beacon, Roximity sells a single beacon for $50, and they also have a three-beacon package that sells for $100.
Turning Your iOS Device Into an iBeacon
If you want to try out the iBeacon technology without purchasing an iBeacon, you can turn your iOS device (one of the newer Bluetooth 4.0 devices listed in the previous section) into an iBeacon.
Apple has created a sample app called AirLocate that can turn your iOS device into an iBeacon. In order to test the iBeacon technology, you need to install the app on two iOS devices—one device to act as the iBeacon and another device to search for the iBeacon. Note that you need to be enrolled in the Apple Developer Program ($99 annual fee) in order to install and run the AirLocate app on your iOS device.
Let's take a step-by-step look at this project.
- Download the AirLocate Xcode project at this link by clicking the Download Sample Code button.
- After downloading the project, expand the AirLocate folder and double-click the AirLocate.xcodeproj file to open the project in Xcode.
- In the Project Navigator on the left side of the Xcode window, expand the Supporting Files group and then select the Main.storyboard file. This displays the project's storyboard in the center area of the Xcode window.
- If you check out the AirLocate scene (Figure 1), you can see there are four main options available for this sample app. The last option in the list, Configuration, is the option that allows you to configure your iOS device as an iBeacon.
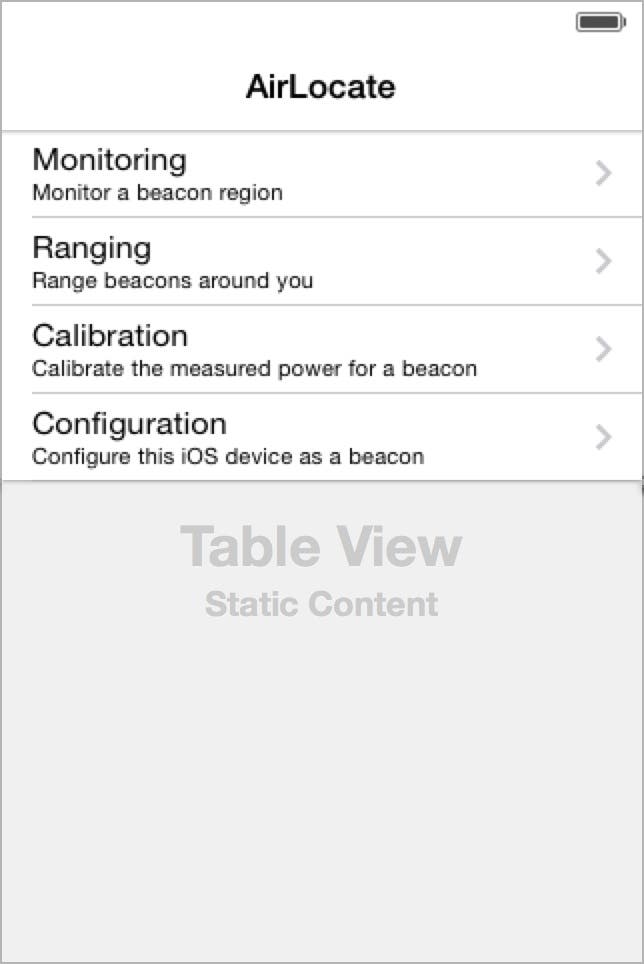 |
| Figure 1 - The AirLocate scene |
- Next, connect your iOS device via a USB cable to your Mac and install the AirLocate app on the device. If you need help, check out my blog post for step-by-step instructions.
- When the app appears on your iOS device, select the Configuration option shown in Figure 1. This takes you to the Configure scene shown in Figure 2.
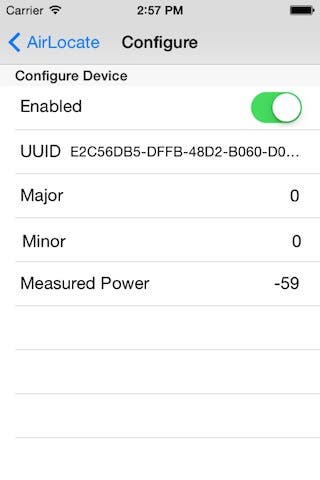 |
| Figure 2- The Configure scene |
Here is an explanation of each row in this list:
- By default, the Enabled switch is turned off, which means the beacon is not transmitting.
- UUID specifies the unique id the iBeacon transmits. If you tap this row, you can choose from three different UUIDs.
- Major specifies the major number transmitted by the iBeacon. You can tap this row to change the number.
- Minor specifies the minor number transmitted by the iBeacon. You can also tap this row to change the number.
- Measured Power specifies the measured power of the iBeacon from a distance of one meter. Although you can change this value, the default of -59 works well for the majority of iOS devices (see the section below Calibrating the Measured Power for an iBeacon).
- Tap the Enabled switch to turn on the iBeacon, and then tap the AirLocate back button to return to the main screen. Your iBeacon is now transmitting!
Note that the iOS device will stop transmitting the iBeacon signal when the device auto-locks. If you want to keep the iBeacon turned on, you can go to the Settings app on the device and under General, set Auto-Lock to Never.
Monitoring a Beacon Region
Now you're ready to monitor the beacon region with another iOS device that is running AirLocate. Here are the step-by-step instructions:
- Install the AirLocate app on a second iOS device and run the app.
- When the main AirLocate screen appears, tap the Monitoring option in the list. This takes you to the Monitor screen shown in Figure 3.
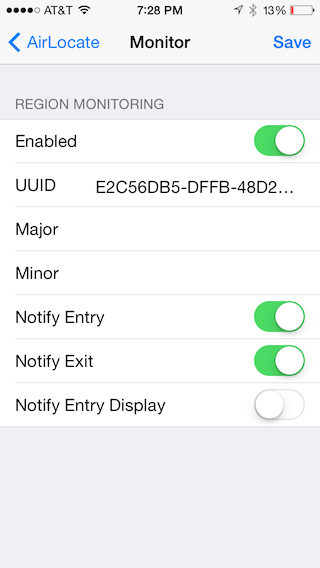 |
| Figure 3 - The Monitor scene |
- Tap the Enabled button and then tap Save. If you are within the proximity of the device acting as an iBeacon (70 meters) then you should see the alert shown in Figure 4.
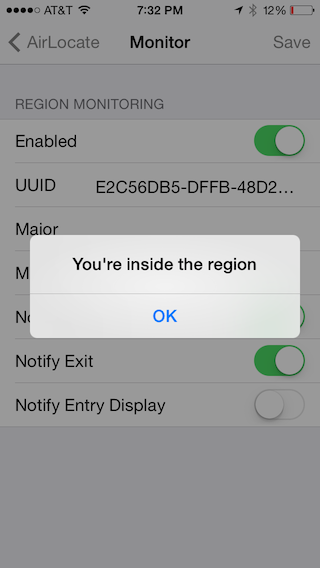 |
| Figure 4 - Inside the beacon region! |
- Try walking away from the other iOS device. When you are out of range of the iBeacon device, you will see the alert shown in Figure 5.
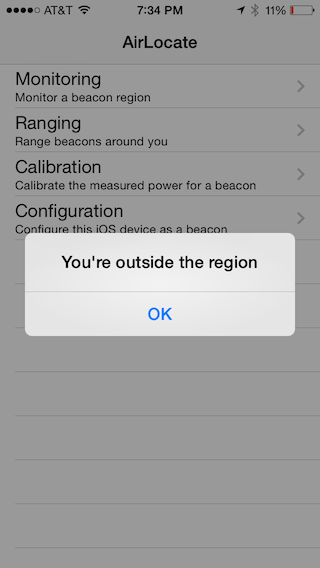 |
| Figure 5 - Outside the beacon region |
- Walk closer to the iBeacon device and you will see the message shown in Figure 4 again.
Ranging Beacons Around You
When you monitor a beacon region, you are simply informed when you enter or leave a beacon region. When you choose the Ranging option in the AirLocate app, you get much more information. Let's check it out.
- Make sure the device you have set up as the iBeacon is awake and transmitting a beacon signal.
- On your second iOS device, choose the Ranging option from the list in the main AirLocate scene. You will be taken to the Ranging scene as shown in Figure 6.
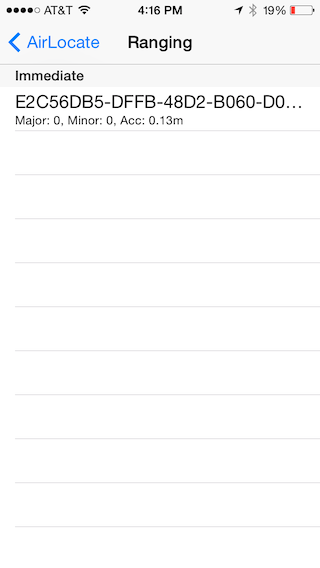 |
In the Ranging scene, you will see a list of all iBeacons that are in your vicinity. In the first line of the table view row, you will see one of four values indicating your proximity to the device:
- Immediate
- Near
- Far
- Unknown
The second line of the table view row displays the UUID of the iBeacon. The third line of the row displays the iBeacon's Major and Minor numbers. The Acc setting indicates "Accuracy", and lets you know how many meters you are positioned from the iBeacon device. As you position your second iOS device nearer or further to the iBeacon device, you can see the proximity and accuracy settings change accordingly.
Calibrating the Measured Power for an iBeacon
In Apple's documentation for the AirLocate app, they mention that calibrating the iBeacon device is optional, but it's recommended if you want to fine-tune the ranging for your environment.
- Make sure the device you have set up as the iBeacon is awake and transmitting a beacon signal.
- Take the second iOS device (the calibration device) and move it exactly one meter from the iBeacon device.
- On the calibration device, select the Calibration option in the main scene. As shown in Figure 7, you should see the iBeacon device in the list, and the bottom line of the table view row should show that you are approximately one meter from the iBeacon device.
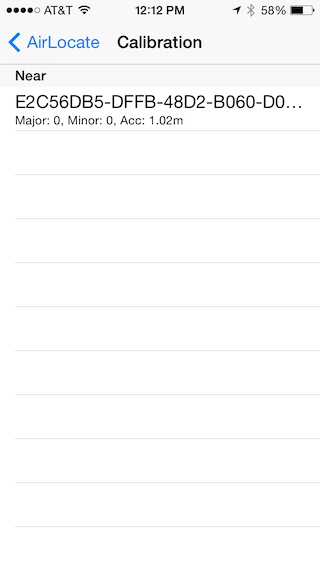 |
| Figure 7 - Calibrating the iBeacon device |
Tap the iBeacon device row in the table view. This displays a progress bar directly above the table view as shown in Figure 8.
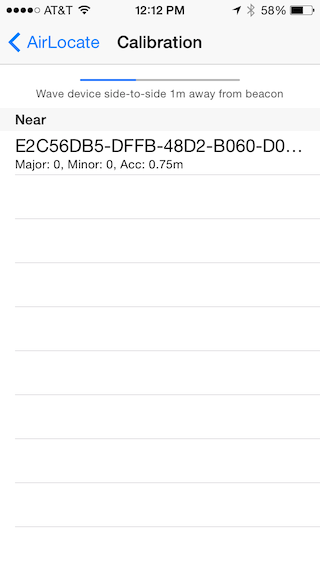 |
| Figure 8 - The calibration progress bar |
- As instructed by the text below the progress bar, wave the calibration device side-to-side while keeping one meter away from the iBeacon device. As you do this, the progress bar will move towards completion. When the calibration process is completed, you will see a number as shown in Figure 9. This is the measured power of the iBeacon device.
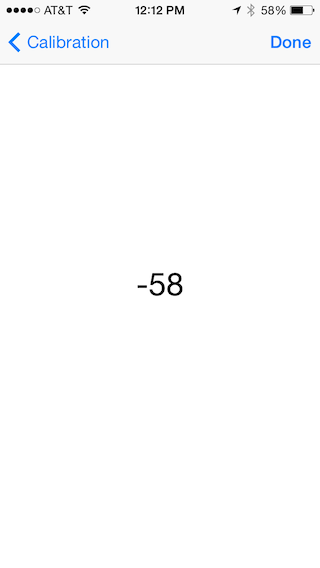 |
| Figure 9 - Calibration is complete! |
- Now go back to the iBeacon device, select the Configuration option and enter this value under Measured Power.
Your iBeacon is now calibrated!
How iBeacon Works Under the Hood
Now that you know how the AirLocate app works at run time, let's take a peek under the hood and see the code that makes it all happen.
- Open the AirLocate project in Xcode.
- In the Project Navigator on the left side of the Xcode window, expand the Frameworks Group. You can see that the CoreBluetooth and CoreLocation frameworks are both included in the project. These frameworks are required when working with the iBeacon technology.
- Now let's see how the iBeacon signal gets transmitted. In the Project Navigator under the AirLocate group, select the APLConfigurationViewController.m file. Near the top of the file you can see the instance variables shown in Figure 10.
 |
| Figure 10 - Configuration instance variables |
The peripheralManager variable holds a reference to the Core Bluetooth Peripheral Manager object (CBPeripheralManager). This is the object that is used to broadcast the iBeacon signal.
The region variable hold a reference to the CLBeaconRegion object which defines the beacon settings (UUID number, major & minor number, and beacon power).
- Just below the declaration of the instance variables is the @interface declaration shown in Figure 11.
| Figure 11 - The APLConfigurationViewController interface |
As you can see, the view controller adopts the CBPeripheralManagerDelegate protocol which allows it to receive notifications from the Peripheral Manager.
- Now scroll down to the viewWillAppear: method and you will see the code shown in Figure 12 at the top of the method.
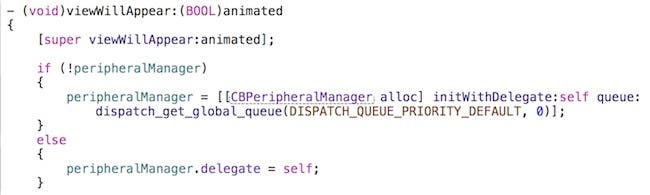 |
| Figure 12 - The Configuration scene's viewWillAppear: method |
This code checks if the peripheralManager object has been created yet. If not, it creates a new Peripheral Manager object, passes the view controller as the delegate, as well as the queue to use for dispatching events (for more information on dispatch queues, check out this link). If the Peripheral Manager object already exists, the view controller is set as its delegate.
- Now scroll to the bottom of the view controller code and check out the code in the updateAdvertisedRegion method (Figure 13).
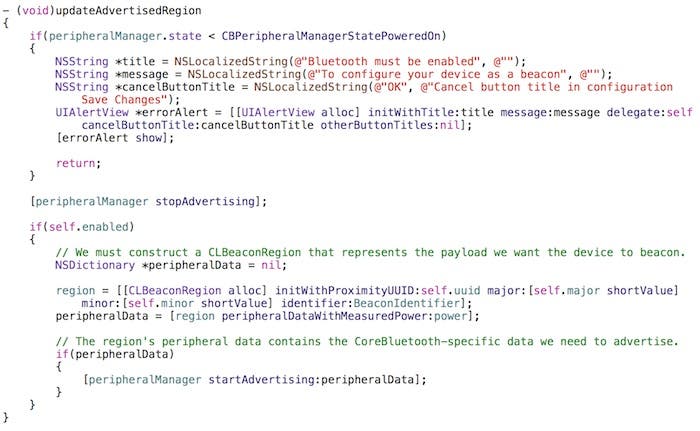 |
| Figure 13 - The Configuration scene's updateAdvertisedRegion method |
This code first checks the state of the Peripheral Manager. Before you can ask the peripheral manager to transmit the Bluetooth iBeacon signal, you must first check that the state of the peripheral manager is powered on (CBPeripheralManagerStatePoweredOn). This indicates that the iOS device supports Bluetooth Low Energy (BLE) and that its Bluetooth is turned on and ready for use.
Next, if the enabled button is on, a CLBeaconRegion object is constructed and configured with the UUID, major & minor numbers, a unique identifier (used to identify the region object) and power level. The CLBeaconRegion object is then passed to the Peripheral Manager's startAdvertising method, which causes the iBeacon to begin transmitting a signal.
How iBeacon Ranging Works Under the Hood
Now let's check out the code that is used to range an iBeacon.
- In Xcode's Project Navigator, select the APLRangingViewController.m file.
- Near the top of the file, you can see this view controller adopts the CLLocationManagerDelegate protocol (Figure 14). This allows the view controller to receive notifications when the heading and distance to the beacon changes.
 |
| Figure 14 - Adopting the CLLocationManagerDelegate protocol |
Just below the protocol declaration, there are three instance variables:
- beacons - Contains a list of discovered beacons
- locationManager - Contains a reference to the Location Manager object, which is used to locate the beacons
- rangedRegions - Contains a list of CLBeaconRegion objects that specify which beacons the app is looking for
- Scroll down to the viewDidLoad method and you will see the code shown in Figure 15.
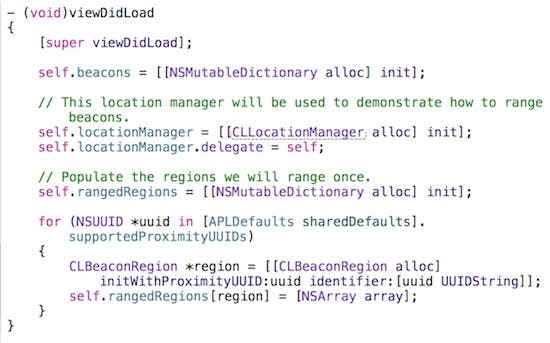 |
| Figure 15 - The Ranging scene's viewDidLoad method |
This code initializes the array of beacons that will be potentially found. Next, it creates a Location Manager object and sets the view controller as its delegate. This allows the view controller to respond when beacons are found. Afterward, it creates an array of rangedRegions for which the app is looking.
Scroll to the bottom of the view controller code and you will find the locationManager:didrangeBeacons:inRegion: method (Figure 16).
| Figure 16 - The Ranging scene's locationManager:didRangeBeacons method |
This delegate method is automatically called by the Location Manager when a beacon comes within range or goes out of range. The Location manager passes an array of all beacons that are in range in the beacons parameter. These beacons are then sorted by their distance to the ranging iOS device and displayed in the table view.
Conclusion
If you're asking the question "How can I get my apps noticed in the App Store?" one of the answers is to incorporate new technologies such as iBeacon. There is also a large, emerging market for developers who can incorporate the iBeacon experience in business apps (my company is already building several of these for our clients). I'm looking forward to seeing how readers of this column incorporate iBeacons in new creative ways in your own apps!

Kevin McNeish
Kevin McNeish is author of the new book “Learn to Code in Swift” as well as the “iOS App Development for Non-Programmers” book series (www.iOSAppsForNonProgrammers.com), winner of the Publishing Innovation Award. Kevin is also an award-winning app developer, software architect, and conference speaker in the U.S. and abroad. He has spent much of his career making difficult concepts easy to understand. Follow Kevin on Twitter: @kjmcneish.
Related topics
Related Articles
 Cullen Thomas
 Rhett Intriago
 Olena Kagui
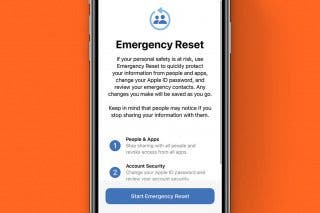
Instantly Protect Yourself on iPhone with Emergency Reset in Safety Check
 Amy Spitzfaden Both
 Rachel Needell

 Hal Goldstein
 Leanne Hays