Unleash Your Inner App Developer Part 38: Storing iOS Images & Video in the Amazon S3 Cloud


Do you have an idea for an app but lack the programming knowledge to begin building it? In this weekly blog series, I will take you, the non-programmer, step by step through the process of creating apps for the iPhone, iPod touch, and iPad. Join me each week on this adventure and you will experience how much fun turning your ideas into reality can be! This is part 38 of the series. If you are just getting started, check out the beginning of the series here.
In my previous post, I talked about using Amazon Web Services (AWS) as cloud storage for your iOS app's entities, and demonstrated their Persistence Framework for Core Data.
But what about the storage and retrieval of images and video for your iOS apps? Amazon has a different tool for this job, and it's Amazon Simple Storage Service, or Amazon S3 for short.
So why use a service such as Amazon S3 rather than setting up your own web server? It's a matter of scaling to meet demand. Amazon sums up the benefits nicely:
Amazon S3 has a simple web services interface that can be used to store and retrieve any amount of data, at any time, from anywhere on the web. It gives any developer access to the same highly scalable, reliable, fast, inexpensive storage infrastructure that Amazon uses to run its own global network of web sites. The service aims to maximize benefits of scale and pass those benefits to developers.
Amazon has some pretty big players using their S3 service. If you check out Amazon's S3 web page, you will find some impressive clients listed, and you can watch a video of how Netflix uses Amazon's S3 service.
At the end of this post I also talk about Amazon's CloudFront service that can be used in conjunction with S3 to provide speed the distribution of files to your users, and provide HTTP Live Streaming. You will also learn how to avoid getting your app rejected by Apple when downloading large video files.
Understanding Amazon S3 Basics
The Amazon S3 world is comprised of objects and buckets (Figure 1). An object is a file and optionally, any metadata that describes the file. Objects are stored in containers called buckets.
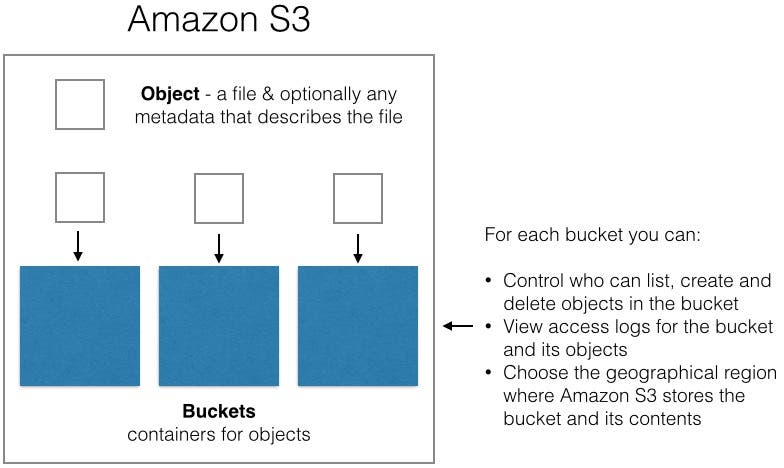 |
| Figure 1 - The Amazon S3 big picture |
You can assign permissions to an object or to a bucket. You can also view access logs for a bucket and its contained objects, and specify the geographical region where Amazon S3 stores the bucket and its contents.
Each AWS account can own up to 100 buckets. There is no limit to the number of objects that can be stored in a single bucket and there is no difference in performance if you use 1 bucket or 100 buckets.
Signing Up for a Free Amazon Web Services Account
If you have been following along in this series, you have already signed up for an AWS account, and you can use this same account to access Amazon S3. If you haven't already created an AWS account, check out the step-by-step instructions in my previous post.
There is no charge for signing up, and in the AWS S3 free tier you get 5 GB of storage, 20,000 get requests, 2,000 put requests, and 15GB of data transfer each month for one year. To see what you will be charged for storage and requests above these free-tier values, check out the Amazon S3 Pricing Page.
Once you have signed up for a free AWS account, you can manage your S3 account by clicking the S3 icon in the AWS console (Figure 2).
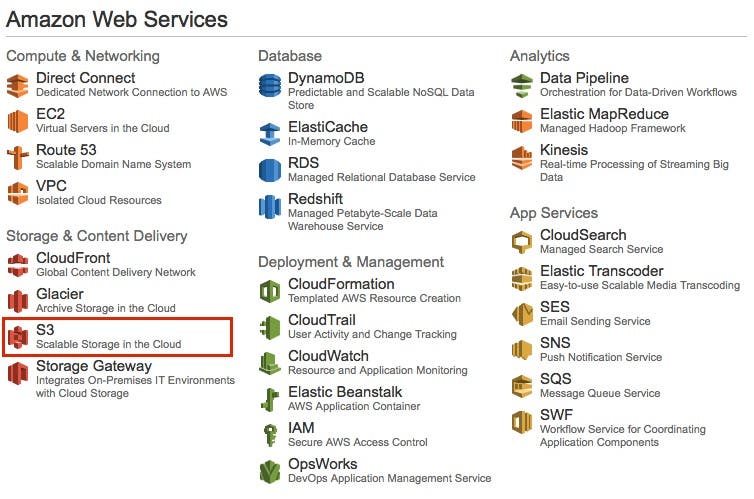 |
| Figure 2 - Select S3 from the AWS Console. |
Manually Creating a Bucket on Amazon S3
- Once you are in the S3 Management Console, click the Create Bucket button (Figure 3).
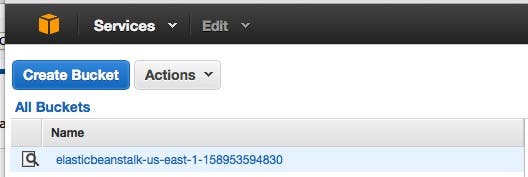 |
| Figure 3 - Click the Create Bucket button. |
This displays the Create a Bucket dialog (Figure 4).
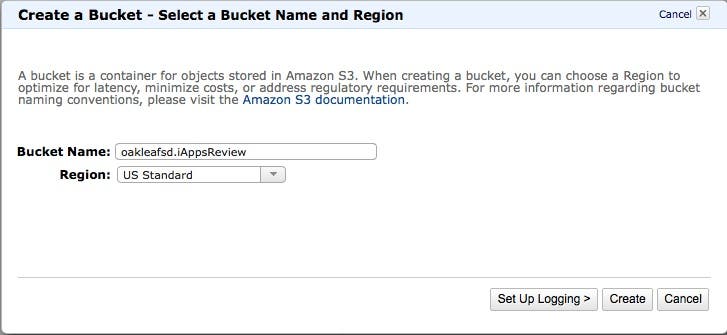 |
| Figure 4 - Enter a Bucket Name and Region. |
- Now you need to enter a Name for the bucket. Here are a few bucket naming guidelines to keep in mind:
- Your bucket name must be unique across all existing bucket names in Amazon S3, much like a domain name for a web site must be unique.
- Amazon recommends that you prefix the bucket name with the name of your organization to help ensure uniqueness.
- After you create a bucket, you can't change its name.
- The name of your bucket is visible in the URL that points to objects stored in the bucket.
For more information on bucket naming rules, check out this link.
- In the Region box, select a region (check out this link to find out more about each region).
- Click the Create button. This displays the new bucket in the list as shown in Figure 5 (yes, I can already hear the "bucket list" puns).
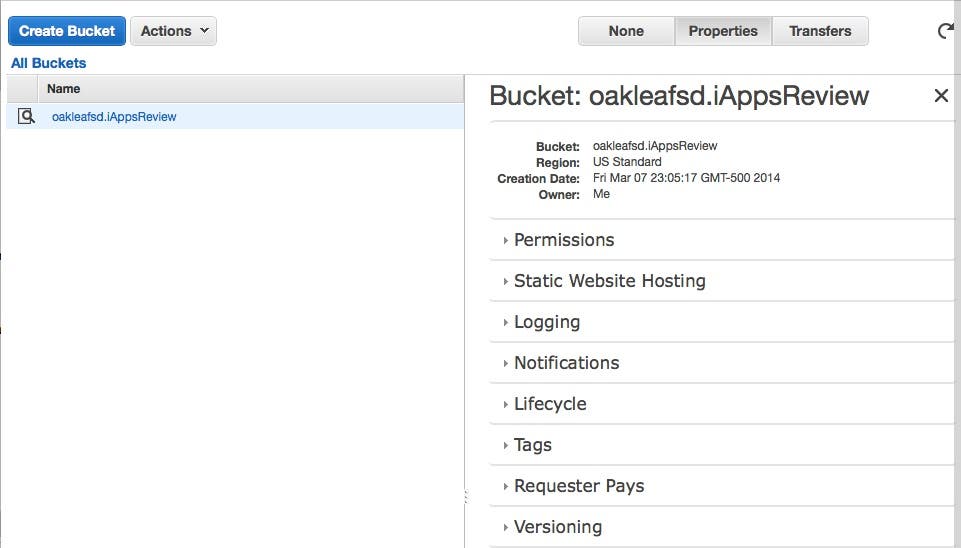 |
| Figure 5 - The new bucket appears in the list. |
Now that you have created a bucket, you can manually upload, view, move, and delete objects from the bucket as described at this link. However, in this post, we're more interesting in interacting with the bucket and objects by means of an iOS app.
Downloading the AWS SDK for iOS
Again, if you have been following along, you have already downloaded the AWS SDK for iOS, which we used in my previous post to access Amazon's DynamoDB database and Persistence Framework for Core Data. You use this same SDK when accessing the Amazon S3 API. If you haven't already done so, you can download the SDK for iOS at this link.
Running the S3 Transfer Manager iOS Sample App
As usual, Amazon has created an iOS sample app that demonstrates how to use the Amazon S3 service. Let's run this sample app to see how it works. If you haven't already done so, you can download the AWS Samples for iOS at this link.
- You can find the S3 sample app in the S3_S3TransferManager subfolder in the samples directory. You can double click the S3TransferManager.xcodeproj file to open the project in Xcode.
- In the Project Navigator, select the Constants.h file, and change the ACCESS_KEY_ID and SECRET_KEY constants to your AWS security credentials which you can access from the AWS web site at this link.
- In the Project Navigator, right-click on the Frameworks group and select Add Files to S3TransferManager... from the shortcut menu. Navigate to the folder where you have stored the AWS SDK for iOS, select the following frameworks, and then click Add:
- AWSRuntime.framework
- AWSS3.framework
- Now you're ready to run the sample app and you can do this in the Simulator or on an iOS device. Click Xcode's Run button and you should see the first screen shown in Figure 6.
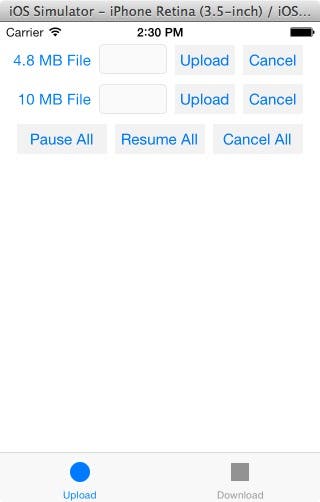 |
| Figure 6 - The sample app's Upload scene |
- As you can see, this screen allows you to upload a small file (4.8MB) and/or a large file (10 MB). You can click one or both of the Upload buttons and you will see a percentage completion shown in the boxes to the left of the buttons. You can also use the other buttons to Pause All, Resume All, and Cancel All.
The S3TransferManager sends files in 5MB chunks. So, if you pause and resume the 4.8MB file, it always reverts back to zero percent. If you pause the upload of the 10 MB file after it's 50 percent complete, it will resume again at 50% (5 MB).
- After your upload has completed, you can go out to the S3 Management Console at this link and you will see that the sample app has created a new bucket that has been added to your list (Figure 7).
 |
| Figure 7 - The sample app created a new bucket. |
- Click on the new bucket and you will see the file(s) that you have uploaded using the S3 sample app (Figure 8).
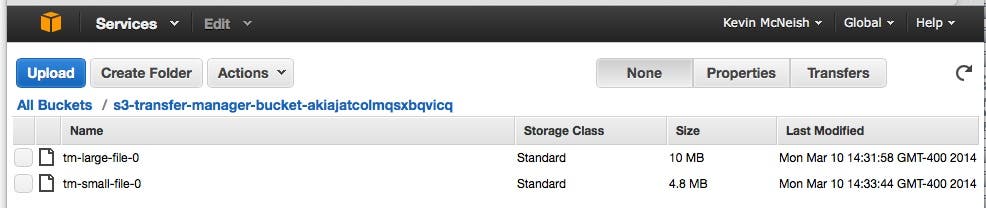 |
| Figure 8 - The newly uploaded files |
- Now go back to the app in the Simulator or iOS device and click the Download tab at the bottom-right corner of the screen, and you will see the scene shown in Figure 9.
 |
| Figure 9 - The sample app's Download scene |
Go ahead and try out the Download, Pause, Resume, and Cancel buttons.
Uploading With the S3 Transfer Manager
Now that you have seen how the sample app works at run time, let's take a closer look at how it works under the hood.
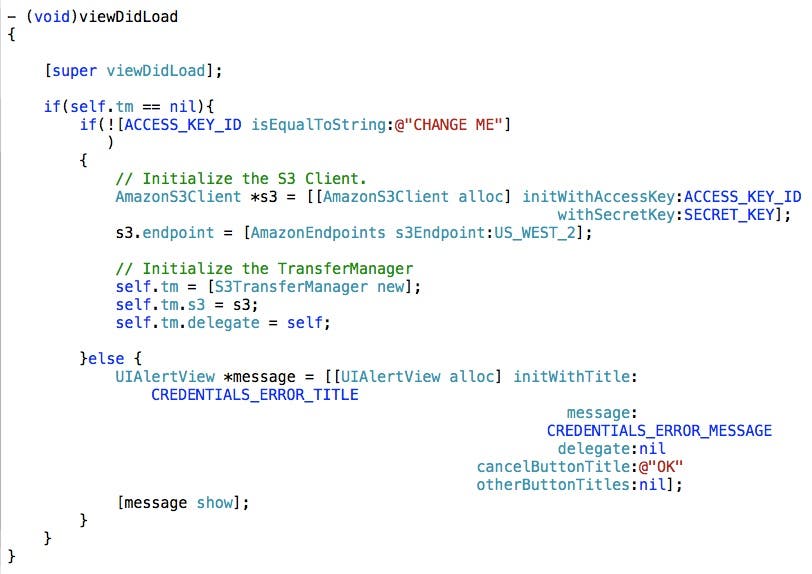
In the Project Navigator, select the S3TransferManagerUploadViewController.m file and check out the viewDidLoad method shown in Figure 10.
 |
| Figure 10 - The viewDidLoad method of the S3TransferManagerUploadViewController. |
The code in this method sets up the Amazon S3 classes, which are used when you upload and download files. The sequence diagram in Figure 11 shows how these objects interact.
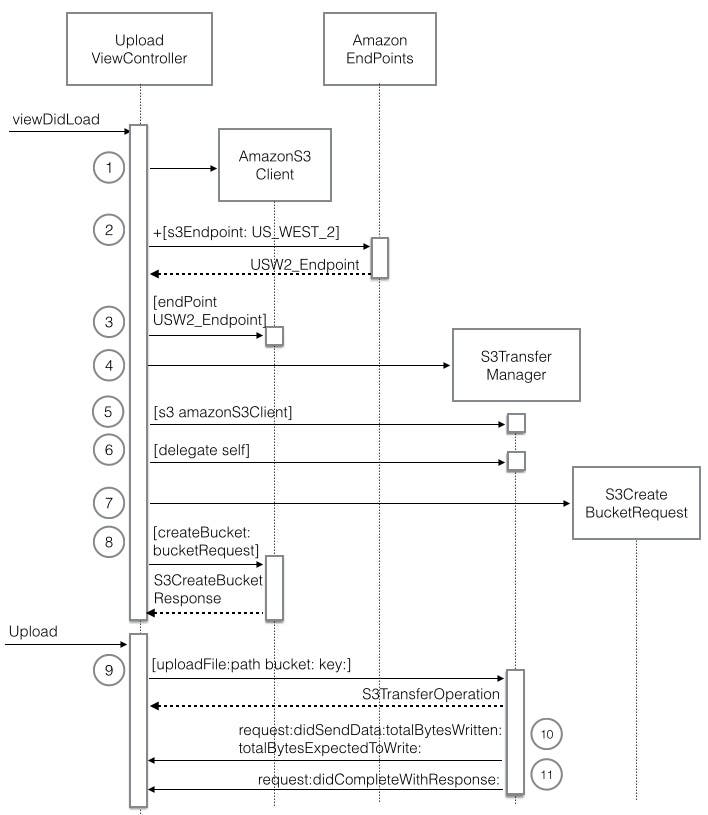 |
| Figure 11 - The Upload Files sequence diagram |
Here's the breakdown of the first set of object interactions, which assemble the necessary objects and create a new bucket on Amazon S3 servers:
- When the view controller's viewDidLoad method is executed, it first creates an AmazonS3Client object.
- Next, an s3Endpoint:US_WEST_2 message is sent to the AmazonEndPoints class, which returns an endpoint for the US West 2 region.
- The endpoint is stored in the AmazonS3Client object's endPoint property.
- An S3TransferManager object is created.
- The AmazonS3Client object is stored in the S3TransferManager's s3 property.
- The view controller stores a reference to itself in the S3TransferManager's delegate property
- An S3CreateBucketRequest object is created.
- A createBucket message is sent to the AmazonS3Client object, passing the newly created S3BucketRequest object, and an S3CreateBucketResponse object is sent back, indicating whether or not the bucket creation was successful.
Now let's take a look at the next set of object interactions in Figure 11 which performs the actual work of uploading.
- When one of the Upload buttons is tapped, an uploadFile:bucket:key: message is sent to the S3TransferManager object, which immediately returns an S3TransferOperation object since the method is executed asynchronously.
- Because the view controller registered itself as a delegate of the S3TransferManagerObject and it implements the AmazonServiceRequestDelegate protocol (in S3TransferManagerDownloadViewController.h), a request:didSendData:totalBytesWritten:totalBytesExpected: message is periodically sent to the view controller, and the view controller updates the percentage-complete display.
- When the upload is complete, a request:didCompleteWithResponse: message is sent to the view controller, and the view controller displays a Done message.
When you upload a file, behind the scenes the S3TransferManager determines which upload mode to use based on the size of the file being uploaded. If the file is less than 5 MB, it uses a put request to upload the file. If it's greater than 5 MB, it uses a multipart upload, breaking the large file into smaller parts. If one part of the upload fails, it retries only that part.
The S3TransferManager has four methods you can use to upload files:
- upload:
- uploadData:bucket:key
- uploadFile:bucket:key
- uploadStream:contentLength:bucket:key
Note that pause and resume only work with the upload: and uploadFile:bucket:key method. For more information on these methods, check out Amazon's documentation.
Downloading With the S3 Transfer Manager
To see the code that performs downloading, select the S3TransferManagerDownloadViewController.m file in the Project Navigator, and check out the viewDidLoad method (Figure 12).
 |
| Figure 12 - The viewDidLoad method of the S3TransferManagerDownloadViewController. |
This code is very similar to the upload code, except it doesn't create a bucket, since the bucket already exists. The download object interactions are shown in the Figure 13 sequence diagram.
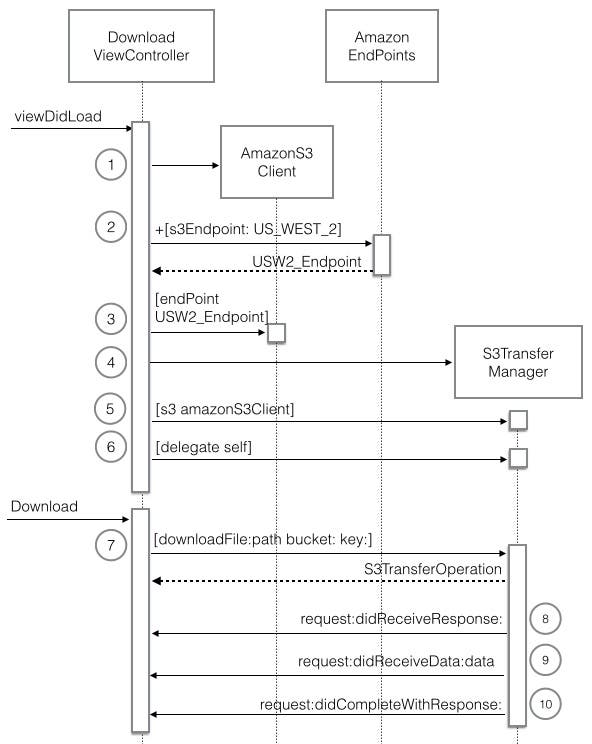 |
| Figure 13 - The Download sequence diagram |
I won't detail steps 1-6 since they are exactly the same as the upload sequence diagram. Here is an explanation of steps 7-10.
- When the Download button is tapped, a downloadFile:bucket: message is sent to the S3TransferManager. This message specifies the name of the file to be created for the download, as well as the bucket and key of the file to be downloaded. Again, this method runs asynchronously, so the S3TransferOperation object is returned immediately.
- Because the view controller registered itself as a delegate of the S3TransferManagerObject and it implements the AmazonServiceRequestDelegate protocol, a request:didReceiveResponse: message is sent to the view controller when the download first begins.
If you look further down in the view controller you can see the following code shown in Figure 14 for this method.
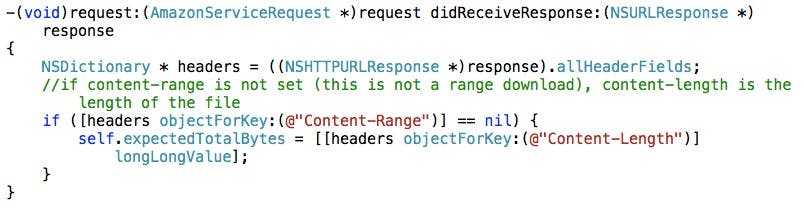 |
| Figure 14 - The request:didReceiveResponse: method |
This code gets a list of all header fields in the response. It checks for a Content-Range object, and if one doesn't exist (it doesn't in this example) it gets the size of the file being downloaded from the Content-Length object and stores this value in the expectedTotalBytes property.
- A request:didReceiveData: message is periodically sent to the view controller, which in turn updates the percentage-complete display.
- When the download is complete, a request:didCompleteWithResponse: message is sent to the view controller, which in turn displays a Done message.
The S3TransferManager has three methods you can use to dowload files:
- download:
- downloadFile:bucket:key
- downloadStream:bucket:key
Note that pause and resume only work with the download: and downloadFile:bucket:key: methods.
Apple Live Streaming and Amazon CloudFront
According to Apple's documentation, iOS apps submitted for the App Store that deliver video over cellular networks must use HTTP Live Streaming to deliver video that exceeds either 10 minutes duration or 5MB of data in a five minute period.
If you ignore this rule, Apple will reject your app.
The term HTTP Live Streaming may sound like you are streaming a live event, but it refers to both live and pre-recorded audio and video. HTTP Live Streaming sends audio and video as a series of small files, typically of about 10 seconds duration, called media segment files. Apple provides a set of tools you can use to set up an HTTP Live Streaming service yourself as described at this link. Alternately, you can use Amazon Cloudfront, which also provides HTTP Live Streaming.
CloudFront is first and foremost a web service that works in conjunction with Amazon S3 to speed up distribution of your files to end users. When a user requests a file, the user is routed to the data center (aka edge location) that provides the best delivery speed. If the content the user requested is not currently at that edge location, CloudFront retrieves the file from the Amazon S3 bucket that you have defined as the main source for your file and caches it at the edge location. Cloudfront's speed improvements are more significant if your users are scattered around the globe.
There are fees incurred when using Amazon CloudFront and you can read more about them at this link. To read step-by-step instructions on getting started with CloudFront, check out this link.
Conclusion
When building an app that you hope will go viral, it's a great idea to plan ahead to make sure the design, architecture, and infrastructure of your app can scale to meet demand. I recommend checking out Amazon AWS services as one option that allows you to concentrate on the app itself rather than its infrastructure.

Kevin McNeish
Kevin McNeish is author of the new book “Learn to Code in Swift” as well as the “iOS App Development for Non-Programmers” book series (www.iOSAppsForNonProgrammers.com), winner of the Publishing Innovation Award. Kevin is also an award-winning app developer, software architect, and conference speaker in the U.S. and abroad. He has spent much of his career making difficult concepts easy to understand. Follow Kevin on Twitter: @kjmcneish.
 Rhett Intriago
 Leanne Hays


 Rachel Needell

 Olena Kagui

 Amy Spitzfaden Both

 Nicholas Naioti