Swift Programming 101: Creating Self-Registering Swift UI Controls


By Kevin McNeish
May 27, 2021
Updated May 27, 2021
By Kevin McNeish
May 27, 2021
Updated May 27, 2021

What’s the best way to create controls that respond to notifications without interfering with existing messaging mechanisms? In this article I demonstrate a Notification Proxy class that helps you add functionality to existing iOS UI controls using a practical example: Adding placeholder text to the text view control.
The Problem: Missing Placeholders
Placeholder text is a great way to let your users known the type of content you intend them to enter in a particular control. UIKit’s UITextField control has a placeholder attribute that lets you do this. For example, Figure 1 shows placeholder text in the Twitter settings screen. The placeholder text in the User Name field indicates you should enter your Twitter handle, including the @ sign. The placeholder text in the Password field indicates it is required.
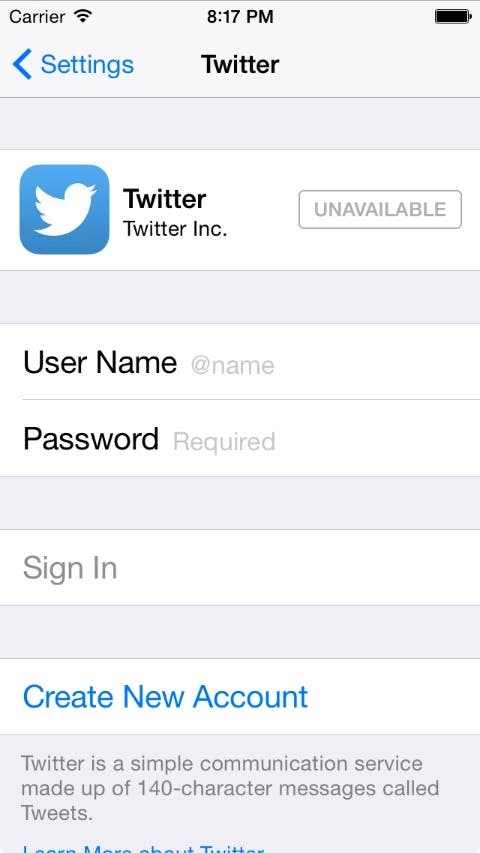 |
| Figure 1 - Placeholder text in the Settings App. |
Although the text field has a placeholder attribute, its cousin the text view control, does not.
Solving the Problem
Here’s the big picture of how I planned to solve this problem:
- Create an extension that adds a calculated property named placeholder to the UITextView class
- In the extension, display the label when there is no text in the text view, and hide it when there is text.
As mentioned in my previous post, I prefer using extensions rather than subclasses because it allows me to use the out-of-the-box UIKit controls in my apps. All I have to do is add the extension code file to my project and all my classes automatically gain the new functionality.
Solution 1: UITextViewDelegate
There are a few ways iOS can notify you when the user types text in a UITextView control. One of these is to adopt the UITextViewDelegate protocol in the extension and store a reference to the text view in its own delegate property. When the user types or deletes characters in the text view at run time, the text view’s delegate method is automatically called. You can then add code to the delegate method that hides or shows the placeholder label.
The problem with this approach is that it ties up the text view’s delegate property, since you can only register a single delegate object with a UI control. If you need to add other delegates to the text view in the future, your hands are tied.
Solution 2: NSNotificationCenter
NSNotificationCenter has a UITextViewTextDidChangeNotification that alerts you when the user types or deletes characters in a text view. This is a better choice because it doesn’t tie up the text view’s delegate property. The downside of this approach is unregistering from NSNotificationCenter. Typically, you deregister an object from NSNotificationCenter by adding code to its deinit. However, in Swift you can’t add a deinit to an extension. How can we get around this limitation?
Creating a Notification Proxy
We can get around the limitations of Swift extensions by creating a lightweight proxy object that is registered with NSNotificationCenter in place of the text view.
I’ve created a UITextView extension along with a proxy class and included it in a project you can download from this link.
You can open the project in Xcode by double-clicking the .xcodeproj file. To see the Notification Proxy class, select the mmTextViewExtensions.swift class file in the Project Navigator (as you can see, I included the mmDynamicTypeExtensions class from my previous article).
Here is the Notification Proxy class located at the top of the code file:
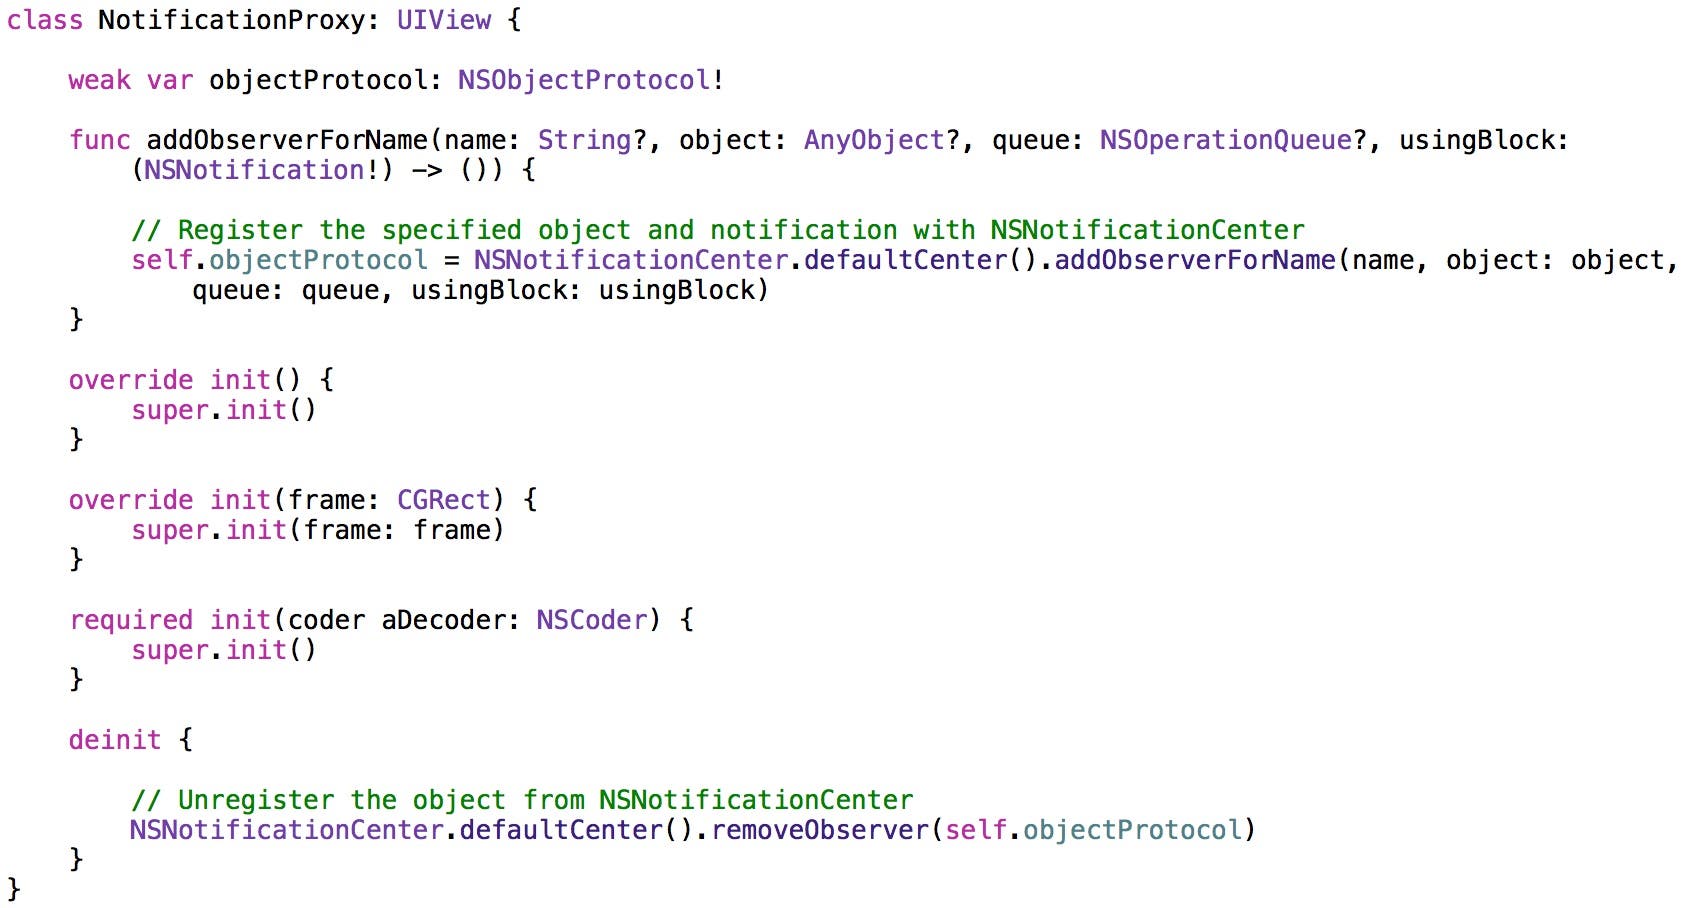
As you can see, it’s a subclass of UIView. This allows us to add it as a subview to the text view control. The addObserverForName:usingBlock: method has the same signature (name, number, and type of parameters) as NSNotificationCenter’s method. There is just a single line of code in this method that registers the text view with NSNotificationCenter and passes through the parameters including the text view’s block to be executed when a notification occurs. NSNotificationCenter returns an NSObjectProtocol object that can be later used to unregister from notifications.
The deinit has a single line of code that simply deregisters the protocol object from NSNotificationCenter.
The Notification Proxy class is reusable. You can use it for any notification and with any class you want to receive notifications.
Below the Notification Proxy in the code file is the UITextView extension. It has a placeholderLabel property that, as you might guess, is used to contain a reference to the placeholder label.
It also has a placeholder String property. As you will see in the next section, all the magic happens when the placeholder property is set at run time and the computed property's code is executed.
Now select the Main.storyboard file in the Project Navigator. As shown in Figure 2, there is a single scene in the storyboard with a text view located near the top of the scene.
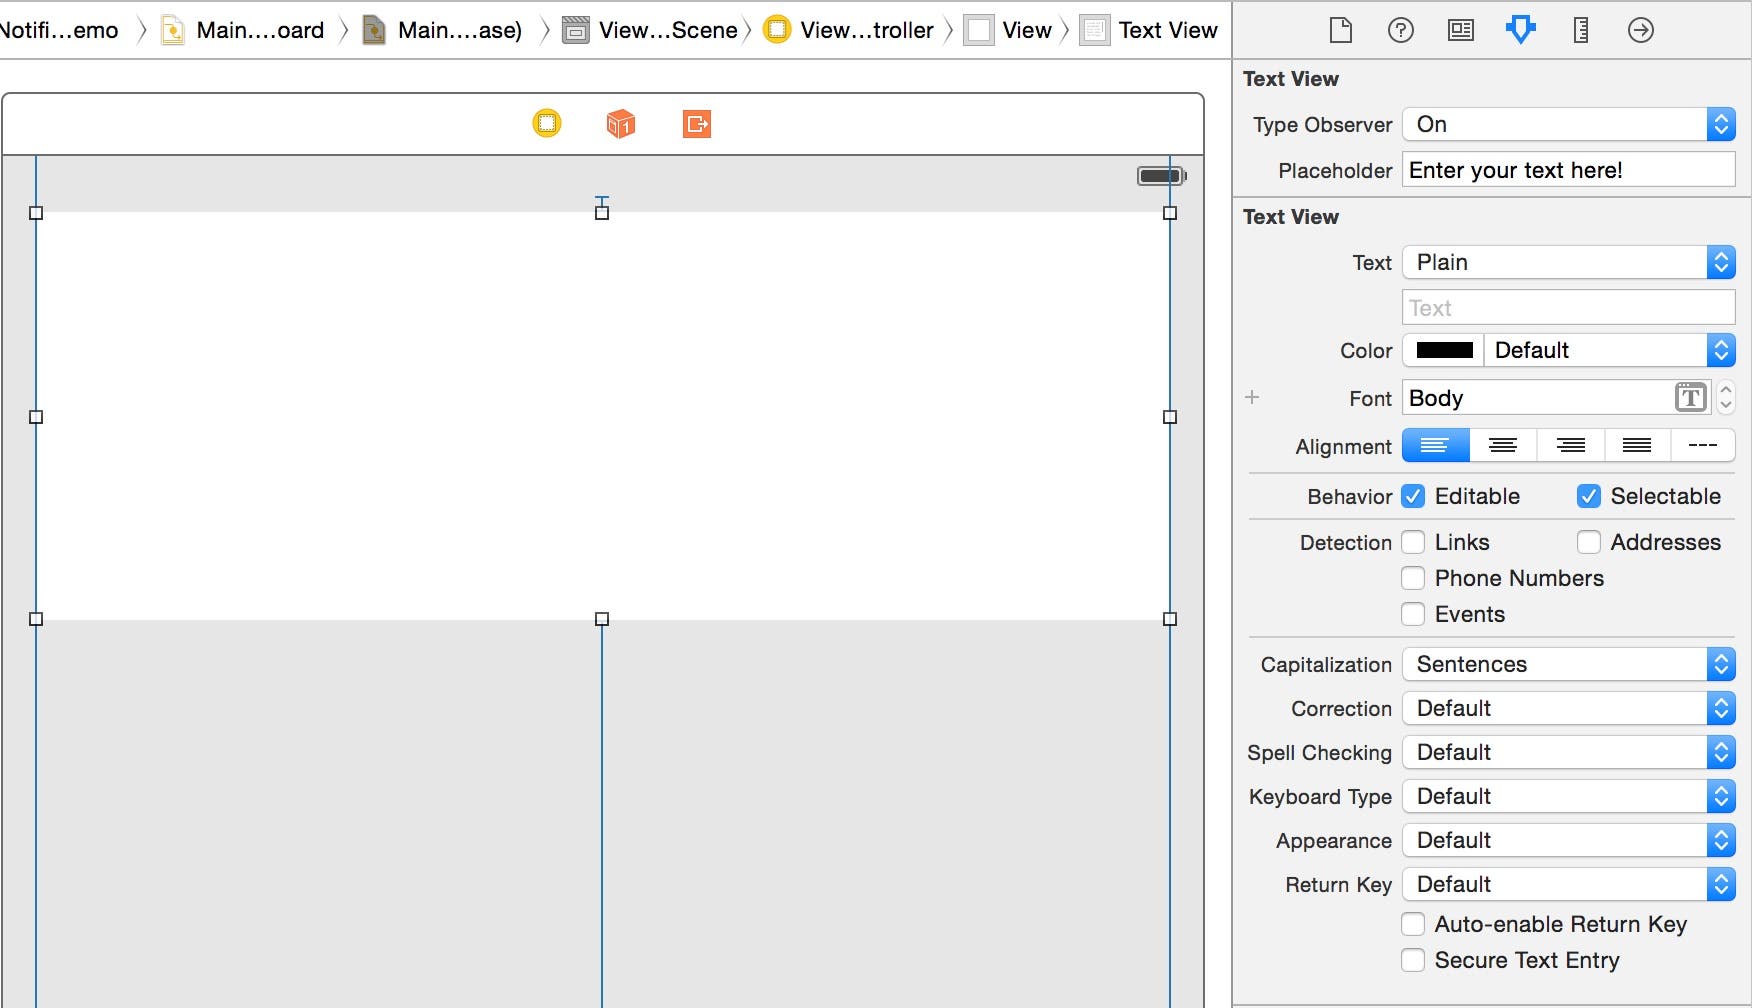 |
| Figure 2 - The main scene contains a text view |
If you select the text view and go to the Attributes Inspector, you can see the Placeholder attribute, which is added by the extension and its value is set to “Enter your text here!”. The placeholder text doesn’t appear in the design surface (we would need to take a number of extra steps to make this happen, and that’s a topic for another article) but it does appear at run time.
The Notification Proxy at Run Time
The UML sequence diagram in Figure 3 shows the order of messages passed between all objects involved in this architecture.
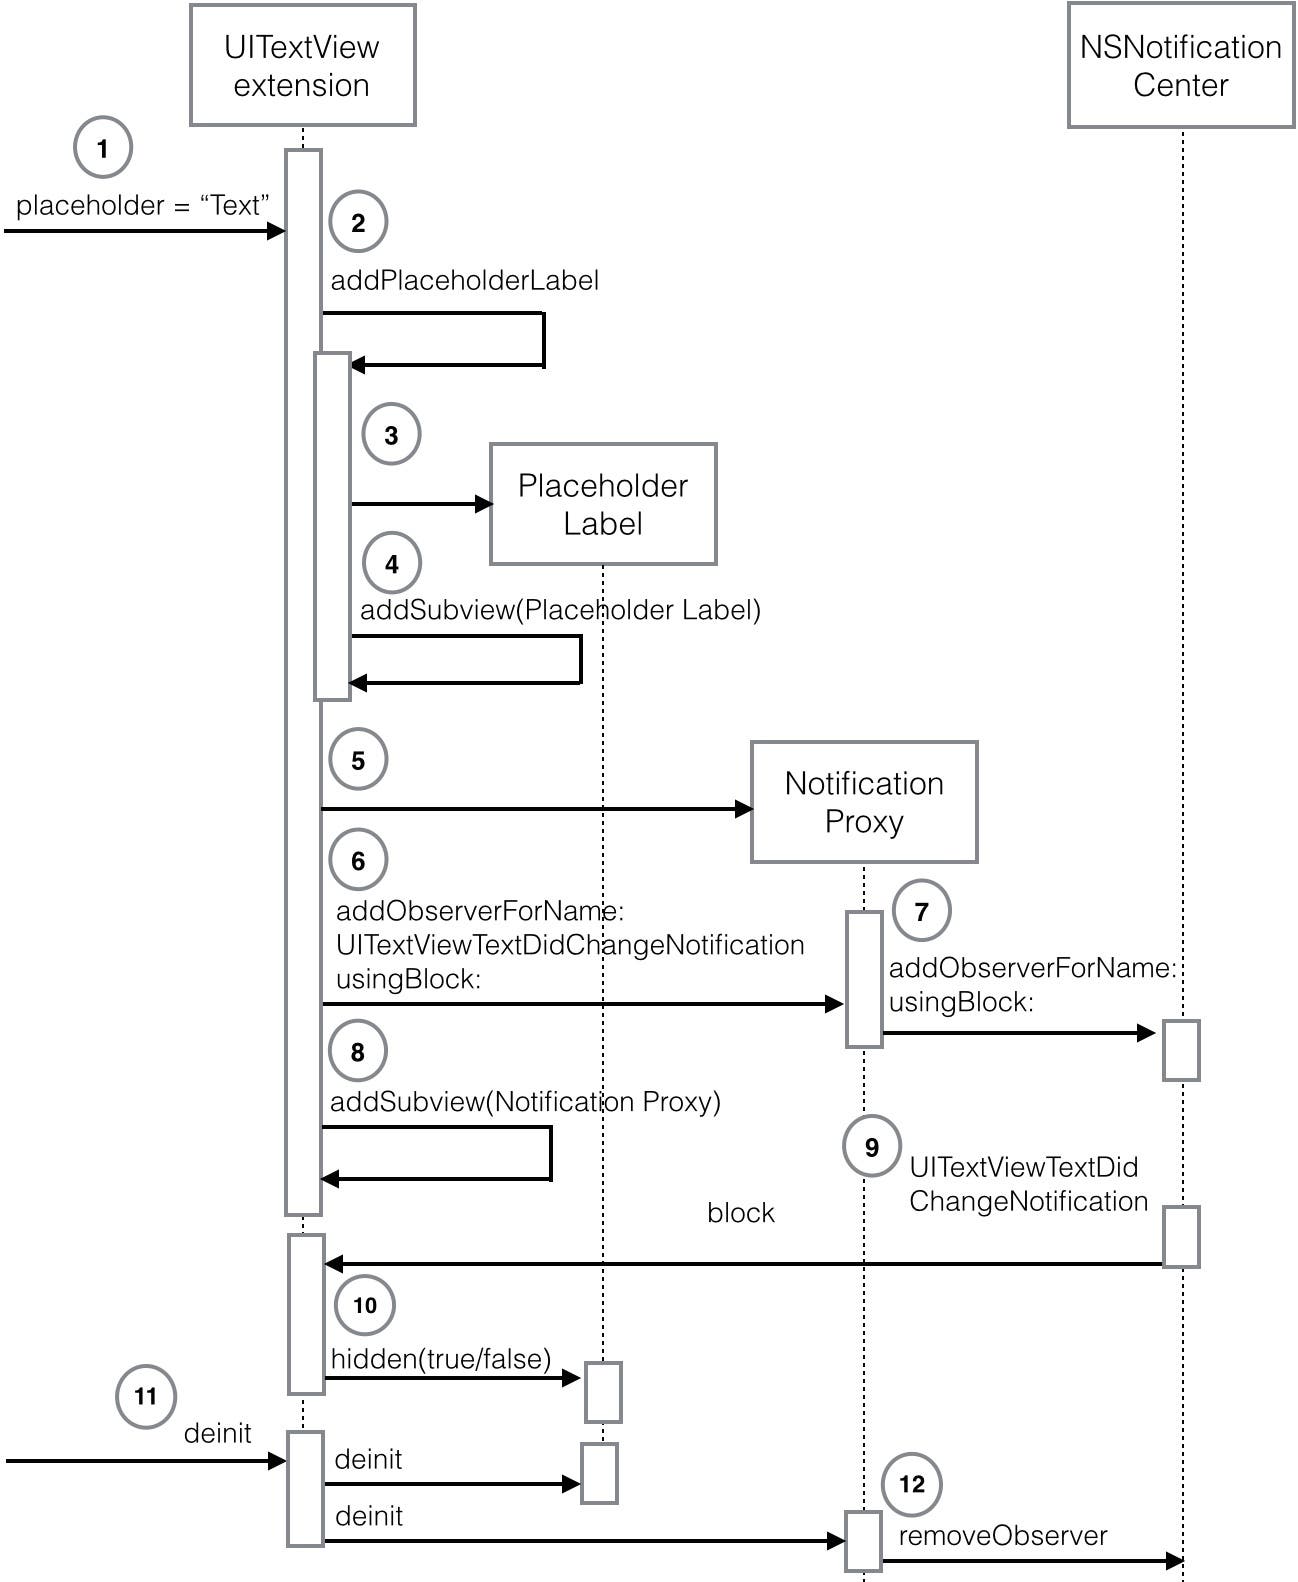 |
| Figure 3 - The order of messages passed between all objects at run time |
Here is an explanation of each step:
- When the UITextView placeholder text is set at run time it fires the extension’s placeholder computed property’s code.
- The UITextView extensions’s addPlaceholderLabel method is called.
- The addPlaceholderLabel method creates a placeholder label and sets its text.
- The placeholder label is added to the UITextView.
- A Notification Proxy object is created.
- The UITextView extension calls the Notification Proxy’s addObserverForName:withBlock: method, specifying UITextViewTextDidChangeNotification as the name of the notification it wants to observe. It also passes a block of code to be executed when the notification occurs.
- The Notification Proxy object registers the UITextView with NSNotificationCenter, also passing through the notification event to be observed and the UITextView block to be executed when the notification occurs.
- The UITextView object adds the Notification Proxy to itself as a subview.
- When a UITextViewTextDidChangeNotification occurs, NSNotificationCenter calls the block on the UITextView extension.
- The UITextView extension sets the placeholder label’s hidden property to true or false, depending on whether or not there is any text entered in the text view.
- When the UITextView is deallocated at run time, the placeholder label and notification proxy object are deallocated.
- When the Notification Proxy object is deallocated, it unregisters the UITextView from NSNotificationCenter.
Let’s Take it for a Test Run!
- In Xcode’s Scheme control, select one of the simulators such as iPhone 6.
- Click Xcode’s Run button.
- When the app appears in the Simulator, you can see the placeholder text (Figure 4).
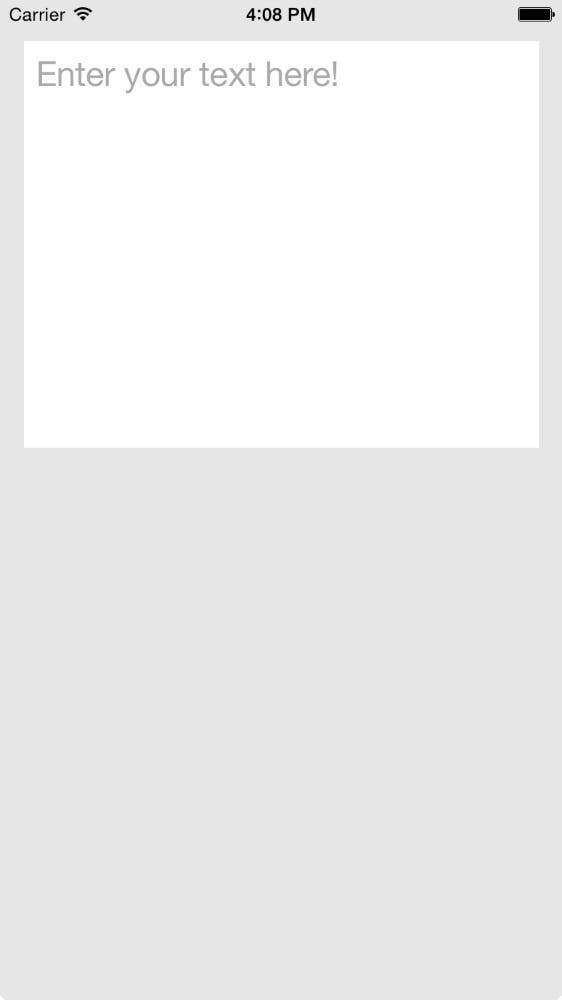 |
| Figure 4 - The placeholder text at run time |
4. Now type some code in the text view. As soon as you begin typing, the placeholder label disappears (Figure 5).
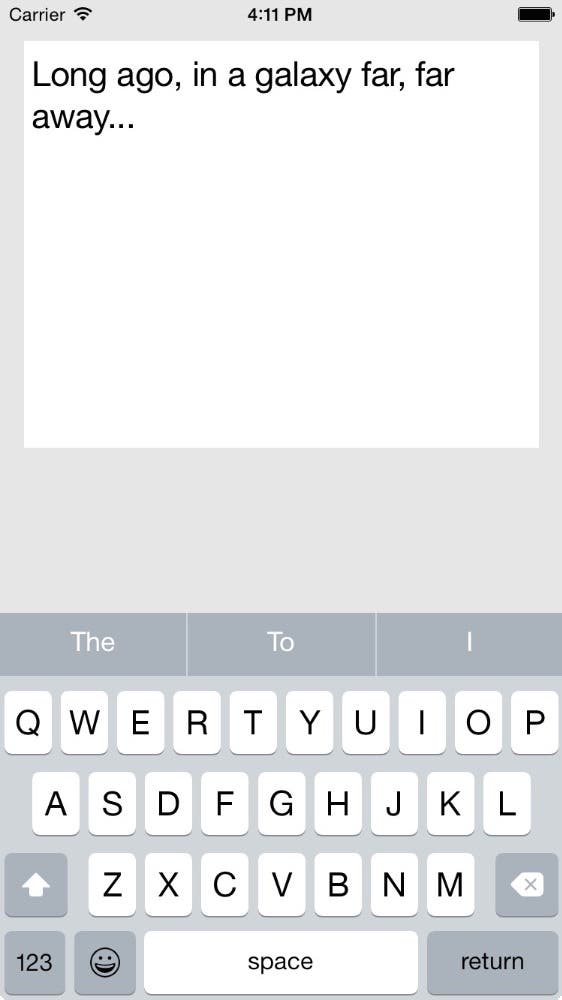 |
| Figure 5 - The placeholder disappears |
- If you delete all the characters you typed, the placeholder reappears.
Conclusion
There are many ways to solve a coding problem. It’s best to take a good look at your options up front and think about the pros and cons of each. I hope through these articles you’re also learning the beauty of sequence diagrams. They allow you to document and understand object interactions that occur at run time. I don’t just use these for my articles. I use them for my real-world coding designs. You’ll find that they can help you identify potential problems as well as help you visualize new and more efficient solutions to your coding challenges.

written by
Kevin McNeish
Kevin McNeish is author of the new book “Learn to Code in Swift” as well as the “iOS App Development for Non-Programmers” book series (www.iOSAppsForNonProgrammers.com), winner of the Publishing Innovation Award. Kevin is also an award-winning app developer, software architect, and conference speaker in the U.S. and abroad. He has spent much of his career making difficult concepts easy to understand. Follow Kevin on Twitter: @kjmcneish.
Related topics
Related Articles
 Olena Kagui

 Rhett Intriago
 Sean Dugan
 David Averbach
 Leanne Hays
Charging Stations & Docks
New iPhone Charger Cable or USB-C to Lightning Adapter?
Olena Kagui
• Dec 12, 2023
Notifications
Quickly Silence Notifications with Wrist Flick (watchOS 26)
Olena Kagui
• Sep 15, 2025

Electric Vehicle
Most Useful Tesla Voice Commands List & How to Use Them Safely
Olena Kagui
• Oct 31, 2023
 Amy Spitzfaden Both