Swift Programming 101: Mastering Protocols and Delegates (Part 2)


In part 2 of this post on Swift's protocols, you will learn practical uses for declaring custom protocols in your own apps, and learn further how they improve the architecture of your apps and make them easier to enhance and extend.
In part 1 of this post, I demonstrated how to implement existing Cocoa Touch protocols in your apps. Now you'll learn how and why to create your very own. First, we need to cover the basic construction of a Swift protocol.
Declaring Your Own Protocols
Here is the basic syntax for declaring a protocol in Swift:

Protocol Methods
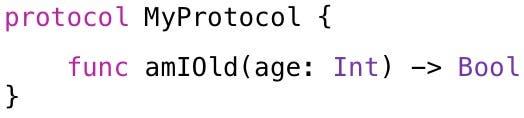
A protocol can specify instance and type methods that must be implemented by classes that conform to it.
You declare a protocol's methods the same way you declare them for a class, but don't include the curly braces or implementation code.
Here is an example of an instance method that accepts a single integer parameter and returns a boolean value:
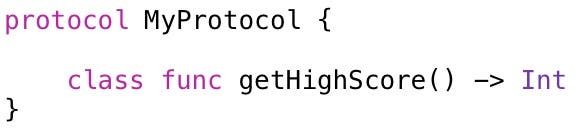
To declare a type method, use the class keyword. The following type methods accepts no parameters and returns an integer value:
Protocol Properties
A protocol can also declare instance and type properties. The protocol specifies the properties' names and types, but doesn't specify whether they must be stored or computed properties. However, a protocol must specify whether a property is read-only or read-write.
For example, the following protocol declares a read-write boolean property named verbose and a read-only integer property named numberOfRetries:

Optional Protocol Members
By default, methods and properties declared in a protocol are required—meaning any class adopting the protocol must implement them.
However, you can indicate that a particular member is optional by using the optional keyword in conjunction with the @objc attribute.
For example, the following protocol declares the verbose property as optional and the numberOfRetries property as required:
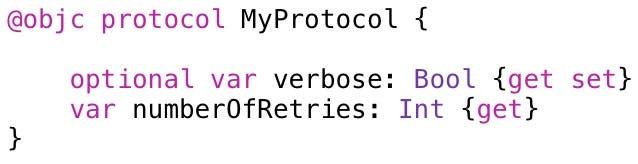
The @objc attribute can be used before any Swift class, method, or property. It indicates that you want to access it from Objective-C. In this case, even if you're not accessing it from Objective-C, you need to use it to mark members of your protocol as optional.
Checking for Protocol Conformance
At times, you may want to check if a class conforms to a particular protocol. Use Swift's is operator to check for conformance, and use its as? and as operators to cast to a particular protocol. Protocols use the same syntax as checking for casting to a type.
There are two important caveats regarding checking for protocol conformance:
- You must mark your protocol with @objc attribute (as shown in the previous section) to check it for conformance.
- If you mark your protocol with the @objc attribute, you can only apply the protocol to classes—not structures or enumerations.
Protocol Inheritance
There are two aspects of protocol inheritance.
First, protocols are inherited by subclasses. If a class adopts a protocol, its subclasses automatically adopt the protocol.
The second aspect of protocol inheritance is that you can subclass and extend the protocol itself.
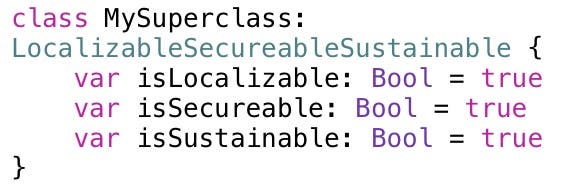
A protocol can inherit one or more protocols and extend those protocols even further. For example, in the following code, the Localizable and Securable protocols are inherited by the LocalizeableSecureableSustainable protocol, which adds its own isSustainable property:

A class that adopts LocalizeableSecurableSustainable must implement all members of the protocols it inherits as well as the members it declares. For example:
Protocol Composition
You can specify that a variable, property, or parameter contains types that conform to multiple protocols.
For example, the following code declares a variable named localizeSecure that contains types that conform to both the Localizable, and Secureable protocols:

Given this declaration, a type that conforms to only the Localizable protocol or only the Secureable protocol can't be stored in this variable. The type must conform to both protocols.
Note that protocol compositions do not create a new protocol. They simply declare a temporary combination of protocols.
Practical Use of Protocols
Where might you use protocols in your iOS projects? As one example, you could declare a protocol for retrieving and storing app settings:

Multiple classes can implement this protocol and provide completely different implementations for their methods. For example, one class can read and write settings to a local file:

Another class can read and write settings to a database:

In Figure 1, the lollipop shape on the right edge of each class indicates it adopts the AppSetting protocol.
 |
| Figure 1 - Classes implementing a protocol |
A protocol declares the signature of methods that a class must implement to adopt the protocol, but it doesn't specify the methods' content and behavior. This provides tremendous flexibility, allowing you to easily extend your app in the future. For example, you may decide to store app settings on the web. You can create a third SettingsInternet class, adopt the AppSetting protocol, and you're ready to go!
In Swift, protocols are full-fledged types. Practically, this means you can declare a variable to be a specific protocol type, and it can store a reference to any class that adopts the protocol.
For example, the following code declares a settings variable of type AppSetting (the protocol). It then stores an instance of the SettingsLocalFile class in the variable, and afterward, an instance of SettingsDatabase:

If you store an instance of a class that doesn't adopt the AppSetting protocol, it produces a compiler error that says: Type 'x' does not conform to protocol AppSetting.
You can even specify a protocol as the type of an array or dictionary. For example, you can declare a protocol named Localizable, and then create an array of Localizable objects:

You can declare a protocol in its own class file, or in the same file as a related class. For example, the UIPickerView class has an associated UIPickerViewDelegate protocol that protocol that defines the methods a delegate needs to implement. In this case, it makes sense to declare the protocol in the same file as the UIPickerView class.
Returning Values from View Controllers
Another practical use of protocols is returning values from one view controller to another. Let's look at an example of this. To follow along, download the sample project from this link.
- Open the iAppsReview project you just downloaded.
- Select the Main.storyboard file in the Project Navigator. On the upper-right side of the storyboard are the scenes shown in Figure 2.
 |
| Figure 2 - Two scenes use the App Category scene. |
When you tap the App Category row at the top of these scenes, they navigate to the App Category scene. When you select a category in the list and tap the Back button, the row at the top of the originating scene displays the selected category.
So how should the App Category scene pass the selected category back to the originating scene?
Let's talk about how not to do it first. Figure 3 demonstrates a poor solution to this problem. In this example, when a view controller navigates to the AppCategoryViewController, it stores a reference to itself in the originatingController property.
 |
| Figure 3 - A poor solution! |
When a user selects a category from the list, the AppCategoryViewController uses Swift's is operator to check the type of the originating controller. If it's WriteReview, then it executes one set of actions to pass back the selected category. If it's OnlineReview, it executes another set of actions.
When I'm performing code reviews for software companies, I see a lot of this "test the object type and perform a set of actions" approach. It's an example of tight coupling, which is not a good thing. The AppCategoryViewController knows too much about the scenes that call it. In fact, if you add a new scene to your app that needs to access the category list, you must add another if statement in the AppCategoryViewController to accommodate the new scene (or maybe even convert it to a switch statement).
Using a protocol is a much better solution. Figure 4 demonstrates how a protocol can be used to elegantly solve this problem.
 |
| Figure 4 - Use a protocol for a better solution. |
Here are the key points as numbered in the class diagram:
- The AppCategoryViewController class declares a protocol named AppCategoryDelegate that contains a single updateAppCategory method that all originating view controllers must implement.
- The AppCategoryViewController has a delegate property that is the type of the AppCategoryDelegate protocol. Originating view controllers store a reference to themselves in this property.
- When an app category is selected from the list, the AppCategoryViewController calls the updateAppCategory method on the view controller stored in the delegate property, passing the selected CategoryEntity.
- The originating view controller's updateAppCategory method is executed, and the newly selected app category is displayed.
Figure 5 contains a sequence diagram that provides a step-by-step view of how the protocol works at run time.
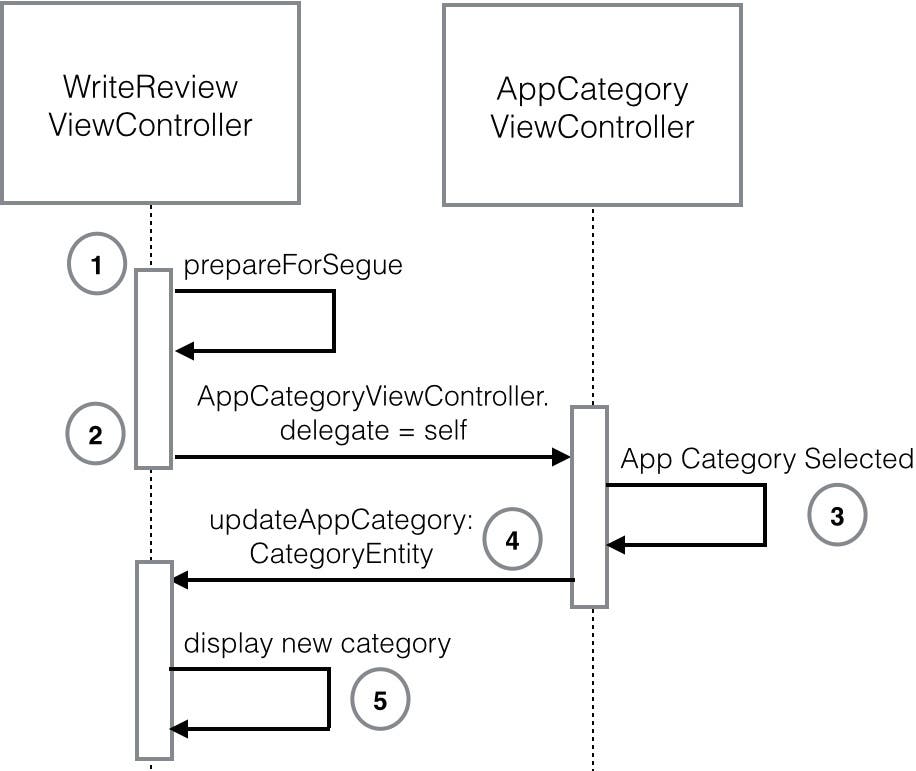 |
| Figure 5 - The protocol sequence diagram |
- The originating view controller's prepareForSegue method is called.
- The originating view controller stores a reference to itself in the AppCategoryViewController's delegate property and control is passed to the AppCategoryViewController.
- An app category is selected from the list.
- The AppCategoryViewController calls the updateCategory method on the originating view controller, passing a reference to the selected AppCategoryEntity.
Now that you have an overview of hwo the protocol works, let's look at the actual code that makes it all happen.
- Select the AppCategoryViewController.swift file in the Project Navigator.
- Near the top of the code file is a protocol named AppCategoryDelegate:
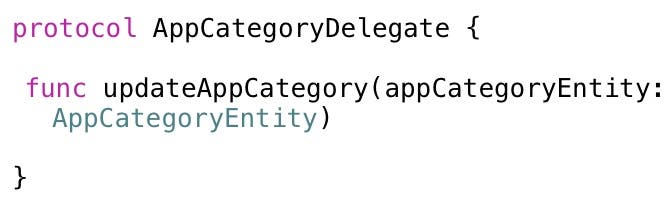
This protocol declares an updateAppCategory method that all originating view controllers must implement so they can be notified when the user selects an app category from the list.
This means an originating view controller must have a method called updateAppCategory that accepts a parameter of type AppCategoryEntity.
- Look a little farther down in the code file to see the delegate property:

Notice its type is the AppCategoryDelegate protocol. An originating view controller that implements the AppCategoryDelegate protocol can store a reference to itself in this property.
- Scroll to tableView:didSelectRowAtIndexPath. This method is called when an app category is selected at run time. Here is the last line of code in this method:

This code calls the updateAppCategory method on the originating view controller object stored in the delegate property, passing the selected AppCategoryEntity.
- Select the WriteReviewViewController.swift file in the Project Navigator. At the top of the file, this view controller adopts the AppCategoryDelegate protocol:

- The prepareForSegue method is called right before navigating to the AppCategoryViewController. In the last line of this method, the originating view controller stores a reference to itself in the delegate property of the AppCategoryViewController:

- At the bottom of the file is the implementation of the updateAppCategory protocol method:

This code updates the row to display the AppCategoryEntity passed back from the AppCategoryViewController.
Testing the Protocol at Run Time
Now let's step through this code at run time so you get an even clearer picture of all the moving parts.
- In the WriteReviewViewController class, add a breakpoint on the last line of code in the prepareForSegue method (Figure 6).
 |
| Figure 6 - Set a breakpoint in prepareForSegue. |
- Next, set a breakpoint on the first line of code in the updateAppCategory method (Figure 7).
 |
| Figure 7 - Set a breakpoint in updateAppCategory. |
- Select the AppCategoryViewController.swift file in the Project Navigator. Set a breakpoint on the last line in the tableView:didSelectRowAtIndexPath: method (Figure 8).
 |
| Figure 8 - Set a breakpoint in tableView:didSelectRowAtIndexPath:. |
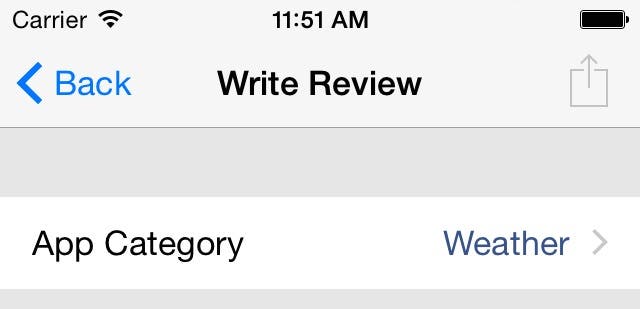
- Press Xcode's Run button. When the app appears in the Simulator, select the Write a Review option in the first screen. This takes you to the Write Review scene (Figure 9).
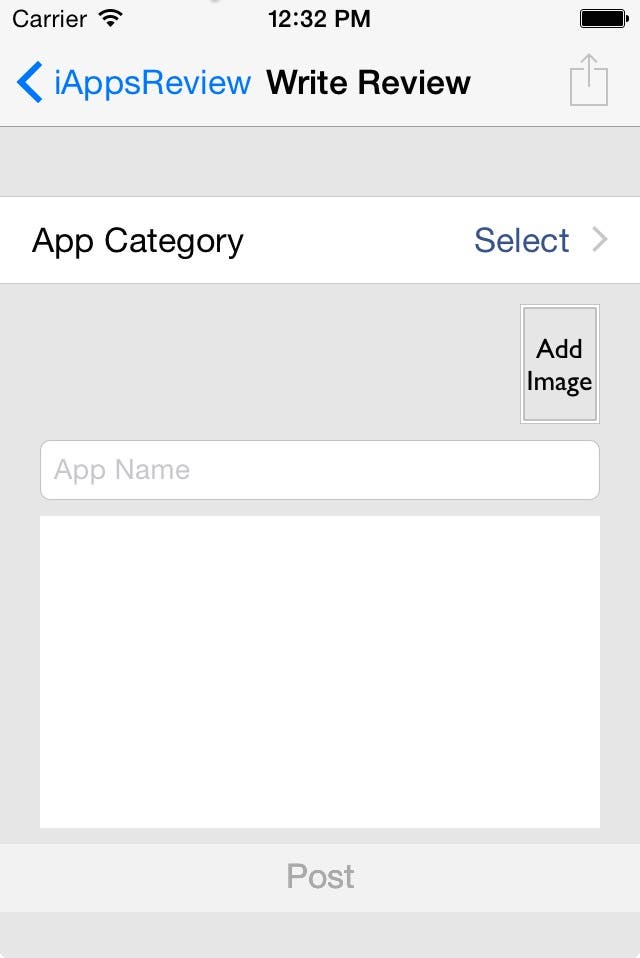 |
| Figure 9 - The Write Review scene |
- At the top of the scene, click on the App Category cell. This causes the first breakpoint to be hit (Figure 6) and the WriteReviewViewController stores a reference to itself in the AppCategoryViewController delegate property.
- in the Debug toolbar, click Continue. This navigates the app to the App Category scene (Figure 10).
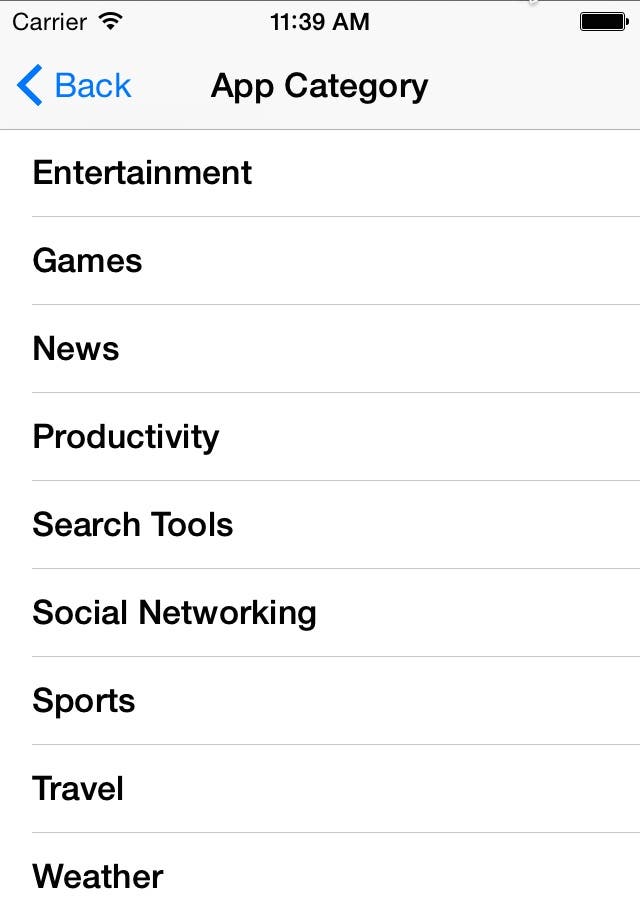 |
| Figure 10 - The App Category scene |
- Select an app category from the list. When you do this, you hit the breakpoint in the tableView:didSelectRowAtIndexPath: method (Figure 8). The AppCategoryViewController calls the updateAppCategory method on the view controller stored in its delegate property, passing the currently selected AppCategoryEntity.
- In the Debug toolbar, click the Continue button. This takes you to the breakpoint in the originating view controller's updateAppCategory method (Figure 7). This code gets the name of the newly selected app category, stores it in the row at the top of the scene, and then tells the table view to reload its data, which refreshes the row.
- Click Continue in the Debug toolbar. This displays the App Category scene with a check mark next to the newly selected app category (Figure 11).
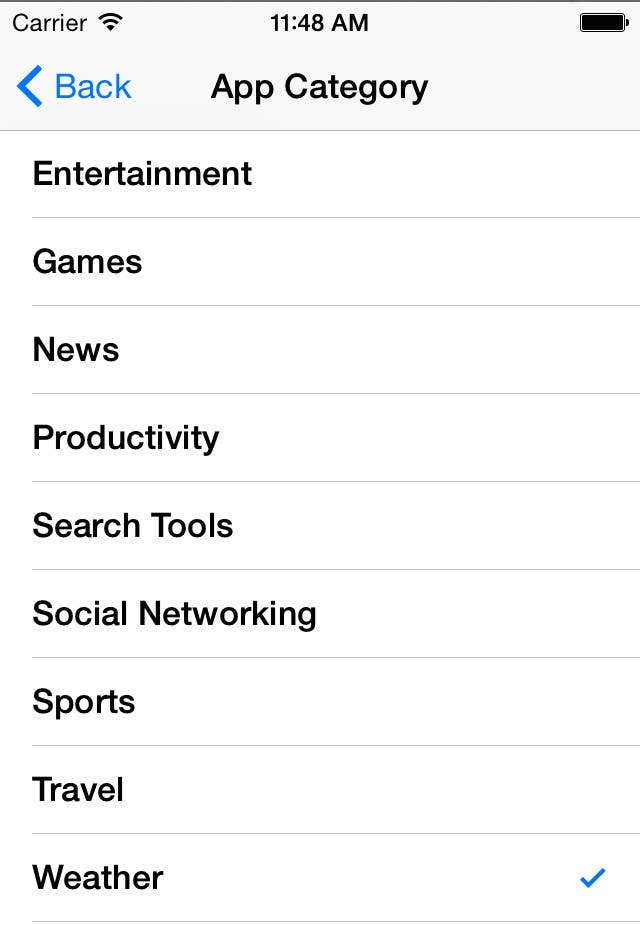 |
| Figure 11 - A check mark next to the selected item |
- Click the Back button at the top of the App Category scene. This takes you back to the Write Review scene where you can see the newly selected category displayed in the cell at the top of the screen (Figure 12).
 |
| Figure 12 - The newly selected item is displayed in the row at the top of the screen! |
This is a great solution, because it's loosely coupled. The AppCategoryViewController knows very little about the view controllers that are calling it. In fact, the only thing it knows is that the view controller has a method named updateAppCategory that accepts an AppCategoryEntity parameter. That's it!
Now any time you have another view controller that needs to use the App Category scene, you don't have to make any changes to the AppCategoryViewController class. That is loose coupling.
This elegant solution is brought to you by Swift's protocols!
Conclusion
Once you learn the syntax, it takes a small amount of effort to create a protocol. The payoff in flexibility and time saved farther down the road is well worth the effort!

Kevin McNeish
Kevin McNeish is author of the new book “Learn to Code in Swift” as well as the “iOS App Development for Non-Programmers” book series (www.iOSAppsForNonProgrammers.com), winner of the Publishing Innovation Award. Kevin is also an award-winning app developer, software architect, and conference speaker in the U.S. and abroad. He has spent much of his career making difficult concepts easy to understand. Follow Kevin on Twitter: @kjmcneish.
 Rachel Needell
 Susan Misuraca
 August Garry
 Rhett Intriago
 Olena Kagui
 Amy Spitzfaden Both