Why Is One AirPod Louder than the Other?
Is one AirPod louder than the other? Here are some solutions to optimize your listening experience.

A lifelong tech enthusiast, with experiences ranging from jailbreaking his iPhone to building his own gaming PC, Rhett specializes in maintaining privacy in a digital world and iPhone security.
Learn More A lifelong tech enthusiast, with experiences ranging from jailbreaking his iPhone to building his own gaming PC, Rhett specializes in maintaining privacy in a digital world and iPhone security.
Learn MoreWhat to Know
- You can check your audio balance in Accessibility settings.
- Re-connecting your AirPods may help resolve any issues you are having.
- If the sound is muffled or quiter than normal, you may just need to clean your AirPods.
- For AirPods Pro, performing an Ear Tip Fit Test can help make sure Active Noise Cancelation is working properly for both AirPods.
AirPods don’t come cheap, so if they are not functioning properly, you definitely want to get them fixed as soon as possible. In this article, we’ll go over what to do when one AirPod is louder than the other or if the sound is muffled. We’ll cover some possible solutions so that you can get back to listening to your music the way it was meant to be heard.
What to Do If One AirPod Is Louder than the Other
The first thing to do is pair your AirPods with another device and test them to help narrow down the cause of the issue. Also, you may want to try testing another pair of earbuds or headphones with your phone to see if the problem still occurs. If you pair your AirPods to a friend’s iPhone or iPad and one AirPod is still louder than the other, you might have a hardware problem or your AirPods may simply need to be cleaned.
However, if you have confirmed that the issue only happens with your iPhone or iPad, there are some solutions you can try that may help fix one AirPod being louder than the other one. For more AirPods tips and tricks, be sure to sign up for our Tip of the Day newsletter.
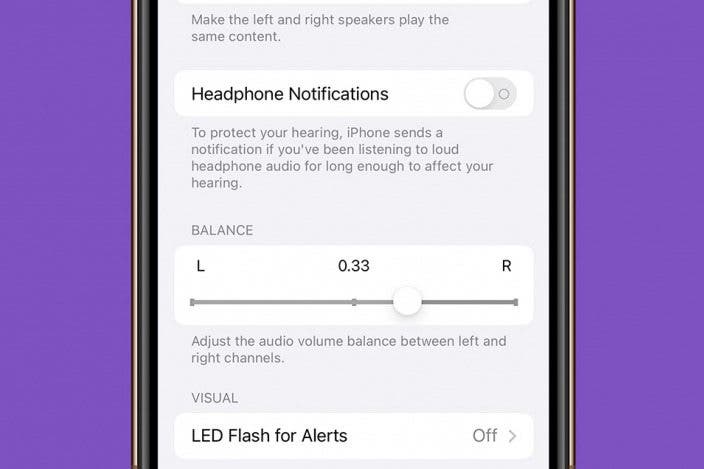
How to Check Audio Balance
If the issue is software-based, you may have accidentally changed the audio balance of your AirPods. This is easy to check and correct.
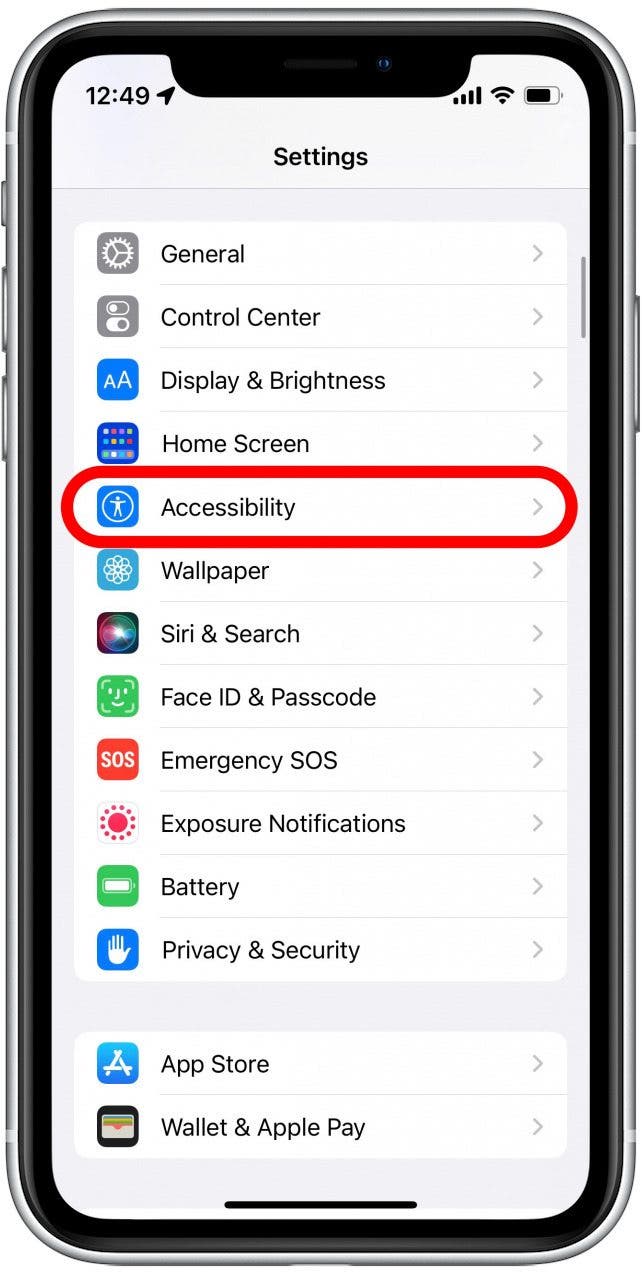
- Open the Settings app.

- Scroll down and tap Accessibility.
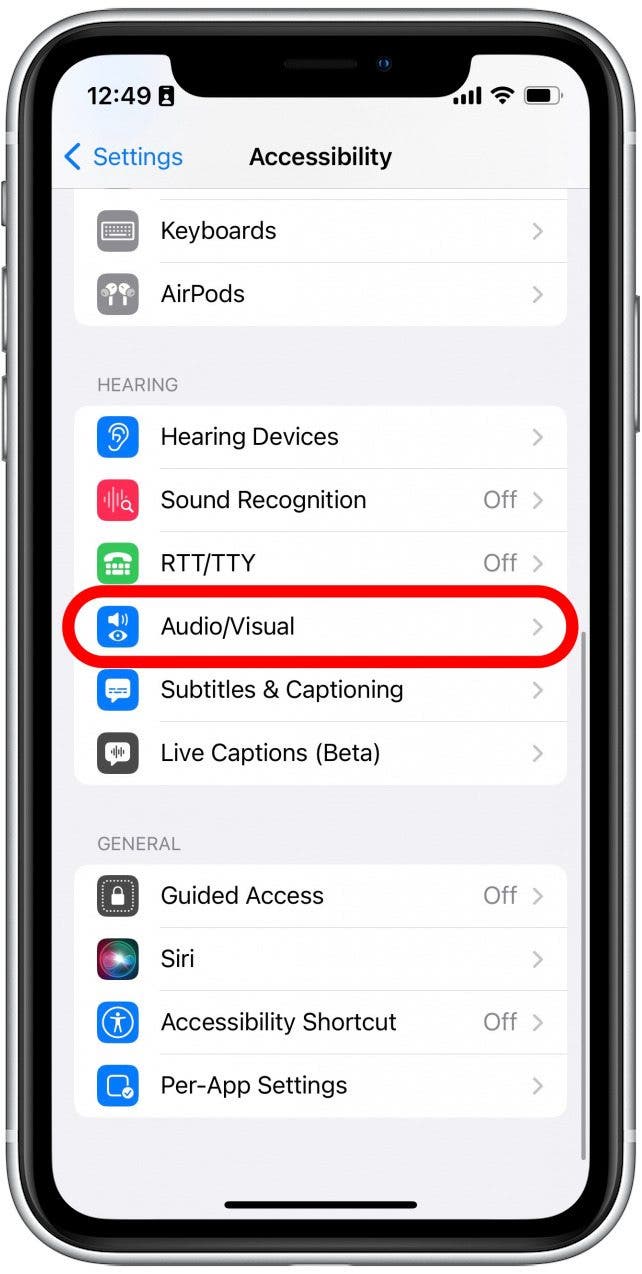
- Scroll down and tap Audio/Visual.
- Under Balance, you will see a slider. If the number in the middle is 0.00, your audio should be balanced equally between the left and right channels. If the number is different, or the slider is to the left or right, your audio might be out of balance.
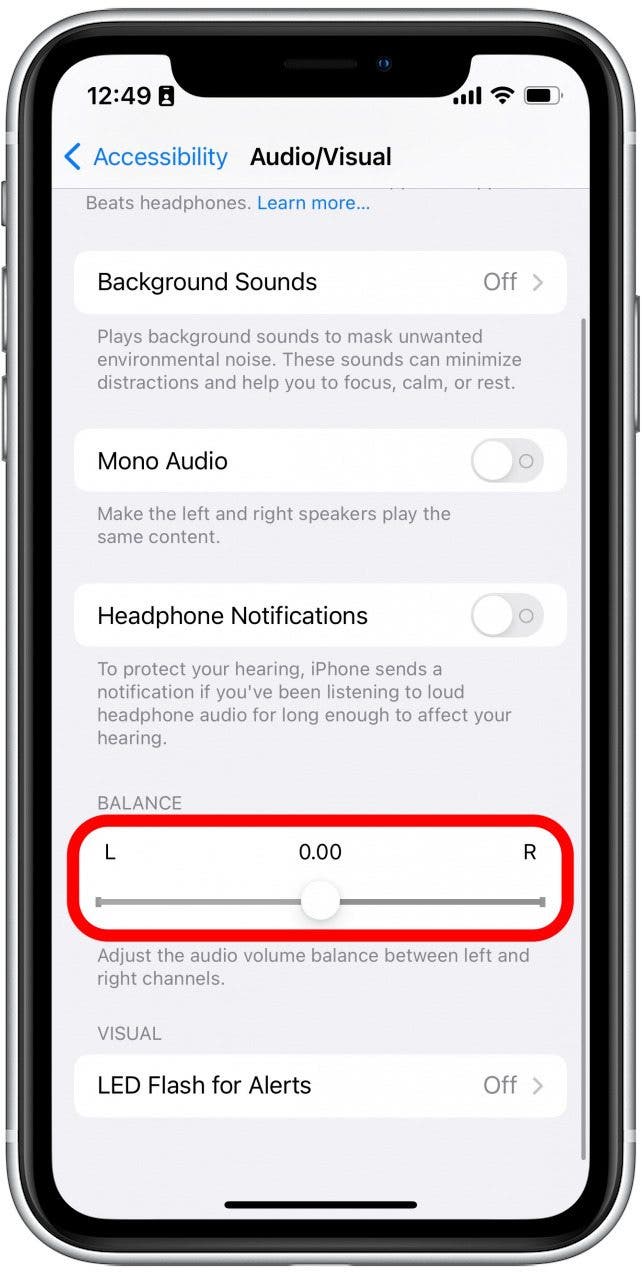
- Try moving the slider to the left or right a bit, and then move it back to the center until the number reads 0.00.
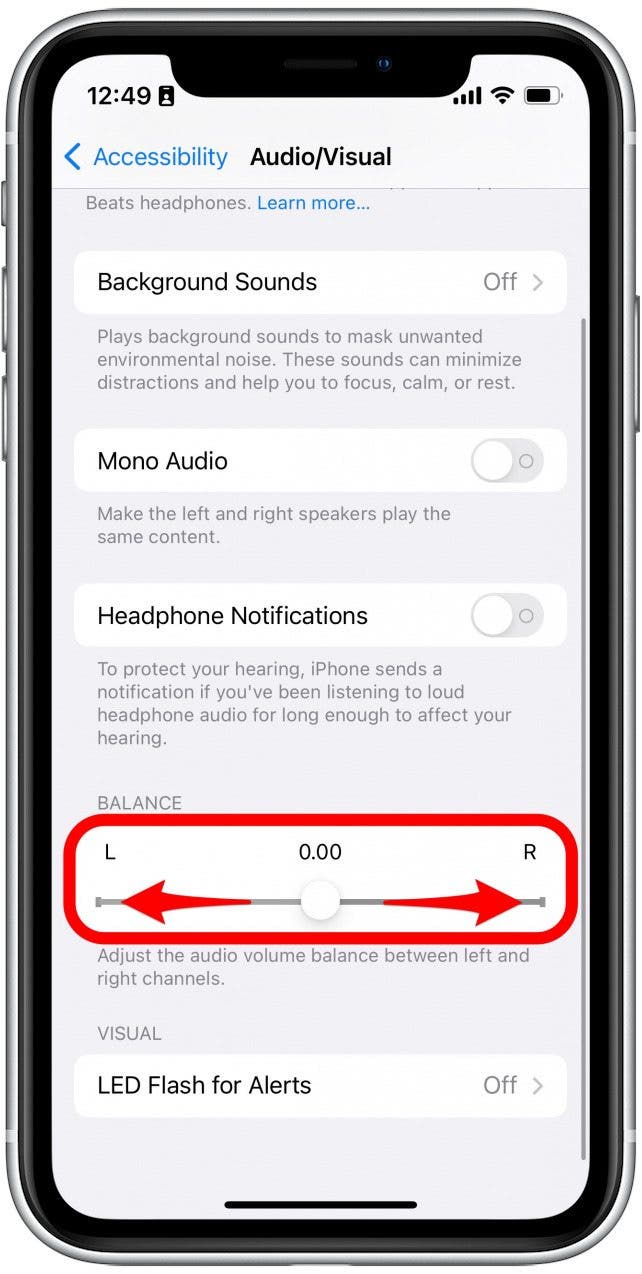
If there are audio balance issues, this should help reset them. Another option you can try is switching Mono Audio on and off again to see if that helps reset the balance.
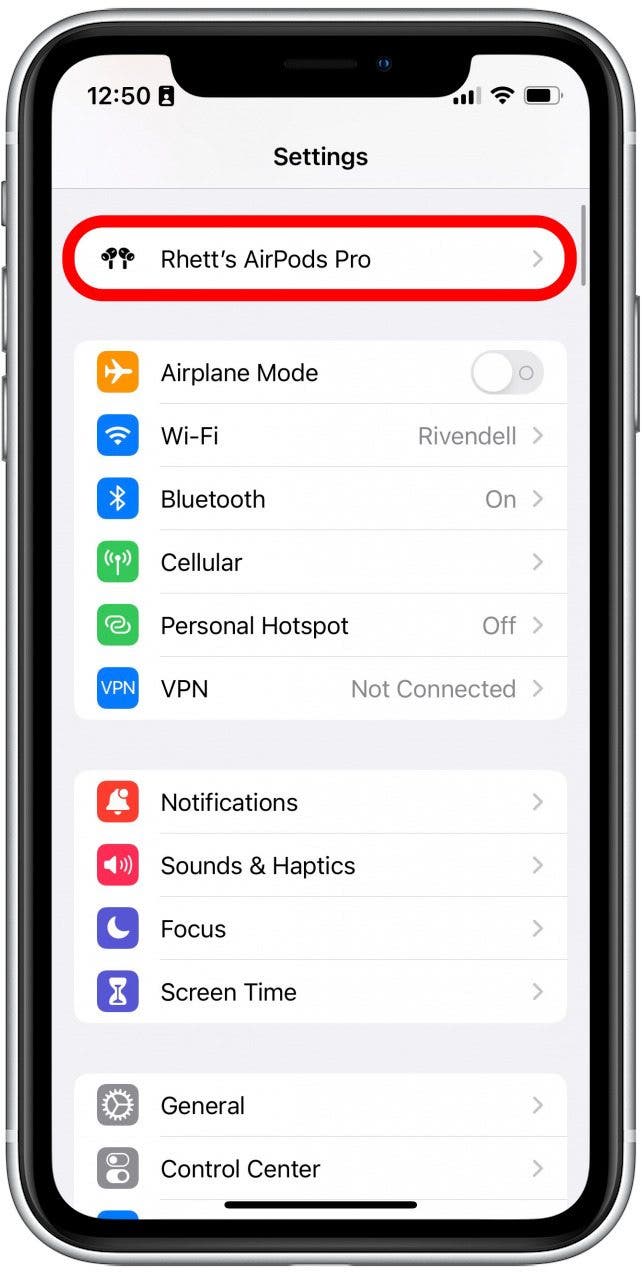
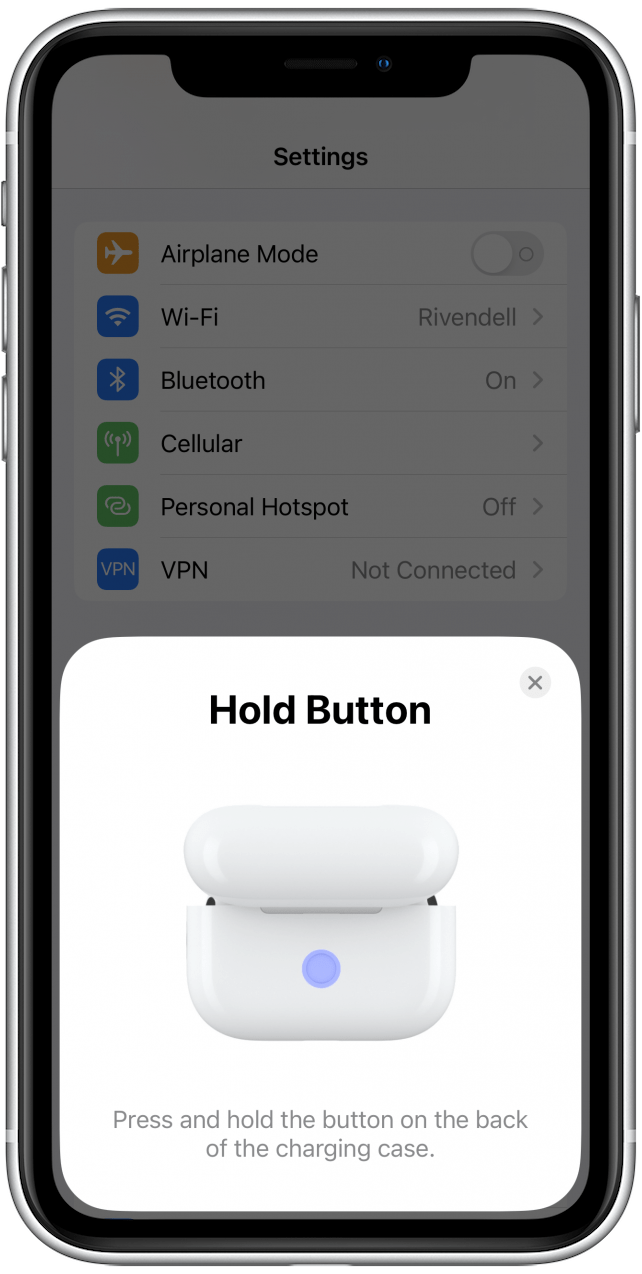
How to Re-Connect Your AirPods
Sometimes, resetting electronics can help resolve any unusual issues. The same is true for AirPods. This is also a good solution if only one AirPod works for you.
- Open the Settings app.
- Tap your AirPods when they are connected to your phone.
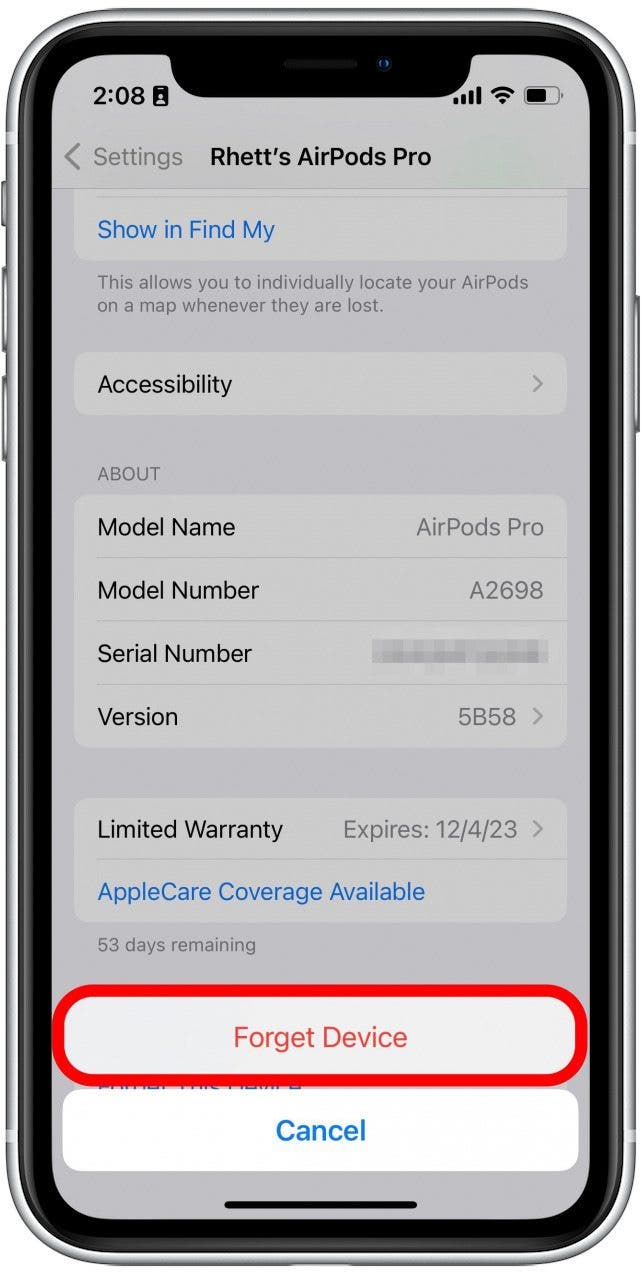
- Scroll all the way to the bottom and tap Forget This Device.

- Tap again to confirm.
- Place both AirPods in the case, and close it.
- Open your AirPods case, and when the Not Your AirPods screen pops up on your iPhone, tap Connect.
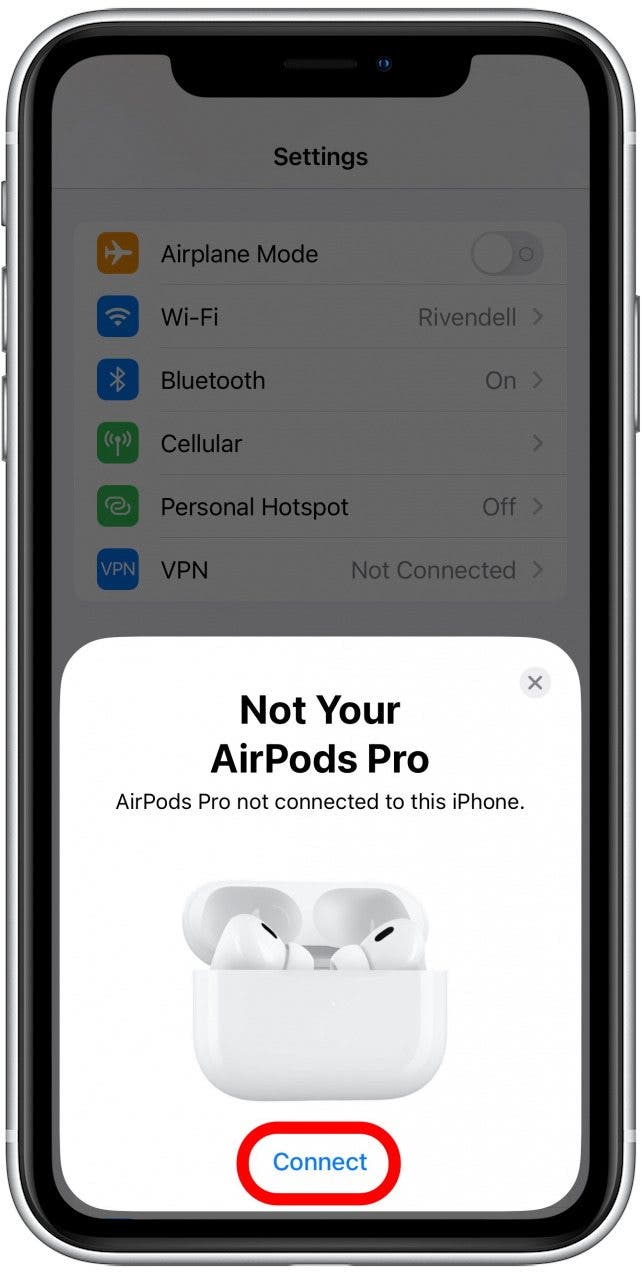
- On your iPhone, follow the on screen instructions to continue connecting your AirPods.
If this doesn’t fix one AirPod being louder than the other or fix only one AirPod working, you may have another problem. Double check the battery level of your AirPods. If one is dead that may explain why one is not working. If you continue to experience trouble, you may need to visit an Apple Store or contact Apple Customer Support for further assistance.
AirPods Sound Muffled? Here’s How to Clean Them
If your AirPods sound muffled or one is quieter than the other, you may just need to clean them. Over time, earwax and dirt can build up in the speaker grills, which weakens the sound of your AirPods. Apple recommends cleaning your AirPods with a damp cloth and then drying them with a lint-free cloth. Avoid using soaps or solvents, and don’t run them underwater. For the microphone and speaker meshes, use a dry cotton swab.
If your AirPods have accumulated quite a bit of wax or dirt in the speaker grill, you can try applying a small piece of adhesive putty to the mesh. It should pick up anything that you missed with a cotton swab. For more detailed information on cleaning your AirPods, please see our AirPods cleaning guide.
How to Check Headphone Safety Settings
If you’ve cleaned your AirPods and they still sound a bit muffled, there are a couple more things you can try. To start, you may want to check your Headphone Safety settings.
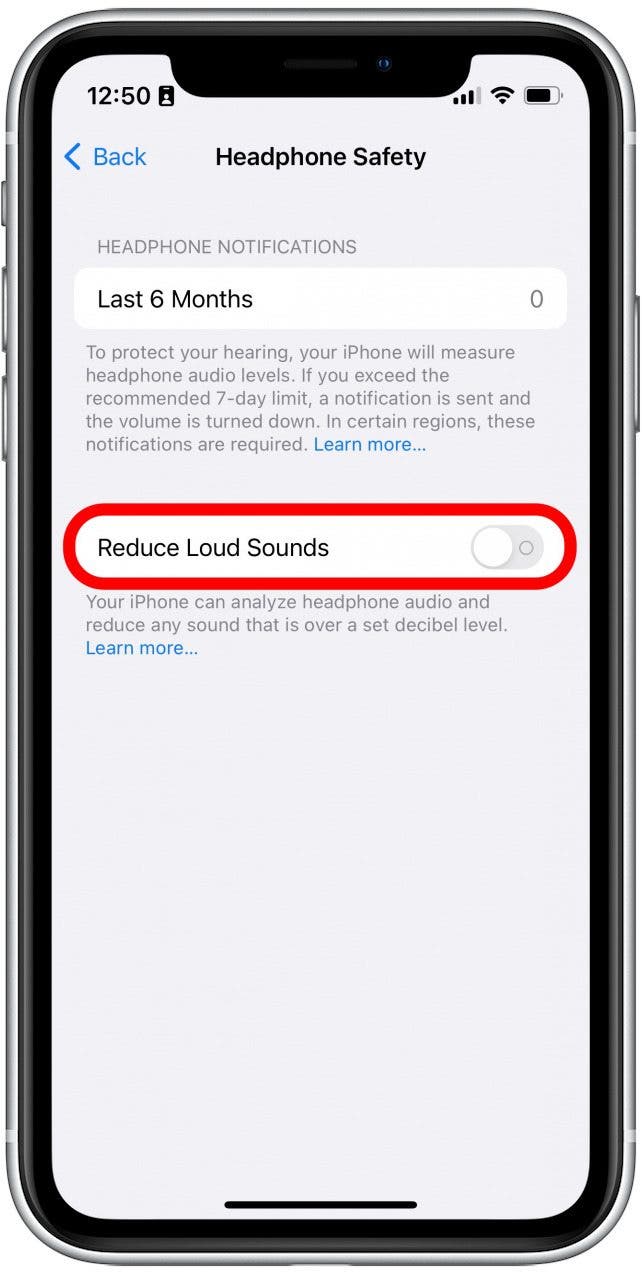
- Open the Settings app.
- Scroll down and tap Sounds & Haptics.
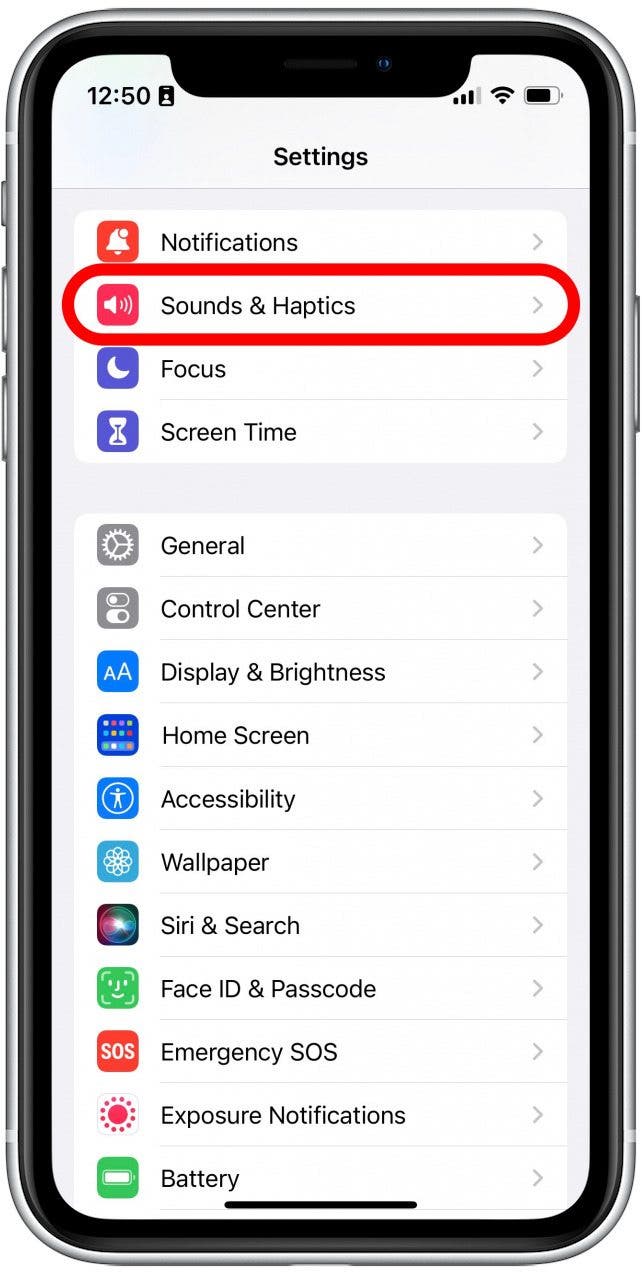
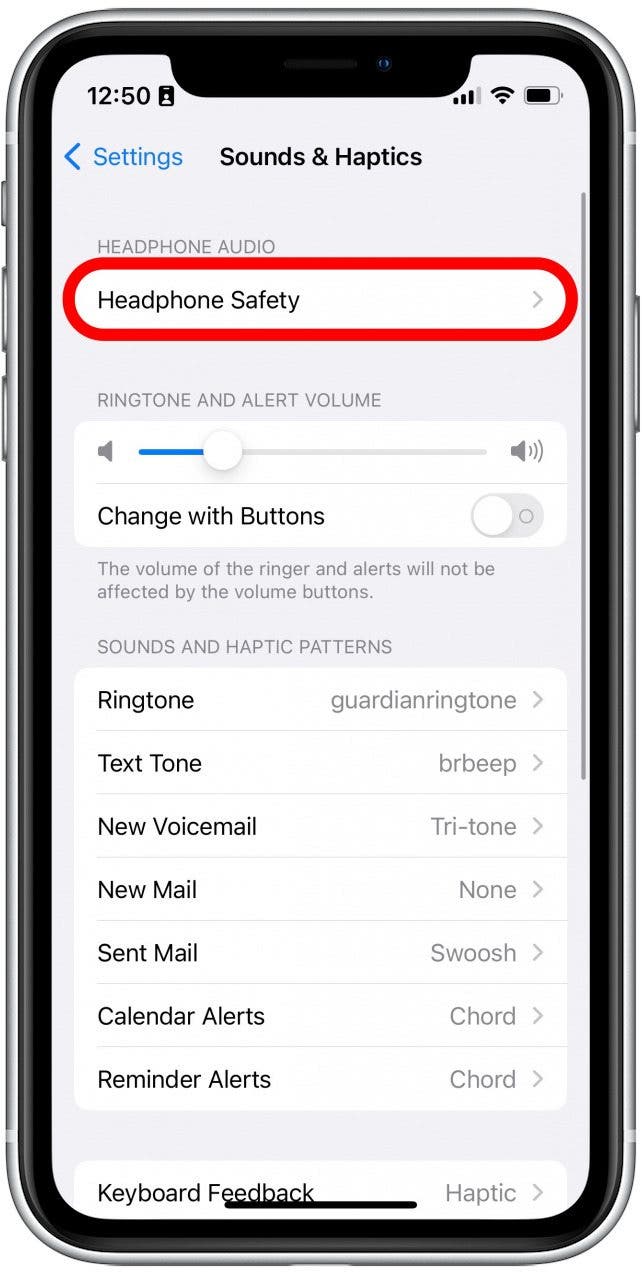
- Tap Headphone Safety.
- If the Reduce Loud Sounds toggle is green, that means this feature is turned on. When you have this setting enabled, your iPhone will attempt to reduce the volume of sounds over the set decibel level, which can make your AirPods sound quieter. You can also move the slider to the left or right to increase or decrease the decibel threshold.
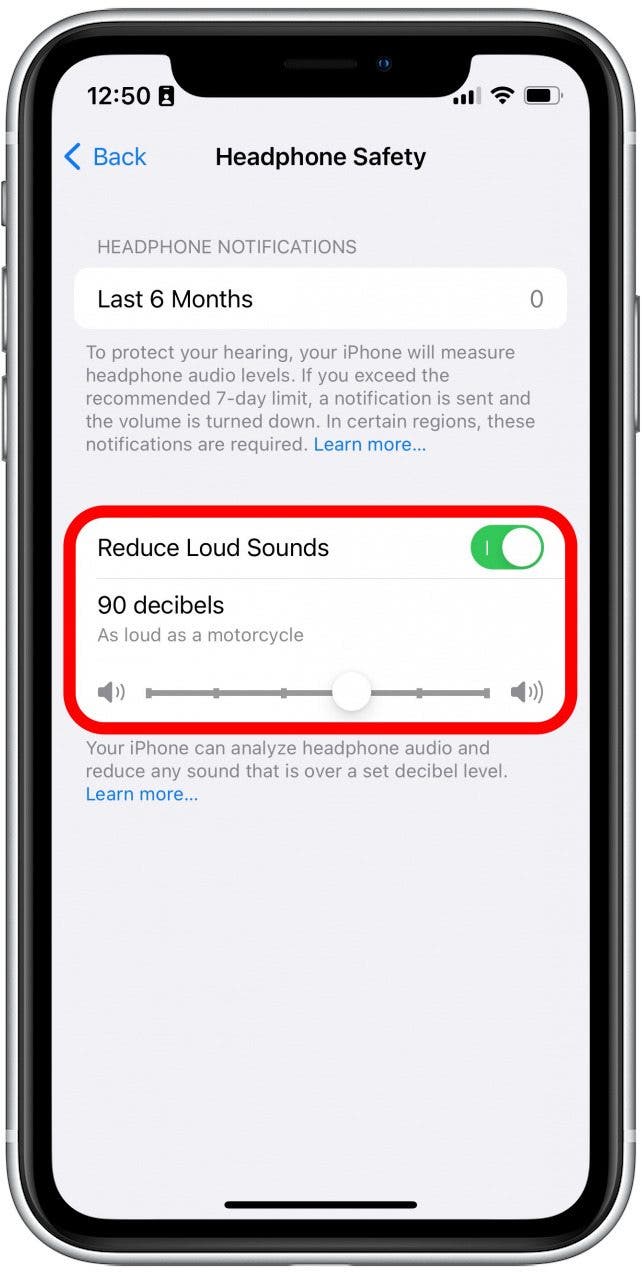
- Tap the toggle so that it turns gray to turn this feature off.
If you are concerned about your eardrums or if you have a habit of listening to music louder than you should, this is a good setting to have enabled. However, if you are good about not listening to music too loudly, you can keep Headphone Safety turned off.
For AirPods Pro: How to Perform an Ear Tip Fit Test
The AirPods Pro are different from standard AirPods in that they use silicone tips to create a seal inside your ear for optimal noise cancelation. If you have the wrong size ear tips on your AirPods Pro, sound may be leaking in, making them seem quieter. Or if you have the wrong size tip on only one of them, one might seem louder than the other.
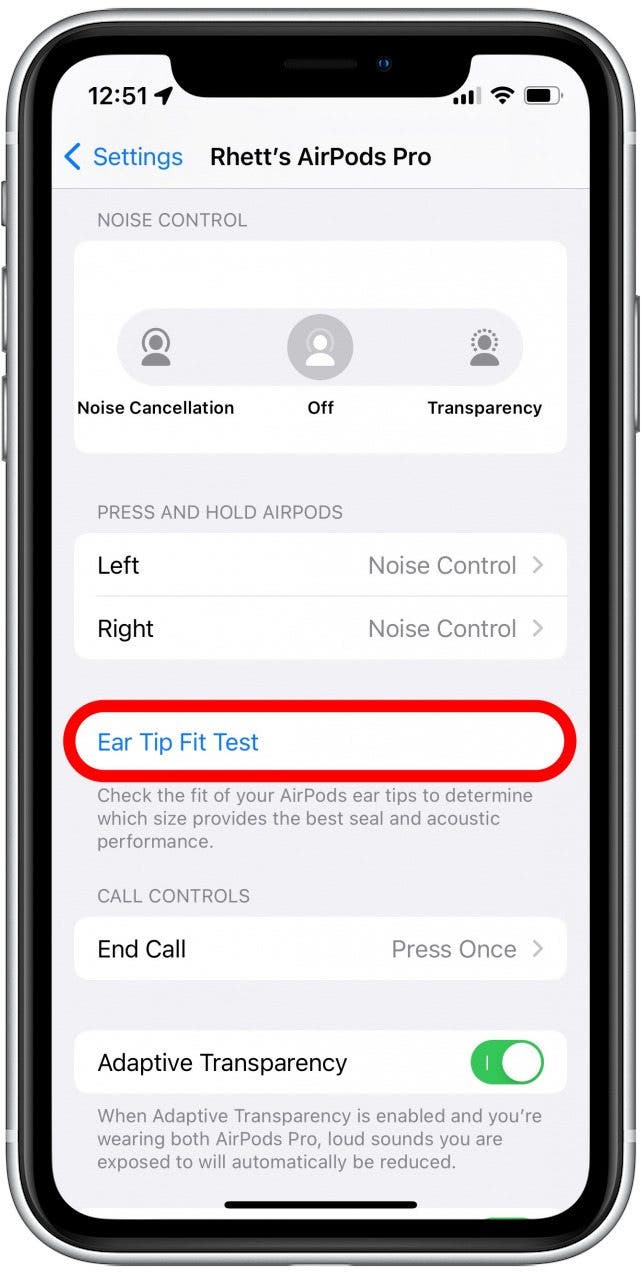
- Open the Settings app.
- Tap your AirPods Pro when they are connected to your phone.
- Tap Ear Tip Fit Test.
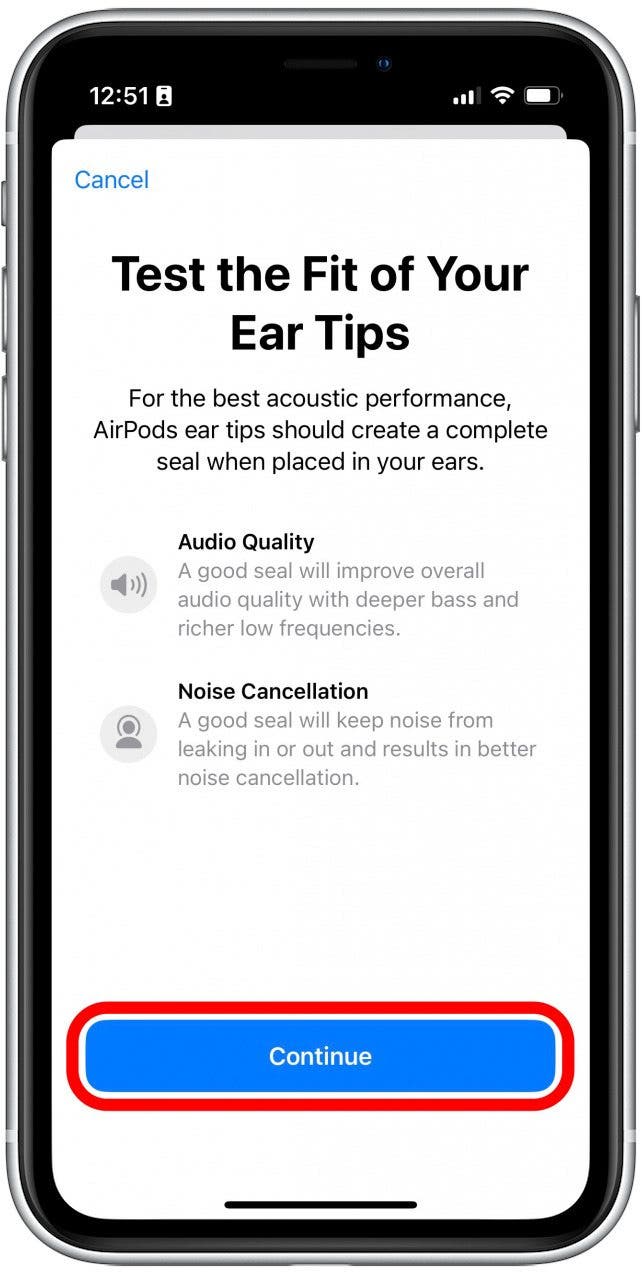
- Tap Continue.
- With your AirPods inserted, tap the play icon to play a test sound which will help your iPhone determine the right ear tip size for you.
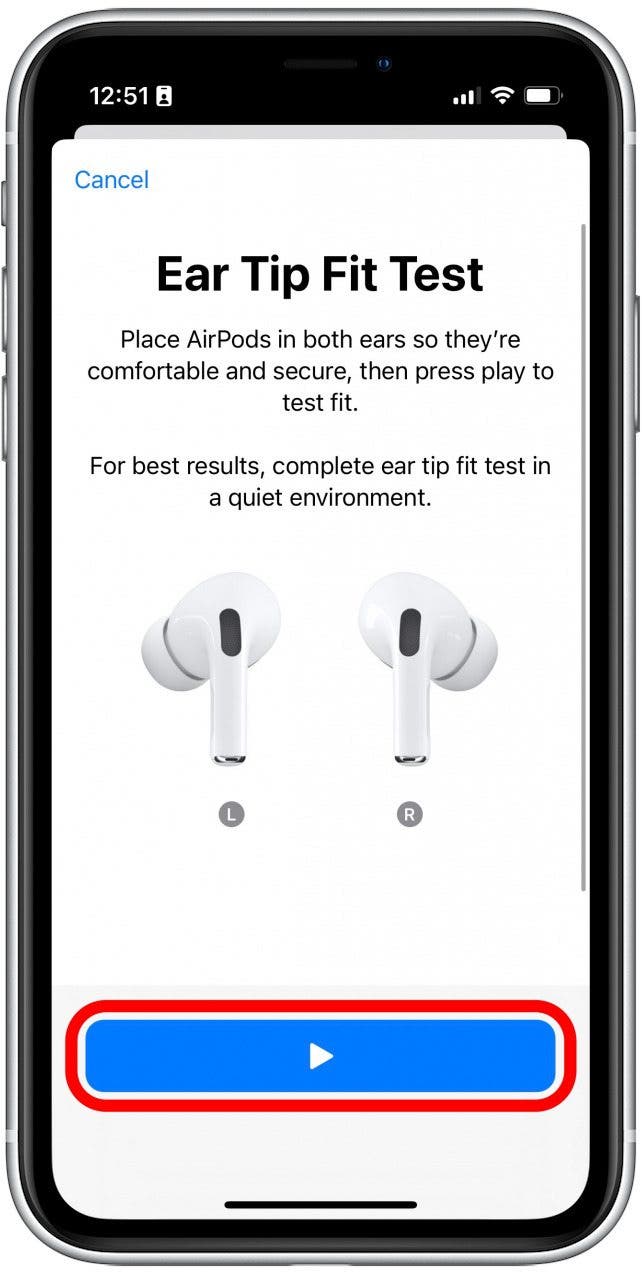
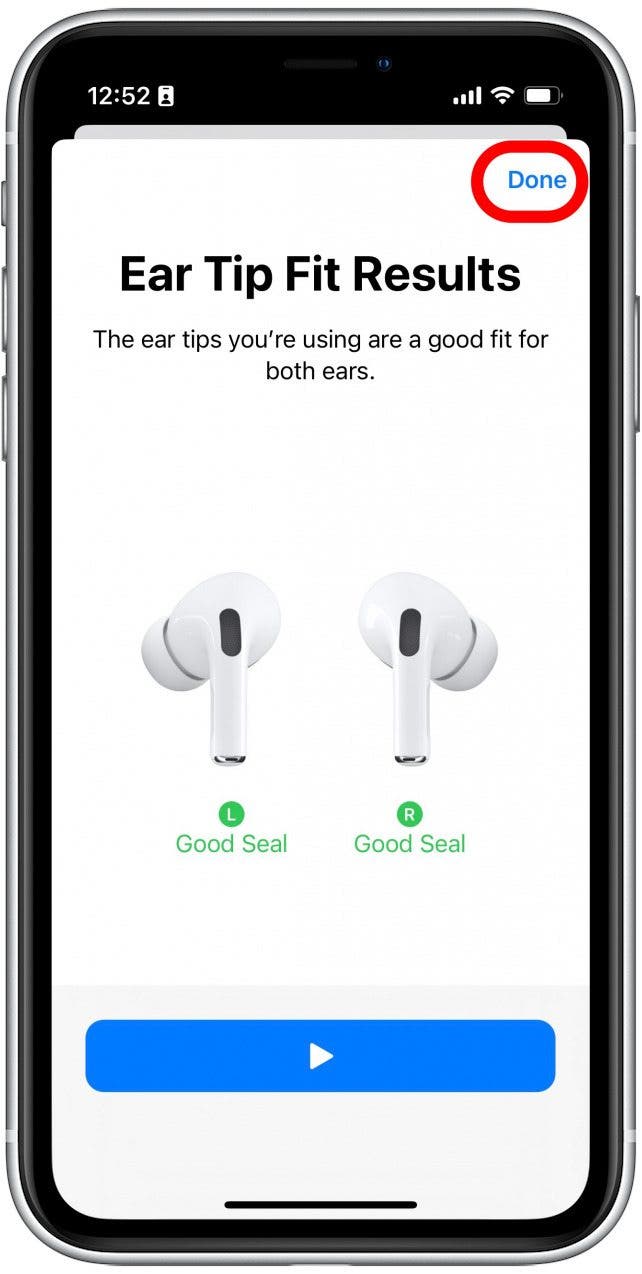
- If you have the wrong size ear tips, you will see yellow text suggesting you try a different size. You may have to change out the tips of your AirPods Pro multiple times during the test, and you may end up needing different size tips for each ear.
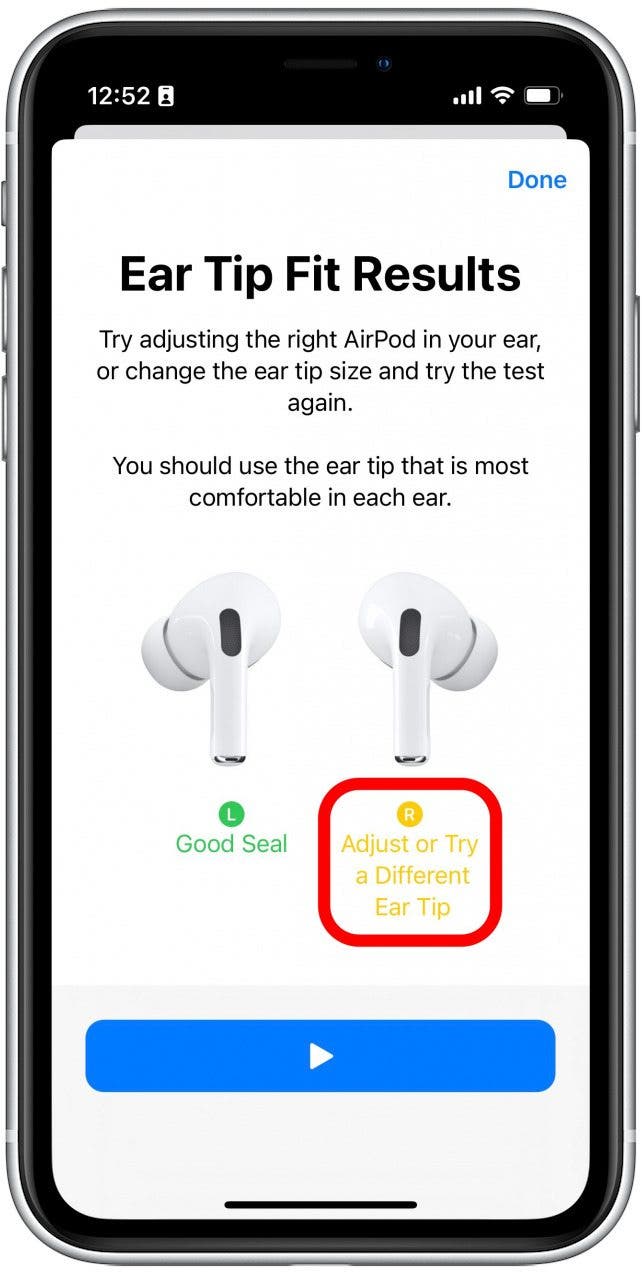
- Once both AirPods have green Good Seal text next to them, you can tap Done.
By having the right ear tips on your AirPods Pro, you can create the best seal needed for Active Noise Cancelation to work. When this feature is functioning properly, your AirPods Pro will sound their best.
Finally, if you are still having trouble with the sound levels of your AirPods, there may be a hardware issue with them. If this is the case, you will likely need to visit an Apple Store or reach out to Apple Customer Support for further assistance. Next, find out what to do when one AirPod stops working altogether.

Rhett Intriago
Rhett Intriago is a Feature Writer at iPhone Life, offering his expertise in all things iPhone, Apple Watch, and AirPods. He enjoys writing on topics related to maintaining privacy in a digital world, as well as iPhone security. He’s been a tech enthusiast all his life, with experiences ranging from jailbreaking his iPhone to building his own gaming PC.
Despite his disdain for the beach, Rhett is based in Florida. In his free time, he enjoys playing the latest games, spoiling his cats, or discovering new places with his wife, Kyla.

 Rhett Intriago
 Rachel Needell
 Olena Kagui
 August Garry


 Nicholas Naioti
 Susan Misuraca
 Cullen Thomas


 Sarah Kingsbury