Swift Programming 101: Advanced Collections


Swift's advanced collections can help you model more complex objects in your apps and create an API that is easier to understand and use. In this post, I model a chessboard using Swift's subscripts and also cover tuples and multidimensional arrays!
What are Tuples, and Why Should I Use Them?
Swift's tuples (pronounced like "tooples" or "tupples") provide a way to create a group of related values. Unlike arrays and dictionaries, a tuple can contain values of different types. Tuples are particularly useful in returning multiple values from a method.
Let's take a look at an example that demonstrates how tuples can be used in your apps. You can download the sample project from this link.
- Open the TuplesDemo sample project in Xcode.
- Let's run the project to get an overview of what the app does. Click Xcode's Run button, and when the app appears in the Simulator, you should the scene shown in Figure 1.
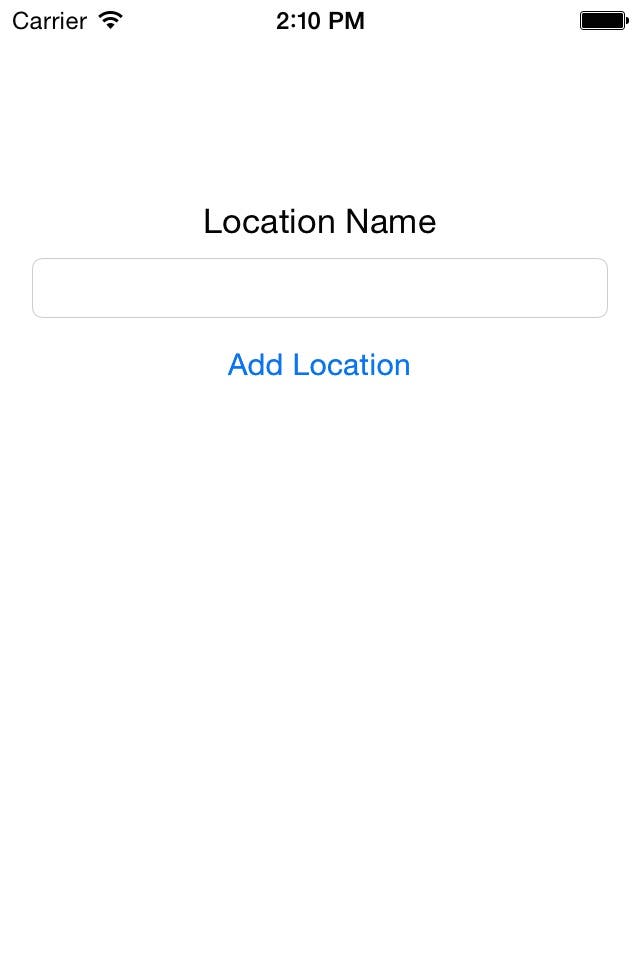 |
| Figure 1 - The TuplesDemo main scene |
This is a very simple app that allows you to add new Locations to the app's database using Core Data.
- Without entering a location name, click the Add Location button. You should see an alert saying you must enter a location name (Figure 2).
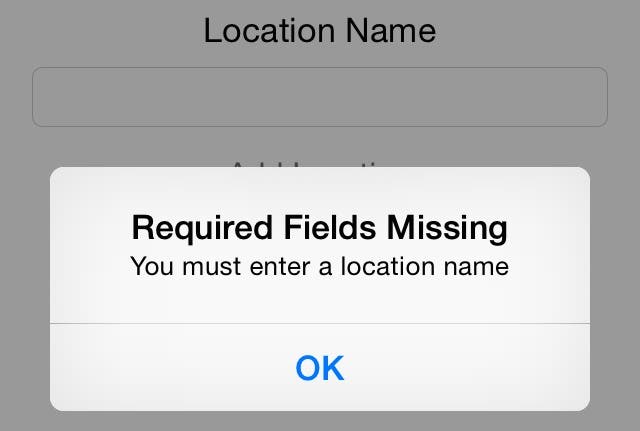 |
| Figure 2 - The TuplesDemo required fields alert |
- Click OK to close the alert. Now enter a Location Name (e.g. Los Angeles, Paris, Beijing) and click Add Location again. You should see he alert shown in Figure 3 indicating the location was successfully saved to the database.
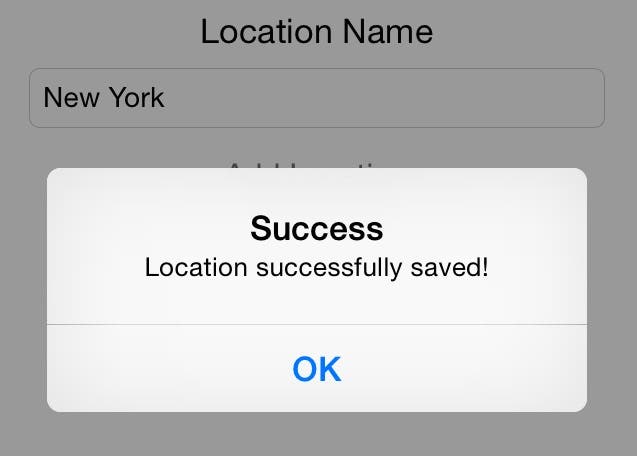 |
| Figure 3 - The location was successfully saved! |
- Go back to Xcode and click the Stop button. Let's look at the code that uses tuples to make all this happen.
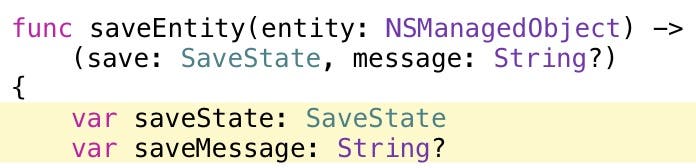
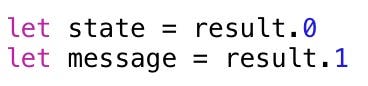
- Expand the Business Layer group and select the mmBusinessObject.swift file in the Project Navigator. Near the top of the file, check out the saveEntity method declaration:

- Take a close look at the return value. This declaration tells you that the saveEntity method returns a tuple containing two named return values. The first is named state and the its type is SaveState. The second is named message and its type is String?.
SaveState is an enumeration declared at the top of the mmBusinessObject.swift code file:

The SaveState enumeratiom contains three possible values reflecting three possible outcomes of saving the entity to the database:
- Error - An error occurred.
- RulesBroken - a business rule was broken (usually a required field is left empty.)
- SaveComplete - The entity was successfully saved.
We could just return the SaveState value from this method, but we can create a better interface for the mmBusinessObject class by also returning a message that contains a further explanation of what happened. That's where tuples come to the rescue!
- Notice there are two variables at the top of the saveEntity method. The saveState variable stores the result of the saveEntity operation, and the saveMessage variable contains any message we want to return from this method.
The code beneath the variables is a bit complex, but for now you just need to know these two variables get set based on the result of the save operation.
- Now look at the return statement at the bottom of the method:

To create a named tuple return value, specify the name, a colon and the value. Separate the values with a comma and place the return values within parentheses.
Note that you can name the values in a Swift tuple. This makes them far more useful than in other languages where you can't do this. You're not required to name the tuple values, but naming them makes your code far more readable and intuitive.
- Let's see how the tuple return values are handles. Click ViewController.swift in the Project Navigator. Check out the third line of code in the addLocation method:

Notice the type of the result variable is the same as the type returned from the saveEntity method. It's a tuple! Since each tuple value is named, the purpose of each value is crystal clear.
I included the result variable's type so you can more clearly understand the code. However, you can remove the type declaration and Swift will figure it out for you using type inference.
The rest of the code uses a switch statement to perform actions and display messages based on the values in the tuple.
Here are some ground rules for tuples:
- The values contained in a tuple can be of any type.
- Any number of values can be in a tuple, although more than two or three becomes cumbersome.
- You can decompose the values contained in a tuple into individual variables or constants:

- If you only need one of the tuple's values, you can use an underscore to ignore the other values:

- You can also access the values in a tuple using a numeric index:
- It's best to name the values in the tuple and then access the values using those names:

Multidimensional Arrays
You can create arrays with more than one dimension. In Swift, you effectively create an "array of arrays" where each member of an array contains a reference to another array. For example, in Figure 4, each element in the array on the left references a second array on the right containing three elements.
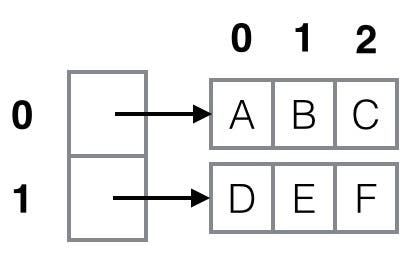 |
| Figure 4 - A two-dimensional array |
You declare a multidimensional array by nesting pairs of square brackets. For example, this code declares a two-dimensional integer array:

You intialize an empty multidimensional array like this:

The two-dimensional string array in Figure 4 is sized and initialized like this:

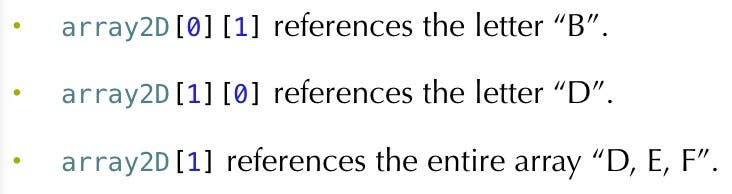
You reference items in a multidimensional array using two sets of square brackets. The first set of brackets references the outer array, and the second set the inner array. For example, given the array in Figure 4:
In the next section, you will see a practical application of where you can use multidimensional arrays in your iOS apps.
Creating Custom Collections
Swift's collection classes serve most needs for your iOS apps. However, in special cases, you may want to declare your own collection classes. This requires the use of Swift's subscripts.
Let's see how we can use subscripts to create a Chessboard class that allows us to access individual squares on the board.
Figure 5 shows a chess board with slightly modified algebraic notation—a common notation used to record a game of chess.
 |
| Figure 5 - A chessboard with algebraic notation |
The rows on the board are numbered 1 through 8, and the columns a through h. Each chess piece has a two-character designation. Black pieces begin with the letter B and white with the letter W. The second letter specifies the type of pieces: R=Rook, N=Night, B=Bishop, Q=Queen, K=King, P=Pawn. (Here's where my notation deviates—in standard algebraic notation, the absence of a letter indicates a pawn.)
To reference a specific square on the chessboard, you use a 2-character notation comprised of column/row. For example, the square at the bottom-left corner of the board is a1. The square at the top-right corner is h8.
To model this column/row notation, we can create a custom subscript for a Chessboard class and use this in combination with a two-dimensional string array. This allows us to reference a square like this:

Subscript Syntax
Here is the syntax for declaring a subscript in Swift:
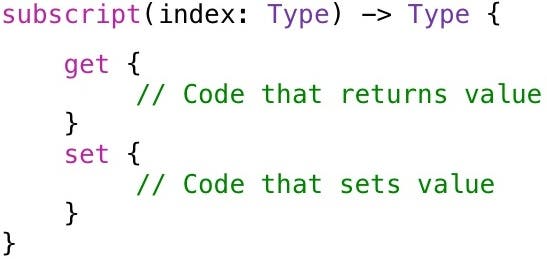
This syntax is similar to computed properties. You begin the declaration with the subscript keyword, followed by one or more input parameters that accept the value(s) used to retrieve a specific item from the collection. Next, you specify the return type, which is the type of the value returned from the collection.
The get method is executed when retrieving a value from the collection, and the set method is executed when storing an item into the collection. You can create a read-only collection by leaving out the set method.
The Chessboard Sample
Let's take a look at sample code that demonstrates two subscripts in action. You can download the sample code playground at this link.
Open the Subscripts.playground file in Xcode. At the top of the playground, a Chessboard class is declared. This class has a two-dimensional string array named board that models the squares on a chessboard. It contains an array of eight elements, representing the rows on a chessboard. Each row element contains another array of eight elements that represent the columns on a chessboard:
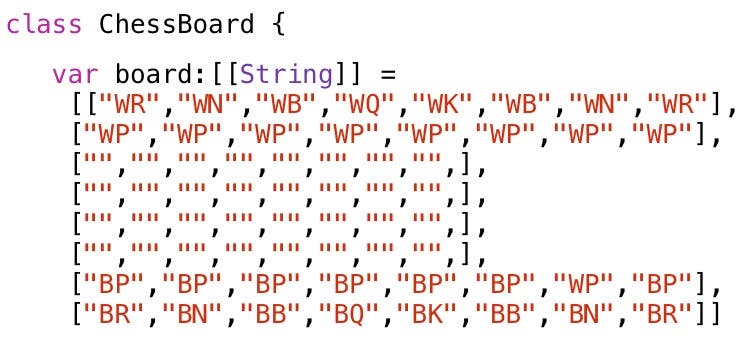
The board array is initialized with chess pieces located on squares as at the start of a game (Figure 5).
The Chessboard class also has two dictionaries:
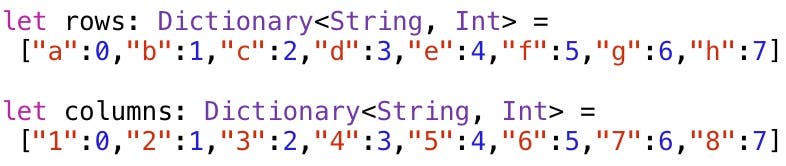
The rows dictionary accepts a row letter and returns the corresponding row number. The columns dictionary accepts a column string, and returns the corresponding column number. We could dispose of the columns array and just perform a simple math calculation to determine the column number. But, for the sake of discoverability, I chose to use a similar methodology for both rows and columns (choosing clarity over cleverness.)
Next, in the playground, is the first subscript declaration:
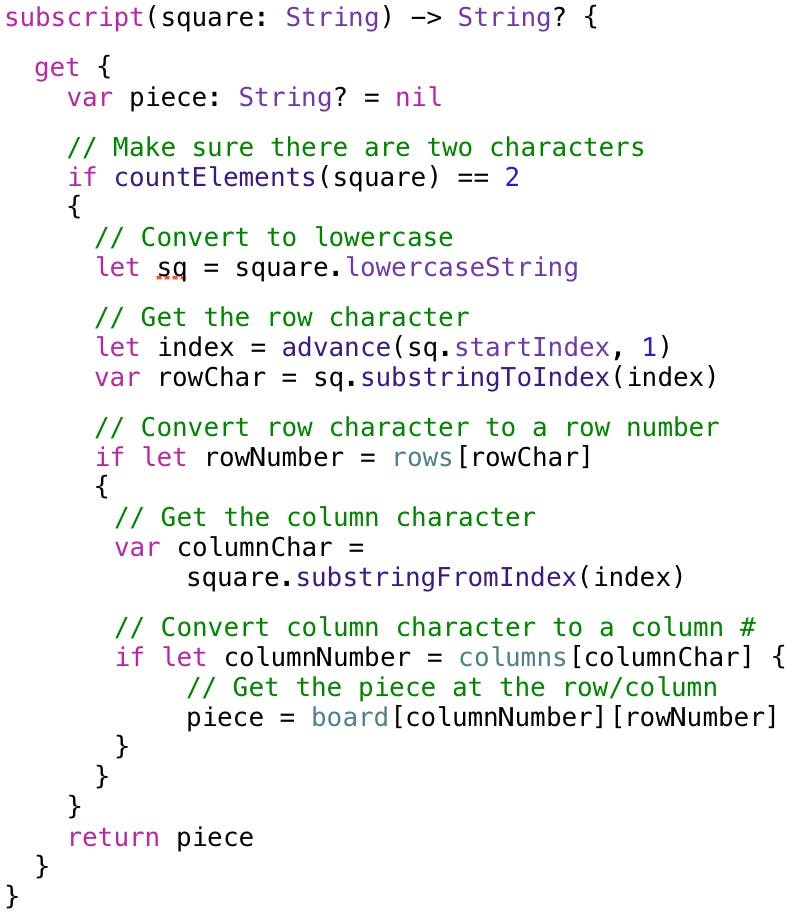
This subscript accepts a String parameter (the column/row pair) and returns an optional String (the chess piece). The return value must be optional because you can pass in an invalid column/row (such as z9) in which case the subscript returns nil.
If the column and row numbers are valid, they are used to retrieve the chess piece that is on the corresponding square in the two-dimensional board array:

This chess piece is then returned from the getter.
To try out this subscript, at the bottom of the playground, try entering different column/row pairs. For example, Figure 6 shows the results of typing two valid and one invalid column/row pairs.
 |
| Figure 6 - Testing the first subscript |
Look further down in the playground to see the second subscript declared for the Chessboard class:
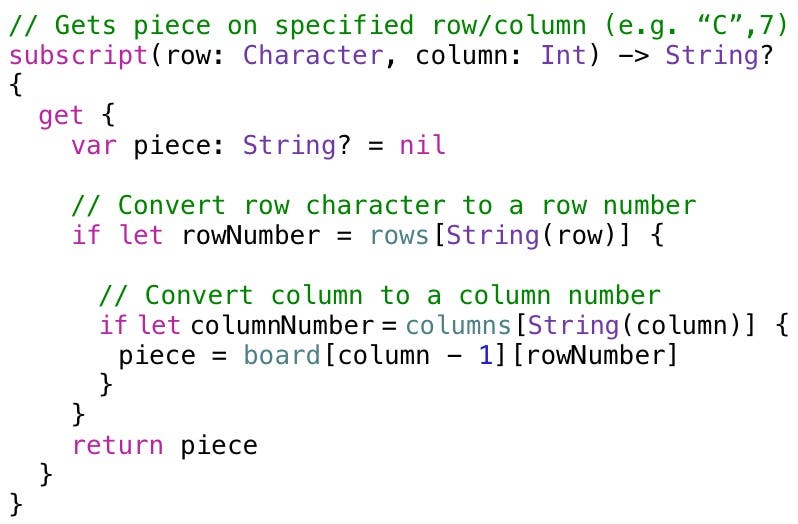
This subscript accepts a row parameter of type Character and a column parameter of type Int (for example, "C", 7), and returns the chess piece as an optional String. Subscripts can accept any number and type of input parameters and return any type.
At the bottom of the playground, try different row, column combinations as in Figure 7.
 |
| Figure 7 - Testing the second subscript |
This subscript needs less error-checking code because the input parameters are more strictly defined. However, it's less natural to use because you have to pass each character separately rather than using the more familiar row/column combination of the first subscript.
I added this second subscript to show you how to accept multiple parameters. Ultimately, I would choose the first subscript in a real-world app because, even though I had to initially write a little more code, it produced a class with a more intuitive interface.
Conclusion
Tuples, multidimensional arrays, and subscripts provide more advanced collection features that you can implement for special cases in your iOS apps. They are another set of tools you can learn and develop in your path to being a better app developer!

Kevin McNeish
Kevin McNeish is author of the new book “Learn to Code in Swift” as well as the “iOS App Development for Non-Programmers” book series (www.iOSAppsForNonProgrammers.com), winner of the Publishing Innovation Award. Kevin is also an award-winning app developer, software architect, and conference speaker in the U.S. and abroad. He has spent much of his career making difficult concepts easy to understand. Follow Kevin on Twitter: @kjmcneish.
Related topics
Related Articles
 Olena Kagui
 Leanne Hays
How to Summarize Text on the iPhone with Apple Intelligence
 Rhett Intriago
See Who Is Connected to Your Hotspot & Remove Them

 Sarah Kingsbury

 Amy Spitzfaden Both
How to Temporarily Use an Old Passcode on iPhone If You Forgot Your New One
 Rachel Needell


 Haley Hunter