Do you have an idea for an app but lack the programming knowledge to begin building it? In this weekly blog series, How To Unleash Your Inner App Developer, I will take you, the non-programmer, step by step through the process of creating apps for the iPhone, iPod Touch, and iPad. Join me each week on this adventure, and you will experience how fun turning your ideas into reality can be! This is Part 7 of the series. If you're just getting started now, check out the beginning of the series here (this post has been updated to Swift 1.2, iOS 8 and Xcode 6.3)
In my last several posts, we have created a prototype app called iAppsReview that allows users to rate apps on their iOS devices. Whenever you build an app, it's a best practice to first create a prototype that you can give to your client or potential user base for feedback. You often need to make changes to the prototype based on the feedback you receive. However, once the dust has settled, you need to turn the prototype into a real app. This requires writing code. Since this blog series is specifically designed for non-programmers, we need to take a step back and look at the big picture of app development and learn the basics of writing code.

The Three Parts of an App
In order to create the best app possible, you first need to understand the three main parts of an app and keep these clear in your mind throughout the entire app development process. This will help you create a well-designed application that is easy to maintain.
The three main parts of an app are:
- User Interface - This is the part of the app that the user sees and interacts with. It includes everything you have built so far in the prototype app including user-interface controls such as the text field, text view, image view, buttons, and the scenes that contain them. User Interface is often abbreviated as UI.
- Core Logic - This is the code that performs actions when a user-interface object is touched or any other process that takes place automatically. When an app performs an action, it requires code to execute a set of instructions.
- Data - The information and preferences that are maintained by an app. Data can be as simple as a user ID and password that's stored on a device or as complex as thousands of songs, pictures, and other lists of information.
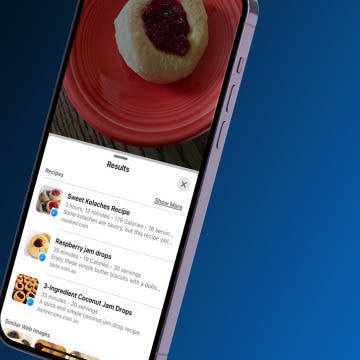
To help solidify this concept, check out the built-in iPhone Music app shown in Figure 1.
 |
| Figure 1 - The built-in iPhone Music App |
- The labels near the bottom of the screen displaying the artist, song, and album (including font, size, and color), the album art, the previous, next, and play buttons as well as the volume slider control are all part of the user interface;
- The part of the app that plays and pauses the current song, changes the volume in response to the slider, and moves to the previous or next song is the core logic;
- The actual music files, albums that group together a list of songs, and playlists comprise the app's data.
Figure 2 provides a conceptual view of the three parts of an app.
 |
| Figure 2 - The three parts of an app |
As depicted in Figure 2, your app needs to adapt to different user-interface sizes and orientations (when the user holds the iOS device upright or sideways). This means you don't want to hard-code your app to work with a device of a specific size. As Apple continues to release devices with new sizes (such as the iPhone 6 and 6 plus), you don't want to make major changes to your app to adapt to these new sizes.
Figure 2 also shows how your app's data may change. You may need to save data on the local device, in the cloud, or often, in both places. Your app needs to adapt between different data storage locations and mechanisms.
Your app's core logic is the one place where your app remains constant from change. For example, the code that plays a song on your iOS device remains the same regardless of whether the Music app is running on an iPhone, iPod touch, iPad, or iPad mini.
In a future post, I'll include a more in-depth discussion of app architecture. For now, just know that you should do your best to keep the three parts of your app independent from each other so that your app can easily adapt to change. In programming jargon, this concept of separation is known as loose coupling.
What is iOS?
To help round out the picture of app development, it's important to know the answer to the question "What is iOS?"
Apps are not the only software running on an iPhone, iPod touch, or iPad. These devices also run an operating system called iOS, which manages the device hardware and provides basic services for all apps running on the device.
For example, when you first turn on an iPhone, the Apple icon displayed on a blank screen greets you. During this startup phase, the operating system, iOS, gets the iPhone ready for use. It displays the wallpaper and app icons and also tries to find a carrier signal for the cell phone and a wireless signal for Wi-Fi access. When you tap an icon on your home screen, iOS responds by launching the app for you. iOS does this and many other things.
Every time Apple releases a new version of iOS, it improves the core functionality of all devices running the operating system by adding new features, fixing bugs, and even releasing new built-in apps, such as the Health app in iOS 8. As it adds new features to iOS, you can enhance your app by taking advantage of these new features. As you design your apps, you get to decide which features of the operating system you want to incorporate into your app. You can use specific hardware and software features for widely different purposes. For example, you can use the microphone to record voice memos or to act as an input for a musical wind instrument as with the Ocarina app. You can use the camera not only to take pictures, but also to view your surroundings using augmented reality as in popular apps such as Yelp.
It's important to know that iOS is divided into several layers as shown in Figure 3. Your apps almost always communicate with the Cocoa Touch layer, which provides high-level services that in turn communicate with the underlying hardware for you. This protects your apps from changes in the hardware, allowing them to work well on any iOS device.
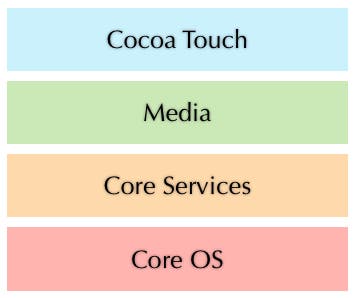 |
| Figure 3 - iOS Layers |
The Cocoa Touch layer is actually a set of frameworks, or reusable sets of tools you can access from within your app. The following table shows a list of some of these important frameworks as well as a description of the functionality they provide for your app.
| Framework | Description |
|---|---|
| UIKit | Contains all the standard iOS user-interface controls you need to design a great user experience, including buttons, text fields, sliders, and table views; |
| Address Book | Lets you access the contacts stored on a device from within your app; |
| Core Location | Allows you to determine the location of the device. You can use this information to display points of interest near the user or even show his or her current altitude; |
| iCloud | Lets you store a user's documents and data in a central location on the Internet that can be accessed from any of the user's devices; |
| Camera & Photo Library | Allows you to import images from the photo library, take new photos, and create augmented-reality apps using the live camera feed. In iPhone 4 and newer, you can access both front & main cameras; |
| iPod Media Library | Allows you to play music in the background while your app runs and provides access to the full media library on the device. |
Source Code, Compilers, and Machine Code
When it comes time to create your app's core logic, you need to write some program code. This is the point where a non-programmer learns to become a programmer.
Swift is the programming language used to write code for your apps (or Apple's older Objective-C language). It is a high-level language, meaning it is closer to human language than the actual code an iOS device executes when it is running your app. A high-level language makes it easier for you as a programmer to understand and write code for your apps. Code written in Swift is also known as source code.
Ultimately, an iOS device doesn't understand code written in the Swift programming language. Rather, an iOS device understands a machine code instruction set consisting of bits of data (ones and zeroes) specific to its microprocessor. So, there needs to be an interpretation, or conversion, of the Swift code that you write into machine code, which an iOS device can understand and execute. The tool that performs this conversion is known as a compiler. When you add Swift code to an Xcode project, you build the project in order to run it in the Simulator or on a device. During this build process, the compiler takes the Swift code you have written and converts it into machine code as shown in Figure 4.
Figure 4 - The compiler converts Swift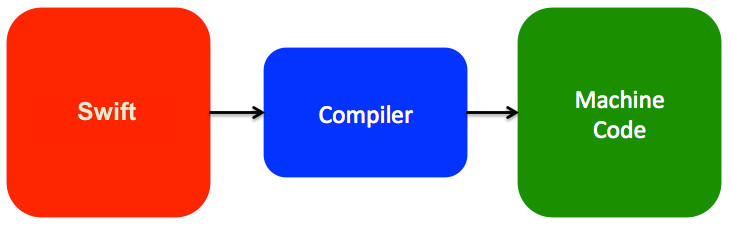 source code to machine code. source code to machine code. |
Understanding Classes and Objects
The Swift programming language is object-oriented. This means when you write code, you are mostly interacting with objects. When creating an iOS app, the majority of objects that you work with are user-interface objects. For example, Figure 5 shows the Write Review scene you created for the iAppsReview prototype app. It contains a table view, five-star rating control, text field, text view, image view, and buttons. Each of these user-interface controls is an object.
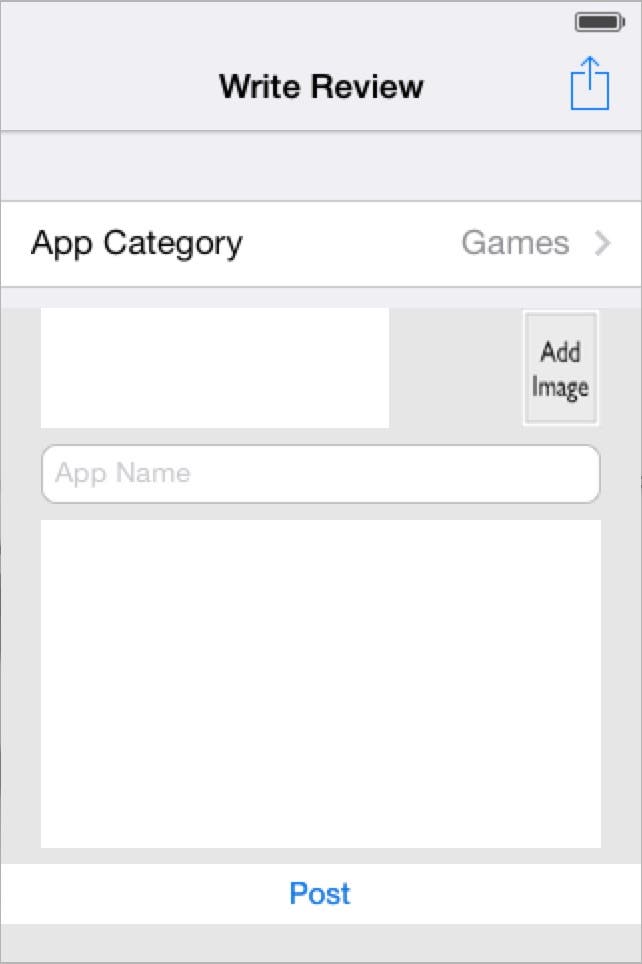 |
| Figure 5 - There are a variety of user-interface objects in the Write Review scene. |
As you have already seen, when you install Xcode on your Mac, a library full of user-interface controls is also installed as seen in Xcode's Object Library in the bottom-right corner of Figure 6.
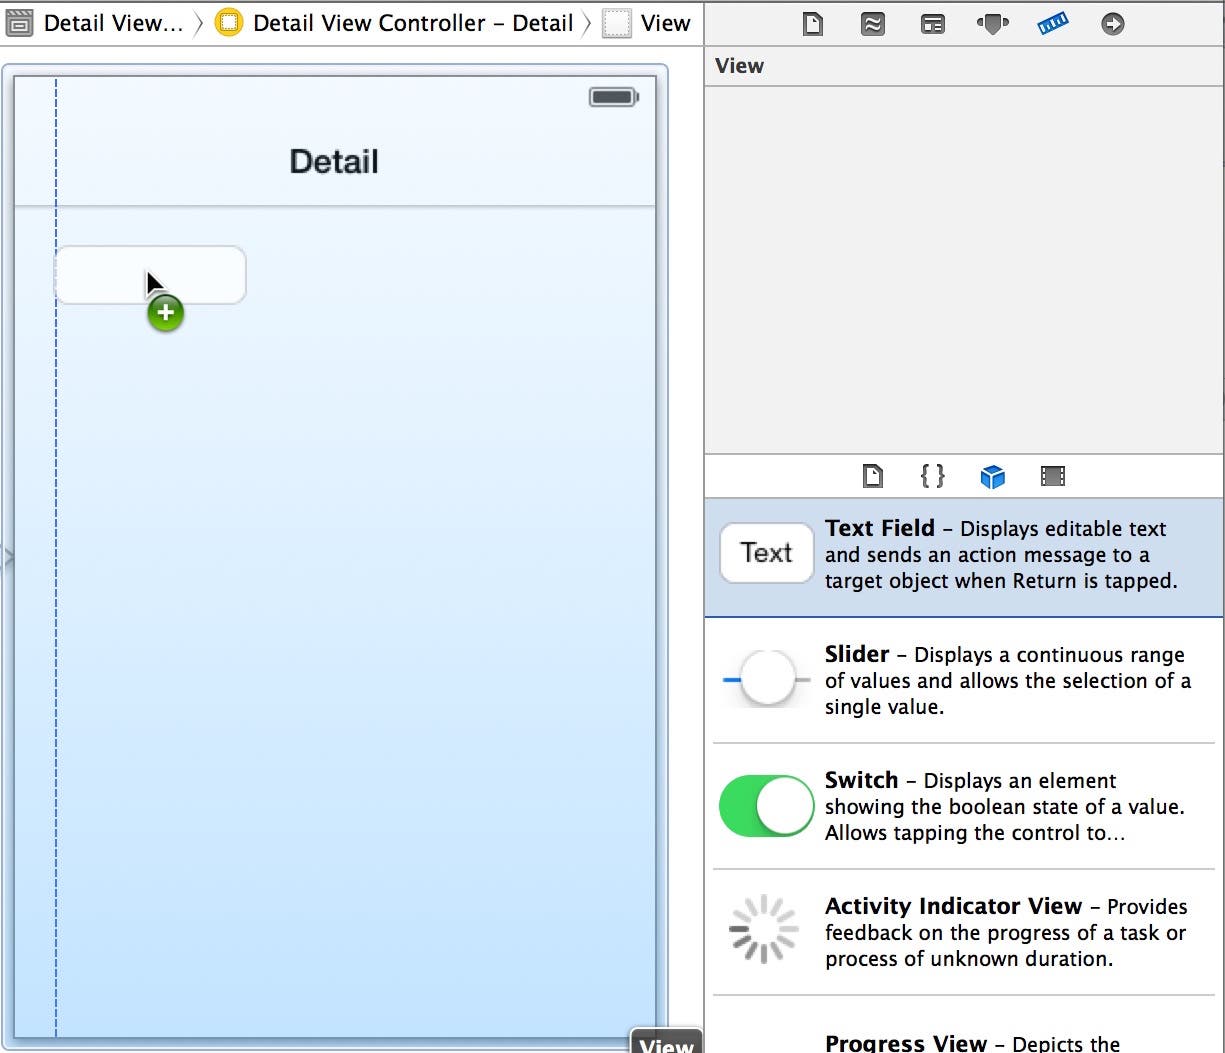 |
| Figure 6 - Creating a text-field object from the UITextField class |
Each of the user-interface controls listed in the Object Library represents an Swift class. A class is like a blueprint for an object. You create objects from a class.
For example, when you drag a Text Field from the Object Library and drop it on the design surface (Figure 6), you are creating a text-field object from the Text Field class. You can create many objects from a single class. As shown in Figure 7, three text fields have been created by dragging the Text Field class and dropping it on the design surface. Ultimately, Object Library is a misnomer. It doesn't contain a list of objects, it contains a list of classes. It should really be called the Class Library. I've taught many beginner iOS classes, and I can tell you this has been a cause of confusion!
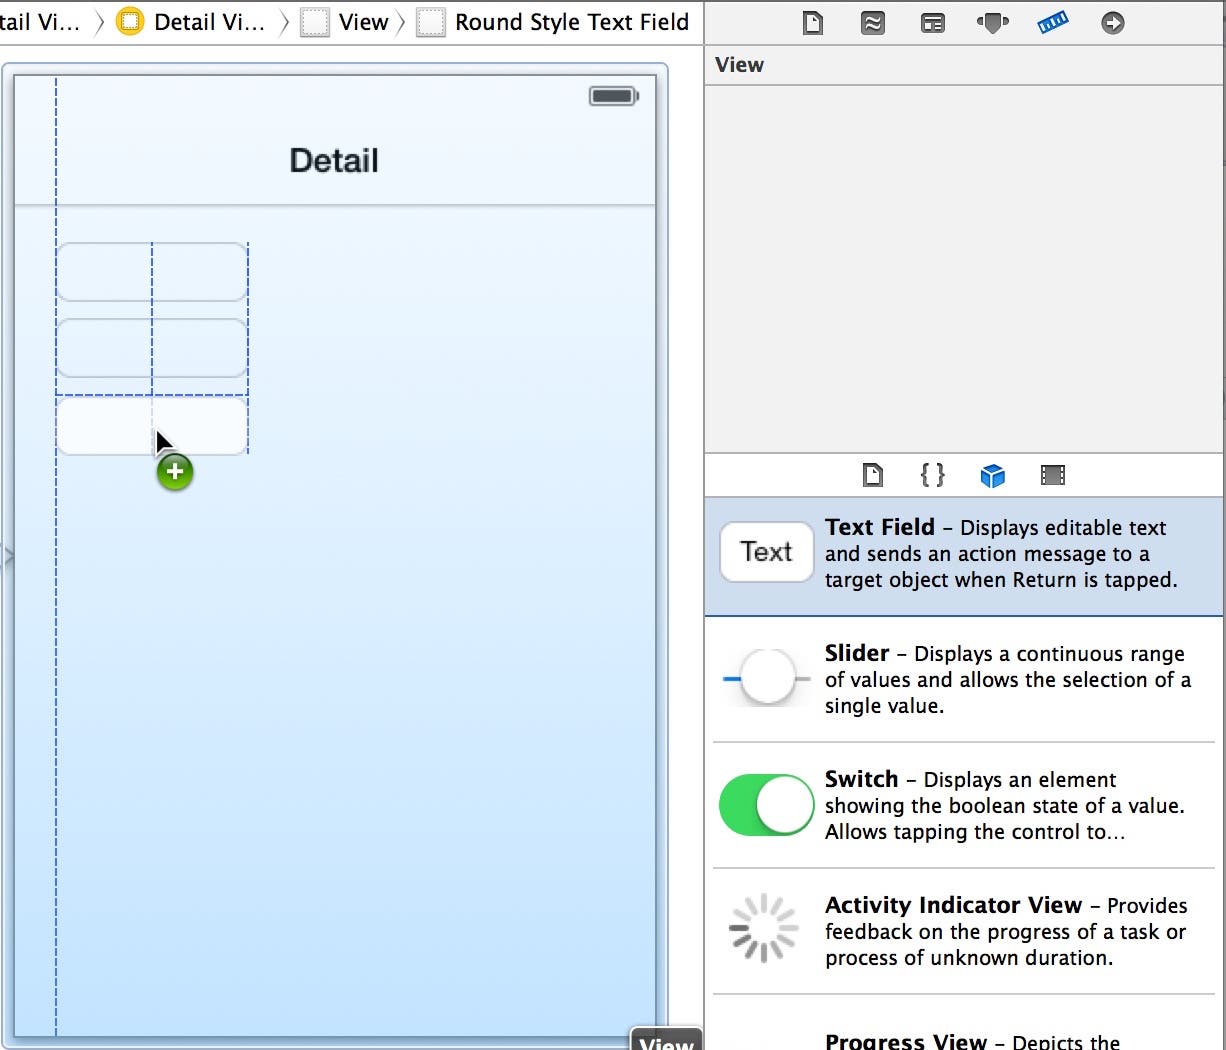 |
| Figure 7 - Creating multiple objects from a single class |
The concept of creating an object from a class is similar to creating a word processing document from a template. You can create many documents from a single template, and the template defines the basic characteristics and behavior of the document.
To find out more information about a particular user-interface class, you can click the class in the Object Library as shown in Figure 8. This displays a help popup that tells you the formal name of the class (UITextField in this example), as well as a description of the physical attributes and behavior of objects created from that class.
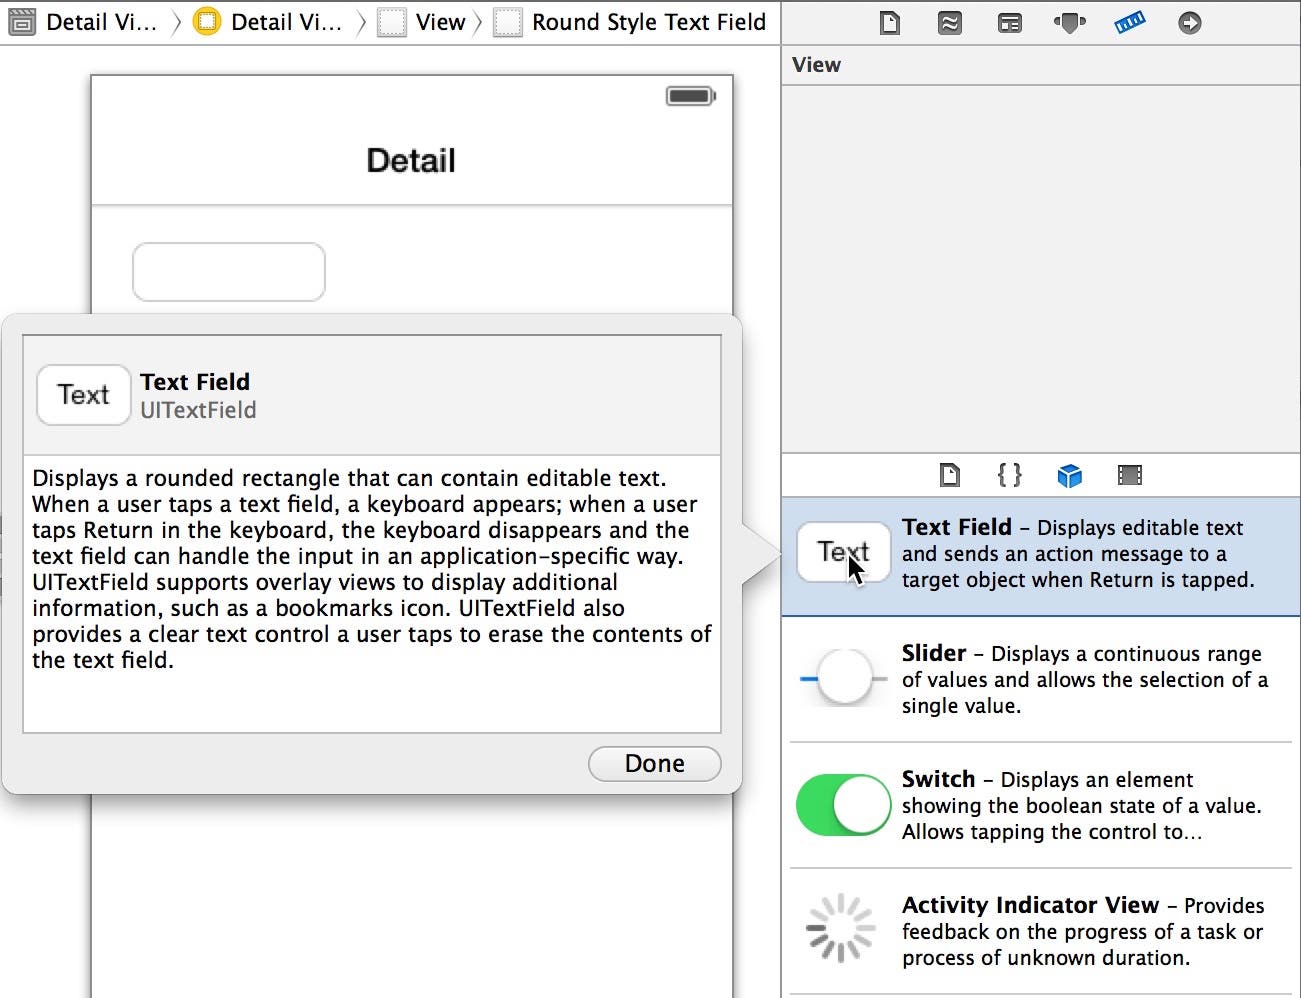 |
| Figure 8 - Click a user-interface item to see its formal class name. |
Understanding Object Attributes
As you have seen previously in this blog series, you can examine the attributes of a user-interface object using Xcode's Attributes Inspector as shown in Figure 9.
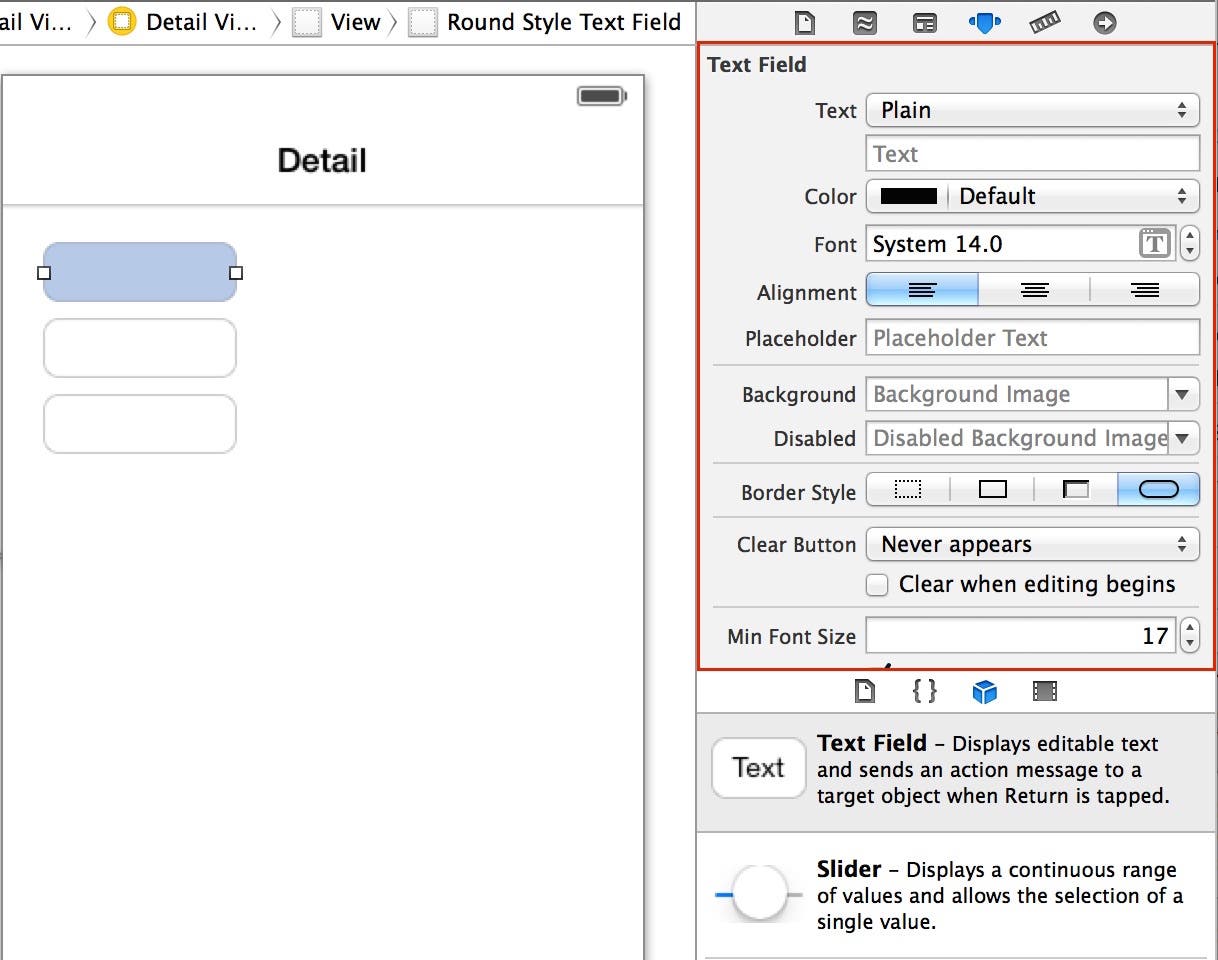 |
| Figure 9 - Viewing an object's attributes in the Attributes Inspector |
An object's attributes are defined in the class blueprint from which the object was created. Each attribute has a default value also specified in the class. After an object has been created, you can change the value of its attributes. It's important to note that each object has its own set of attributes, so you can change an attribute on one object without affecting any other objects.
Apple used the Objective-C language to create the user-interface classes you use in your iOS projects. However, you can create your own classes and these can be written in either Swift or Objective-C.
Understanding Class Properties
For every object attribute you see in the Attributes Inspector, there is a corresponding property in the class definition. In fact, Apple could have called the Attributes Inspector the Property Inspector (and other development tools do just that).
If you looked at Apple's documentation for the UITextField class, you would see a list of properties such as:
- background
- font
- placeholder
- text
- textAlignment
- textColor
In this context, attributes and properties are similar. In Xcode, a user-interface object you drop on a scene has attributes. In Swift, the class on which the object is based has properties. This will all become clearer as we create our own custom classes in a future post.
Understanding Class Methods
Not only do user-interface objects have attributes, they also have behavior. For example, when you touch a text field in an app, a keyboard pops up. Each letter you type on the keyboard automatically appears in the text field.
The behavior of an object, or the actions that it can perform are defined in the class blueprint as methods. A method is comprised of one or more lines of code that are grouped together to perform a specific task.
Figure 10 shows a visual representation of the UITextField class known as a class diagram. It lists a subset of the UITextField class properties and a few of its commonly used methods.
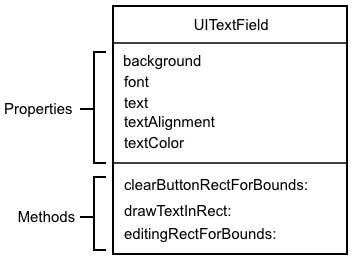 |
| Figure 10 - The UITextField class diagram |
Each of these methods can be performed individually and has a different effect on the text field. For example, the drawTextInRect: method displays the text inside the text field.
All objects created from a single class have the same behavior because the same method code runs for every object created from that class.
Non-Visual Objects
Not all objects can be seen or interacted with as you can with user-interface objects. A great example of this is the view controller object shown in Figure 11.
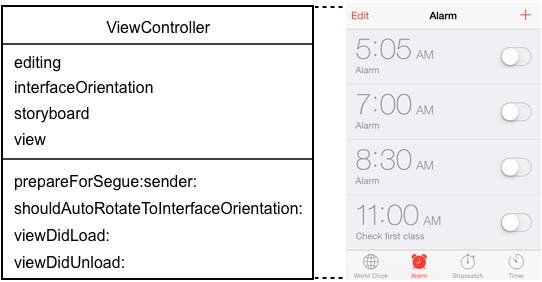 |
| Figure 11 - The View Controller is a non-visual object. |
On the right side of Figure 11 is a view. As you have already learned, a view contains one screen of information on an iOS device. Every view in an iOS app has a view controller that works behind the scenes in cooperation with the view. It has properties that:
- Specify if the user can edit items in the view.
- Report the orientation of the user interface.
- Allow you to access user-interface objects.
It has methods that:
- Allow you to navigate to other views.
- Specify the interface orientation that the view supports.
- Indicate when the associated view is loaded and unloaded from the screen.
Another category of non-visual objects that work behind the scenes to accomplish important tasks is business objects. Business objects contain the core logic of your app. They often represent real-world entities such as a customer, product, payment, game, player, and so on. Figure 12 shows a Calculator class that contains properties and methods. A Calculator object can be created from this class and used within an iOS Calculator app to perform basic math functions.
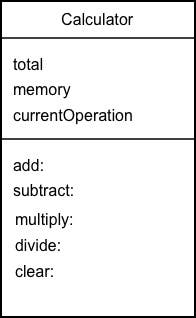 |
| Figure 12 - The Calculator object |
You will learn much more about creating and using custom classes as we proceed through this blog series.
Conclusion
There are some very important and sometimes difficult-to-understand concepts in this post. If you find yourself scratching your head, I recommend rereading it until terms such as property, method, class, and object become more familiar to you. As you use this information in future posts, it will definitely solidify your understanding of these important concepts on your road to becoming an app developer!