Unleash Your Inner App Developer Part 12: Hardening Your Code


Do you have an idea for an app but lack the programming knowledge to begin building it? In this weekly blog series, How to Unleash Your Inner App Developer, I will take you, the non-programmer, step by step through the process of creating apps for the iPhone, iPod touch, and iPad. Join me each week on this adventure, and you will experience how much fun turning your ideas into reality can be! This is Part 12 of the series. If you're just getting started now, check out the beginning of the series here (this post has been updated to Swift 1.2, iOS 8, and Xcode 6.3.)
One of the best software development books of all time is Steve McConnell's Code Complete. Whether you are a seasoned software developer or a brand new programmer, regardless of the platform or language in which you write code, I highly recommend checking out this book. It will change your way of thinking and vastly improve the quality of the code you write.
'Software Accretion'—Building Over Time
After reading Code Complete years ago, the book's comparison of software development to oyster farming really stuck with me. McConnell used the term software accretion to describe the process of building software over a period of time. The word "accretion" refers to any growth or increase in size by a gradual external addition or accumulation. This is the way an oyster makes a pearl; by gradually adding small amounts of calcium carbonate over a period of time, a pearl grows larger and larger.
With incremental software development, you start out by making the simplest version of a system that will run. You create a skeleton strong enough to hold the real system as it's developed, just like an oyster that begins building a pearl with a small grain of sand. This is exactly what we have done so far in this column with the iAppsReview app. We built a prototype of the app first, and gradually, over time, we have added code each week with the final goal of creating a fully-functioning app.
Hardening Your Code
As part of the incremental process of building an app, you need to take a look at your code and ask the question, "What could go wrong?" One of the biggest variables to consider is your users. They will constantly surprise you by using your app in ways you don't expect. I've worked with quite a few development teams over the years, and I have yet to see a case where developers weren't astonished by watching people use their software. When it comes to app development, it is critical that you let others kick the tires on your app before submitting it to the App Store. Their feedback will absolutely improve your app's user experience.
Let's take a look at iAppsReview, identify areas where problems may occur, and then harden our code to avoid any issues. You can get the project we have completed so far at this link. If you get stuck following the step-by-step instructions, you can get the completed project for this post at this link.
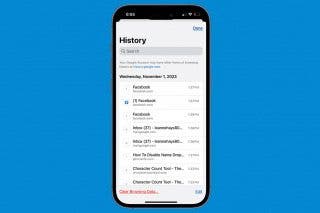
As it stands right now, if the user doesn't enter an app name or comments in the Write Review scene, the app doesn't crash; but when they try to share the review on Twitter, they will get an empty tweet except for the hyphen as shown in Figure 1.
 |
| Figure 1 - The user can send an empty tweet. |
So how should we address this problem? It's a best practice to look at the built-in iOS apps to see how Apple handles a particular situation, and use that as a guide for our own apps. For example, when specifying a Twitter account in the Settings app, the Sign In option is disabled until the user enters both a User Name and Password (Figure 2).
 |
| Figure 2 - The Sign In button is disabled until the user enters a User Name and Password. |
This is also a good approach for the Write Review scene. We only want to enable the Share button if there is text in both the App Name text field and comments text view. This means each time the user types a character, we need to check both user-interface controls. If either is empty, the Share button must be disabled. If both controls contain text, the Share button should be enabled. We have to perform this check for every character the user types, because they could press the delete key, leaving one of the user-interface controls empty.
Creating a Share Button Outlet
Since we need to access the Share button so we can enable and disable it, our first step is to create an outlet for the button. To do this, follow the steps listed below.
- Open the iAppsReview project in Xcode.
- In the Project Navigator, select the Main.storyboard file.
- In the Write Review scene, click on the Share button in the top-right corner of the scene.
- Go to the Attributes Inspector (the third button from the right in the Inspector toolbar), and uncheck the Enabled check box as shown in Figure 3. This causes the Share button to look disabled at design time and when the scene first appears at run time;
 |
| Figure 3 - Uncheck the Enabled check box. |
- Next, display the Assistant Editor by clicking the center button in the Editor button group at the top right of the Xcode window. This should display the WriteReviewViewController.swift file in the Assistant Editor.
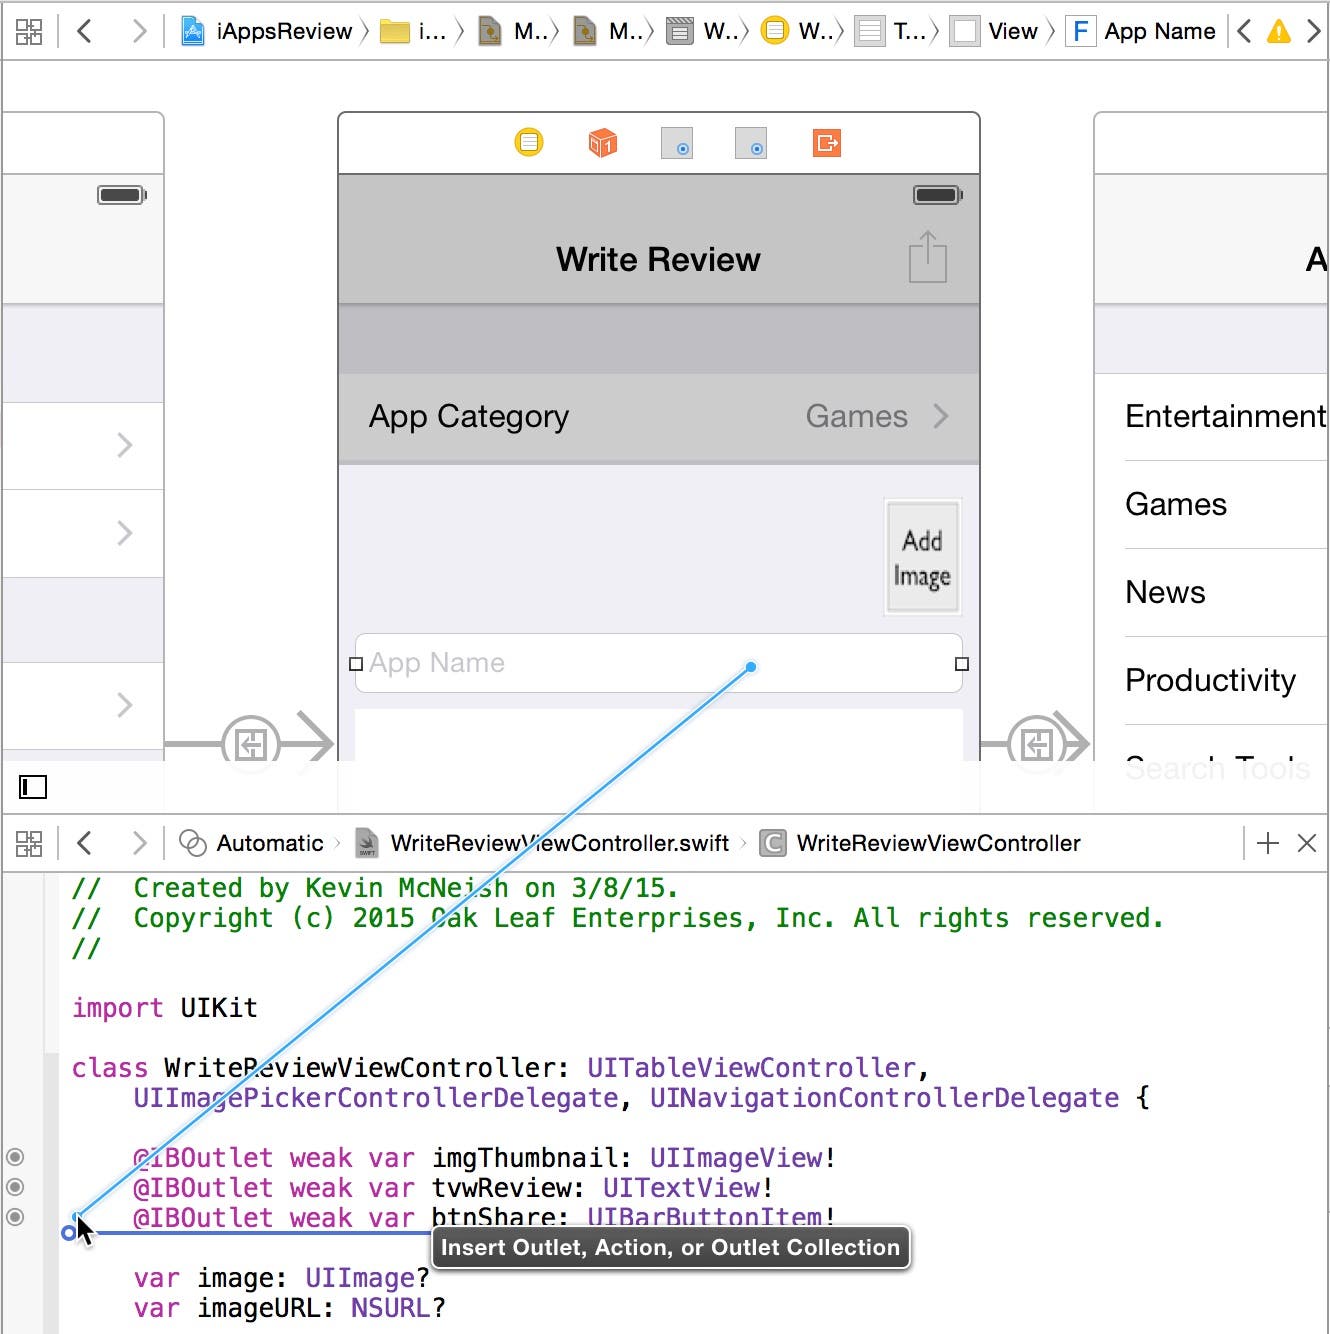
- Hold the control key down, click on the Share button, and drag down into the WriteReviewViewController.swift file as shown in Figure 4.
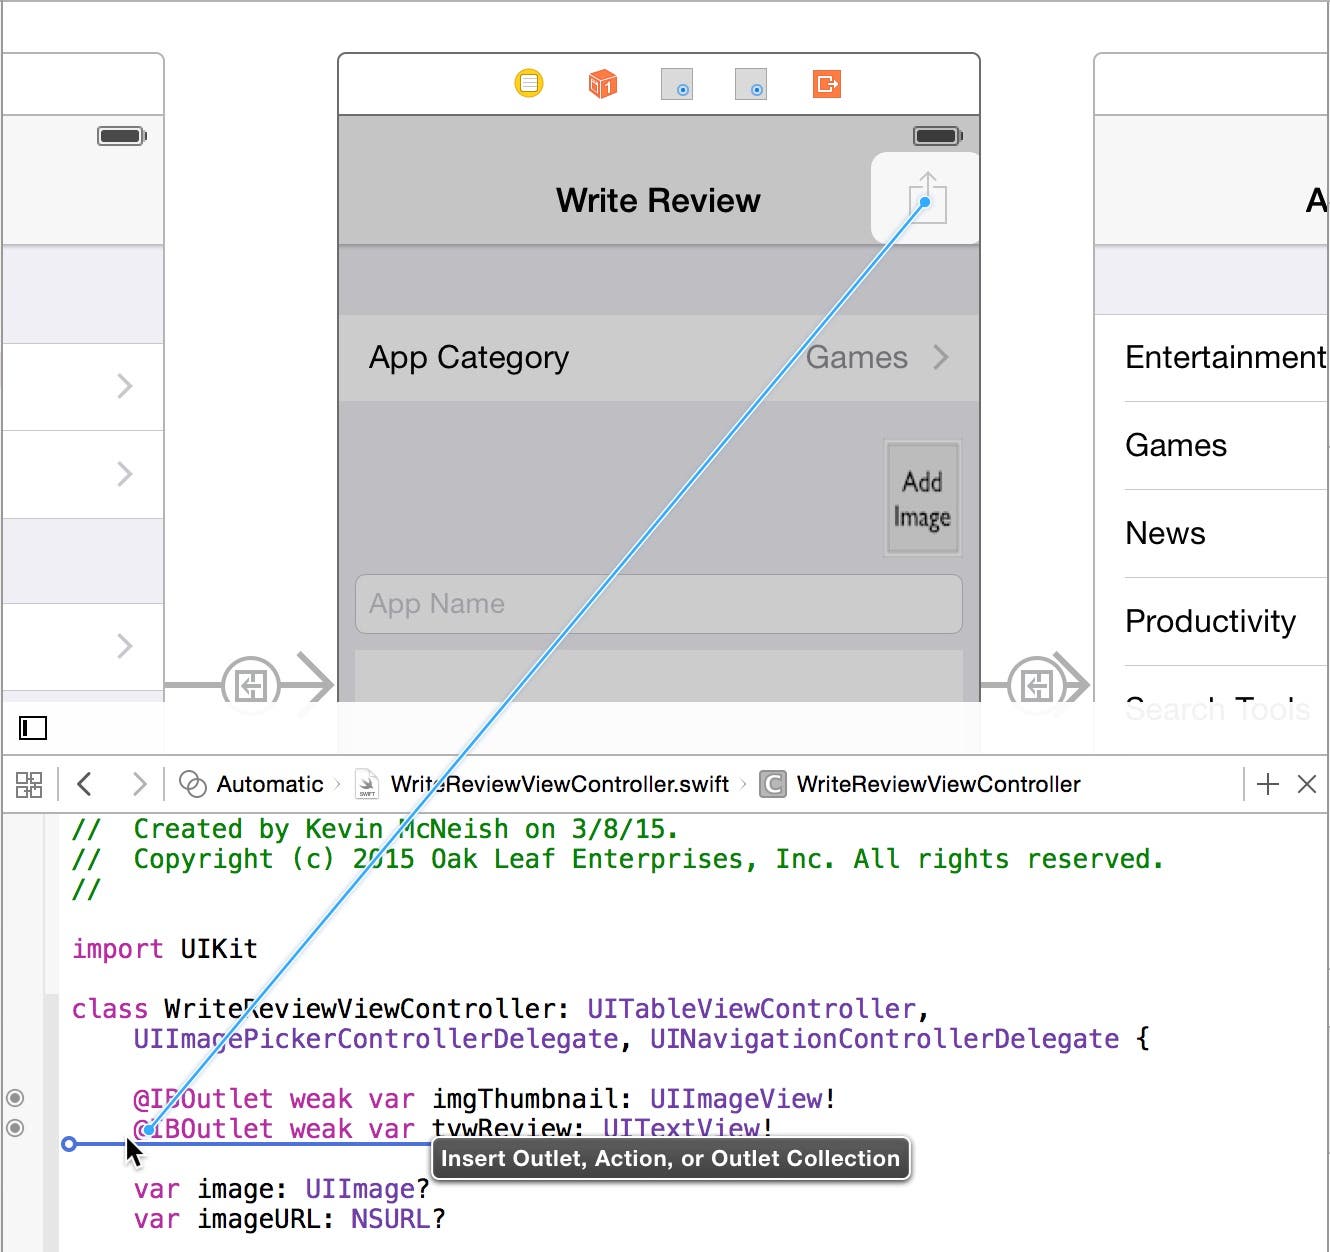 |
| Figure 4 - Create an outlet for the Share button. |
- When you see the Insert Outlet, Action, or Outlet Collection popup, let go of the mouse button and the control key. This displays the Insert Outlet popup. Enter btnShare as the outlet Name and then click the Connect button (Figure 5). This adds a new btnShare outlet property to the code file.
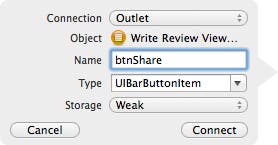 |
| Figure 5 - Create an outlet named btnShare. |
Configuring the App Name Text Field
Now let's configure the App Name text field to enable and disable the Share button. First we need to create an outlet we can use to reference the text field.
- Control+Click on the App Name text field in the design surface, and then drag down into the WriteReviewViewController.swift file as shown in Figure 6.
 |
| Figure 6 - Create an outlet for the text field. |
- In the Create Outlet popup, set the Name field to txtAppName, and then click Connect (Figure 7). This creates a new outlet property named txtAppName.
 |
| Figure 7 - Enter txtAppName in the Name field. |
- With the App Name text field still selected, go to the Connections Inspector (the button on the far right in the Inspectors toolbar). Under the Sent Events section, click the connection well to the right of the Value Changed event and drag down into the WriteReviewViewController.swift file as shown in Figure 8. The Value Changed event fires each time the user enters or deletes a character in the text field.
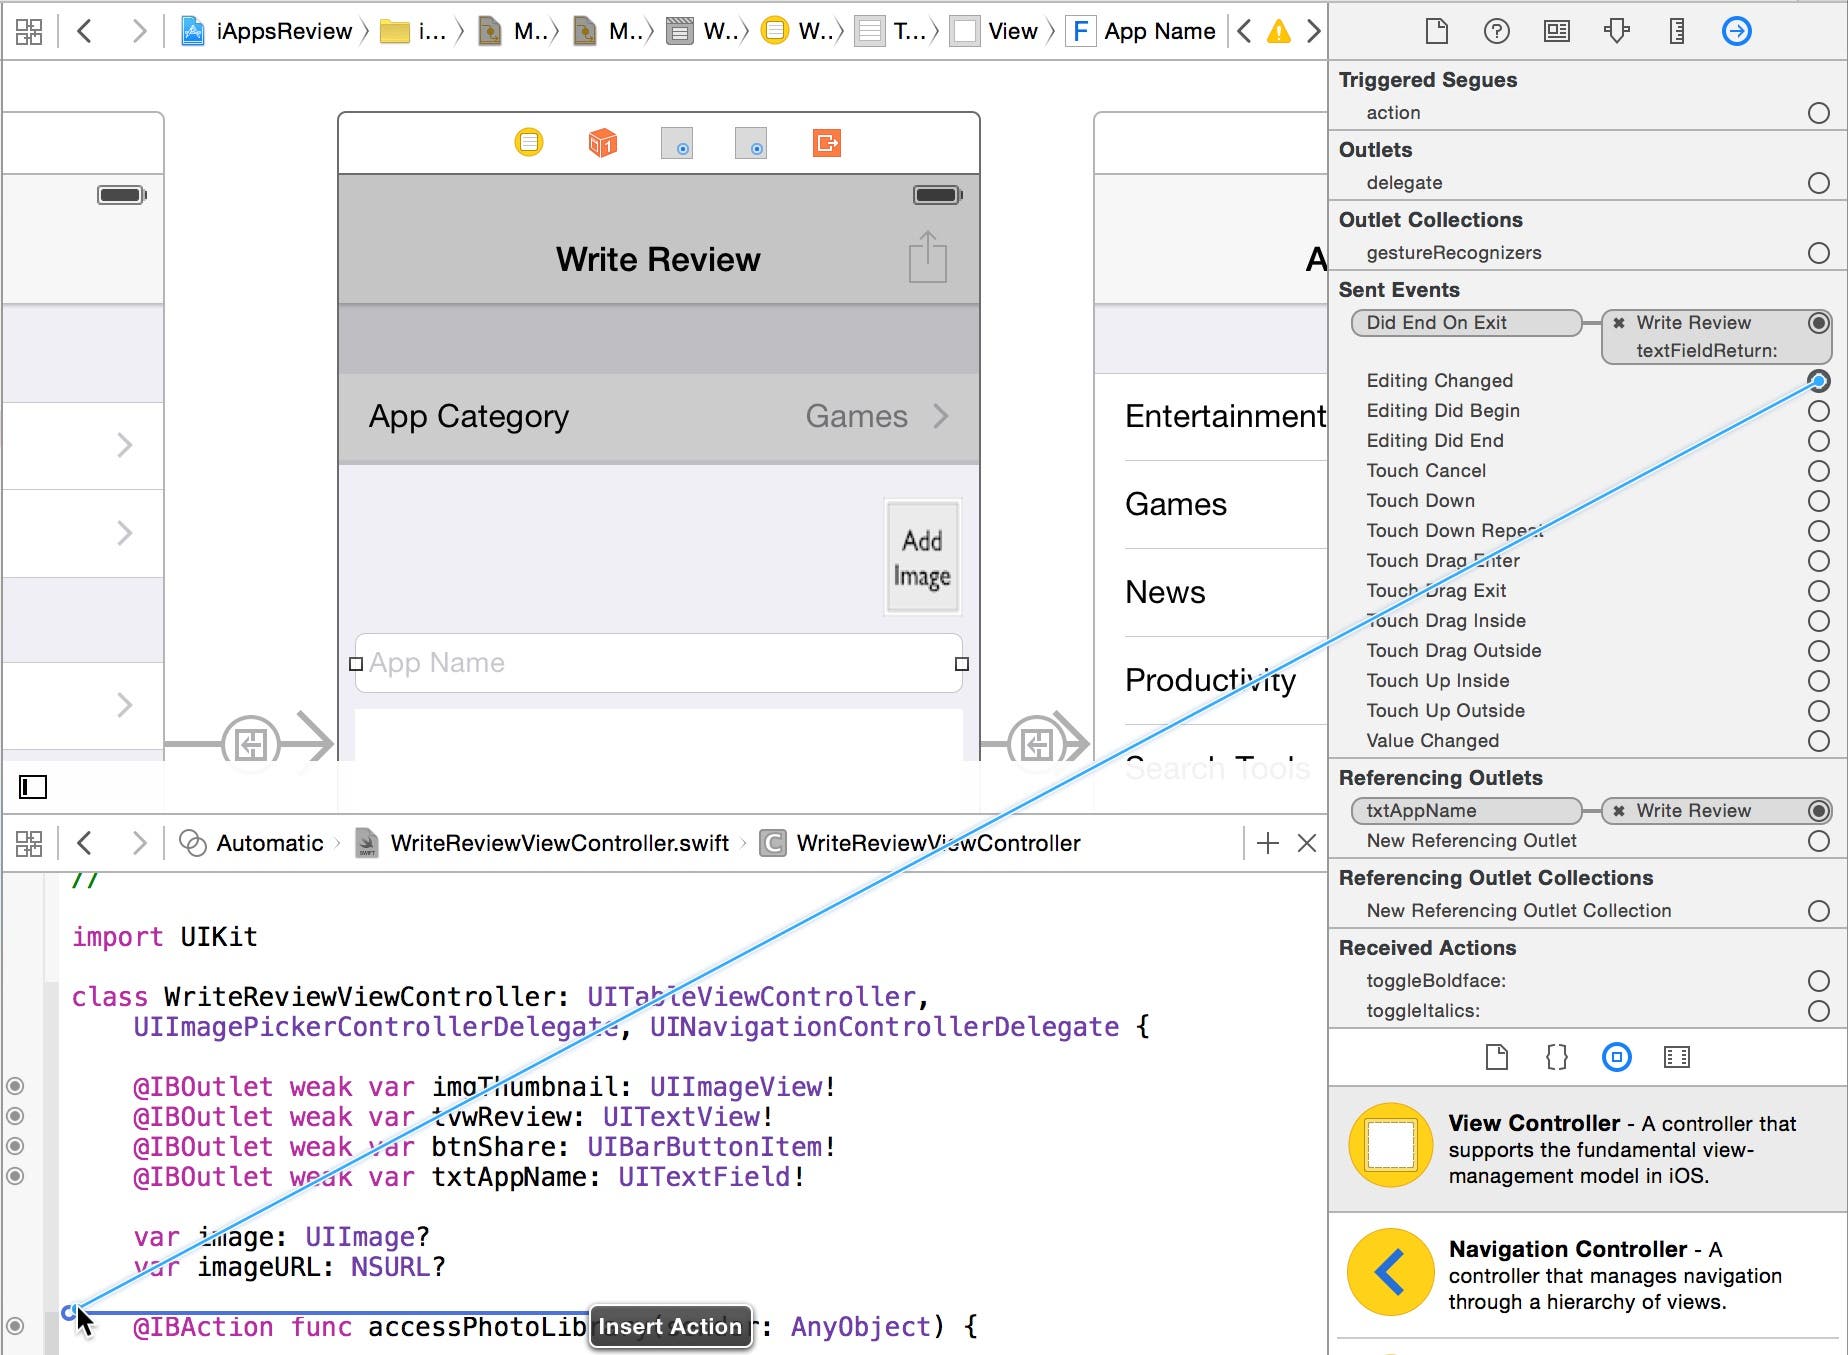 |
| Figure 8 - Create an action method for the Editing Changed event. |
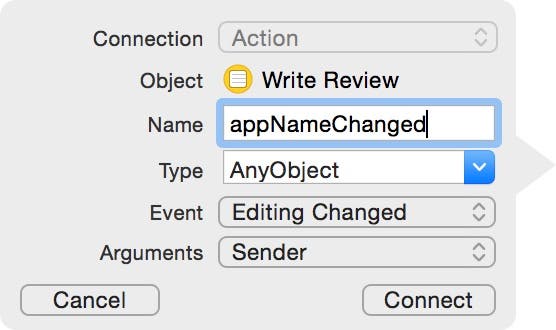
- When the Insert Action popup appears, let go of your mouse button and the control key. This displays the Create Action Method popup (Figure 9). Enter appNameChanged as the method Name and then click the Connect button. This adds a new action method to the WriteReviewViewController.swift file. You can close the Assistant Editor now by clicking the left button in the Editor button group.
 |
| Figure 9 - Create an action method named appNameChanged. |
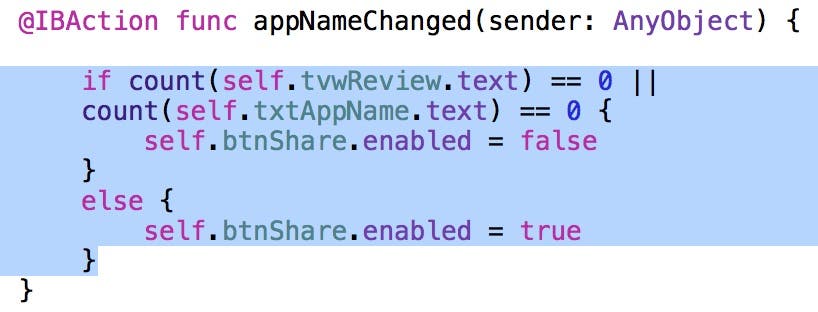
- Now let's implement the new method. In the WriteReviewViewController.swift code file enter the code shown in Figure 10.
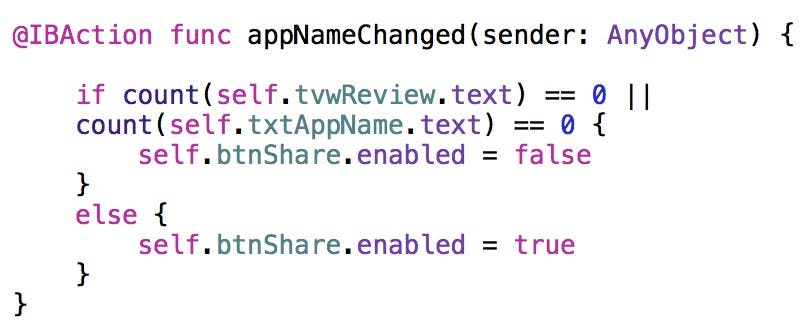 |
| Figure 10 - The code in this method enables and disables the Share button. |
This is the first time I have shown this type of code in my blog post so I'll explain how it works. This is a Swift if else statement. It belongs to a family of conditional statements and it allows you to execute one set of code or another based on a condition.
The condition that is checked by this statement immediately follows the if in the first line of code in this method. This particular condition contains a compound comparison, where two values are checked. The double vertical lines between the two conditions ( || ) is a logical OR operator. This means if the first condition OR the second condition evaluates to true, then the code within the curly braces directly following the if is executed. Otherwise, the code contained in the curly braces following the else statement is executed.
First, the count function is called to check if the number of elements (characters, in this case) of the text in the tvwReview control is equal to zero, which it will be if the text view is blank. If this part of the condition is true, then the code that disables the button is executed without checking the second part of the condition. There's no need to check because if either part of the condition is true, the button should be disabled. If the first part of the condition is true, then the second part of the condition is checked. If the count function returns zero for the text property of the text field, then the code that disables the button is executed.
If both parts of the condition are false, then the code in the else statement executes, which enables the Share button.
Configuring the Review Comments Text View
Now you're ready to set up the review comments text view. We have to take a different approach with the text view because it doesn't have an Editing Changed event as the text field does (you can click on the text view in the design surface and then go to the Connections Inspector to see what I mean).
As is the case with the text view, if you don't find the event that you need with a particular user-interface control, your next step is to check if the control has a delegate protocol that can be adopted so you can be notified of important events (see my previous post for a discussion of delegates and protocols). If you look at the UITextView documentation, you will find there is a delegate property whose type is a protocol named UITextViewDelegate. This protocol contains a textViewDidChange: method (Figure 11), which is exactly what we need. As the documentation states, this method is automatically called on the delegate when the user changes the text in the text view.
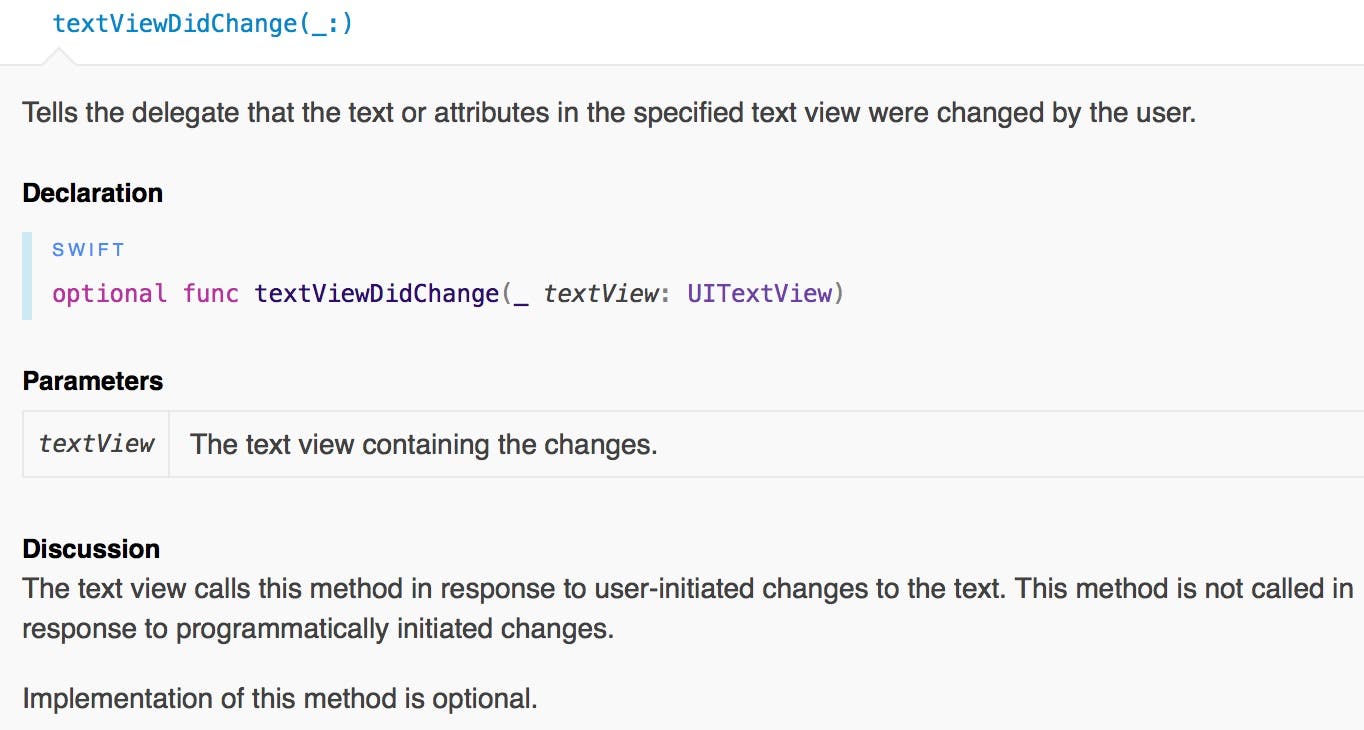 |
| Figure 11 - The textViewDidChange: method is called when the user changes the text in the text view. |
Let's adopt this protocol now.
- We no longer need the Assistant editor, so click the button on the left in the Editor button group to get rid of it. Next, in the Project Navigator, select the WriteReviewViewController.swift code file.
- Add the code shown in Figure 12 to adopt the UITextViewDelegate protocol, and remember to add a comma after the UINavigationControllerDelegate protocol at the end of the previous line of code;
 |
| Figure 12 - Adopting the UITextViewDelegate protocol |
- Now let's implement the protocol. To do this, add the new, empty textViewDidChange: method shown in Figure 13 directly below the appNameChanged: method.
 |
| Figure 13 - Add the textViewDidChange: method. |
Line for line, we need the code in the textViewDidChange: method to do exactly what the code in in the appNameChanged: method is doing. So what should you do? First of all, let's talk about what you should not do.
One of the biggest mistakes rookie developers (and unfortunately even some seasoned developers) make is copying the code from one method and pasting it into another. Why is this a problem? One of your goals as a developer is to avoid creating duplicate code. Why? If you ever have to make a change to the code (and eventually you will) it means there is more than one place where you have to make the change.
So what should you do instead? You should break the code out into a separate method that can be called from multiple places in your app. That's exactly what we're going to do now.
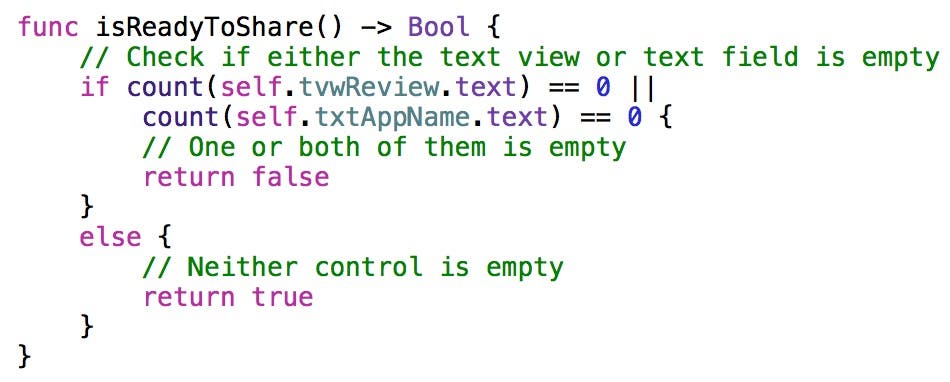
- Add a new, empty isReadyToShare method as shown in Figure 14 directly below the textViewDidChange: method. Ignore the red error icon in the gutter to the left of the code. You are getting this error because the -> Bool in the method declaration specifies that this method should return a Boolean value. Since it isn't yet, you'll see the compiler error. When we finish adding the code, this method will return true if the Share button should be enabled, and false if it should not.
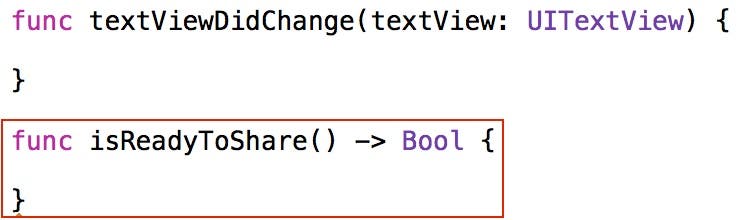 |
| Figure 14 - Add the new isReadyToShare method. |
- Now, instead of doing a copy and paste, we are going to cut and paste the code from the textViewDidChange: method into the new isReadyToShare method. To do this, select all of the code in the textViewDidChange: method as shown in Figure 15 by clicking and dragging from the first line of code to the last line of code in the method.
 |
| Figure 15 - Select all code in the appNameChanged: method. |
- Next, type Command+X to cut the code from this method.
- Now click inside the curly braces of the isReadyToShare method and press Command+V to paste the code into the method. When you're finished, these three methods should look like Figure 16.
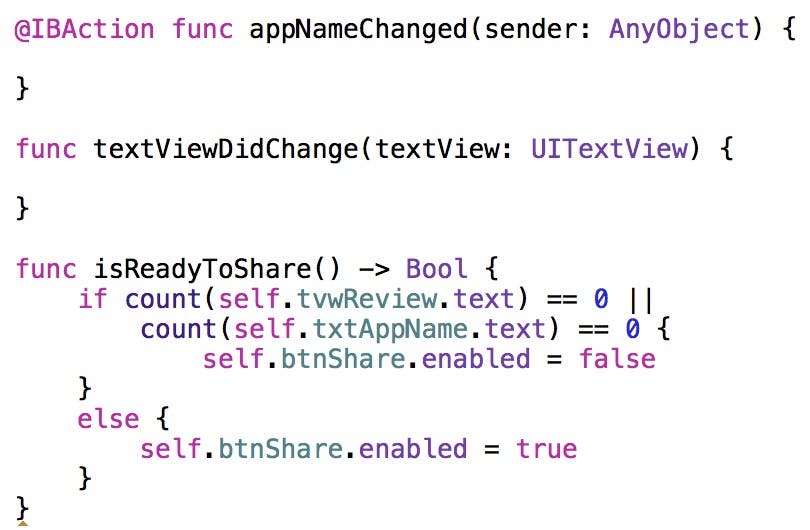 |
| Figure 16 - The code has been cut from appNameChanged: and pasted into isReadyToShare. |
- Now we need to change the code in this method to return false if the Share button should not be enabled, and true if it should. To do this, replace the code between curly braces in the if else statement as shown in Figure 17. Notice I have also added comments that explain how this method works.
 |
| Figure 17 - isReadyToShare returns NO to disable the Share button and YES to enable it. |
- Now add the code shown in Figure 18 to the appNameChanged: and textViewDidChange: methods. This code calls the isReadyToShare method on the view controller and stores the returned value into the enabled property of the Share button.
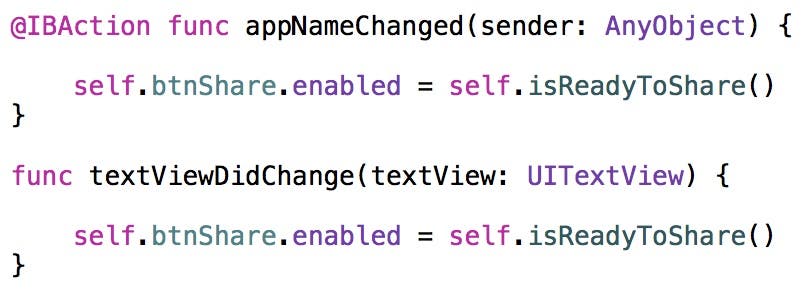 |
| Figure 18 - Pass an isReadyToShare message from both methods. |
- There's one more step we need to take to make this work properly. We need to store a reference to the WriteReviewController in the delegate property of the text view.
To do this, go to the Project Navigator and select the Main.Storyboard file and then go to the Connection Inspector (the button on the far right in the Inspectors toolbar). Click on the text view in the design surface to select it. Next, click the connection well to the right of the delegate outlet and drag over to the Write Review View Controller icon in the dock above the Write Review scene as shown in Figure 19. When you release your mouse, the delegate outlet and view controller will be connected.
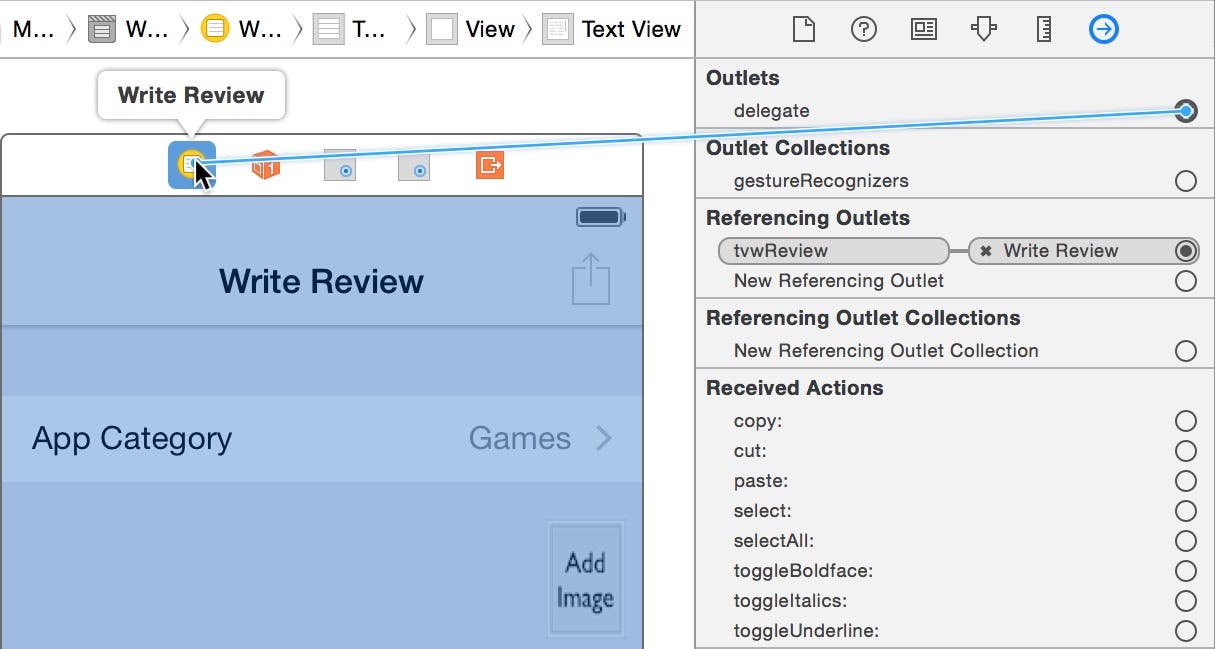 |
| Figure 19 - Connect the text view's delegate property to the WriteReviewViewController. |
Kicking the Tires!
Now you're ready to kick the tires and see how the changes you made work.
- Click the Run button in Xcode and when the app appears in the Simulator, select the Write a Review option.
- Type text into the App Name text field first, and then type in the text view afterwards. Notice as soon as you type the first character into the text view, the Share button is enabled!
- Try deleting all the characters in one of the controls and then the other to see the Share button get enabled and disabled.
Growing the Pearl
If you were building this app for a client, you might show them the app to get some feedback after adding this new functionality. At this point, what if the sponsor tells you a zero star rating is not acceptable (just as in the App Store)? Now you need to change the app to ensure the Share button is not enabled until a rating is selected.
I'd like you to think about what you would have to do if you had simply copied the code that checked for an empty text field and text view from the appNameChanged: method and pasted it into the textViewDidChange: method. Now you would have two places where you would have to add code that checks if the user selected a rating for the app! This is not the kind of app you want to create. It is far better to do what we have done in this post and create a separate method that can be called from the appNameChanged: and textViewDidChange: methods, because there is only one place where we have to change the code.
Conclusion
Creating high quality apps is both a science and an art. The effort you put into creating a well-designed app will pay you back in dividends many times during the life of your app. I recommend you read through books such as Code Complete to learn even more great coding practices and elevate your app development skills!

Kevin McNeish
Kevin McNeish is author of the new book “Learn to Code in Swift” as well as the “iOS App Development for Non-Programmers” book series (www.iOSAppsForNonProgrammers.com), winner of the Publishing Innovation Award. Kevin is also an award-winning app developer, software architect, and conference speaker in the U.S. and abroad. He has spent much of his career making difficult concepts easy to understand. Follow Kevin on Twitter: @kjmcneish.
Related topics
Related Articles
 Rachel Needell

Answered: Does the iPhone Need a Case?
 Rhett Intriago
 Amy Spitzfaden Both
 Leanne Hays

 August Garry
 Olena Kagui