Unleash Your Inner App Developer Part 11: The Photo Library


Do you have an idea for an app but lack the programming knowledge to begin building it? In this weekly blog series, How to Unleash Your Inner App Developer, I will take you, the non-programmer, step by step through the process of creating apps for the iPhone, iPod touch, and iPad. Join me each week on this adventure, and you will experience how fun turning your ideas into reality can be! This is Part 11 of the series. If you're just getting started now, check out the beginning of the series here. (This post has been updated to Swift 1.2, iOS 8 and Xcode 6.3)
Now that you have some of the basics of Swift programming under your belt, it's time to dive into some deeper coding territory. To get the latest version of iAppsReview, select this link.
The iOS Photo Library
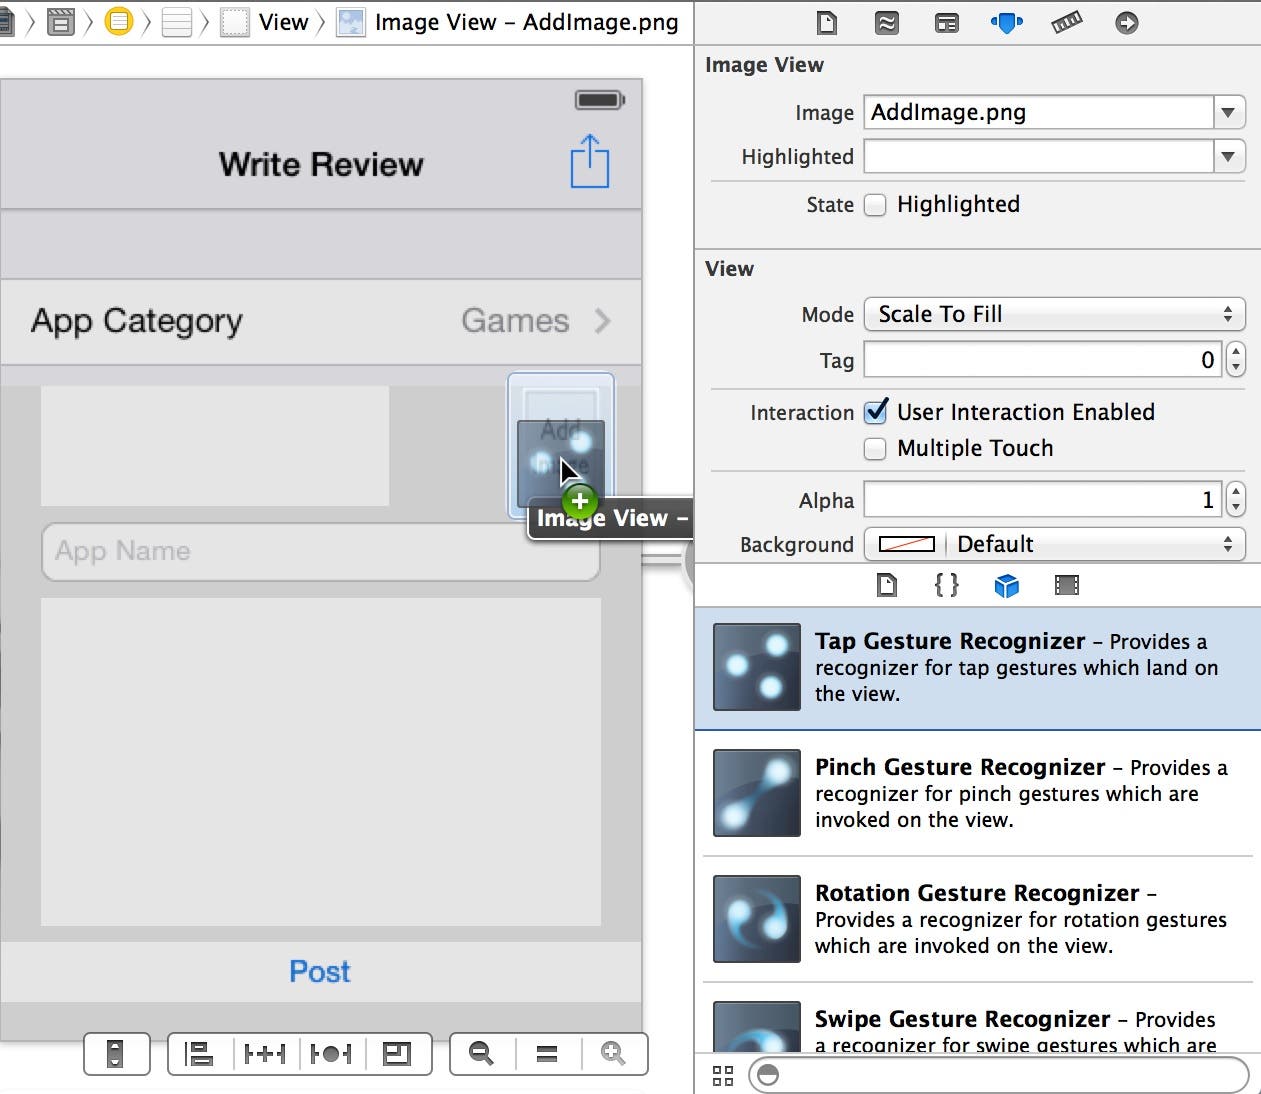
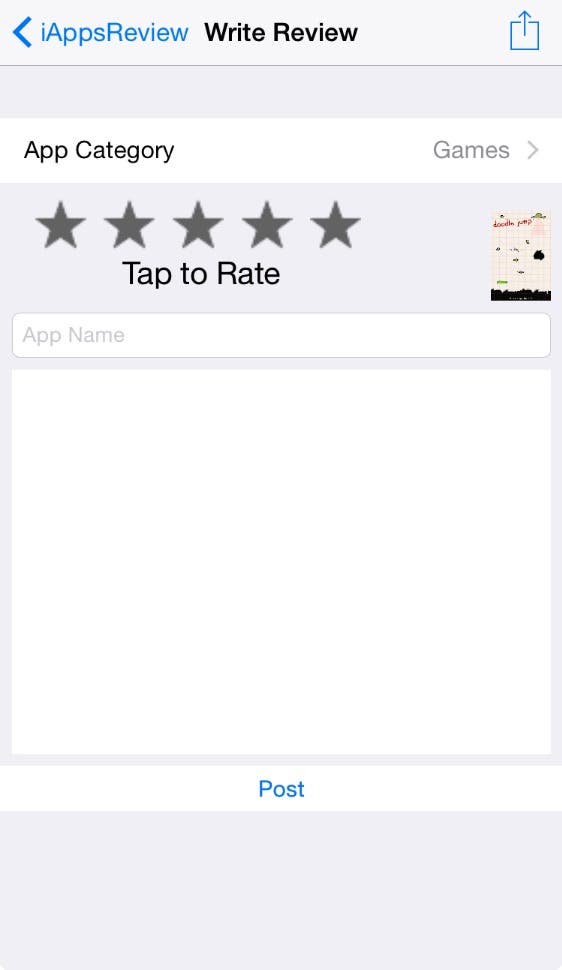
Apple allows the custom apps you create to access the Photo Library on an iOS device. This allows you to add some great functionality to your apps. Apple makes it easy to do so by providing a pre-built user interface allowing users to navigate their photos and select an image. Our goal in this post is to display an image picker when the user taps the image view with the Add Image placeholder (Figure 1), let them select an image from the photo album, and display a thumbnail of the image in the image view control to the right of the button.
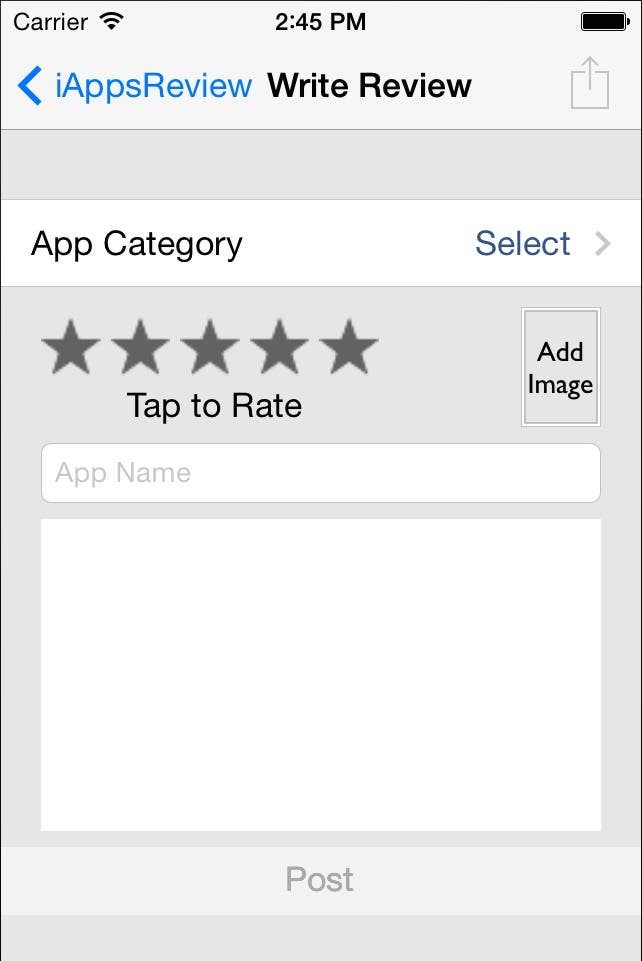 |
| Figure 1 - The Photo Album button in the bottom-left corner of the Write Review scene |
Adding Photos to the Simulator
By default, the iOS Simulator doesn't have any photos in its Photo Library, which we need for this demo. Fortunately, it's easy to add images as outlined in these steps:
- In the Xcode menu, select Xcode > Open Developer Tool > iOS Simulator;
- Download the Doodle Jump app images I have created for you from this link. This automatically decompresses the DoodleJump folder into your Mac's Downloads folder.
- Open Finder and Navigate to your Downloads folder. Expand the DoodleJump folder and you will see the DoodleJump1.PNG and DoodleJump2.PNG files.
- Drag the DoodleJump1.PNG file from the Finder window to the Simulator as shown in Figure 2, and then release your mouse button.
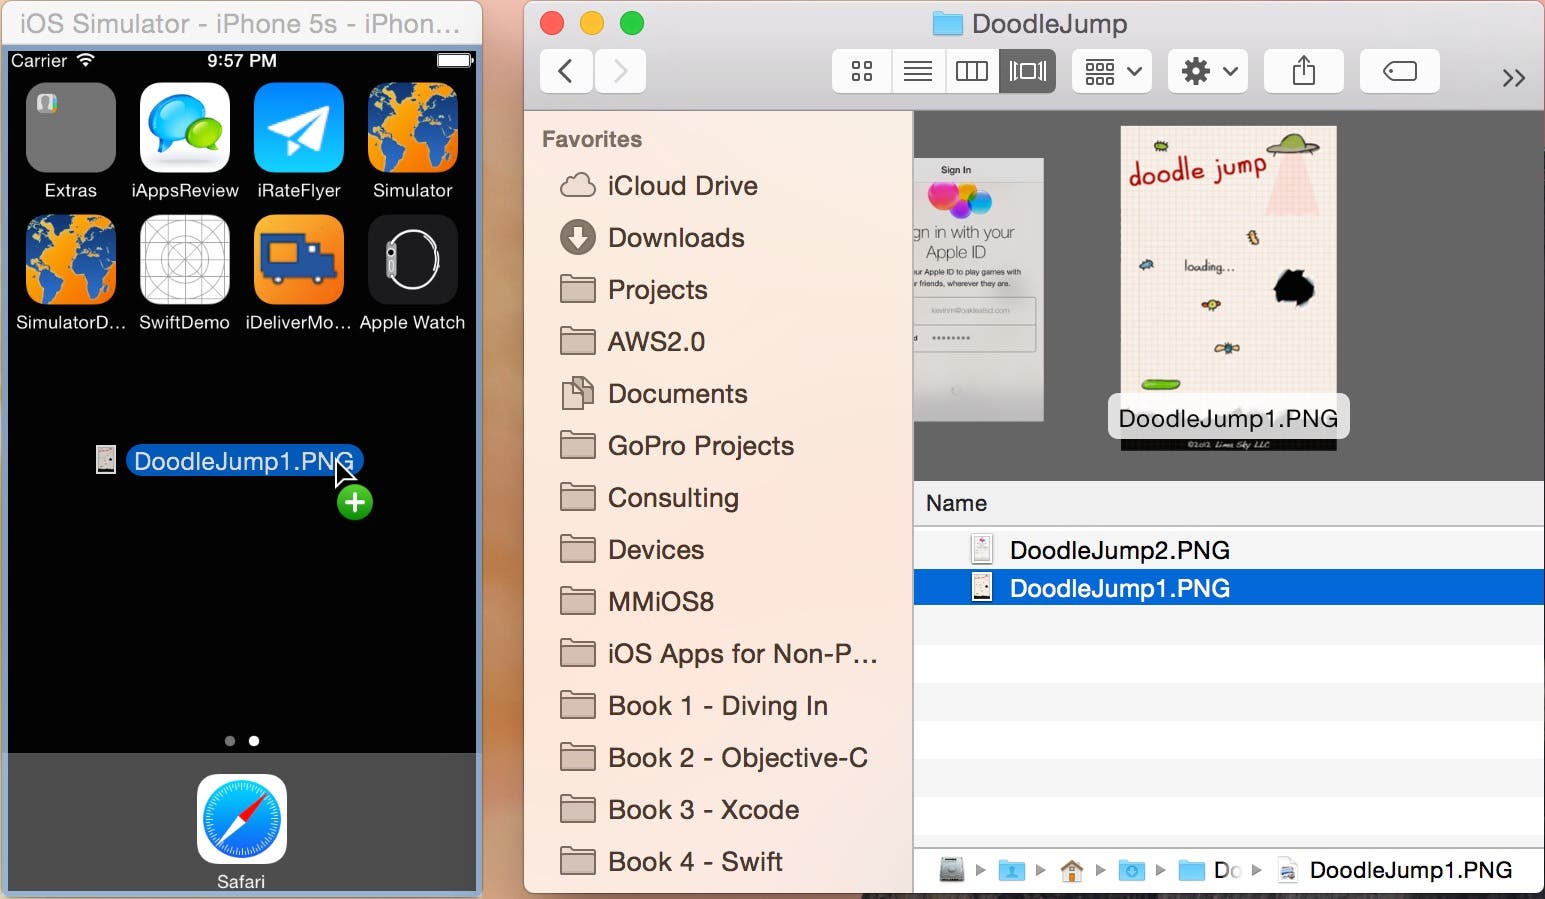 |
| Figure 2 - Dragging an image to the Simulator adds it to the Simulator's Photo Library. |
When you do this, the Photos app is launched in the Simulator, and the image is displayed in the window as shown in Figure 3.
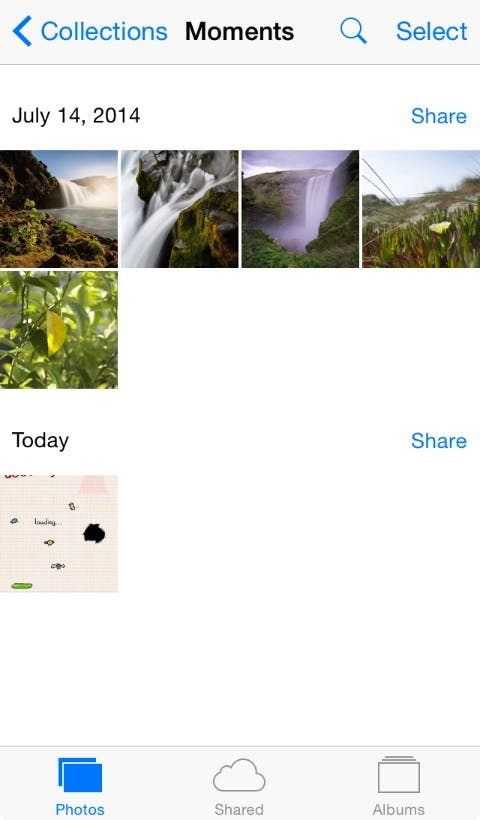 |
| Figure 3 - The image is displayed in the Photos app. |
- Now drag and drop the DoodleJump2.PNG from Finder onto the Simulator.
That's it! Now you have two images in the iPhone Simulator you can access from the iAppsReview app. If you'd like, you can click the Simulator Home button, launch the Photos app, and check out the two newly added images.
Creating an Action Method and Outlet
In order to display the image picker view that allows the user to select an image from the Photo Album and store it in the image view, you need to do the following:
- Make the image view control interactive.
- Add a Tap Gesture Recognizer control to the image view.
- Create an accessPhotoLibrary: action method for the Tap Gesture Recognizer.
- Create an outlet named imgThumbNail for the image view.
Here are the detailed steps:
- Open the iAppsReview project in Xcode.
- Click on the image view (with the Add Image placeholder) in the Write Review scene to select it, and then go to the Attributes Inspector and select the User Interaction Enabled check box (Figure 4).
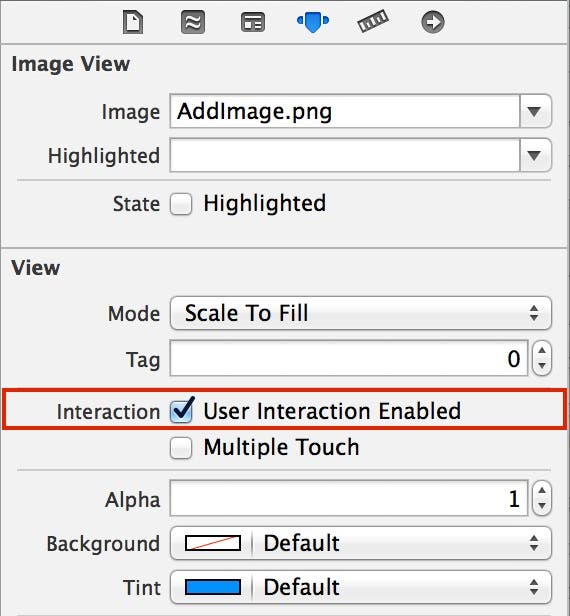 |
| Figure 4 - Select the User Interaction Enabled check box. |
- Unfortunately, image views don't have an event that gets fired when you tap on them. Here is where gesture recognizers come to the rescue. Drag a Tap Gesture Recognizer from the Object Library and drop it on the image view as shown in Figure 5.
 |
| Figure 5 - Drag and drop a Tap Gesture Recognizer on the image view. |
This adds a second gesture recognizer to the scene dock above the Write Review Scene.
- Since we need to add a new action method to the scene's view controller, let's display the Assistant Editor. To do this, click the center button in the Editor button group at the top right of the Xcode window. This should automatically display the WriteReviewController.swift file in the Assistant Editor window. If it doesn't, select Automatic > WriteReviewViewController.swift from the navigation bar at the top of the Assistant Editor.
- Click on the gesture recognizer on the right to select it, and then go to the Connections Inspector (the first button on the right in the Inspectors toolbar.) In the Sent Actions section, click the connection well to the right of the selector action and drag down to the WriteReviewViewController.swift file just above the shareReview: action method as shown in Figure 6.
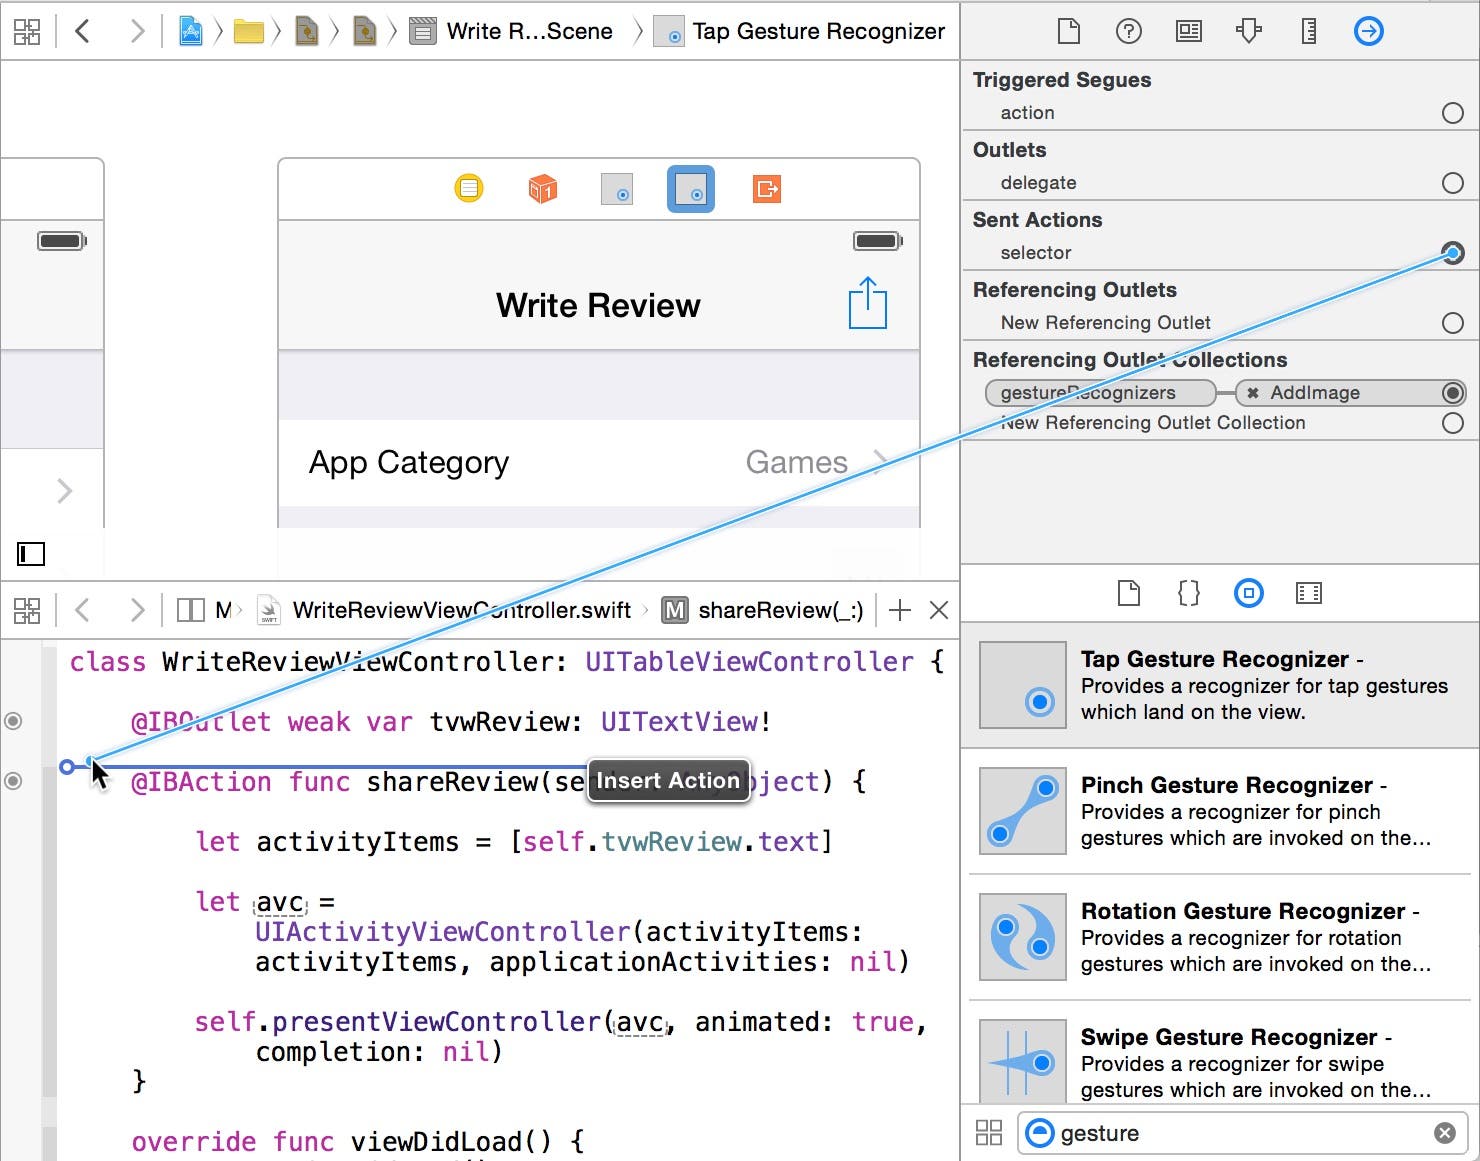 |
| Figure 6 - Create a connection from the gesture recognizer. |
Release the mouse button and you will see a create connection popup (Figure 7). In the Name text field, enter accessPhotoLibrary and then click Connect.
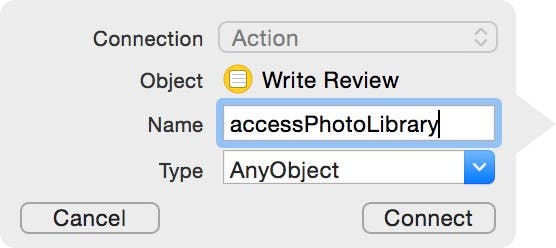 |
| Figure 7 - Create a new action method named accessPhotoLibrary. |
This creates a new accessPhotoLibrary: action method in the code file. We'll come back and implement this method in just a bit, but first, let's create an outlet for the image view.
Creating an Outlet for the Image View
- In the Write Review scene, click on the image view. Next, go to the Connections Inspector, click the connection well to the right of New Referencing Outlet and drag down into the WriteReviewViewController.swift file just above the tvwReview property as shown in Figure 8.
 |
| Figure 8 - Create an outlet for the image view. |
- In the Create Outlet popup, enter imgThumbNail and click Connect. This creates a new outlet property as shown in Figure 9.
 |
| Figure 9 - The new imgThumbnail outlet property |
Implementing the accessPhotoLibrary: Method
Now you're ready to add implementation code to the accessPhotoLibrary: method:
- Close the Assistant Editor by clicking the button on the left button in the Editor button group at the top right of the Xcode window.
- In the Project Navigator, click the WriteReviewViewController.swift code file and scroll down to the bottom of the code file to see the accessPhotoLibrary: method.
- Add the code shown in Figure 10, and then we'll discuss what the code does (based on my previous posts, I'm assuming you know the basics of how to type code into a method. Make sure you allow Xcode's Code Completion to automatically complete your code rather than typing in every character yourself.)
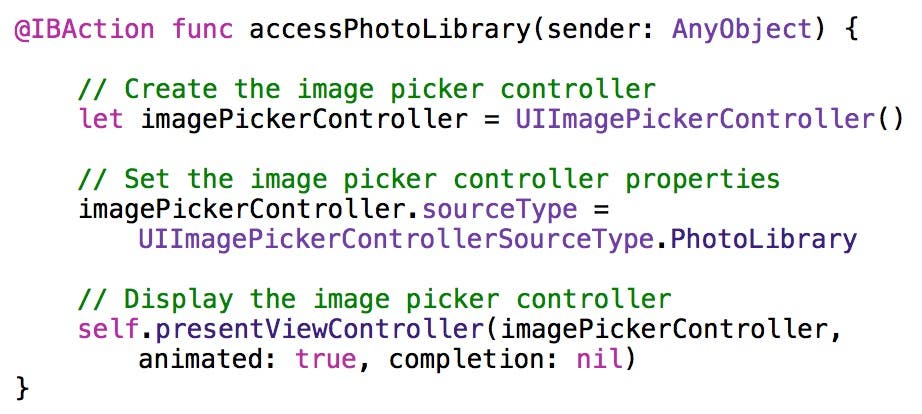 |
| Figure 10 - accessPhotoLibrary: code |
The first line of code creates an image picker controller object from the UIImagePickerController class. In the second line of code, the image picker controller object's sourceType property is set. The third line of code displays the image picker controller.
Let's take a closer look at the second line of code. When you set the value of a property you're not familiar with, it's a good idea to read Apple's documentation to see how the property is used. Figure 11 contains the documentation for the sourceType property.
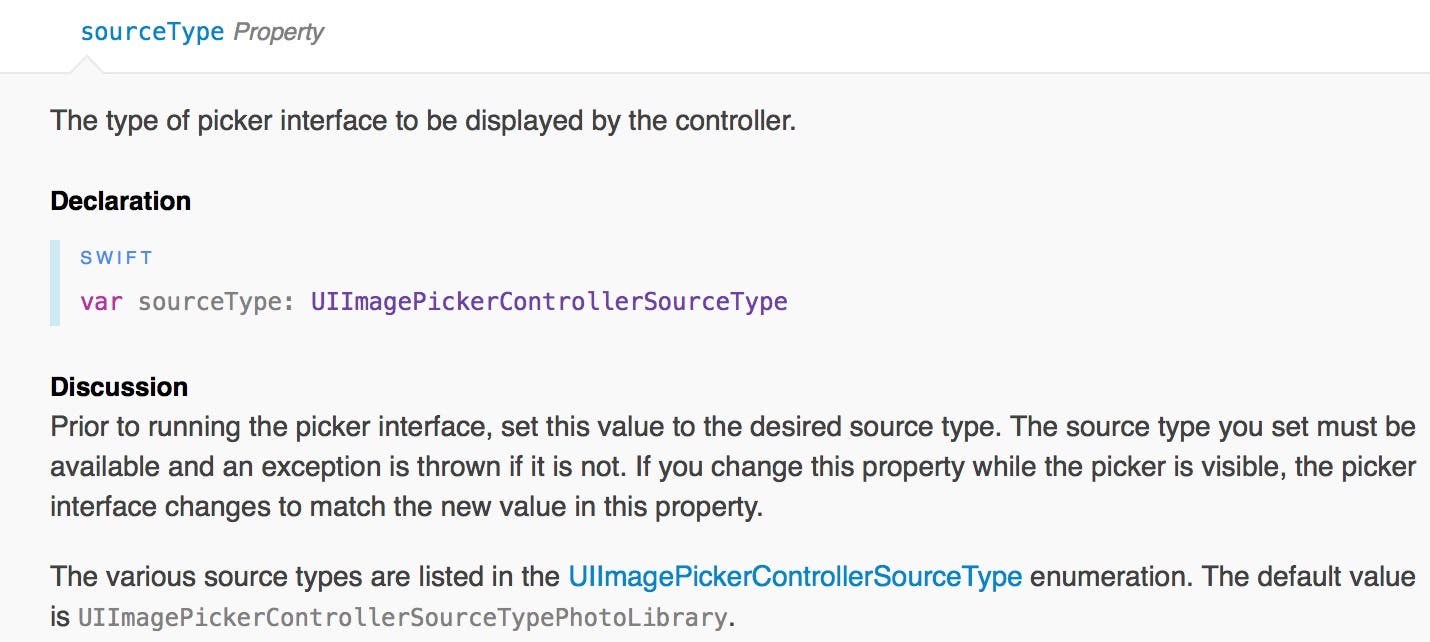 |
| Figure 11 - Apple's documentation for the sourceType property of the UIImagePickerController |
The documentation specifies that the sourceType property holds a value of the type UIImagePickerControllerSourceType, and it refers to the type as an enumeration. We'll find out what that is in just a moment.
If you click on the UIImagePickerControllerSourceType link, it takes you to the documentation shown in Figure 12.
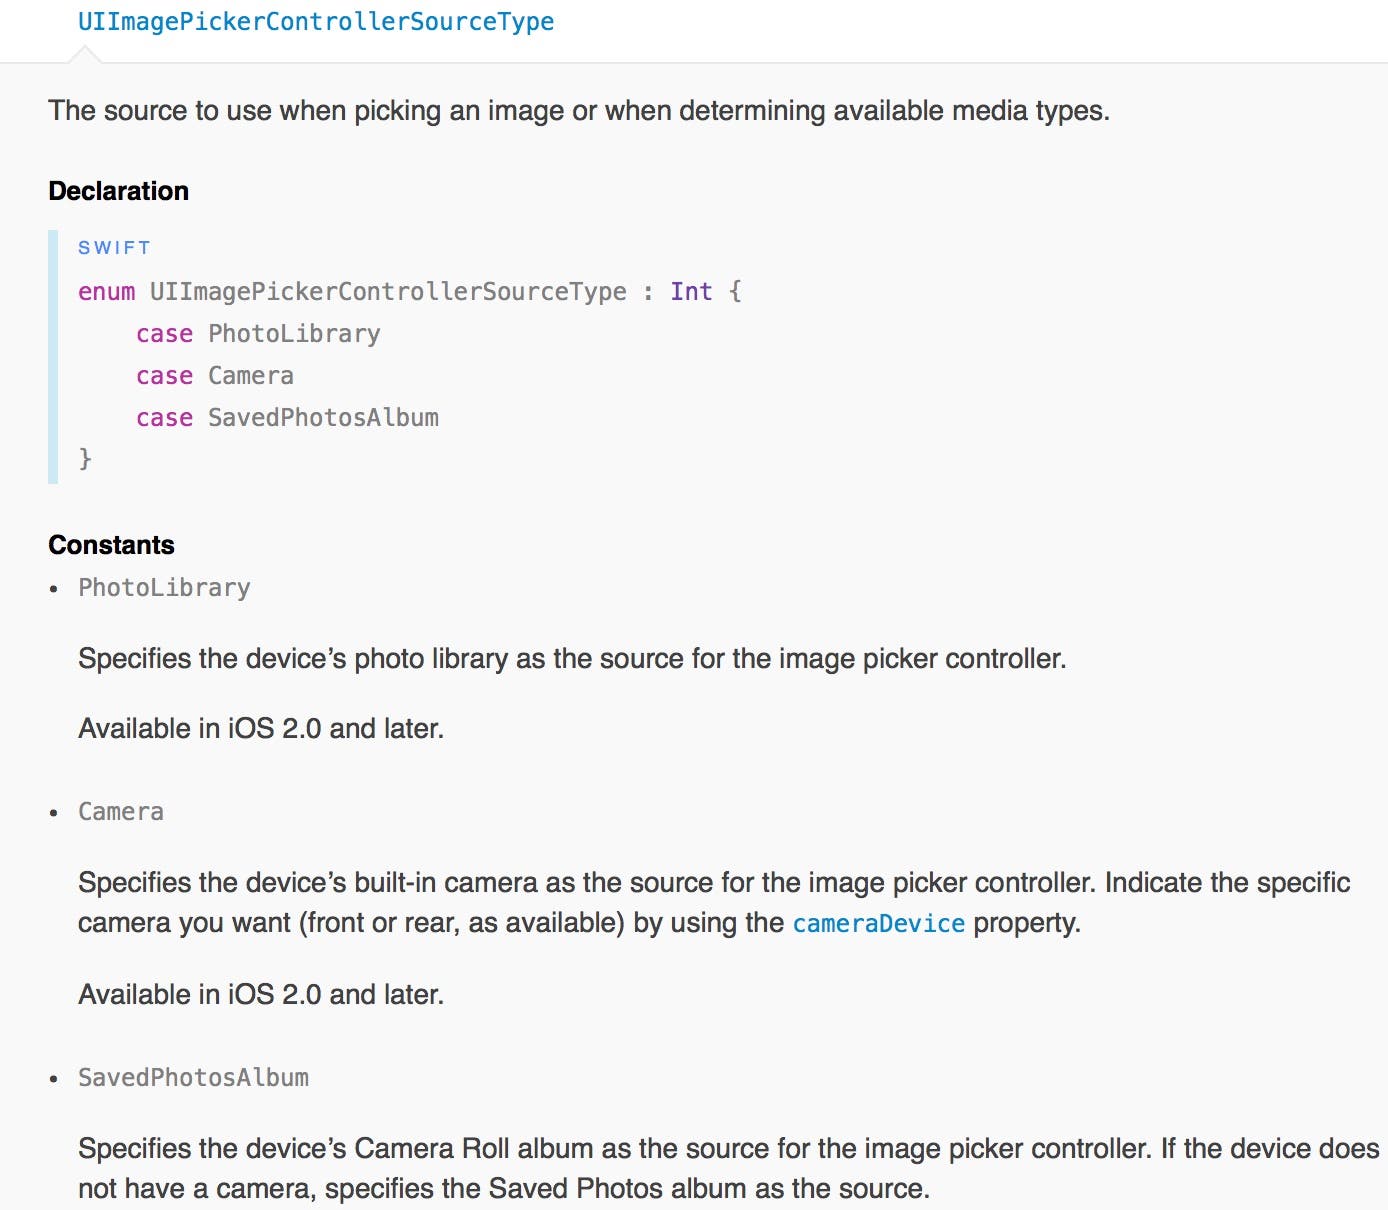 |
| Figure 12 - The UIImagePickerControllerSourceType enumeration |
An enumeration is a group of related constant values. In this case, the UIImagePickerControllerSourceType enumeration defines the valid values that can be stored in the sourceType property. Enumerations come in handy in cases like this when there are a finite number of valid values that can be stored in a property. Unlike string variables where you can store any string of characters, or integer variables where you can store any valid integer, enumerations limit the valid values to a finite set.
Reading through the documentation, you can determine that the value you want is PhotoLibrary because it specifies that the device's photo library is the source for the image picker. This is exactly what we want.
Before moving on, take a look at Figure 13, which contains a sequence diagram that shows the interaction between the WriteReviewViewController and UIImagePickerController objects.
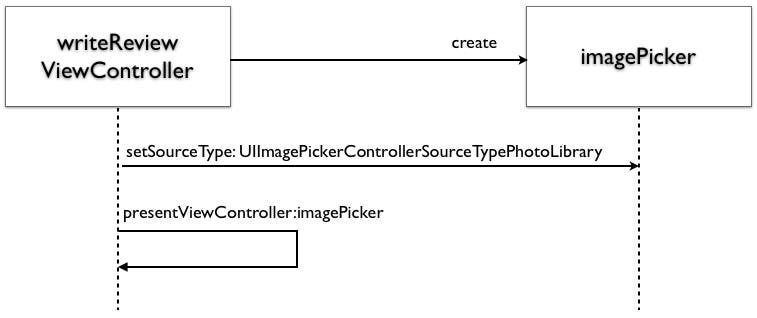 |
| Figure 13 - The method interaction between the writeReviewController and imagePicker objects |
The rectangles at the top of the sequence diagram represent the objects that are created from the WriteReviewViewController and UIImagePickerController classes at run time. The dotted lines below the objects are called "lifelines" and indicate the life of an object. The arrows pointing between the objects and between the lifelines are each a single method call between the objects. Here's the order in which the method calls occur:
- The writeReviewViewController object creates an imagePicker object from the UIImagePickerController class.
- The writeReviewViewController object calls the setSourceType: method on the imagePicker object, passing a UIImagePickerControllerSourceType.PhotoLibrary argument.
- The writeReviewViewController object calls the presentViewController: method on itself, passing the imagePicker object as an argument (I've left out the other arguments for the sake of brevity). When the presentViewController: method is executed at run time, the imagePicker object is displayed in the user interface.
I find it's important to visual object interaction so you truly understand how your code works. As you work on your own apps, I recommend creating sequence diagrams for your app's more complicated method call sequences.
Testing the Photo Library Integration
Let's take the code we wrote for a spin to see how it works.
- In Xcode, click the Run button.
- When the app appears in the Simulator, click the Write a Review option, and then on the Write Review screen, click on the image view with the Add Image placeholder. Since this is the first time the iAppsReview app has tried to access the photo library, a dialog appears asking if you would like iAppsReview to access your photos. Click on OK to allow it. This displays the Photos screen shown on the left side of Figure 14, and youc can see the last image we added to the Simulator. This is the same interface that users are comfortable with in the built-in Photos app.
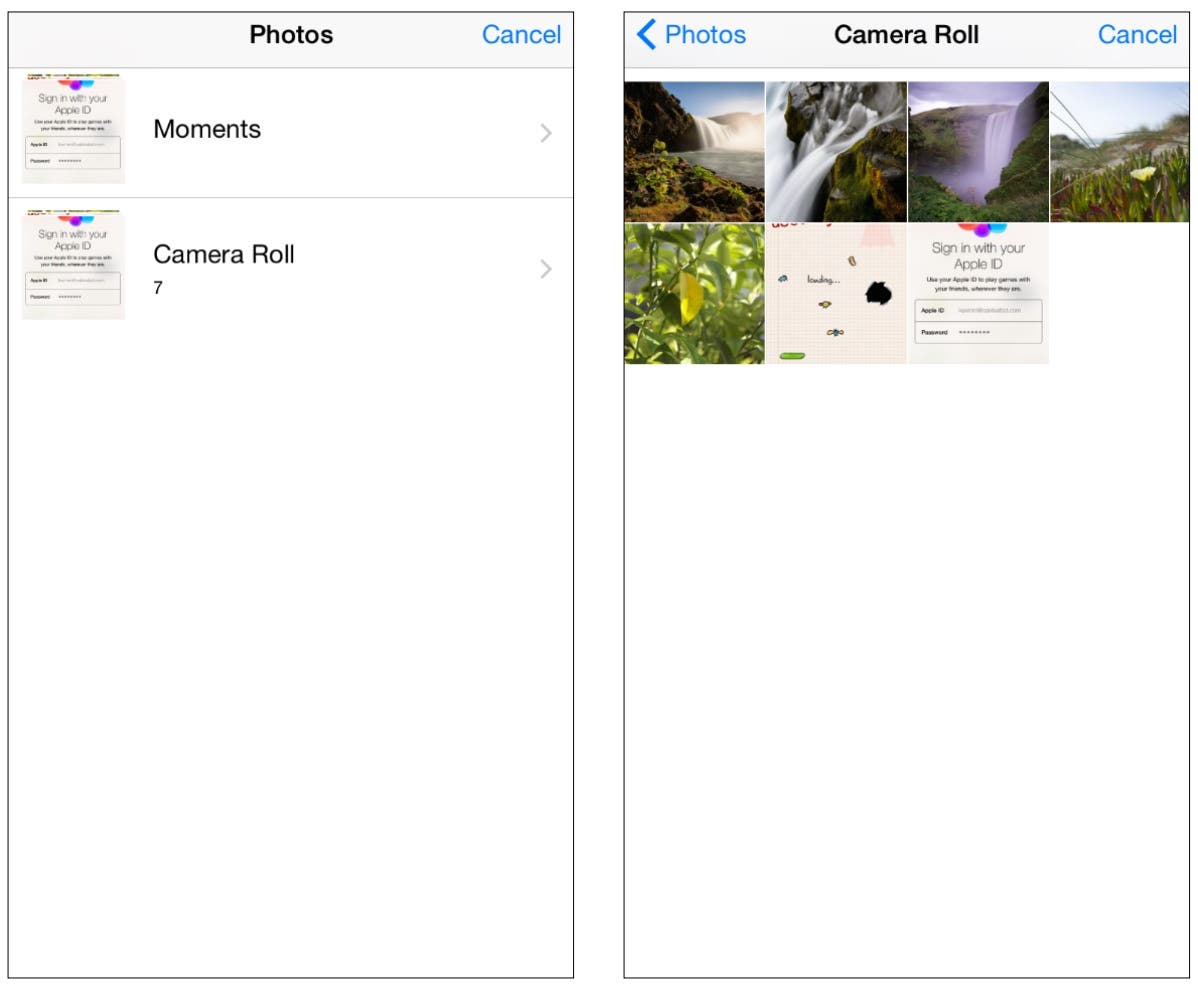 |
| Figure 14 - The Photo Library screens of the Image Picker Controller |
- Tap the Camera Roll row and you will be taken to the Camera Roll screen shown in the right side of Figure 14. If you select one of the photos, the image picker controller disappears down through the bottom of the screen. Nothing happens with the image is selected because we haven't written any code to respond to the selection yet.
Retrieving the Selected Image Using a Delegate
If you take another look at the sequence diagram in Figure 13, there doesn't seem to be a way for the WriteReviewViewController object to get the image that is selected in the imagePicker object.
If you read further down in the Apple's documentation for the UIImagePickerController class, you will see the section Providing a Delegate Object as shown in Figure 15.
 |
| Figure 15 - You must provide a delegate object for an image picker controller. |
This documentation states: "To use an image picker controller you must provide a delegate that conforms to the UIImagePickerControllerDelegate protocol." What does this mean?
In this context, delegation refers to one object relying on another object (the delegate) to provide a specified set of functionality. In Swift, you can define a specific set of required functionality using a protocol. The fact that the protocol mentioned in the documentation is named UIImagePickerControllerDelegate indicates it's the image picker controller that specifies the functionality it needs to pass back information about the image selected by the user.
If you click on the UIImagePickerControllerDelegate Protocol Reference link in the help topic shown in Figure 9, you are taken to a help topic that defines the methods shown in Figure 16.
 |
| Figure 16 - The UIImagePickerControllerDelegate Protocol methods |
Here's a synopsis of these two methods:
- imagePickerController:didFinishPickingMediaWithInfo: The image picker controller calls this method on the delegate object when the user has finished selecting an image. It passes back information to the delegate describing the media that has been selected.
- imagePickerControllerDidCancel: The image picker controller calls this method on the delegate object when the user clicks Cancel rather than selecting an image.
Ultimately, any object that is a delegate of the image picker controller must have these two methods. Unfortunately, Apple's documentation is somewhat misleading. While it's true that a delegate object must implement the UIImagePickerControllerDelegate, it must also implement the UINavigationControllerDelegate. How do I know this? The UIImagePickerController class has a delegate property that is described in the Apple documentation shown in Figure 17.
 |
| Figure 17 - The delegate property of the UIImagePickerControllerDelegate class |
So bottom line, you need to implement both of these protocols on the delegate object.
Although you can make any object the delegate for an image picker controller, it's typical to make the view controller the delegate object. Let's do that now as outlined in the following steps.
- In the Project Navigator, select the WriteReviewViewController.swift code file.
- Near the top of the code file in the second line of code, click to the right of the "r" in UITableViewController (and before the opening curly brace).
- We could put the code that implements the protocol on this same line, but it's easier to read if we add it on a second line. To do this, first type a comma, then press return and then tab to indent the code a bit.
- Next, type the code shown in Figure 18. This code between angled brackets tells the world (because it's in the public header file) that the WriteReviewViewController class implements the UIImagePickerControllerDelegate and UINavigationControllerDelegate protocols;
 |
| Figure 18 - Implementing the protocols |
- Before we implement the methods that are in the UIImagePickerControllerDelegate protocol, we need to add some properties to the class to hold some of the information that we get back from the image picker controller. Rather than creating local variables within a method, we are going to create properties at the class level. Properties are very useful, because, unlike local variables, they can be accessed by any method in the class.
To create these properties, go to the Project Navigator and select the WriteReviewViewController.swift implementation file. Afterwards, scroll to the top of the code file and add the code shown in Figure 19 below the IBOutlet declarations.
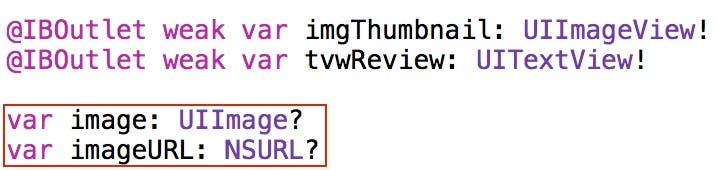 |
| Figure 19 - Declaring properties |
This code declares a property named image of the type UIImage and another property named imageURL that holds an object of type NSURL. The question marks after each property declaration indicate the properties may at times contain nil, or nothing. In Swift, if a property may potentially contain nil, you must add a question mark after its type.
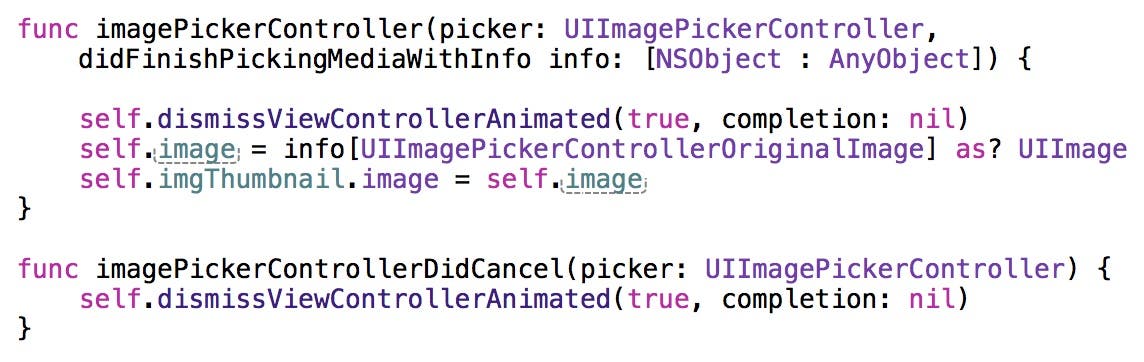
- Now we need to implement the methods that are in the UIImagePickerControllerDelegate protocol. To do this, add the methods shown in Figure 20 below the accessPhotoLibrary: method.
 |
|
Figure 20 - The implementation of the UIImagePickerControllerDelegate methods |
The code in the first method calls the dismissViewControllerAnimated:completion: method on the view controller (self), which hides the image picker controller after the user selects an image. Next, it grabs the image from the info parameter passed back from the image picker controller and stores it in the image property for future use. Next, the code takes the image and stores it in the image view's image property. This will cause the image to appear in the image view at run time.
The imagePickerControllerDidCancel: method also dismisses the image picker controller, but doesn't need to do anything afterwards.
- Now there's just one other thing you need to do—set WriteReviewViewController as the delegate for the image picker controller. To do this, add the code shown in Figure 21 to the accessPhotoLibrary: method.
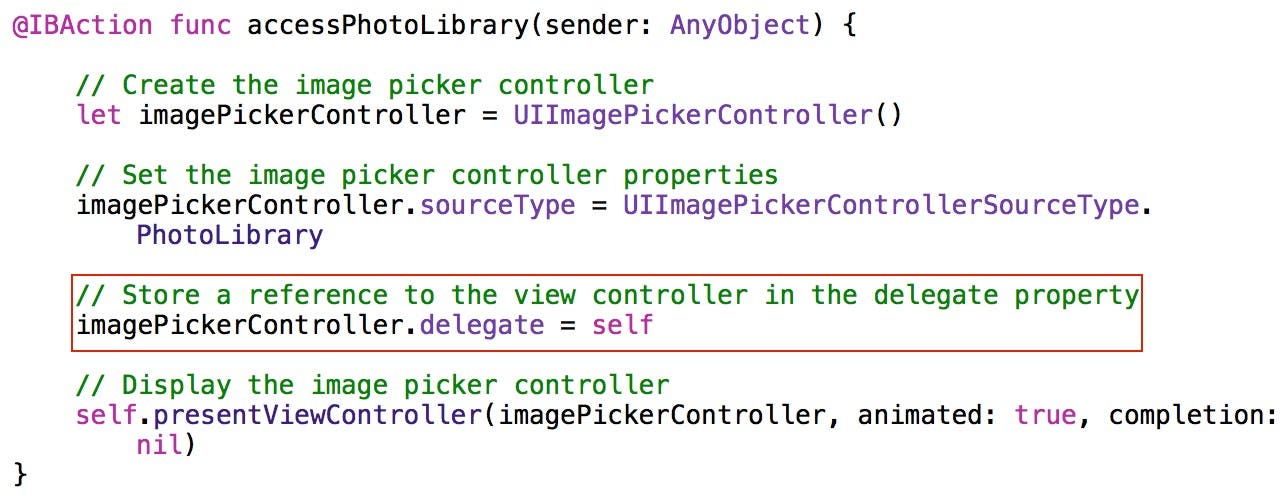 |
| Figure 21 - Store a reference to the WriteReviewViewController object in the delegate property of the image picker controller. |
To get a clearer picture of how these new method calls between the objects work, check out Figure 22.
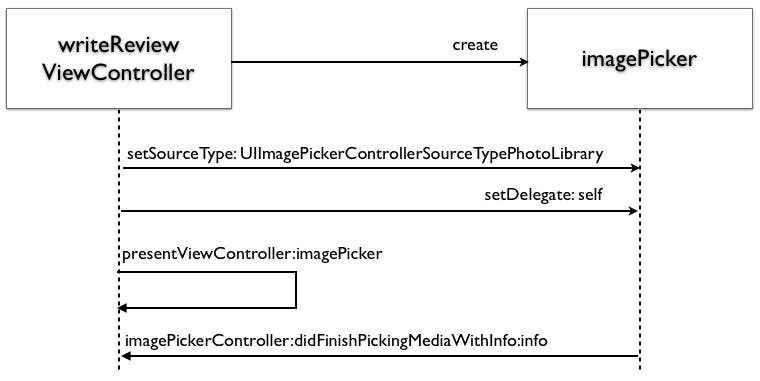 |
| Figure 22 - The complete method call flow between objects |
In this updated sequence diagram, notice there is a new setDelegate method where the writeReviewViewController object stores a reference to itself in the imagePicker object's delegate property. At the bottom of the diagram, a new method call has been added. This method call is sent from the imagePicker object to the writeReviewViewController object after the user selects an image. A media argument is sent in this method call that contains a collection of objects containing information about the selected image.
Testing the Delegate Code
Now you're ready to test the code and see how it works.
- Click Xcode's Run button.
- When the app appears in the Simulator, click the Write a Review row.
- Click the Photo Album button.
- In the Photos screen, select the Saved Photos row.
- Select either of the two images.
- The image picker controller should disappear and you should see the image displayed as a thumbnail in the image view as shown in Figure 23.
 |
| Figure 23 - The selected photo appears in the image view. |
If you would like a copy of the project as we have completed it so far, just click on this link.
Conclusion
Personally, I find it interesting and fun to add the type of functionality we have added to iAppsReview in this post. Along the way, you have learned a number of new concepts including delegates, protocols, and properties. As time goes by and we use these concepts in future posts, they will become far more familiar and an important part of your iOS tool kit.

Kevin McNeish
Kevin McNeish is author of the new book “Learn to Code in Swift” as well as the “iOS App Development for Non-Programmers” book series (www.iOSAppsForNonProgrammers.com), winner of the Publishing Innovation Award. Kevin is also an award-winning app developer, software architect, and conference speaker in the U.S. and abroad. He has spent much of his career making difficult concepts easy to understand. Follow Kevin on Twitter: @kjmcneish.

 Olena Kagui
 Leanne Hays

 Rhett Intriago
 Amy Spitzfaden Both


 Rachel Needell