
Do you have an idea for an app but lack the programming knowledge to begin building it? In this weekly blog series, How To Unleash Your Inner App Developer, I will take you, the non-programmer, step by step through the process of creating apps for the iPhone, iPod Touch, and iPad. Join me each week on this adventure, and you will experience how fun turning your ideas into reality can be! This is Part 3 of the series. If you're just getting started now, check out the beginning of the series here (This post has been updated to iOS 8.0, Xcode 6.3 and Swift 1.2.)
In my previous post, we started the process of creating a prototype of an iPhone app called iAppsReview. You learned how to create a new project in Xcode, how to add a storyboard to a project and configure it, and how to add a navigation controller to a storyboard. You had just begun to configure the table view, which we will finish in this post. You'll learn how to create multiple sections in a table view, set section header text, add images to a project, and incorporate them in table-view cells.
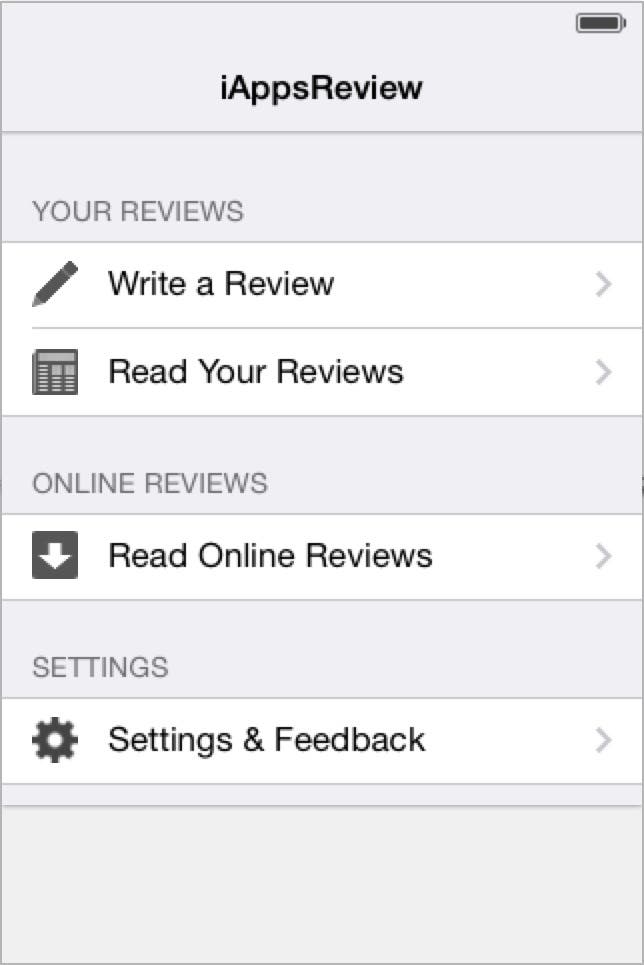 |
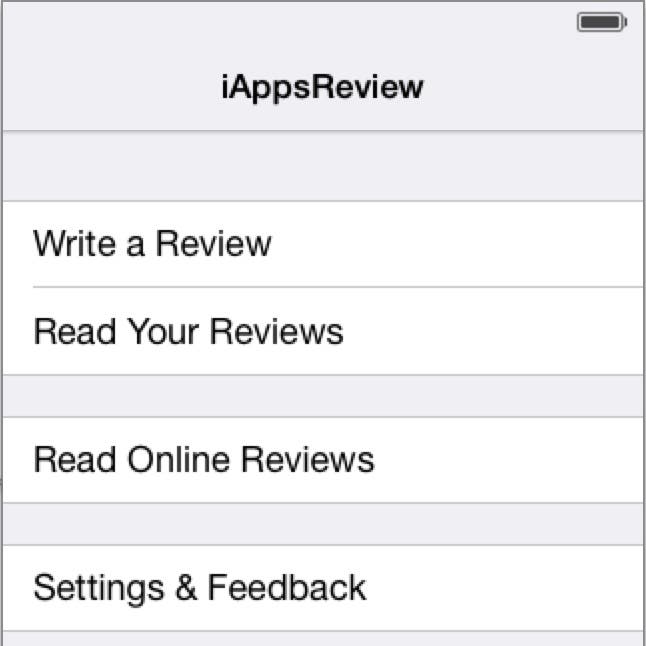
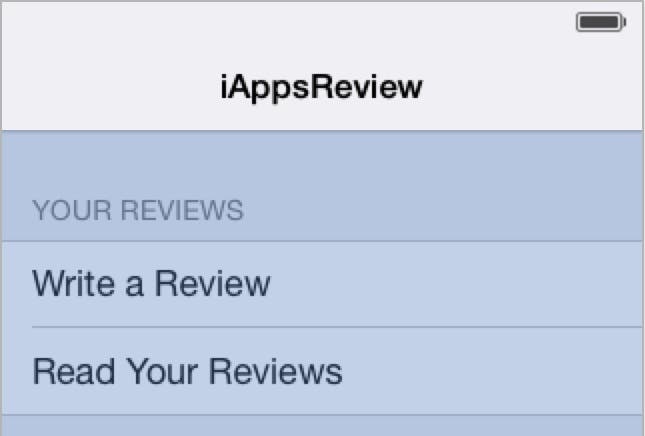
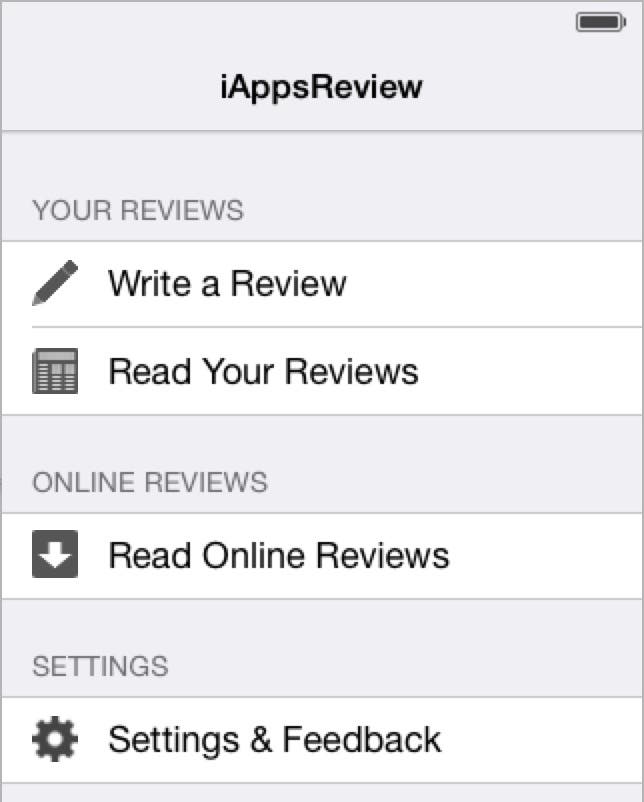
| Figure 1 - The app's main scene |
To help jog your memory, Figure 1 shows the main scene that we are going to be working on in this post. If you missed my previous post, or just want a fresh start, you can download the project I created last week from this link.
I highly recommend going through all of the steps in this post on your own for the best learning experience.
Opening the Project
Let's pick up where we left off and open the project we created in my previous post.
- Launch Xcode on your Mac.
- To open the project from Xcode's Welcome window, just click the iAppsReview project in the Recents panel on the right side of the window (Figure 2), and then click Open. You also can open the project by selecting File > Open Recent > iAppsReview.xcodeproj from the Xcode menu.
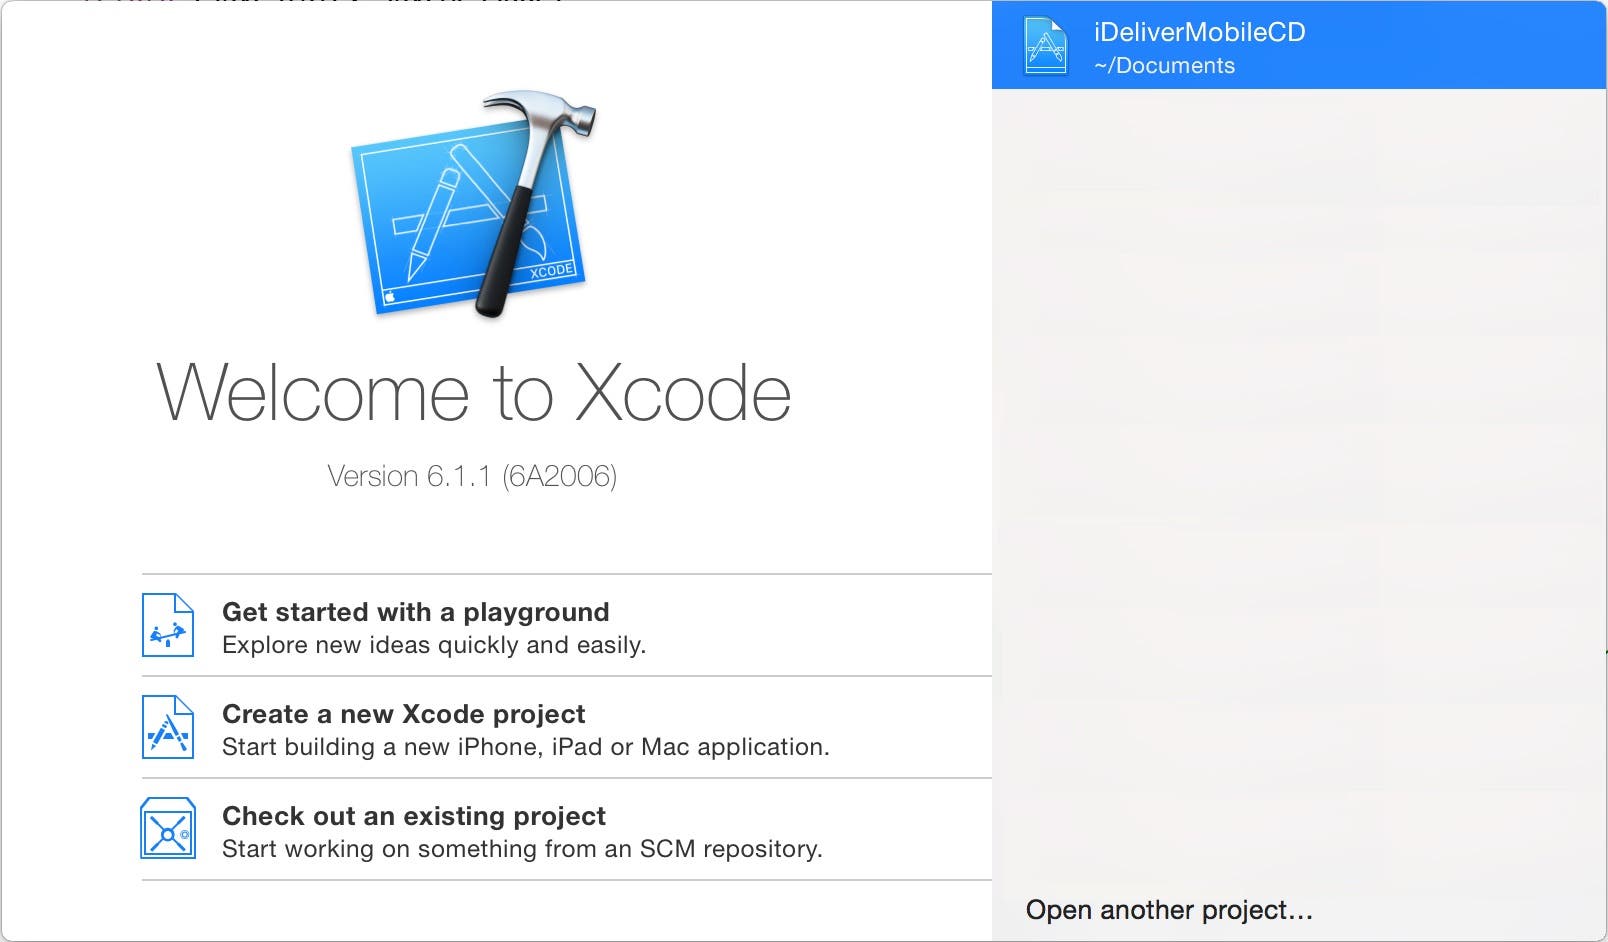 |
| Figure 2 - Select the iAppsReview project and click Open. |
- After the project is open, in the Project Navigator on the left side of the Xcode window, select the Main.storyboard file. This displays the storyboard in the Interface Builder Editor in the center of the Xcode window.
Configuring the Table View
Now you're ready to configure the table view in the app's main scene.
- Click the gray area in the iAppsReview scene labeled Table View Static Content.
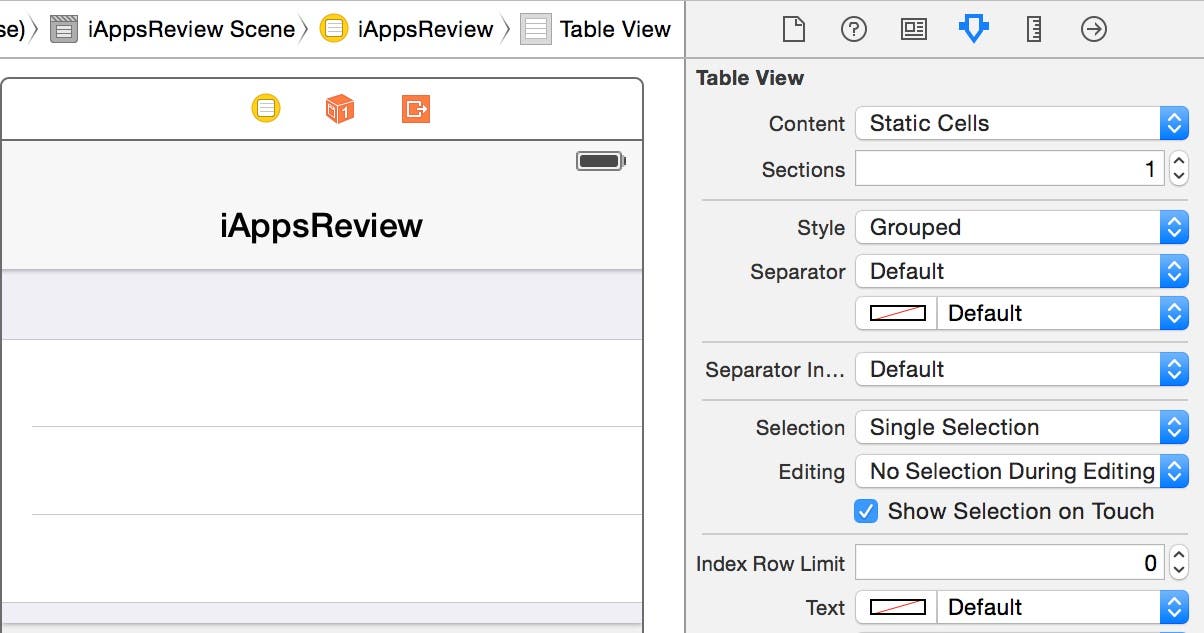
- Now go to the Attributes Inspector (Figure 4). You may remember from my previous post that if the Attributes Inspector isn't visible, you can select View > Utilities > Show Attributes Inspector from the Xcode menu. Now change the Style to Grouped. This causes the table view to take on the grouped appearance as shown in Figure 3.
 |
| Figure 3 - Set the table view's Style to Grouped. |
-
According to our design, all of the cells in this table view should have the same general appearance, so let's delete all of the cells except for one, configure the remaining cell, and then copy it to make the other cells in the table view. To do this, select the second cell in the table view by clicking on it. Then, to select the third cell, hold the shift key down and click on it. This selects the last two cells as shown in Figure 4.
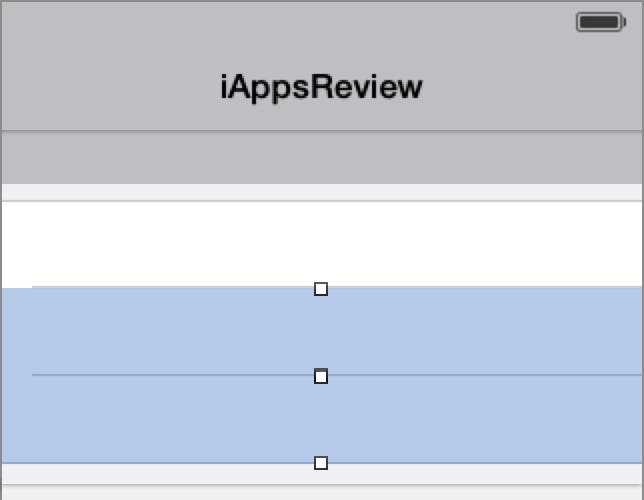 |
| Figure 4 - Select the last two cells in the table view. |
- Press the Delete key to delete both of the selected cells. This leaves the remaining cell selected.
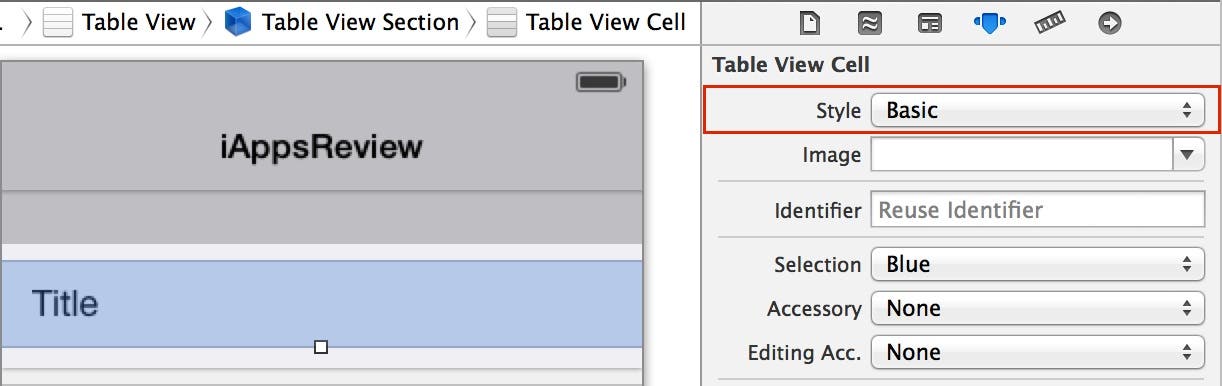
- Next, go to the Attributes Inspector and change the cell's Style to Basic as shown in Figure 5. This adds a single label on the left side of the cell. You will see how some of the other cell styles look later on in this tutorial.
 |
| Figure 5 - Set the cell's Style to Basic. |
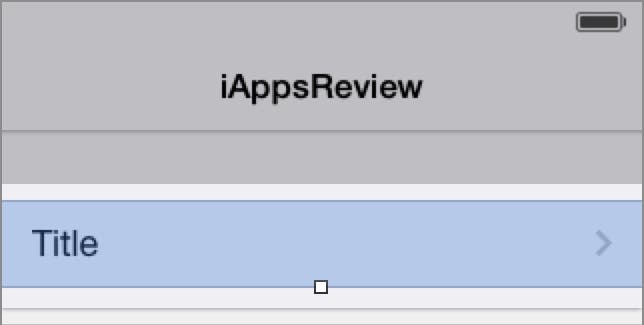
- According to our design shown in Figure 1, there should be a disclosure indicator (a gray right arrow) on the right side of all the cells in this table view. So let's add one to the cell now. Change the cell's Accessory attribute to Disclosure Indicator. This displays the disclosure indicator on the right side of the cell as shown in Figure 6.
 |
| Figure 6 - The cell contains a disclosure indicator. |
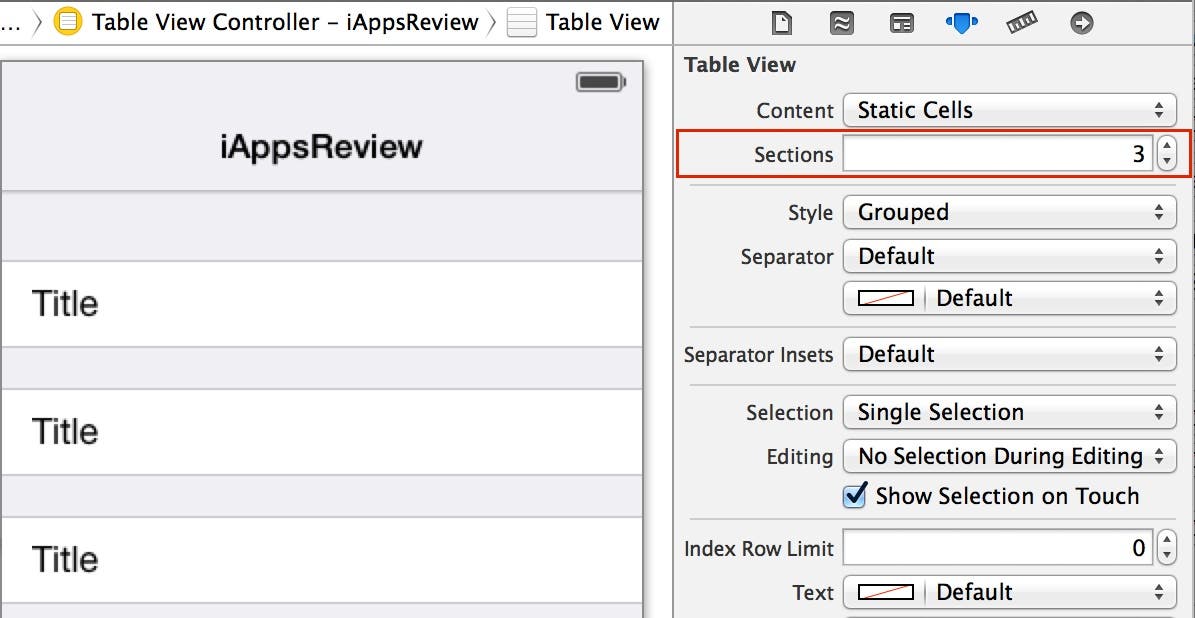
- Now that you have set up the style for the table-view cell, it's time to add multiple groups to the table view. To do this, first select the table view by clicking the gray area below the table-view cell labeled Table View Static Content. Afterwards, go to the Attributes Inspector and increase the number of sections to 3 by clicking the up arrow to the right of the Sections attribute twice. When you do this, two new sections are created, each with a copy of the cell you configured in the previous steps (Figure 7).
 |
| Figure 7 - Set the number of Sections to 3. |
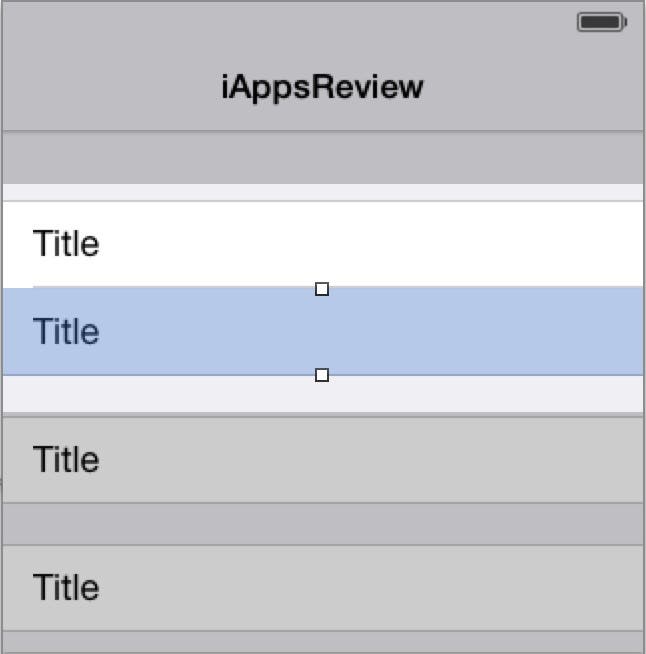
- As shown in Figure 1, the first section in the table view contains two cells: Write a Review and Read Your Reviews. To create the second cell, create a copy of the first cell. To do this, click on the first cell in section 1 to select it, and then press the Command+D keys (press both keys at the same time) to make a copy of the cell. When you're finished, you should see two cells in the first section as shown in Figure 8.
 |
| Figure 8 - Duplicate the first cell to create two cells in the first section. |
- Now that you have all the cells you need, you can change the Title label text in each cell to the values shown in Figure 1. To do this, double-click the first cell in the table view (or you can even click twice slowly) to select the Title label contained in the table-view cell. When the label is selected, go to the Attributes Inspector and change the Text of the label to Write a Review, and then press the return key. When you do this, the text of the label in the first cell changes as shown in Figure 9.
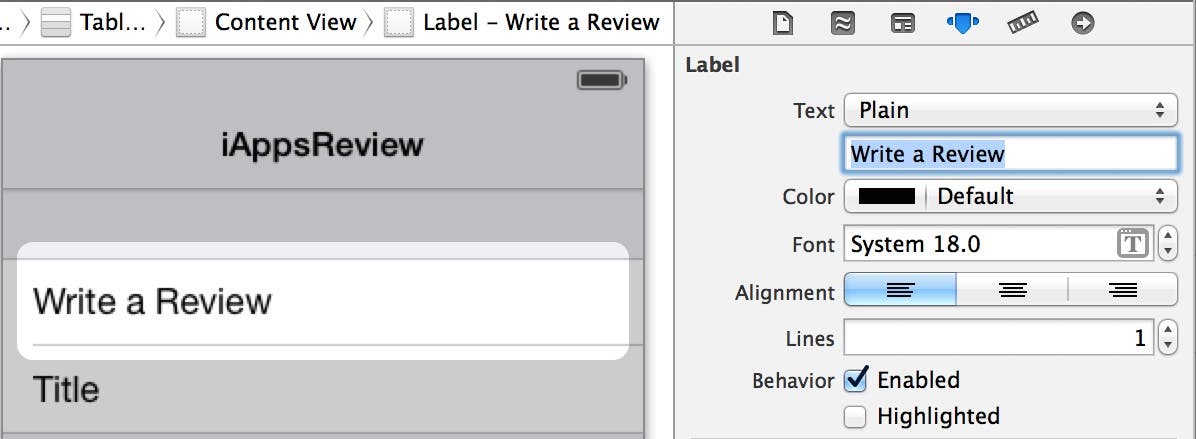 |
| Figure 9 - Set the Title of the first cell to Write a Review. |
- Now change the text of the Title label in the other cells as shown in the bulleted list below, starting with the second cell. When you're finished, your table-view cells should look like Figure 10.
- Read Your Reviews (cell 2)
- Read Online Reviews (cell 3)
- Settings & Feedback (cell 4)
 |
| Figure 10 - Set the text of all cell labels. |
Setting Up Section Headers
As shown in Figure 1, each section has header text that is used to describe the rows in each section. Follow these steps to add the section header text to your table view:
- The easiest way to individually select each section to be configured in a table view is by using Xcode's Document Outline pane, which is shown on the left side of Figure 11. If the Document Outline pane isn't visible, you can click the small square button at the bottom-left corner of the storyboard (Figure 11) or you can select Editor > Show Document Outline from the Xcode menu.
 |
| Figure 11 - The Document Outline pane is located to the left of the storyboard. |
- The Document Outline provides a hierarchical view of all the user interface objects on the currently selected scene. As you can see in Figure 12, there are three table-view sections in the table view. Select the first table-view section and we will set its header text.
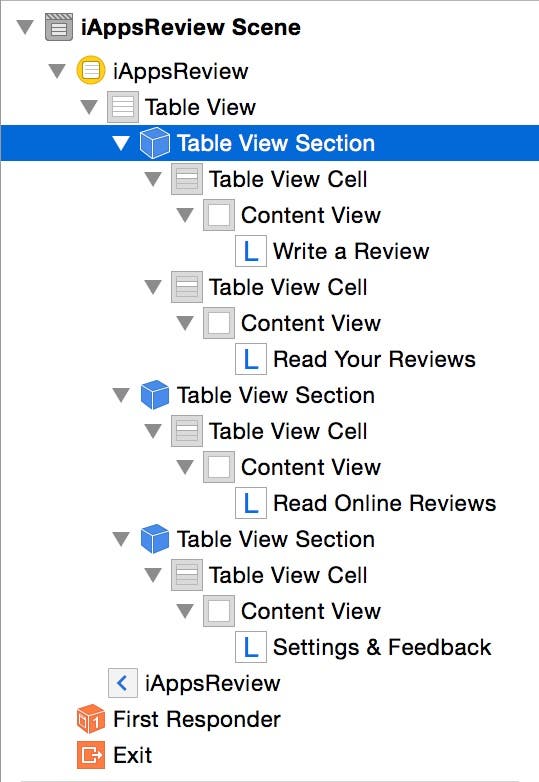 |
| Figure 12 - Select the first table-view section |
- With the first table-view section selected, go to the Attributes Inspector and change the Header attribute to Your Reviews and press the return key. This adds a header section to the scene as shown in Figure 13.
 |
| Figure 13 - Set the section header text. |
- Next, select the second table-view section in the Document Outline pane and set its Header attribute to Online Reviews.
- Now select the third table-view section in the Document Outline pande and set its Header attribute to Settings. When you're finished, the table-view section headers should look like Figure 14.
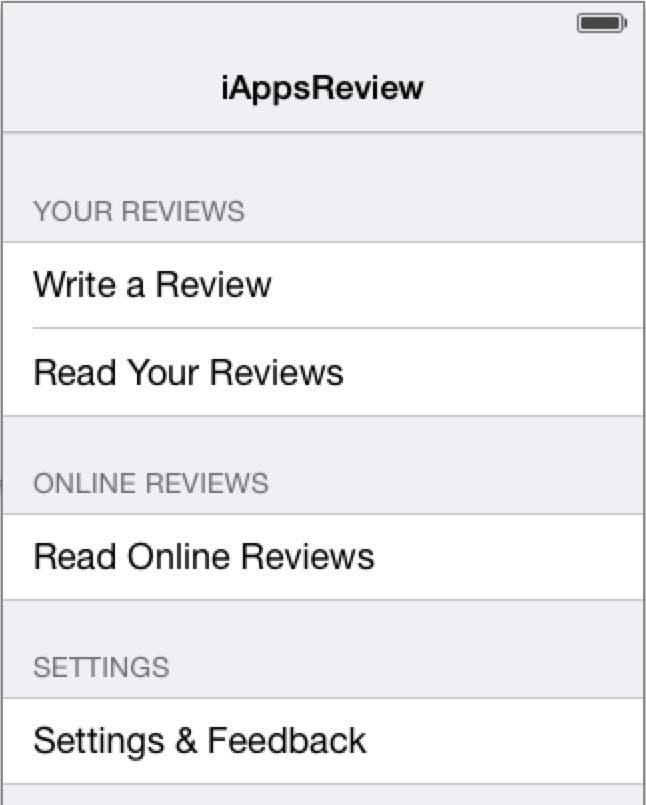 |
| Figure 14 - The completed header text |
Adding Images to Your Project — with Glyphish & iStockPhoto
Adding images to your app's user interface goes a long way in giving it a professional look. Unless you're a graphic artist, I don't recommend creating your own images. There are many high quality free and inexpensive images available on the web.
For example, all of the images shown in Figure 1 came from a set of icons you can get for free from Glyphish. These images are simple and straightforward. You don't want to make your users turn their head sideways to figure out what your image is trying to convey. The high quality images from glyphish are just the ticket. I recommend spending the extra $25 to get Glyphish pro, which includes 400 icons that look great and work well on both the regular and Retina iOS displays.
When I'm looking for an image to use for my app icon (the image that appears for the app button in the iOS Home screen) and for splash screens that appear at startup, I like to use iStockPhoto. The images on this site are not free, but they are high quality, relatively inexpensive, and well worth the money considering the app icon is the main image users see in the app store when deciding whether to purchase your app. My advice? Spend a few dollars and show potential buyers that you have a high quality app. When searching for images from iStockPhoto, you typically set the search filter to Illustrations to find clip art that suits an iOS app.
I have prepared a number of images that I have included in this project. If you want to check them out, select the Images.xcassets file in the Project Navigator and click on the list of image sets (Figure 15).
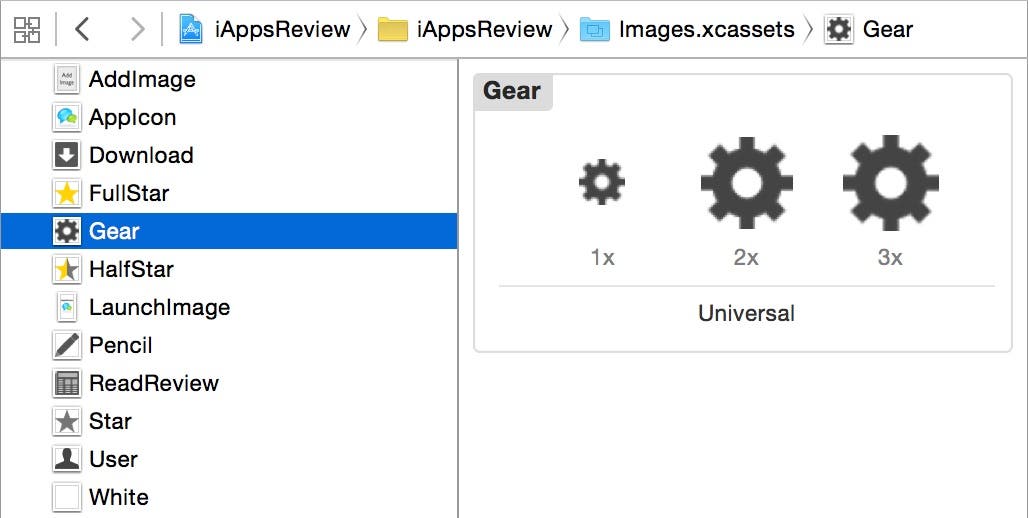 |
| Figure 15 - Exploriing the Images.xcassets file |
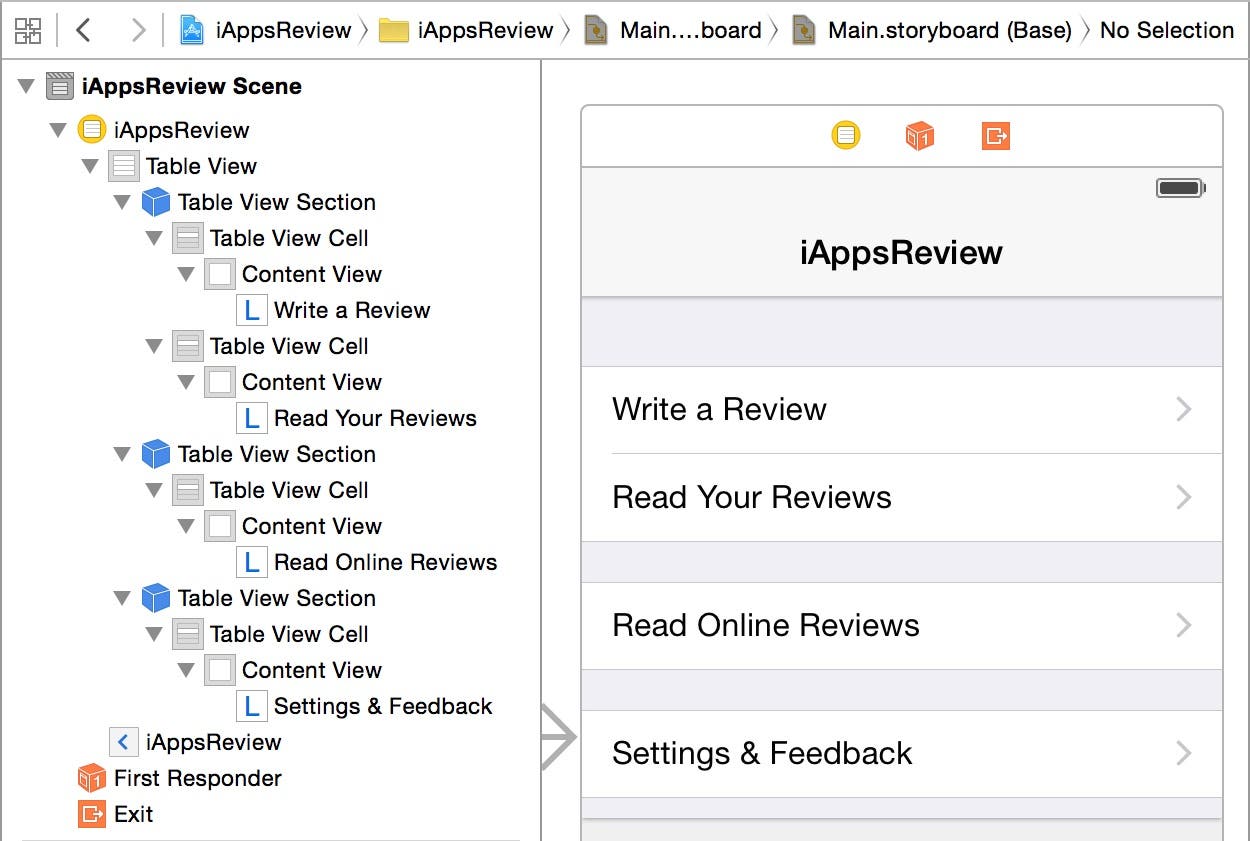
- We will take a look at some of the other interesting image files later on, but for now, let's add images to the table-view cells. To begin, select the first cell (Write a Review) in the table view. Next, go to the Attributes Inspector and in the Image combo box, select Pencil (all of the files you just added to the project are now listed here). This displays the pencil image on the left side of the cell as shown in Figure 16.
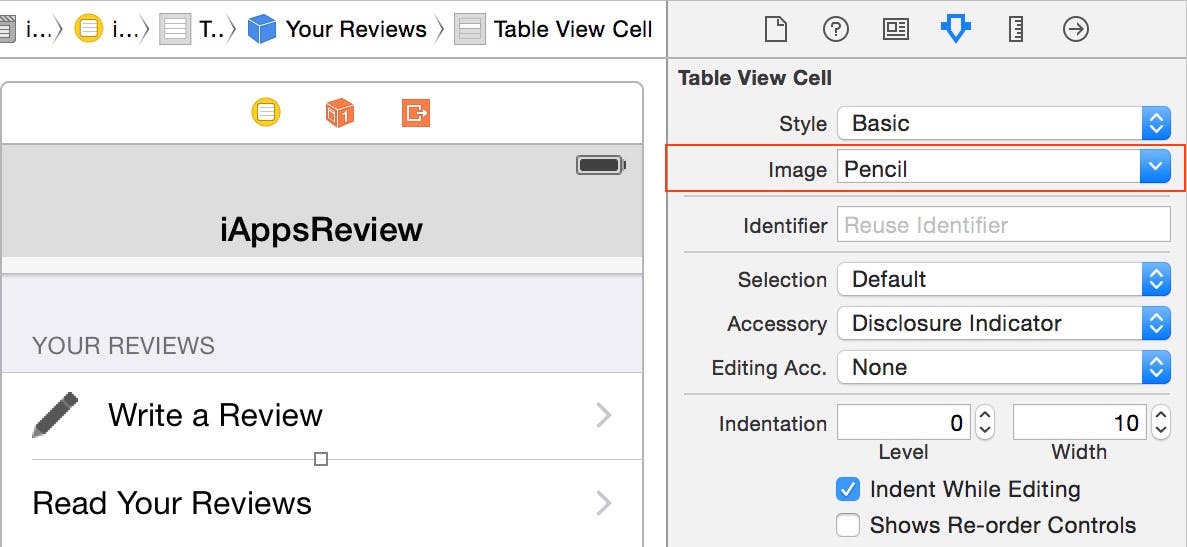 |
| Figure 16 - Set the first cell's Image attribute to pencil.png. |
- Now change the Image attribute of the other cells as shown in the bulleted list below, starting with the second cell. When you're finished, your table view cells should look like Figure 17.
- ReadReview (cell 2)
- Download (cell 3)
- Gear (cell 4)
 |
| Figure 17 - Set the Image attribute of each cell in the table view. |
- In the project's images I have included the app's icon and launch images. To see these, in the Project Navigator located on the left side of the Xcode window, select the Images.xcassets file. When you do this, you should see the asset catalog displayed in the center of the Xcode window. If it's not already selected, select AppIcon from the list to the right of the Project Navigator as shown in Figure 18.
Based on the fact that I have specified that this app is iPhone-only and will run on iOS 8, Xcode determines that I should include four app icons with my app, which I have done (Figure 18).
 |
| Figure 18 - The app icons are set up in the asset catalog. |
- Now let's check out the launch images. These are the images that are displayed when the app first starts up. To do this, click on LaunchImage in the list on the left side of the asset catalog. When you do this, you will see the LaunchImage settings as shown in Figure 19.
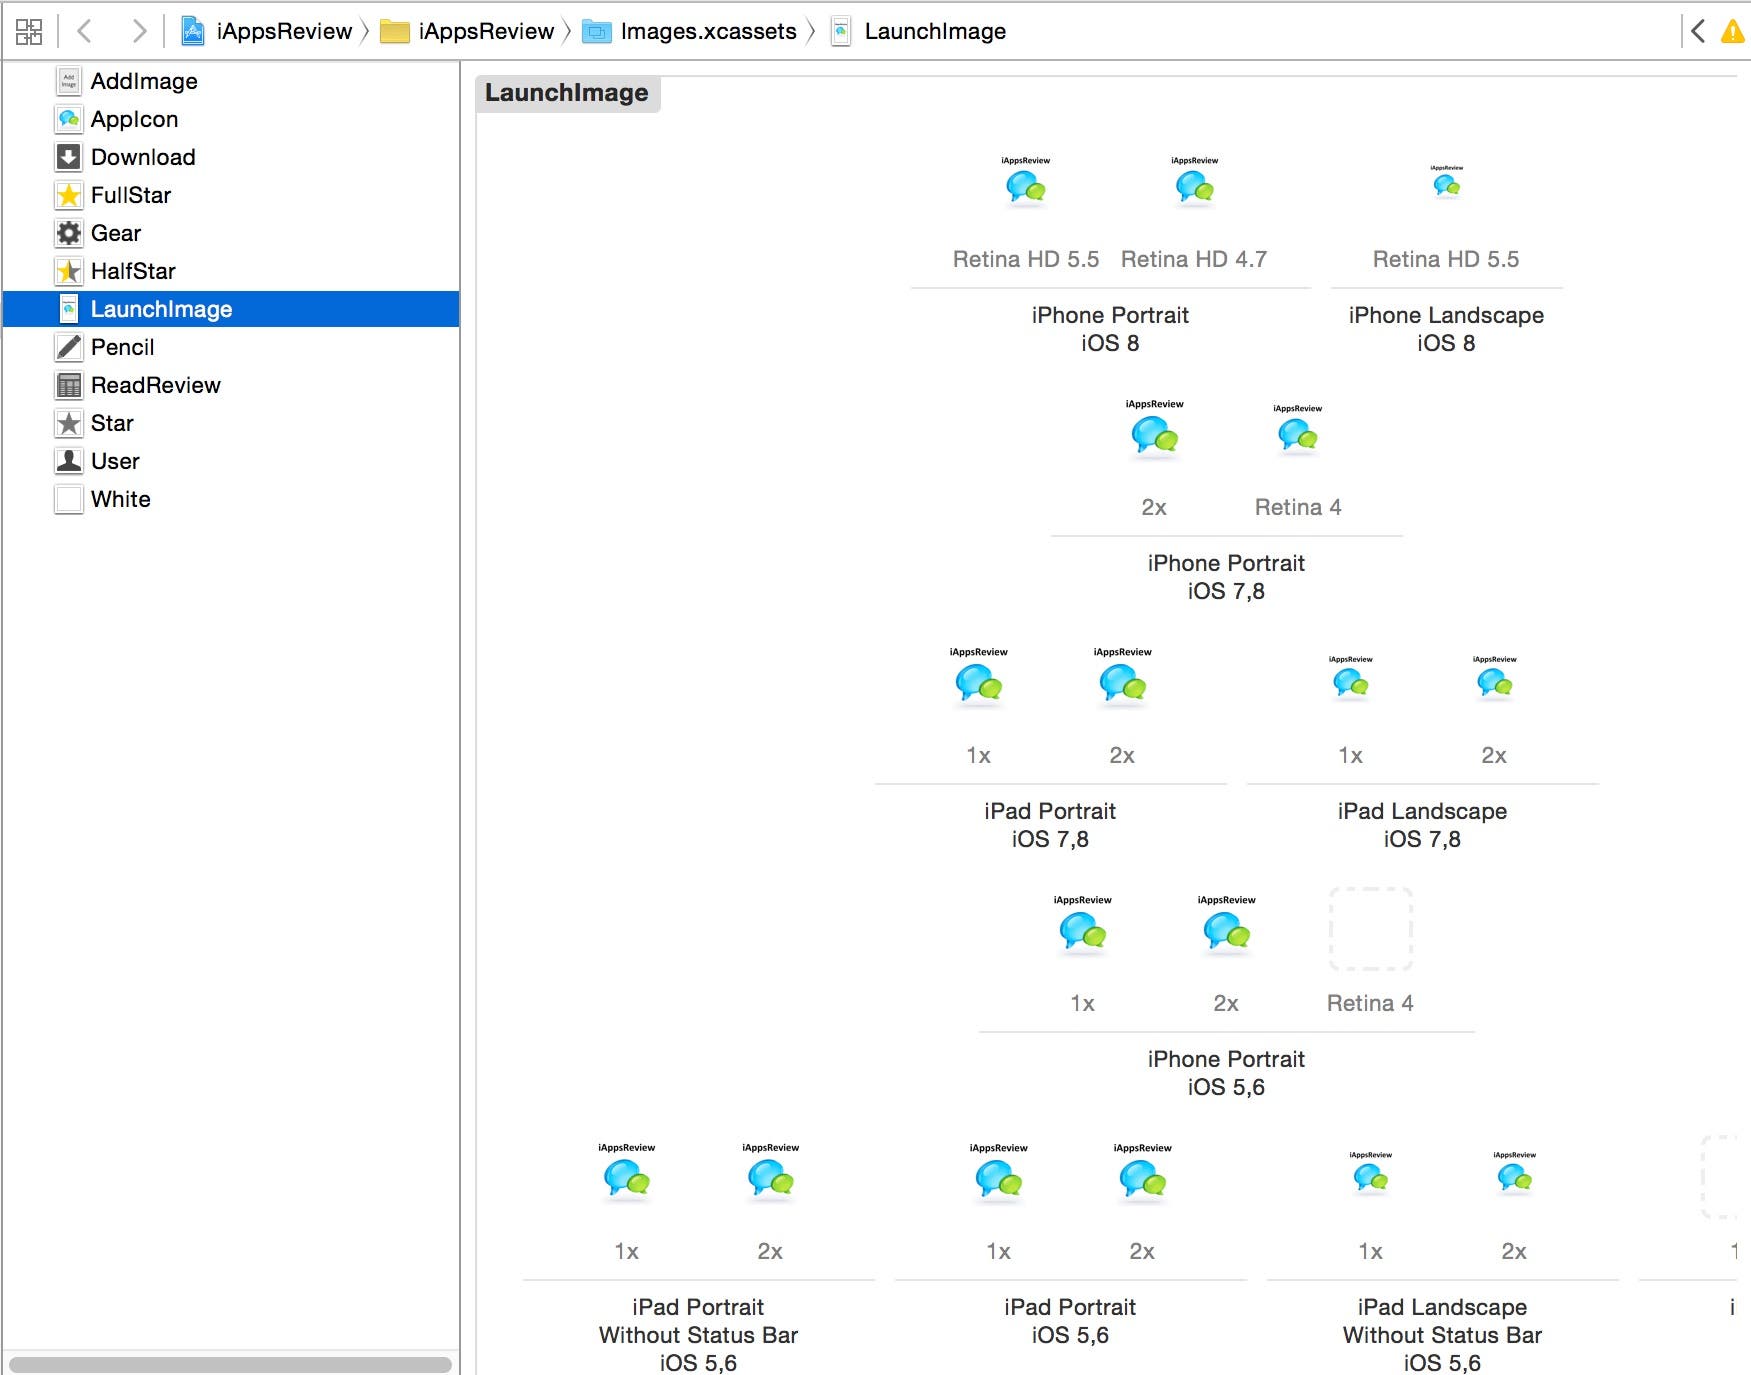 |
| Figure 19 - The Launch Images in the asset catalog. |
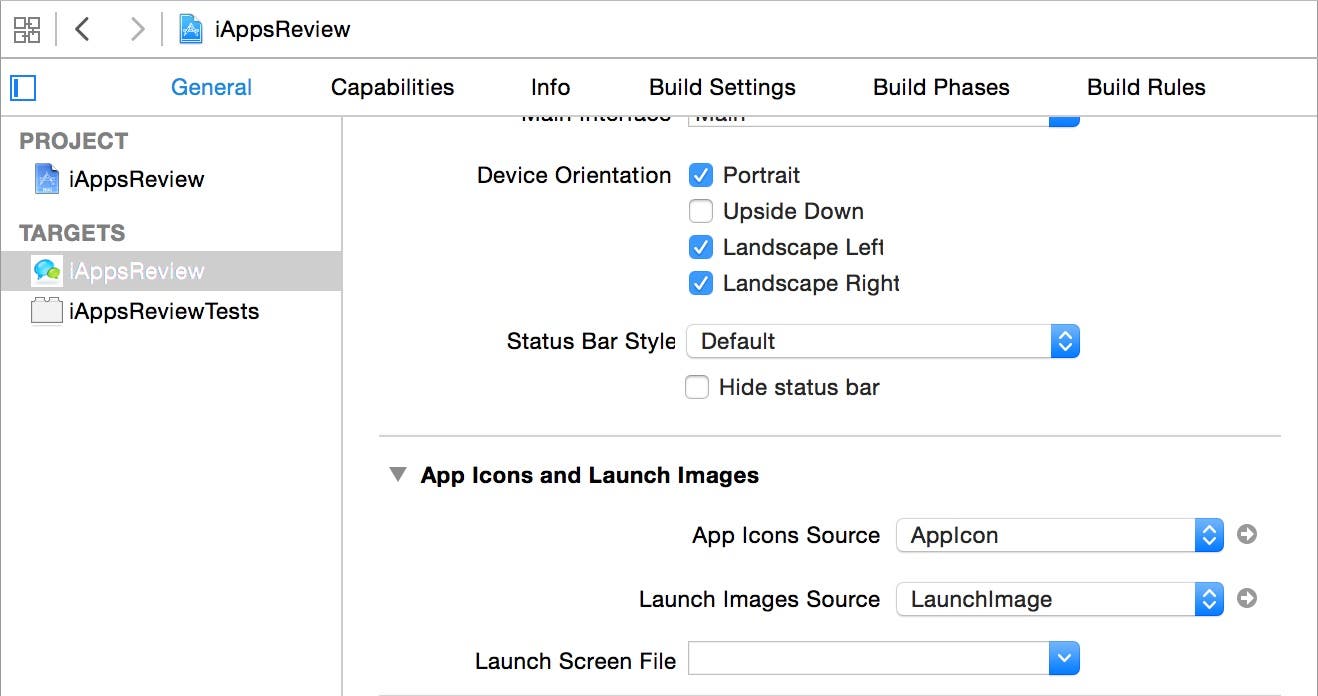
- Xcode adds a LaunchScreen.xib to your project when you first create it, and by default, this screen is displayed when your app is first launched. To display the launch image instead, in the Project Navigator, select the first node, which displays the Project Editor. Under Targets select iAppsReview, and make sure the General tab is selected (Figure 20). Under the App Icons and Launch Images section, set Launch Image Source to LaunchImage, and clear out the Launch Screen File box.
 |
| Figure 20 - Set the launch images |
- The LaunchScreen.xib file is no longer used so you can delete it. To do this, right-click the LaunchScreen.xib file in the Project Navigator. Select Delete from the popup menu and then select Move to Trash.
Running the App in the Simulator
Now it's time to see how the App looks in the Simulator. In Xcode, click the Run button, and after several seconds you should see iAppsReview appear in the Simulator as shown on the left side of Figure 21. At first, the new app launch image you just added to the project is displayed. After a few seconds, the app launch image disappears and you will see the main iAppsReview scene as shown on the right side of Figure 28. In a future post, I'll show you how to make the app launch image fade slowly rather than disappear abruptly from the screen.
 |
| Figure 28 - iAppsReview running in the Simulator! |
Conclusion
In this post, you learned how to create multiple sections in a table view, set section header text, as well add images (including app launch images) to a project and incorporate them in table-view cells. In my next post, we will add a new scene to the storyboard, learn how to create a segue to it, and learn about several other iOS user-interface controls along the way.