Do you have an idea for an app but lack the programming knowledge to begin building it? In this weekly blog series, How To Unleash Your Inner App Developer, I will take you, the non-programmer, step by step through the process of creating apps for the iPhone, iPod Touch, and iPad. Join me each week on this adventure, and you will experience how fun turning your ideas into reality can be! This is Part 4 of the blog series. If you're just getting started now, check out the beginning of the series here (This post has been updated to iOS 8, Xcode 6.3 and Swift 1.2.)
In my previous post, we finished up the main screen of the iAppsReview iPhone app. In the process, you learned how to configure a table view, how to add images to a project, and how to use them as launch images as well as in the rows of a table view.

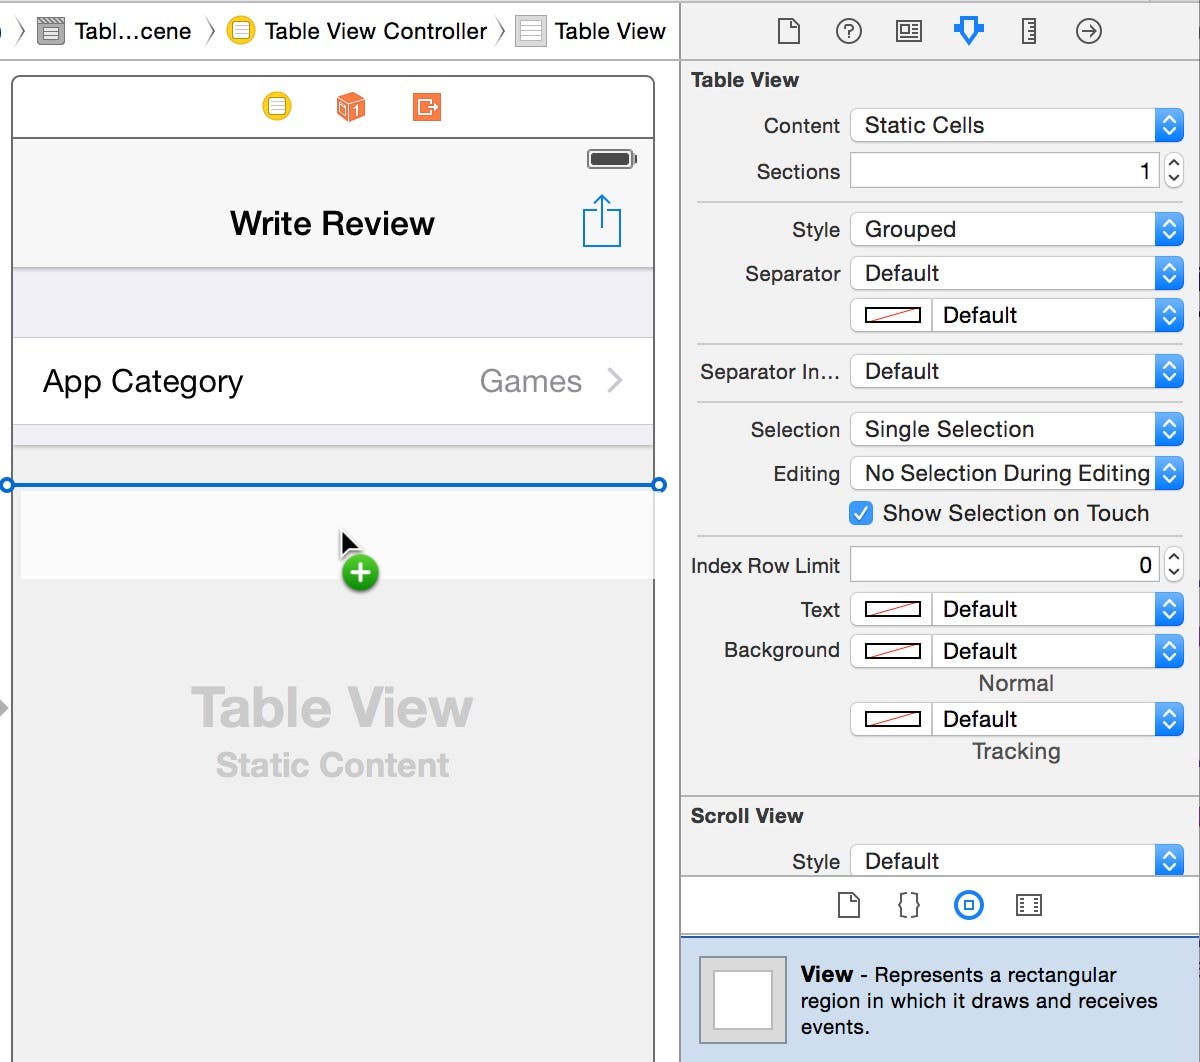
This week, you will add a new scene (shown in Figure 1) to the storyboard and learn about navigation between different scenes.
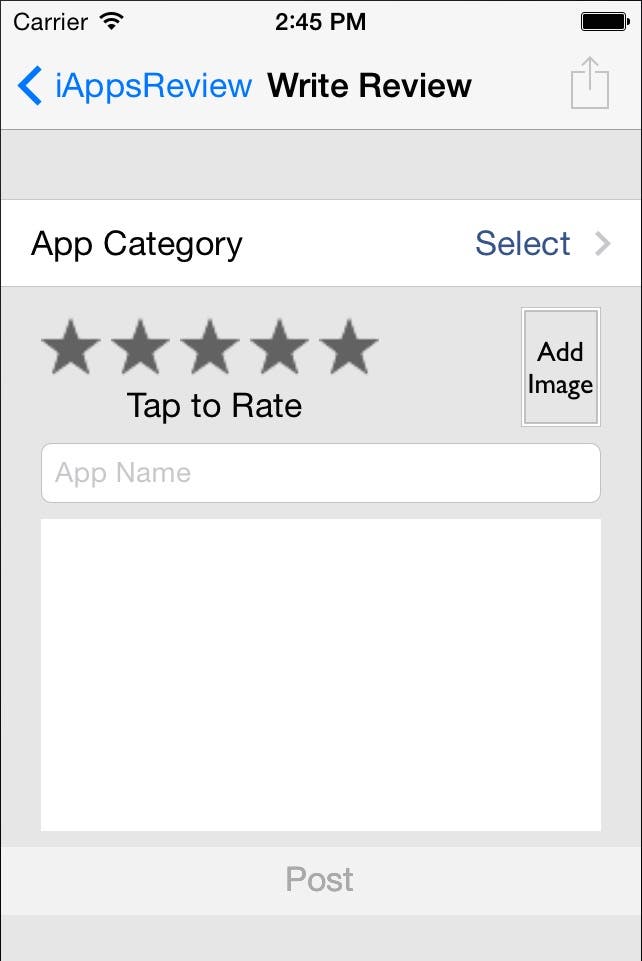 |
| Figure 1 - The Write Review scene |
Opening the Project
Follow these steps to open the project you created in the previous post (you can also download the project from this link):
- Launch Xcode on your Mac.
- To open the project from Xcode's Welcome window, select iAppsReview in the Recents panel on the right side of the window, and then click Open. You also can open the project by selecting File > Open Recent > iAppsReview.xcodeproj from the Xcode menu.
- After the project is open, in the Project Navigator on the left side of the Xcode window, select the Main.storyboard file to display the storyboard in the Interface Builder Editor in the center of the Xcode window.
Adding a New Scene to the Storyboard
Now let's add a new scene to the storyboard.
- Make sure the Object Library at the bottom right corner of the Xcode window is visible as shown in Figure 2. If it's not visible, go to the Xcode menu and select View > Utilities > Show Object Library.
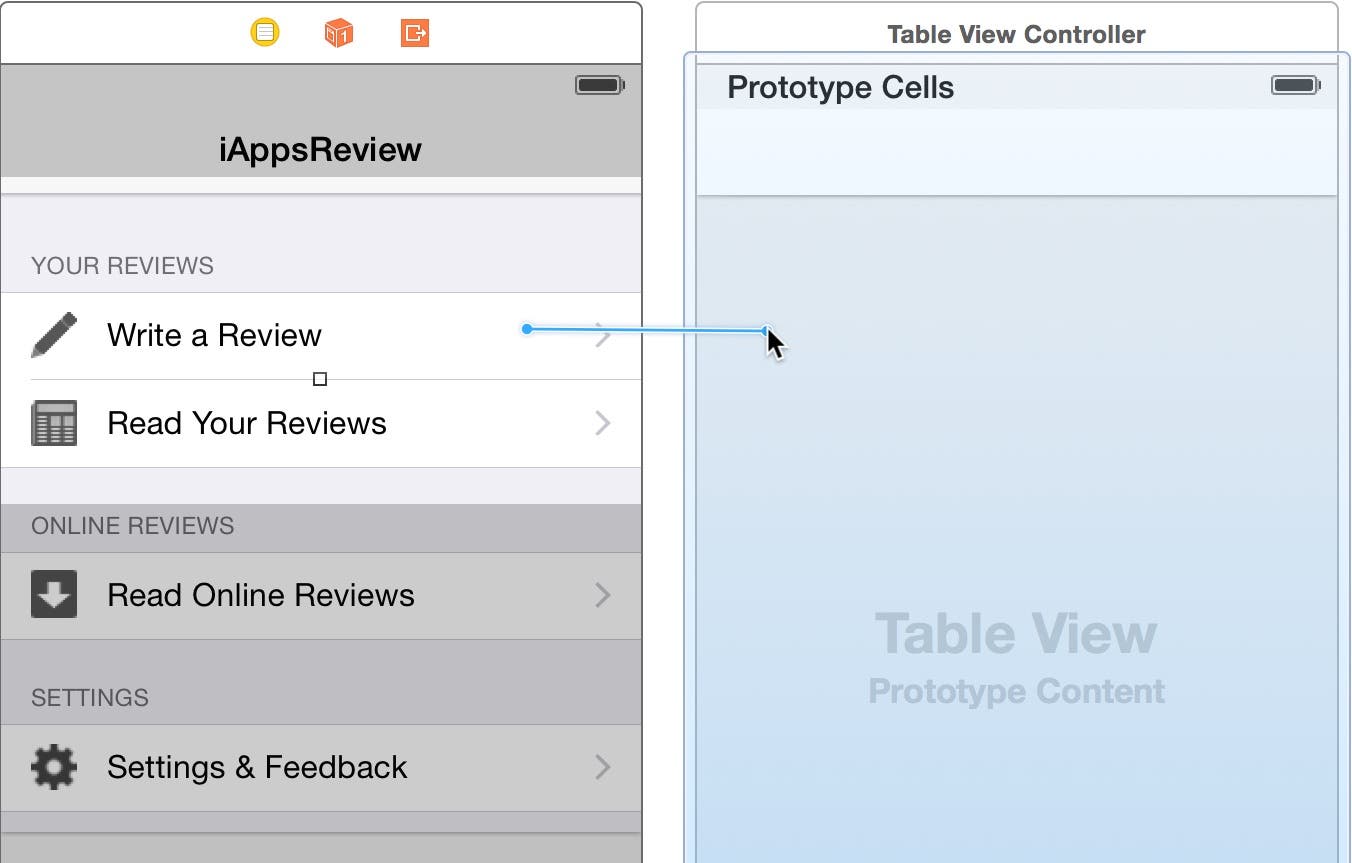
- To add a new scene to a storyboard, all you have to do is drag one of the view controllers from the Object Library onto the storyboard design surface. You choose which view controller to add based on the kind of user interface controls you want to include in the scene. For example, if you need a scene that contains a table view controller, you should choose the Table View Controller item from the Object Library. As you can see in Figure 1, our new scene will contain a table view with a single row, so we need to add a Table View Controller to the storyboard.
So as shown in Figure 2, drag a Table View Controller from the Object Library and drop it to the right of the iAppsReview scene. I place it on the right, because I like to position my view controllers on the storyboard in the order in which they are displayed at run time. This makes my storyboard self documenting.
 |
| Figure 2 - Add a Table View Controller to the storyboard. |
After adding the new scene to the storyboard, you will see various warnings displayed in the Activity Viewer at the top center of the Xcode window. You can safely ignore those warnings for now, and we will address them later in this post.
Creating a Segue Between Scenes
Now we need to create a connection, or segue, between the iAppsReview scene and the new scene you just added. Xcode makes this incredibly easy.
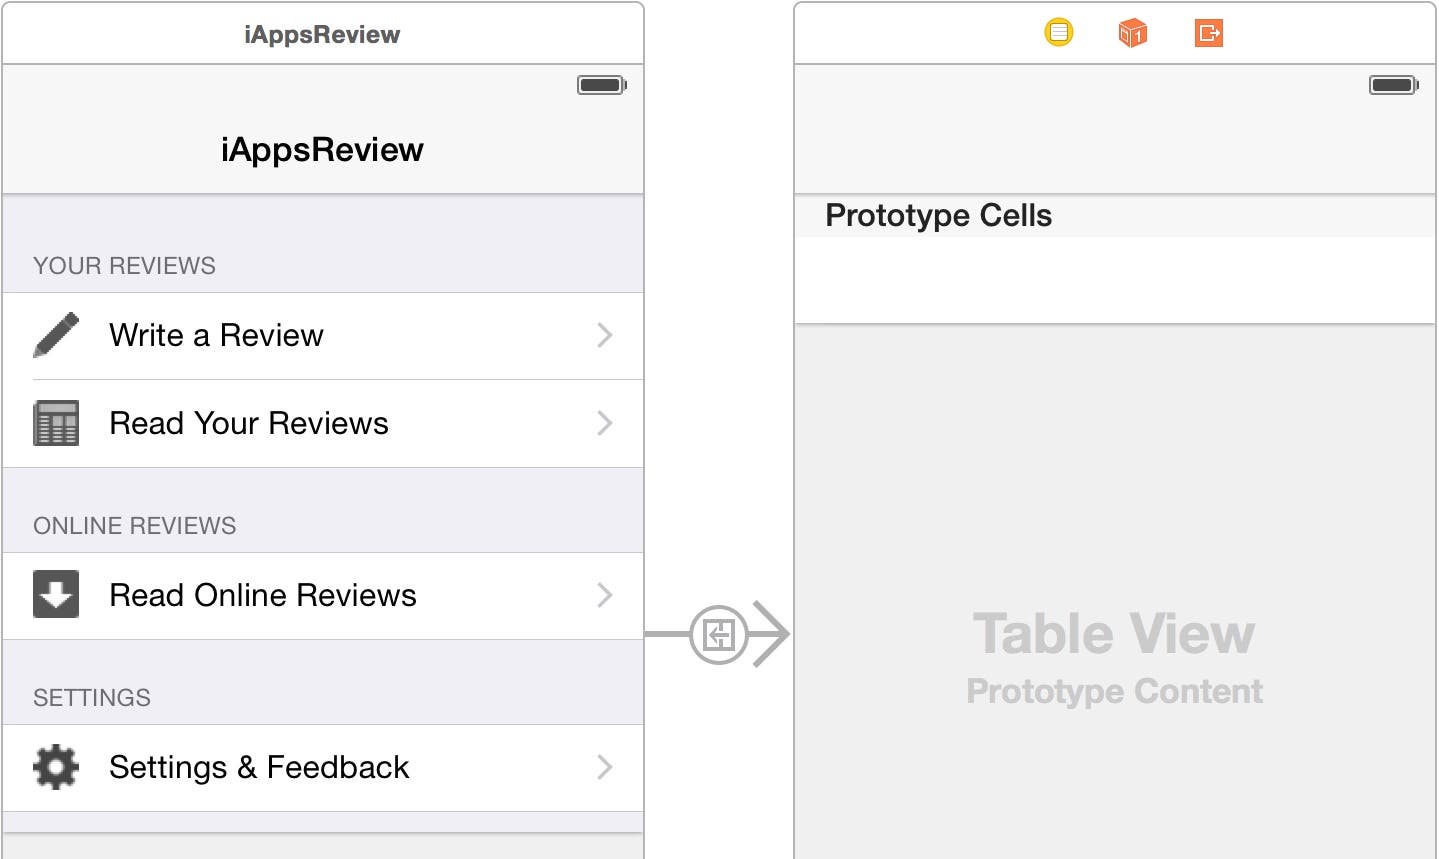
- When creating a segue, you must first decide which user interface element should kick off the segue, or transition, to the next scene. In this case, the Write a Review row is the object that should trigger the segue. So, while holding down the control key, click on the Write a Review row, and then drag your mouse pointer over to the new scene as shown in Figure 3.
 |
| Figure 3 - Control+Drag from the Write a Review row to the new scene. |
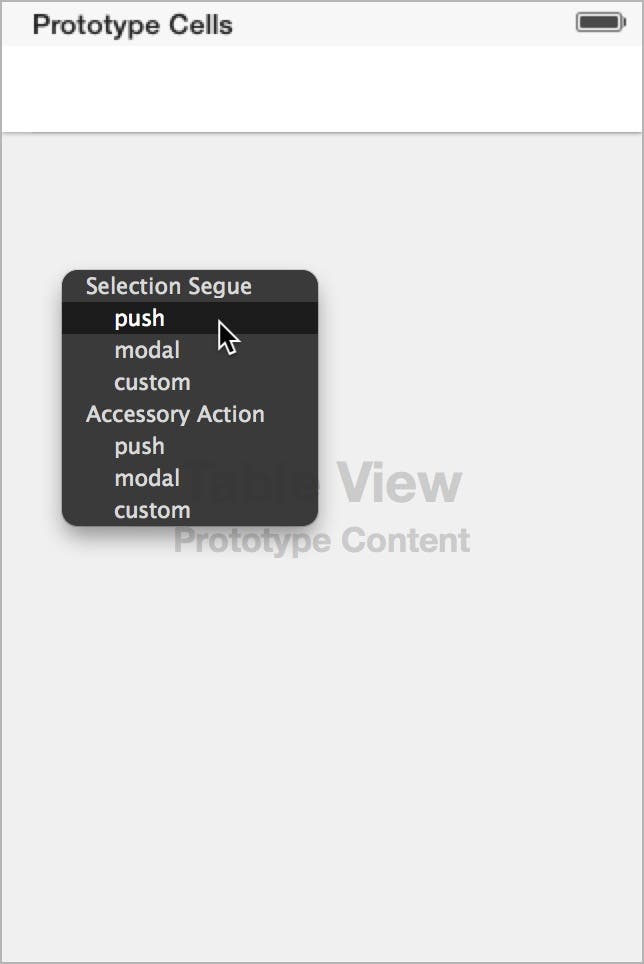
- When the new scene is highlighted in blue as shown in Figure 3, let go of the mouse button and the control key. This displays the Segue popup listing the different types of segues you can choose from as shown in Figure 4.
 |
| Figure 4 - Select the push segue. |
- We will examine all of the options shown in this popup in a future post, but for now, just select the push option as shown in Figure 4. When you do this, a segue is added between the two scenes as shown in Figure 5.
 |
| Figure 5 - A segue is added between the two scenes. |
The segue's arrow points in the direction in which the navigation between scenes occurs. When two scenes have a segue relationship like this, the scene that triggers the segue is known as the source, and the scene you are navigating to is known as the destination. Notice that when a segue is selected (as it is in Figure 5), the object that triggers the segue is highlighted (in this case, the Write a Review row). When you have many segues on a storyboard, this is extremely helpful in determining which user interface control is used to trigger a particular segue. You may have also noticed that a navigation bar was automatically added to the top of the destination scene. This is convenient since you typically want a navigation bar at the top of a destination scene when you are navigating from a source scene that has a navigation bar.
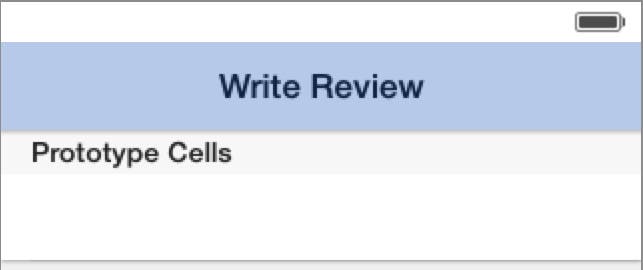
- Now let's add a title to the destination scene's navigation bar. To do this, double-click the navigation bar to put it into edit mode, then type the text Write Review and press return. When you're finished, the navigation bar should look like Figure 6.
 |
| Figure 6 - Set the navigation bar title to Write Review. |
- Let's complete the navigation bar by adding a button to its right side. This button will eventually allow users to share their review with others. To add this button, in the Object Library (located at bottom right corner of the Xcode window), scroll down until you see the Bar Button Item. Drag the Bar Button Item from the Object Library and hover it over the right side of the Write Review scene's navigation bar. When you see the blue rounded rectangle guide shown in Figure 7, let go of your mouse button to drop the button in this location.
 |
| Figure 7 - Add a Bar Button Item to the right side of the navigation bar. |
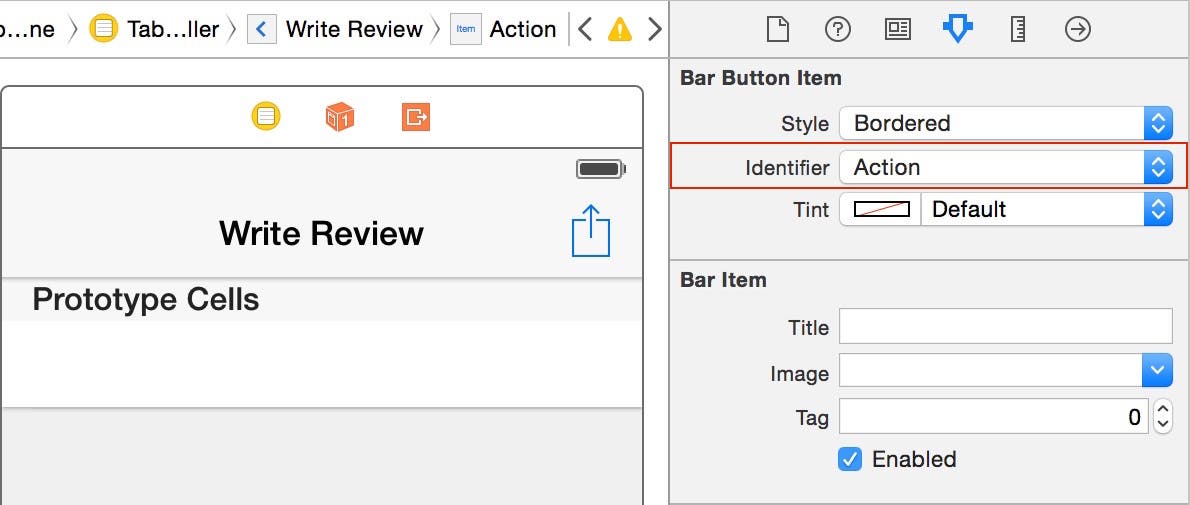
- Now let's change the visual appearance of the button to provide a clue to the user that tapping this button will allow them to share their review. To do this, with the bar button item still selected, go to the Attributes Inspector. If the Attributes Inspector is not visible, you can display it by selecting View > Utilities > Show Attributes Inspector from the Xcode menu. Next, set the Identifier attribute to Action as shown in Figure 8. This displays the familiar iOS action image in the button (Figure 8). Feel free to try select some of the other Identifier options to see what they look like, but when you're done, set it back to Action (Figure 8).
 |
| Figure 8 - Set the bar button item's Identifier attribute to Action. |
- Now let's see how all of this works at run time. Click the Run button at the top-left corner of the Xcode window. After several seconds, the app appears in the Simulator as shown on the left side of Figure 9. Click on the Write a Review row, and the iAppsReview scene will move off the screen to the left, and the Write Review scene will move in its place from the right as shown in Figure 9 (depending on the version of Xcode you are using, your Simulator may look different).
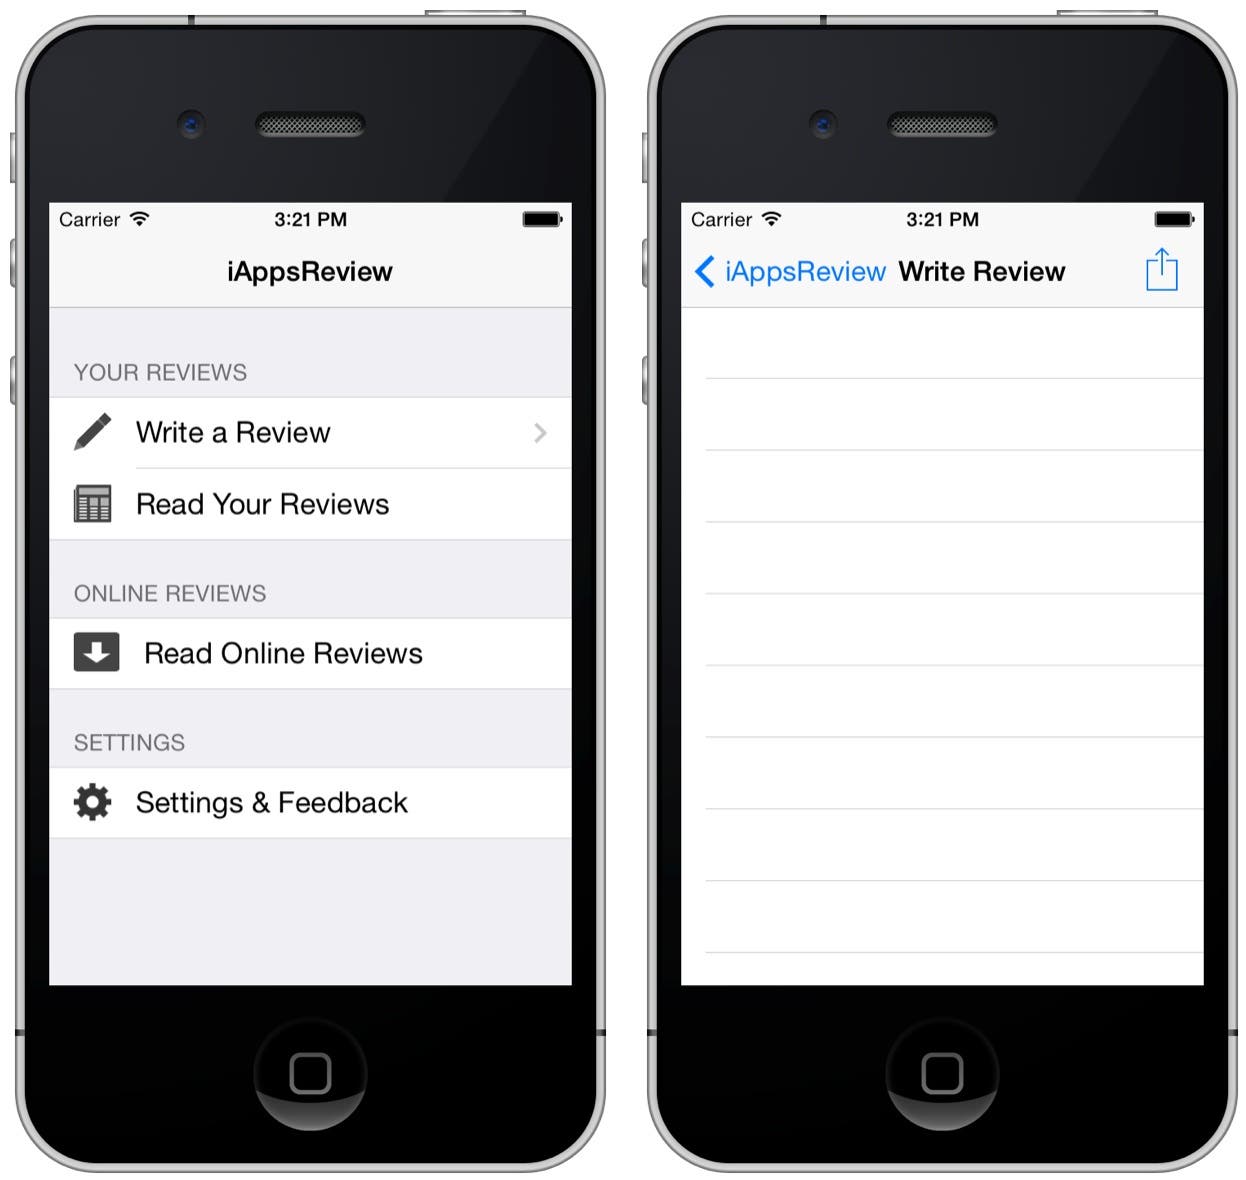 |
| Figure 9 - iAppsReview at run time |
- Notice the Write Review scene has a "back" button that was automatically added on the left side of its navigation bar (Figure 9). This is convenient because the user needs a way to navigate back to the iAppsReview scene. By default, the back button contains the text of the source scene's navigation bar title (iAppsReview, in this case). In a later post, I'll show you how to change this default text, but for now, this text works just fine. Go ahead and tap the back button to navigate back to the iAppsReview scene.
- Go back to Xcode and click the Stop button to stop the app from running in the Simulator.
Configuring the Table View
Now you're ready to configure the table view that appears at the top of the Write Review scene as shown in Figure 1. We need to configure one table view cell that allows the user to select the app category when writing a review. Eventually, tapping on this cell at run time will take the user to another scene where they can select an app category from a list.
- In the Write Review scene, click in the gray area below the table view labeled Table View Prototype Content to select the table view.
- Next, go to the Attributes Inspector and change the Content to Static Cells, and the Style to Grouped. When you do this, two additional cells are added and the table view takes on the grouped appearance shown in Figure 10.
 |
| Figure 10 - Set the Content to Static Cells and the Style to Grouped. |
- We only need one cell in the table view, so let's delete the last two cells. To do this, click on the second cell to select it, hold the shift key, and then click on the third cell. With the last two cells selected, press the delete key to remove them from the table view.
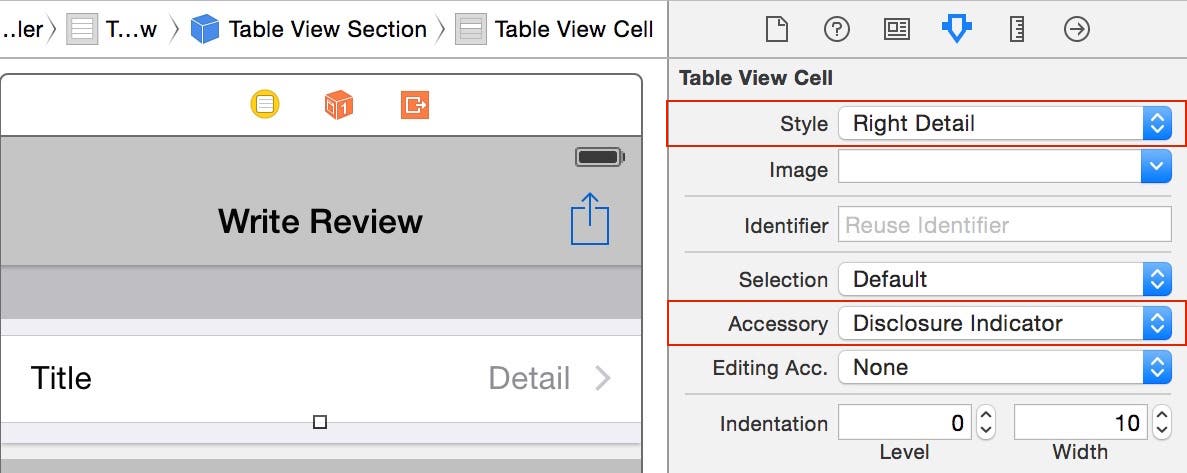
- With the remaining cell selected as shown in Figure 11, change the Style to Right Detail. This adds a Title label on the left of the cell and a Detail label on the right side of the cell. Next, change the Accessory attribute to Disclosure Indicator, which adds a small gray arrow on the right side of the cell.
 |
| Figure 11 - Set the Style to Right Detail and the Accessory to Disclosure Indictator. |
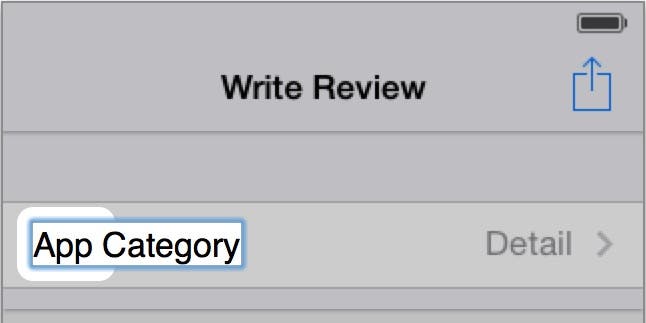
- Now let's change the text of the Title and Detail labels. To do this, first double-click the Title label top put it into edit mode, type the text App Category as shown in Figure 13 and then press return.
 |
| Figure 13 - Change the Title label's text to App Category. |
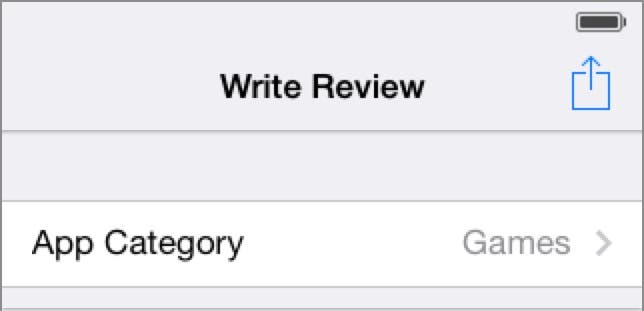
- Since this is a prototype app, it's useful to set up some static data so users can get an idea of how it will work when it's converted to a real app. So, let's change the text of the Detail label to Games, indicating that the app being reviewed is a game. To do this, double-click the Detail label to put it into edit mode, type the text Games and then press return. When you're finished, the cell will look like Figure 14.
 |
| Figure 14 - Change the Detail label's text to Games. |
This completes the setup of the table view. Let's move on to the other user-interface controls on this scene!
Adding A View to the Scene
Often, a table view fills an entire scene. With the Write Review scene, this isn't the case. There is only one row in the table view, so you are going to learn how to add other user-interface controls below the table view.
First of all, you need to add a View directly below the table view to contain all the other user-interface controls. This is necessary in order to provide a container in which you can position and size your other controls.
- To do this, scroll up in the Object Library, locate the View item, and then drag it over to the Write Review scene until you see the blue alignment bar shown in Figure 15.
 |
| Figure 15 - Add a View to the Write Review scene. |
- Release your mouse button to drop the View on the scene. When you do this, it is automatically positioned directly below the table view as shown in Figure 16.
 |
| Figure 16 - The newly added view |
- Now let's resize the view so it fills the entire area below the table view. To do this, grab the resizing handle (the small white box) at the bottom of the view, and drag it towards the bottom of the scene. As you do this, a size popup displays the width and height of the view. Keep dragging down until the height of the View is 415.0 as shown in Figure 17, and then let go of the mouse button.
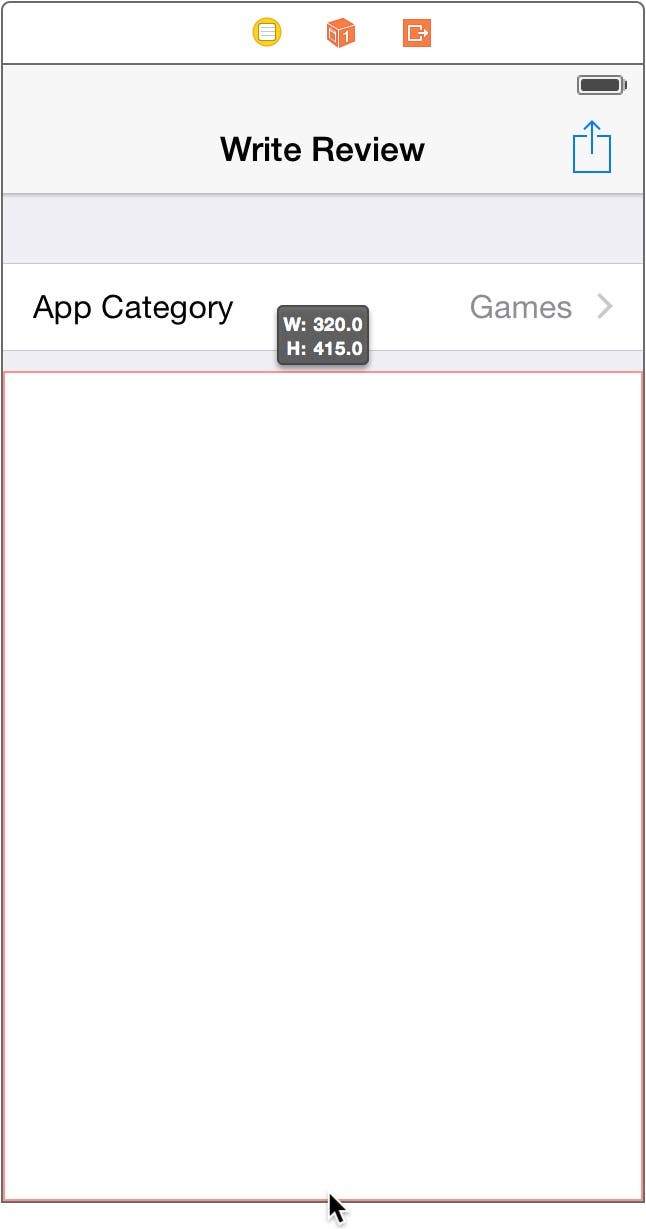 |
| Figure 17 - Resize the view |
- Next, let's change the background color of the View. With the View still selected, go to the Attributes Inspector and click the right side of the Background control to display the Colors popup (Figure 18). If the Crayons are not visible, click the Crayons button at the top right of the Colors popup. Next, select the gray crayon on the far right of the second row from the bottom as shown in Figure 18.
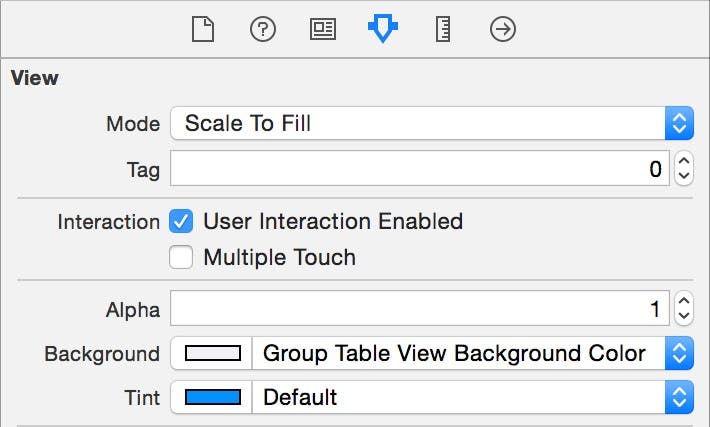 |
| Figure 18 - Set the view's background color. |
Now you're ready to add other user-interface controls inside the view.
Adding a Five-Star Review Control
As you can see in Figure 1, the first control directly below the table view is a five-star review control. Unfortunately, this isn't one of the user-interface controls that Apple provides in the iOS tool kit, so I had to create a custom iOS control for this project. Follow these steps to add the five-star review control to your project.
- First, click this link and the five-star review files will be saved in the Downloads folder on your Mac.
- Next, go the Project Navigator on the left side of the Xcode window, right-click iAppsReview group and select Add Files to "iAppsReview"... from the popup menu (Figure 19).
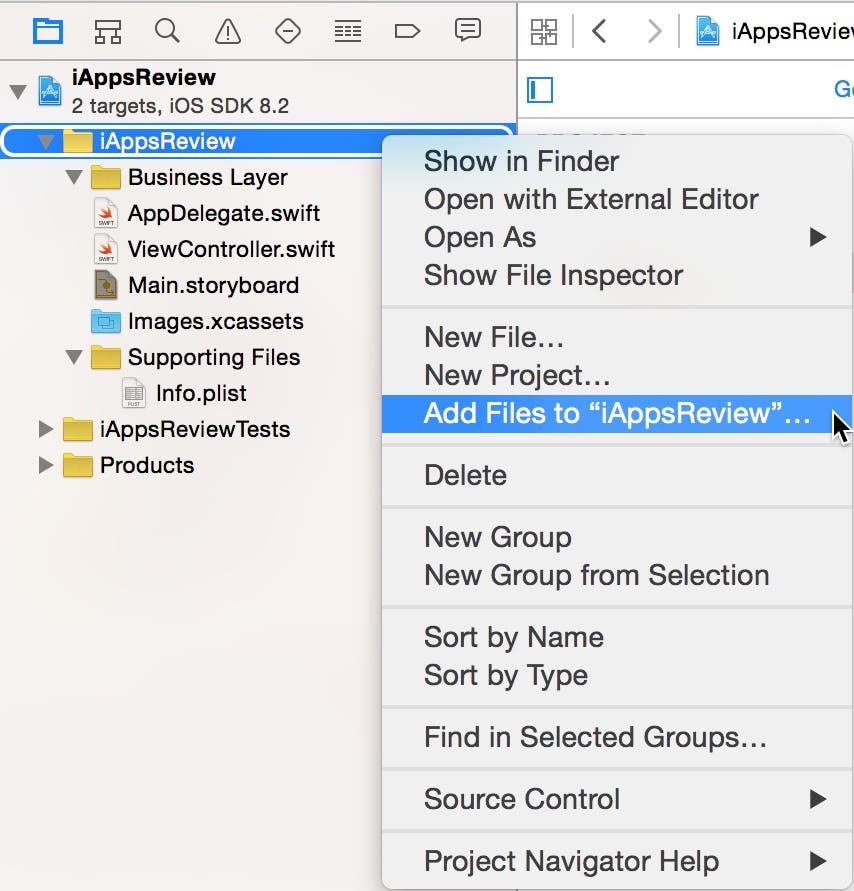 |
| Figure 19 - Add files to the iAppsReview group. |
- In the Add Files window which is displayed next, select the Downloads folder in the Favorites pane on the left. Next, on the right side of the window, scroll down to the StarRating folder and click on the gray arrow to the left of the folder to expand it. Now click on the mmStarRating.swift file to select it (Figure 20).
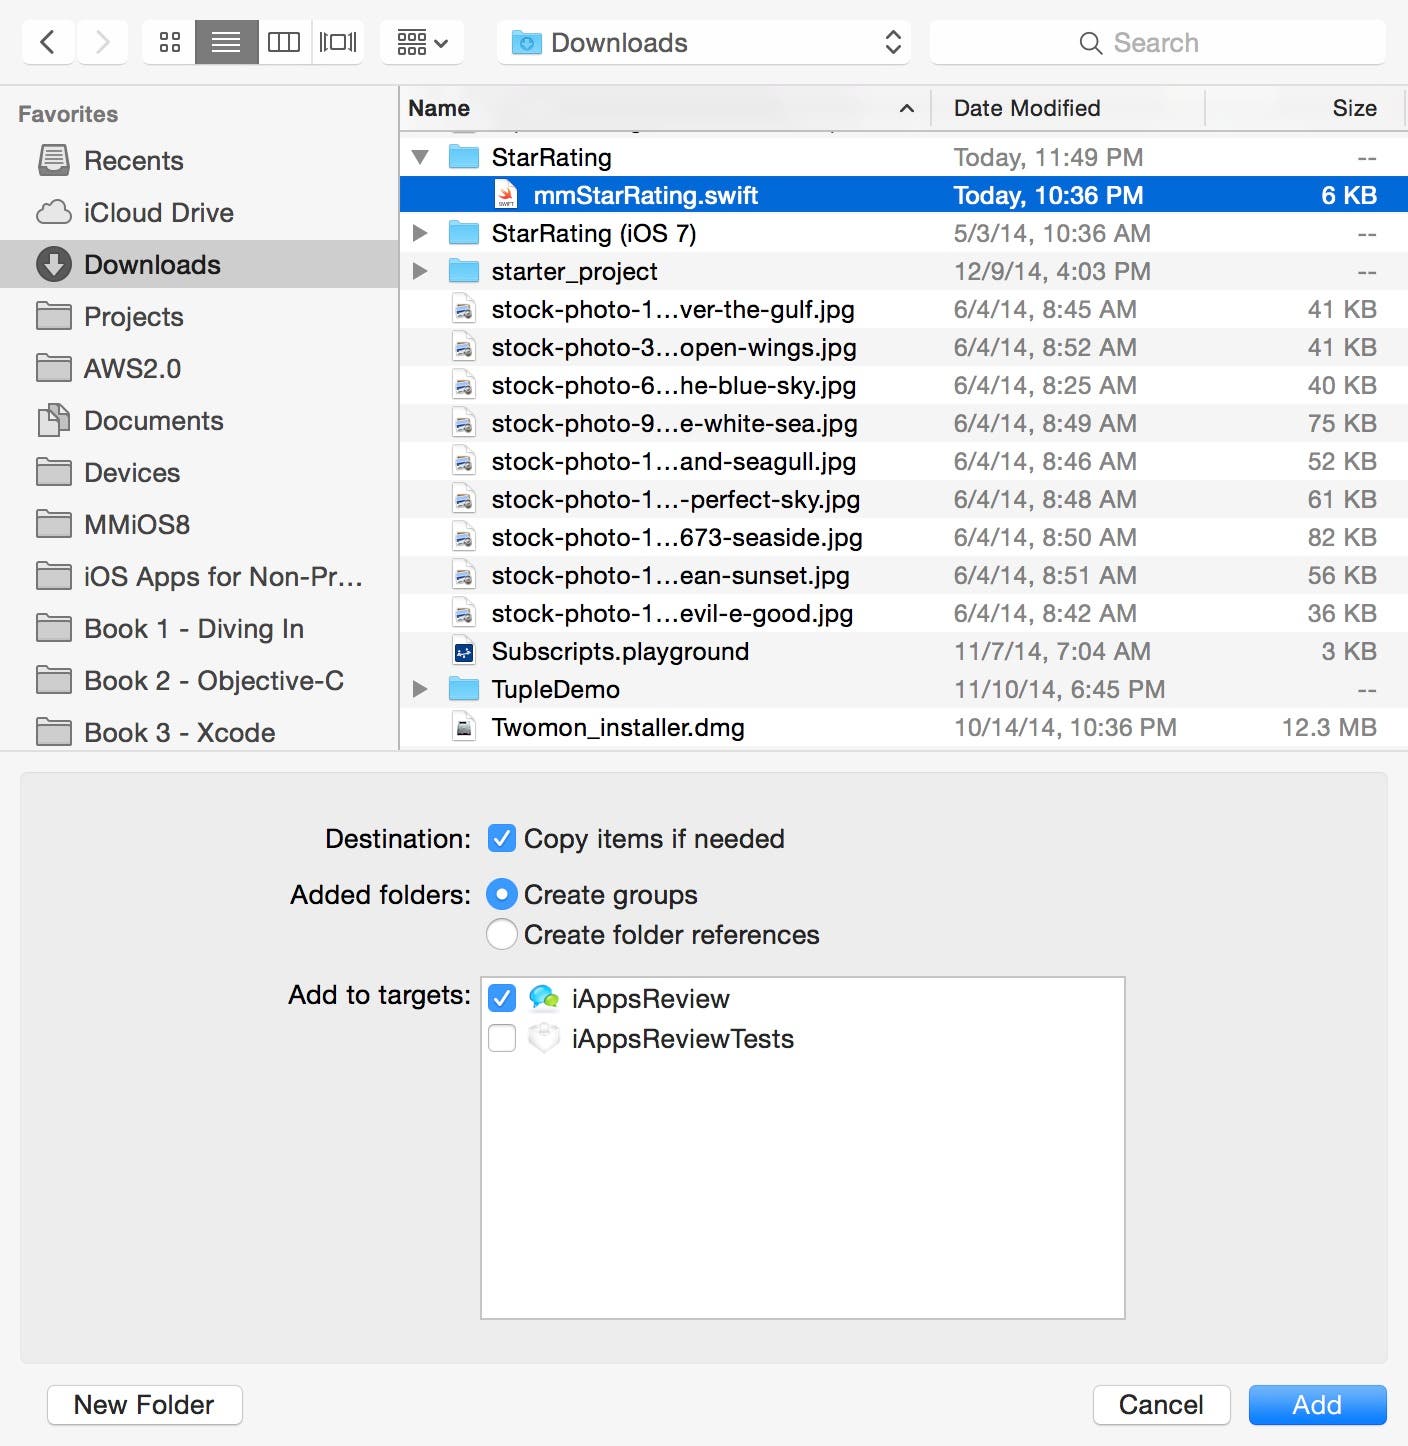 |
| Figure 20 - Add the mmStarRating.swift file to your project. |
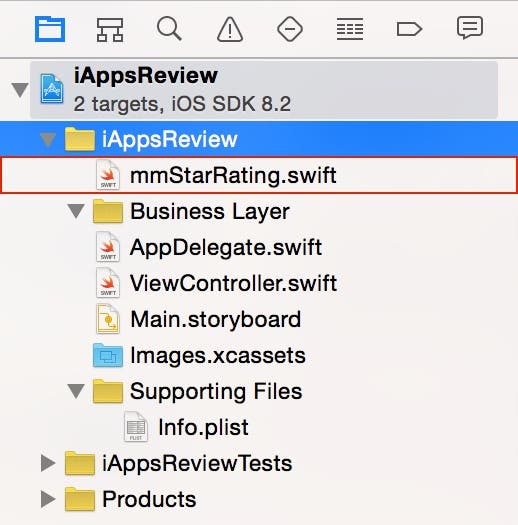
- With the file selected, make sure the Copy items if needed option is checked, and then click the Add button. This adds the file to your project as shown in Figure 21.
 |
| Figure 21 - The new file in the Project Navigator |
The file you just added is called a code file because it contains programming code. Feel free to take a peek at it if you would like, but for now, we'll just use the star rating user-interface control in our project.
I'd like to point out that I didn't create this star rating control from scratch. When you need a new custom control, it's a best practice to search the web to see if someone else has already written a control that's at least close to what you want. That's exactly what I did. I found a control from Ray Wenderlich that was pretty close to what I was looking for and converted it from Objective-C to Swift. I then added some additional features and tweaked the control a bit to make it work exactly the way I wanted.
When you create a custom control like this, it is not automatically added to the Object Browser so that you can drag and drop it on a scene. It takes some extra work to make this possible, but we'll skip that for now and I'll show you how to use a custom control in your project without dragging and dropping from the Object Library.
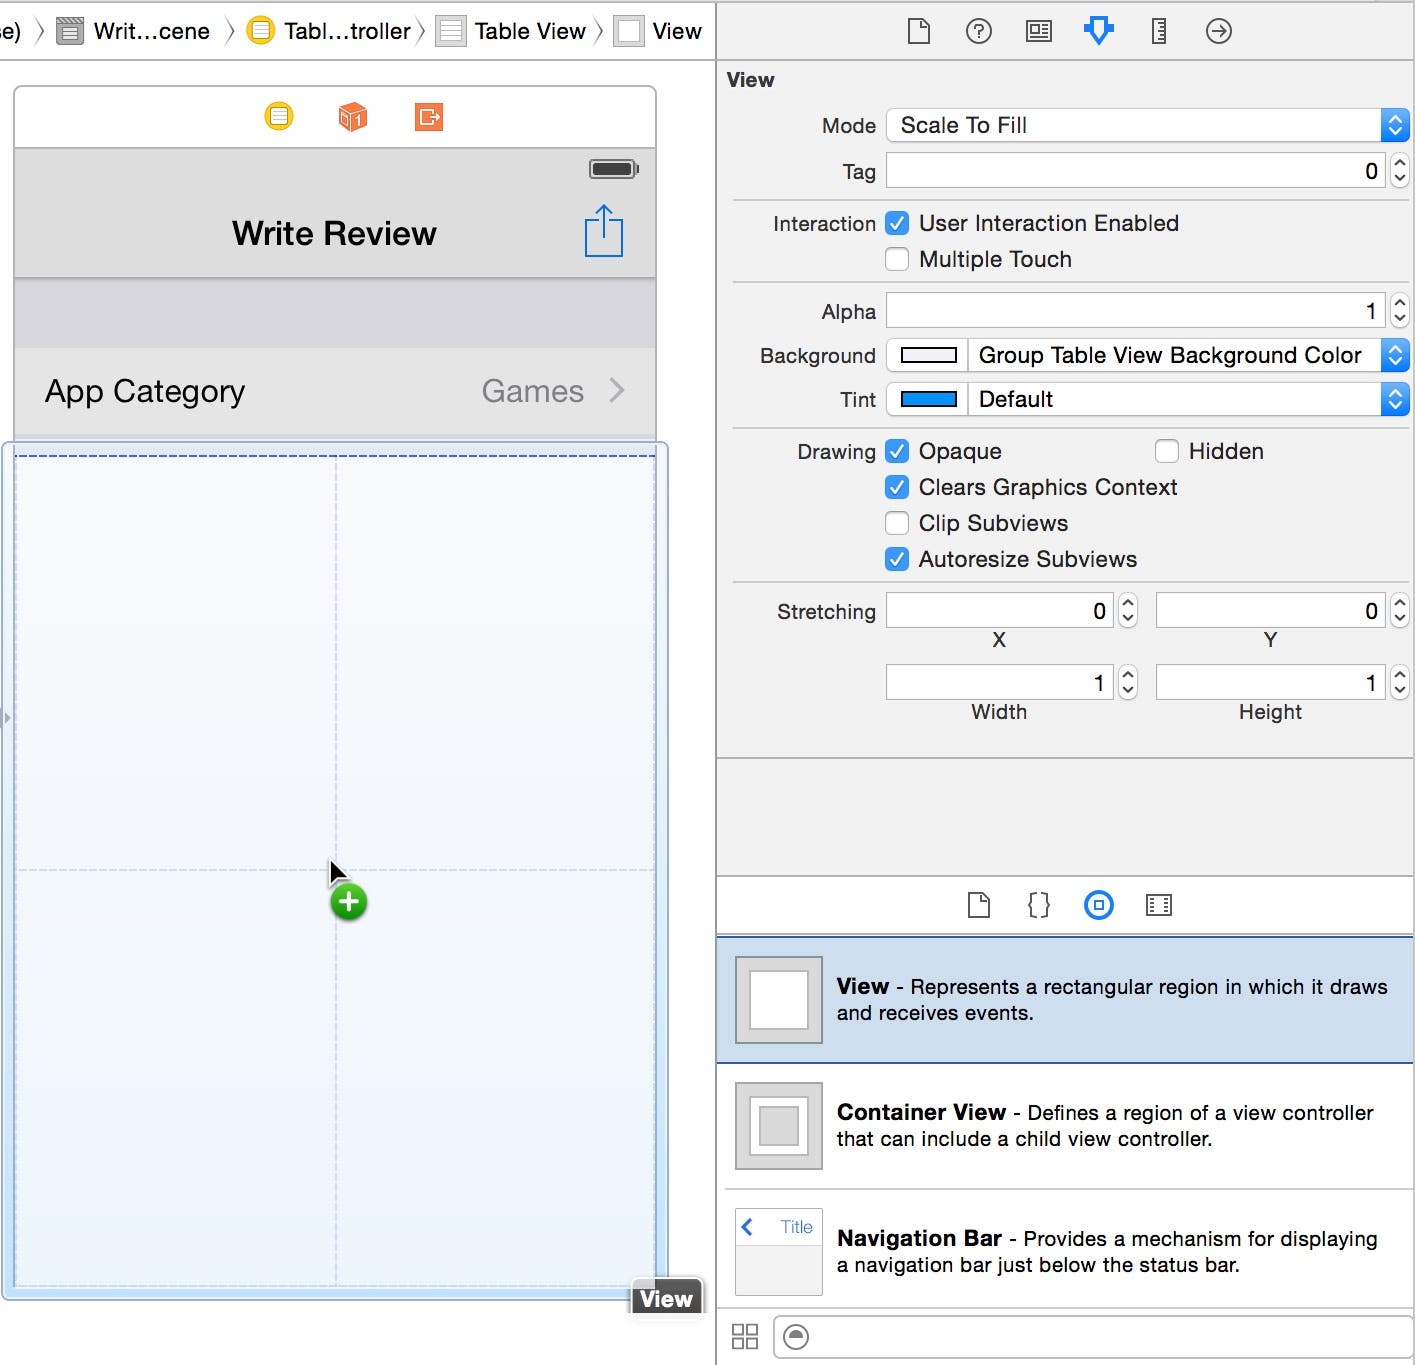
- First, make sure the storyboard is selected in the Project Navigator. Next, go to the Object Browser, click on the View item to select it, and then drag it onto the Write Review scene as shown in Figure 22. Try to position the new View so that the guideline appears near the top of the original view as shown in Figure 22 (you don't have to get this exactly right, because we'll fix it in just a moment).
 |
| Figure 22 - Drop a new view inside the existing view. |
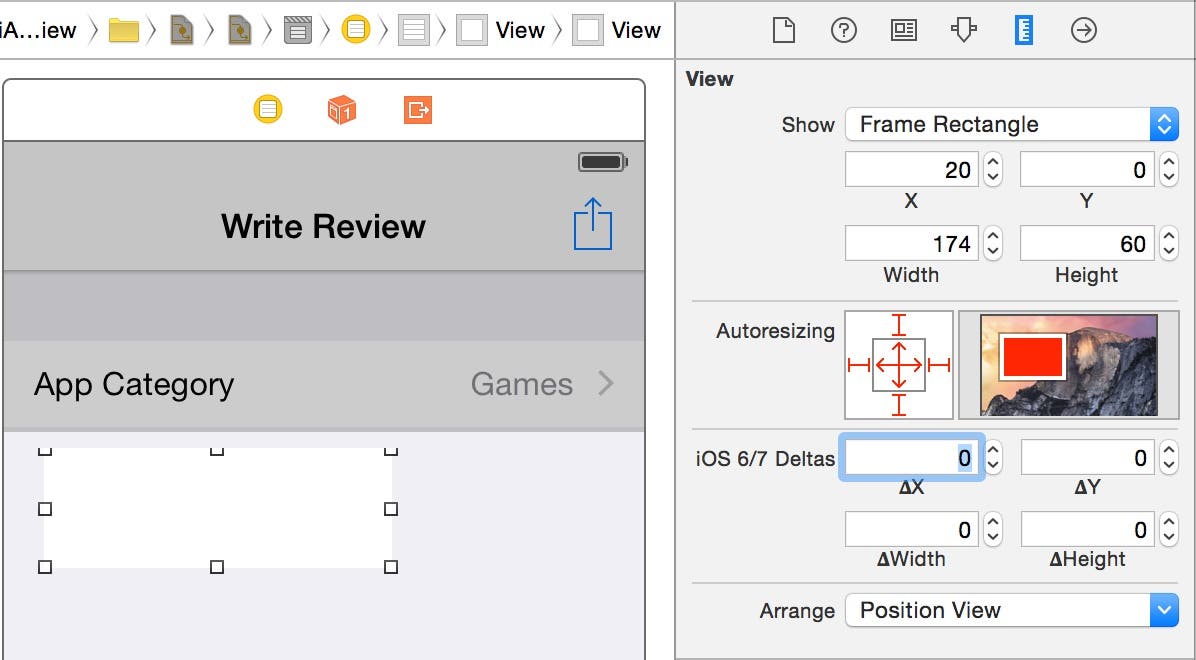
- In order to get the size and position of this View exactly right, let's switch over to the Size Inspector. To do this, click on the second button from the right in the Inspector toolbar as shown in Figure 24. In the Size Inspector, set the following position and size attribute values:
- X = 20
- Y = 0
- Width = 174
- Height = 60
When you're finished, the view should be sized and positioned in the scene as shown in Figure 23.
 |
| Figure 23 - Set the size and position of the view in the Size Inspector. |
- With the view still selected, let's go to the Identity Inspector by clicking the third button from the left in the Inspectors toolbar as shown in Figure 24. Next, change the Class setting to mmStarRating. When you do this, you are effectively converting the plain View object into a five-star rating control. It's as easy as that! You won't see any stars at design time, but you will see them when you run the app.
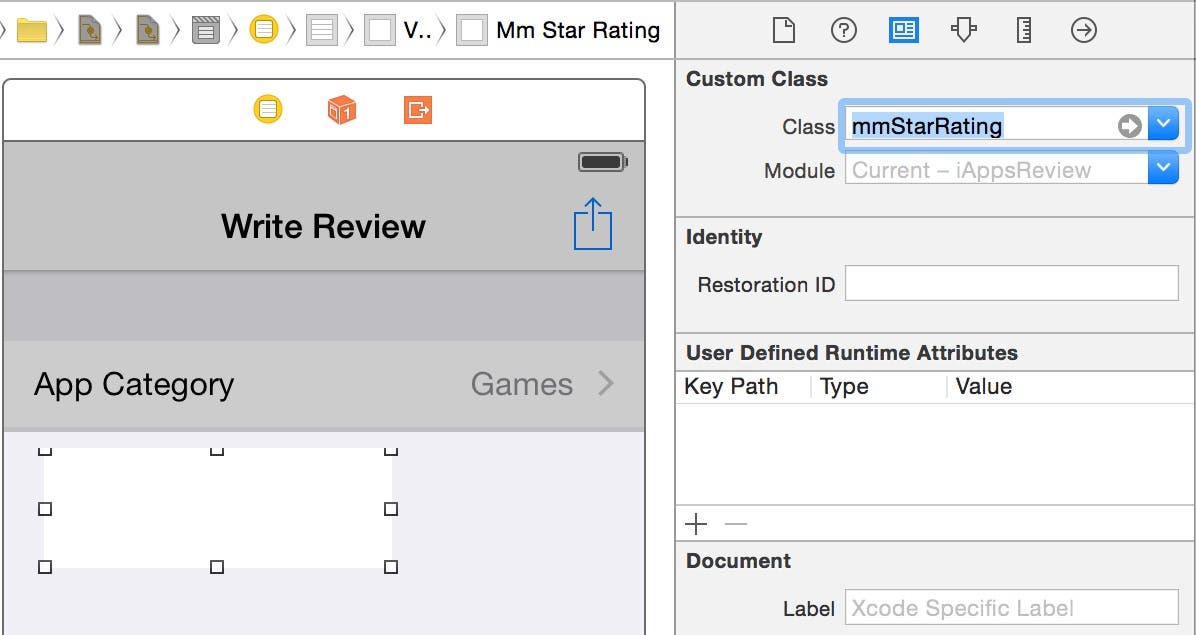 |
| Figure 24 - In the Attributes Inspector, change the Class to mmStarRating. |
- Now go back to the Attributes Inspector and set the Background color to Group Table View Background Color so it blends in with the view background.
- Now let's see how the control looks at run time. Click Xcode's Run button and after several seconds you will see the iAppsReview scene appear in the Simulator. Click the Write a Review row in the table view and you will navigate to the Write Review scene. As you can see, it contains the new five-star rating control. As you click on different stars they turn gold in color and associated text is displayed beneath the stars as shown in Figure 25.
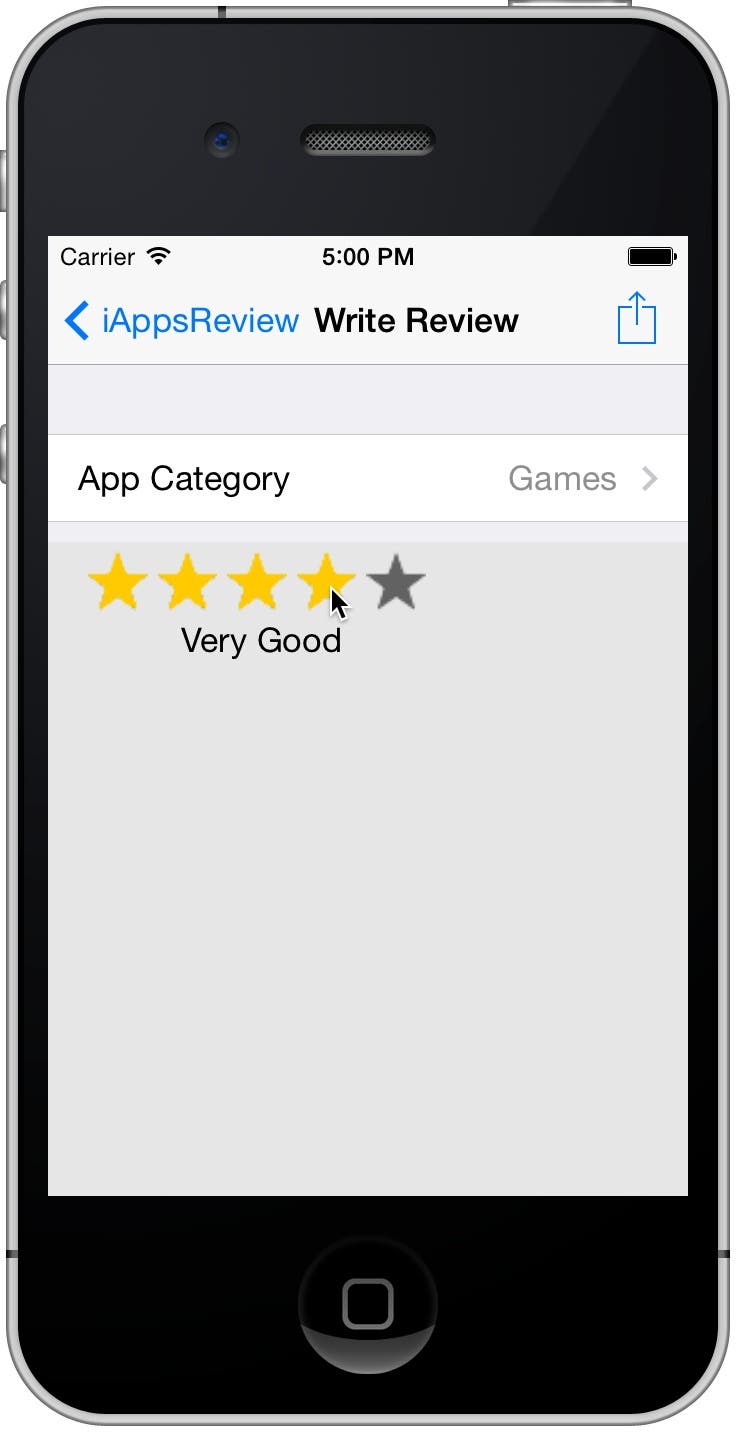 |
| Figure 25 - The star rating control at run time |
- To stop the app from running in the Simulator, go back to Xcode and click the Stop button.
Conclusion
In this post you learned how to create a segue between two scenes on a storyboard, how to add controls to a scene that already contains a table view, and how to use a custom (non-Apple) control in your iOS Apps. In case you hit any snags along the way, you can download the completed (so far) project at this link. In my next post, we will finish up this scene and build another one of the less complicated scenes, adding another piece to your iOS skill set!