Unleash Your Inner App Developer Part 14: Core Data


Do you have an idea for an app but lack the programming knowledge to begin building it? In this weekly blog series, How to Unleash Your Inner App Developer, I will take you, the non-programmer, step-by-step through the process of creating apps for the iPhone, iPod touch, and iPad. Join me each week on this adventure, and you will experience how much fun turning your ideas into reality can be! This is Part 14 of the series. If you are just getting started now, check out the beginning of the series here. (This post has been updated to Swift 1.2, iOS 8, and Xcode 6.3)
Core Data is the technology that allows you to store and retrieve information on an iOS device. Although it is an advanced technology often difficult to grasp, my goal in this post is to simplify Core Data so it can be easily used by beginners.
I'll start out by giving you the big picture of how Cora Data works. Afterward, we'll take a look at Apple's default implementation of Core Data, and then I'll show you how we can easily improve on it.
Core Data and Entities
As mentioned in my previous post, your app's data usually takes the form of entities, which are the Model in the Model-View-Controller design pattern. An entity represents an object in the real world and has attributes that model a real-world object. For example, the main purpose of the iAppsReview app that we have been building is to give users a place to write reviews of apps. When modeling entities for this app, you can create a ReviewEntity that describes a real-world review. You can create an AppCategoryEntity that describes the different categories you can assign to an app, and you can even create a UserEntity to describe the person using your app.
Creating Entities
- Model, or define the entities in an entity data model;
- Use Xcode to generate an entity class from each entity in the data model;
- Add code to your app that creates entity objects from the entity classes and manipulates them.
Let's find out more about each of these steps.
Modeling Entities With an Entity Data Model
Xcode provides a visual tool called an entity data model (or just "data model" for short) that you can use to model your app's entities. For example, check out the ReviewEntity shown on the left side of the entity data model shown in Figure 1.
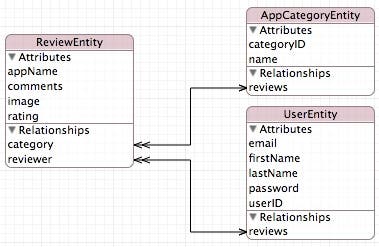 |
| Figure 1 - An entity data model |
This entity has attributes such as appName, comments, image, rating, category and reviewer. As you can see, there also is an AppCategoryEntity and a UserEntity that possess their own attributes and each have a relationship to the ReviewEntity.
Generating Entity Classes From an Entity Data Model
The entities that you define in an entity data model are not Swift classes. They are simply a representation of your entities that are defined in a diagram. However, you really do need entity classes in your app, so after defining entities in the entity data model, your next step is to create a Swift class from each entity in the model as shown in Figure 2.
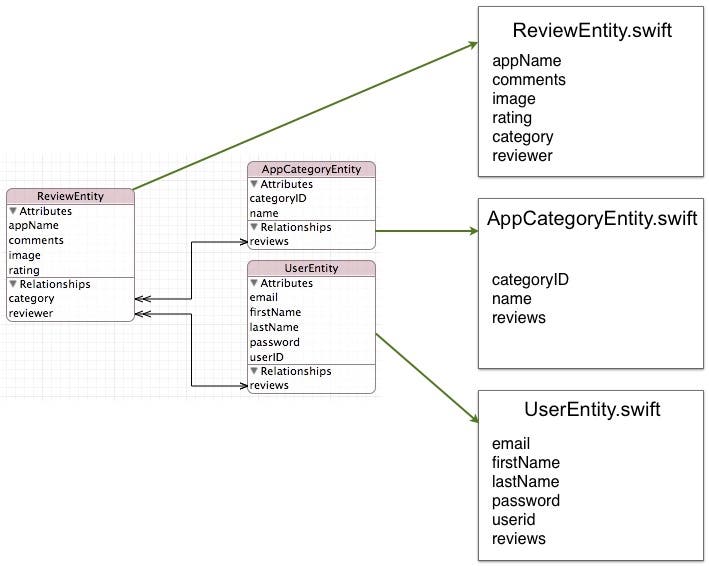 |
| Figure 2 - You need to generate entity classes from the entities in the data model. |
Fortunately, Xcode can do this for you in one easy step, as you will see.
Creating Entity Objects
Once you have generated classes from your entities, you can then add code to your app that creates objects from these entity classes and manipulates them.
For example, as shown in Figure 3, in response to a user writing a review, you can create a new ReviewEntity object and store the category, rating, app name, comments, and image into the properties of the object.
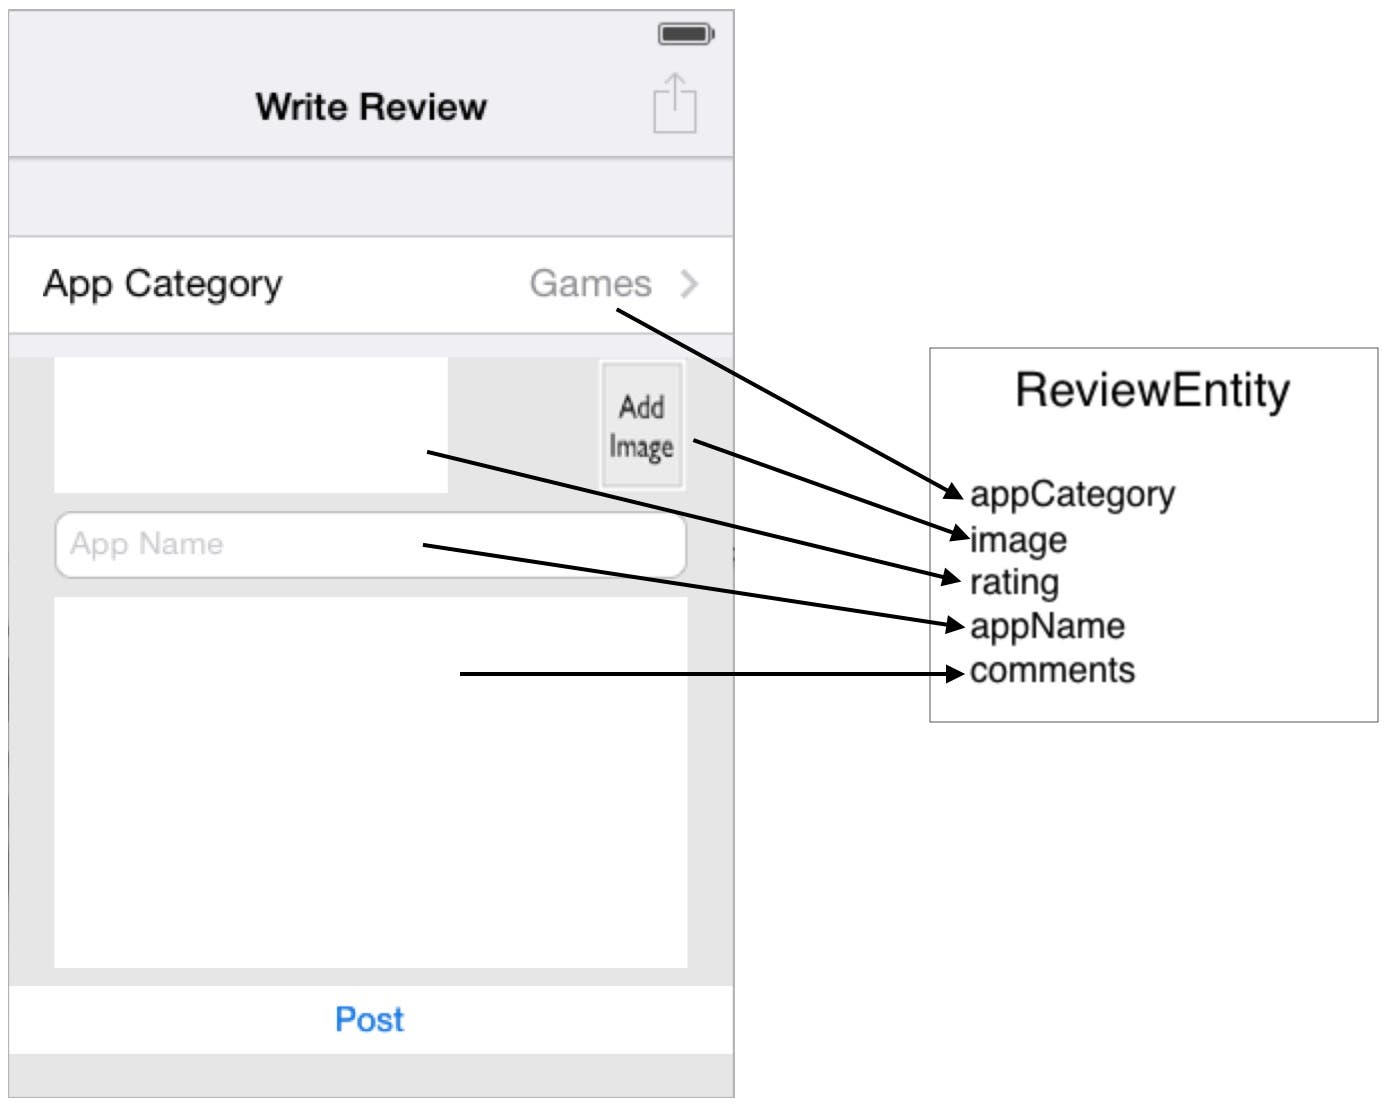 |
| Figure 3 - You can save user-interface control values into properties of an entity object. |
Saving Entity Objects in a Database
After creating an entity object and storing information in its various properties, how do you save the entity so that the next time you open up the app you can see the review again? This is where Core Data comes to the rescue.
Core Data saves your entities in a database. Most non-programmers are familiar with the term "database" and at least have a vague notion that it's a place where your data is stored and from which it can be retrieved at a later date. Let's dive in and find out more about the structure of a database.
Behind the scenes, Core Data creates a database for your app and then adds a table in the database for each of the app's entities as shown in Figure 4. Notice Core Data creates a table with the same name as your entity but with a "Z" prefix.
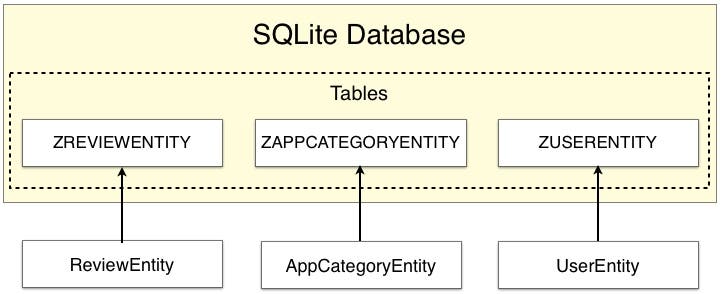 |
| Figure 4 - Core Data stores your entities in a database. |
A table can contain multiple data records of the same type. So, for example, all of your reviews are stored in the ZREVIEWENTITY table, all app categories are stored in the ZAPPCATEGORYENTITY table, and user information is stored in the ZUSERENTITY table.
Core Data creates a column in the table for each property on the associated entity. For example, as shown in Figure 5, the ZAPPCATEGORYENTITY table has two columns, categoryID and name, one for each attribute in AppCategoryEntity.
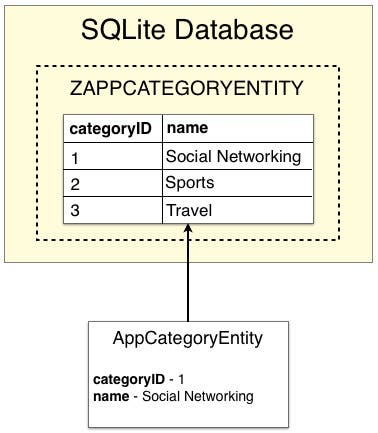 |
| Figure 5 - Core Data creates a table column for each entity property. |
In Figure 5, there are three records in the table, also known as rows. Every time you save a new AppCategoryEntity object, a new record is added to the ZAPPCATEGORYENTITY table.
The magic, which Core Data performs in converting your entities into rows of data in a data table, is known as object-relational mapping (ORM). It's called this because Core Data converts your entity objects into data stored in a relational database (called such because the tables in a database can have relationships between them). Using Core Data spares you the burden of learning the intricacies of database programming. You can save, retrieve, update, and delete entities without learning a database programming language!
The database Apple has chosen to use on iOS devices is SQLite. The SQLite database is compact and is one of the most widely-deployed databases in the world, used in other popular systems such as Google's Android, Microsoft's Windows Phone 8, RIM's Blackberry and Nokia's Maemo. For more information on SQLite, check out this link.
Working With the Object Context
Core Data is comprised of a set of classes in the Cocoa Touch Framework. The primary Core Data class you will work with is NSManagedObjectContext. You send messages to an instance of the object context to create, retrieve, insert, update, and delete your app's entities. The object context keeps track of all the entities you have retrieved or created as well as any changes you have made to the entities.
The object context offers an all-or-nothing approach to updating your entities. When you send it a saveEntities message, it saves all the entities that have changed. It doesn't offer the option to save changes to one or more select entities.
Behind the scenes, the object context uses a persistent store coordinator object (an instance of the NSPersistentCoordinater class), which it uses to communicate with the SQLite database. The persistent store coordinator knows the name and location of the database. It uses a managed object model (an instance of NSManagedObjectModel) that knows about all the entities in the data model and their relationships.
Out-of-the-Box Core Data
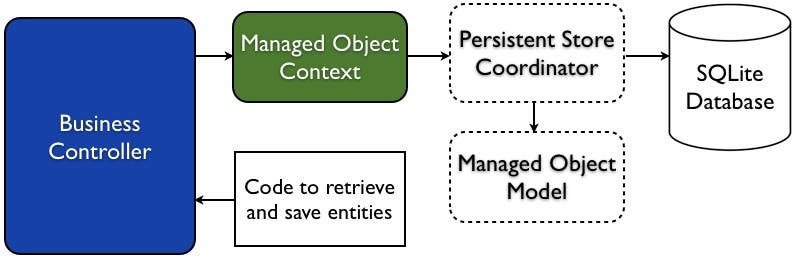
The out-of-the-box Core Data architecture leaves something to be desired. To show you what I mean, Figure 6 provides an overview of the default architecture you get when you create a new project in Xcode and select the Use Core Data option.
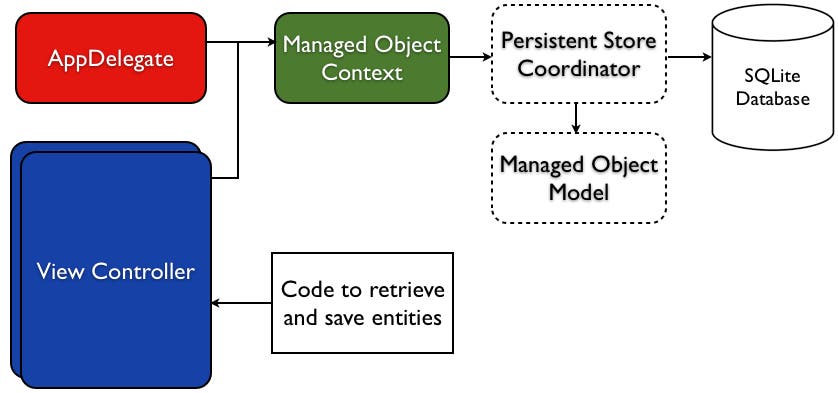 |
| Figure 6 - The out-of-the-box Core Data Architecture |
As you can see, the AppDelegate object stores a reference to a Managed Object Context. The object context uses a Persistent Store Coordinator, which in turn uses a Managed Object Model to retrieve and update entities from the SQLite database.
In this default architecture, a single object context attached to the AppDelegate is referenced by all view controllers in your app. As each view controller is created, a reference to the AppDelegate's object context is passed to the controller, which it then stores in its own managedObjectContext property. Apple recommends that you put code in your view controllers that sends messages to the object context to create, retrieve, update, and delete entities.
The problem with this approach is that it breaks the rule of separating your app into these distinct sections:
- User Interface
- Core Logic
- Data
The more formal way of separating sections is into Model, View, and Controller.
As you learned in my previous post, the view controller is part of the user interface. The only code that belongs in the view controller is code that has something to do with the user interface. Therefore, code that is used to retrieve, manipulate, and update entities does not belong in the view controller.
This isn't just ivory-tower thinking. Putting your entity manipulation code in the user interface has practical implications that can make it difficult to extend your app in the future. For example, if you enhance your app at a later date to save and retrieve entities from the web, you're going to have to find all the places that use this Core Data logic and change them. As another example, if you create an Apple Watch app, you need to move your Core Data logic into a separate framework project that can be accessed from the WatchKit app as well as the associated iPhone app.
What you need is a place to put this code that encapsulates or hides it from the user interface.
Improved Core Data Model
So where should you put your entity manipulation code? You should put it in a business controller class!
Figure 7 shows an improved Core Data model where the Managed Object Context is attached to a Business Controller, and the code to retrieve and save entities is stored in the methods of the Business Controller.
 |
| Figure 7 - An improved Core Data Architecture |
What are the benefits to this approach?
First of all, it encapsulates the entity manipulation code within the business controller. You can now pass messages from within the view controller to the business controller to retrieve and update entities, and the mechanics of how those entities are retrieved and updated are hidden from the user interface. This means you can change where and how entities are stored at a later date without affecting the user interface.
Another benefit of this model is reusability. When you place your entity retrieval, manipulation, and update code in the methods of a business controller, you can call those same methods from multiple view controllers and even from multiple apps. This is what we call reusability!
There is another benefit to this architecture that may not be readily apparent. As I mentioned earlier, an object context is an all-or-nothing proposition. When you ask it to save changes, it saves changes to all entities in your app. Allowing each business controller to have its own object context allows finer control over when and how entities are saved to the database. You can have a Customer business controller and an Order business controller, each with their own object context. This allows you to retrieve and update CustomerEntity objects without affecting OrderEntity objects.
However, there are times when you do want or need multiple business controllers to share the same object context. As you shall see in a future post, this architecture also allows you to do just that.
Conclusion
We covered a lot of conceptual ground in this post. You have learned about entity data models, databases with their tables, columns, rows, and how Core Data handles much of the heavy lifting of manipulating entities for you. In next week's post, we will apply what you have learned this week and add Core Data to the iAppsReview project.

Kevin McNeish
Kevin McNeish is author of the new book “Learn to Code in Swift” as well as the “iOS App Development for Non-Programmers” book series (www.iOSAppsForNonProgrammers.com), winner of the Publishing Innovation Award. Kevin is also an award-winning app developer, software architect, and conference speaker in the U.S. and abroad. He has spent much of his career making difficult concepts easy to understand. Follow Kevin on Twitter: @kjmcneish.
Related topics
Related Articles

 Rhett Intriago
 Rachel Needell
6 Ways You've Used AI in Daily Life without Realizing It
 Olena Kagui


Lines on iPhone Screen after Dropping Phone? Try This First

5 Things You Need to Know from Apple's iPhone 16 Event
 Amy Spitzfaden Both