Unleash Your Inner App Developer Part 13: App Architecture


Do you have an idea for an app but lack the programming knowledge to begin building it? In this weekly blog series, How to Unleash Your Inner App Developer, I will take you, the non-programmer, step-by-step through the process of creating apps for the iPhone, iPod touch, and iPad. Join me each week on this adventure, and you will experience how much fun turning your ideas into reality can be! This is Part 13 of the series. If you are just getting started now, check out the beginning of the series here. (This post has been updated to Swift 1.2, iOS 8, and Xcode 6.3)
This post contains some of the most important information you need to know to build a well-designed app that easily adapts to changes requested by users, the constant changes Apple makes to iOS, and the ever-changing landscape of iOS devices. It all comes down to a solid app architecture. We're going to take a quick digression from the iAppsReview app this week to look at a simpler Calculator app to help us establish good architectural principles.
The word architecture usually evokes images of planning the construction of a building. Whether you are building something as small as a dog house or as large as a skyscraper, a solid architecture is important to make sure the design is sound. This is just as true when constructing software. Whether you are creating a small app or a large business application, good architecture can make it easier to design, build, and extend your software.
Design Patterns to the Rescue
Recently, when I needed to build a shed, rather than starting from scratch, I went online to see what architectural plans other people were sharing. I knew others had already learned from experience what to do and what not to do. I wanted to learn from others' experience and mistakes rather than make the same mistakes myself.
This same principle applies to building software. Through trial and error, other software developers have distilled their experience into what we call design patterns. When you come across a particular problem, you can look up a list of design patterns to see what other developers have done in your situation. Although it's a bit of a heavy read, the most definitive source on design patterns is the book Design Patterns: Elements of Reusable Object-Oriented Software Design by Gamma, Helm, Johnson, Vlissides. For a little lighter reading on a few specific design patterns for iOS development, check out Apple's article at this link.
Anticipating Change
Your app is going to change, not just a few times, but many times over—and that's even before you release it to the App Store! After it's released, your app will change even more as people use it, provide feedback, and suggest enhancements.
If your app is designed to anticipate change, this process is much easier. If your app design doesn't anticipate change, you are headed for a lot of tedious and unnecessary rework. If you get a change request from a user and you find you need to completely rework your app to implement the change, you didn't do your job as an architect! You want to make sure you have designed your app using an architecture that anticipates change to make this process as smooth as possible.
Where Do You Put Your Code?
In a previous post, I discussed the three main parts of an app:
- User Interface
- Core Logic
- Data
Having these separate parts in mind when creating your app is a great start in creating a solid architecture that anticipates change. When these different parts are too tightly bound together, you create a situation where you can't change one part of the app without changing another.
Ultimately, where you put your code has everything to do with how easy it is to write, extend, and maintain your app. Putting your code in logical, predictable places also helps you avoid the game of "Where's that code?" that many developers play on a daily basis.
Introducing Model View Controller
A more formal way to look at the three main parts of an app is by means of the Model View Controller (MVC) design pattern. This pattern has been around for many years and helps you maintain a clear separation between the main parts of your app.
I've been using Model View Controller and its many cousin-patterns for many years. So when I first came to the iOS platform back in 2008, I was intrigued to hear that Apple encouraged the use of the MVC pattern in iOS app development.
Here's how the MVC pattern maps to the main parts of your app:
- Model → Data
- View → User Interface
- Controller → Core Logic
Let's break this down by first looking at a traditional implementation of the MVC pattern, and then we can look at Apple's implementation.
Model
The Model is your application's data, and in iOS, it normally takes the form of entities. An entity usually represents an object in the real world. For example, if you are creating an app that handles customer orders, you might have a Customer entity, Order entity, and Product entity. If you are creating a card game app, you might have a Dealer entity, Player entity, and a deck of cards comprised of individual Card entities.
An entity has properties that represent the attributes of the real-world object it is modeled after. For example, a Customer entity might have companyName, webAddress, phone, address, and other properties that hold this information for each customer as shown in Figure 1.
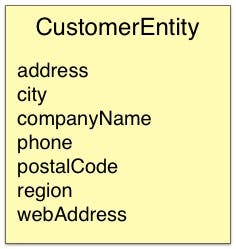 |
| Figure 1 - A CustomerEntity has properties that represent attributes of the real-world object that it represents. |
View
The View is the part of the app the user interacts with directly, and it contains user-interface objects such as buttons, text fields, sliders, and so on. Because of this, Apple refers to each screen full of information in an app as a view.
Controller
The Controller acts as an intermediary between the Model and the View. The Controller is where your app's core logic goes. Figure 2 shows the interaction that occurs between the Model, View, and Controller.
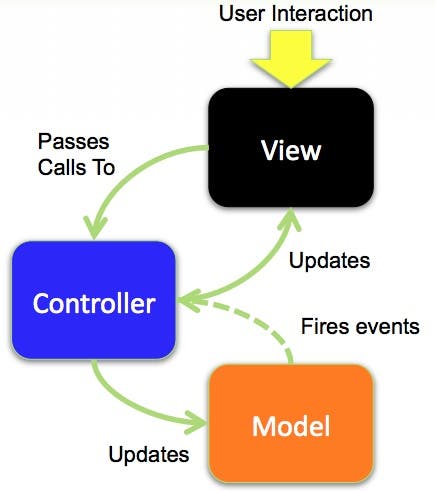 |
| Figure 2 - Model, View, and Controller interaction |
In the MVC pattern, the user interacts with the view—they can touch, tap, pinch, or flick a user-interface object. In response, the View passes a call to the Controller, and the Controller does something based on that interaction. For example, the user might change information in a text field and touch a Done button. The controller could take that new information and update a Model entity.
Sometimes when you save a Model entity, it gets new or default values. The model can fire an event that tells the controller, "I've got updated data." The controller can then update the view and the new data can be displayed in the user interface.
The Controller is the place where you should put your app's core logic. For example, in a Calculator app, you could have a Calculator controller object that adds, subtracts, multiplies, and divides.
Separation of Concerns
MVC is a great pattern for "separating concerns"—keeping the three parts of your app separate. In the MVC diagram shown in Figure 2, there are communication lines between the Model and the Controller and between the Controller and the View, but you will never see communication between the Model and the View. This allows your data and core logic to be used independently of the user interface. When you are creating a universal iOS app (one that runs on both the iPhone and iPad), this is a very important consideration!
Apple's MVC Implementation
Design patterns are a great tool for building high-quality apps quickly. However, I have found that the implementation of a particular pattern may not be true to the pattern's original intent. For example, I was surprised at Apple's use of the MVC pattern because it wasn't a traditional implementation. This isn't just an academic, ivory-tower concern. Unfortunately, Apple's implementation of MVC doesn't provide well-defined boundaries between the three main parts of an app, which is the whole purpose of the MVC pattern.
I think nothing helps the understanding of architectural principles more than looking at a real example. So, I have created a sample app that follows Apple's MVC pattern, and then I have recreated the app using a better implementation of MVC.
Calculator Sample App with Apple MVC
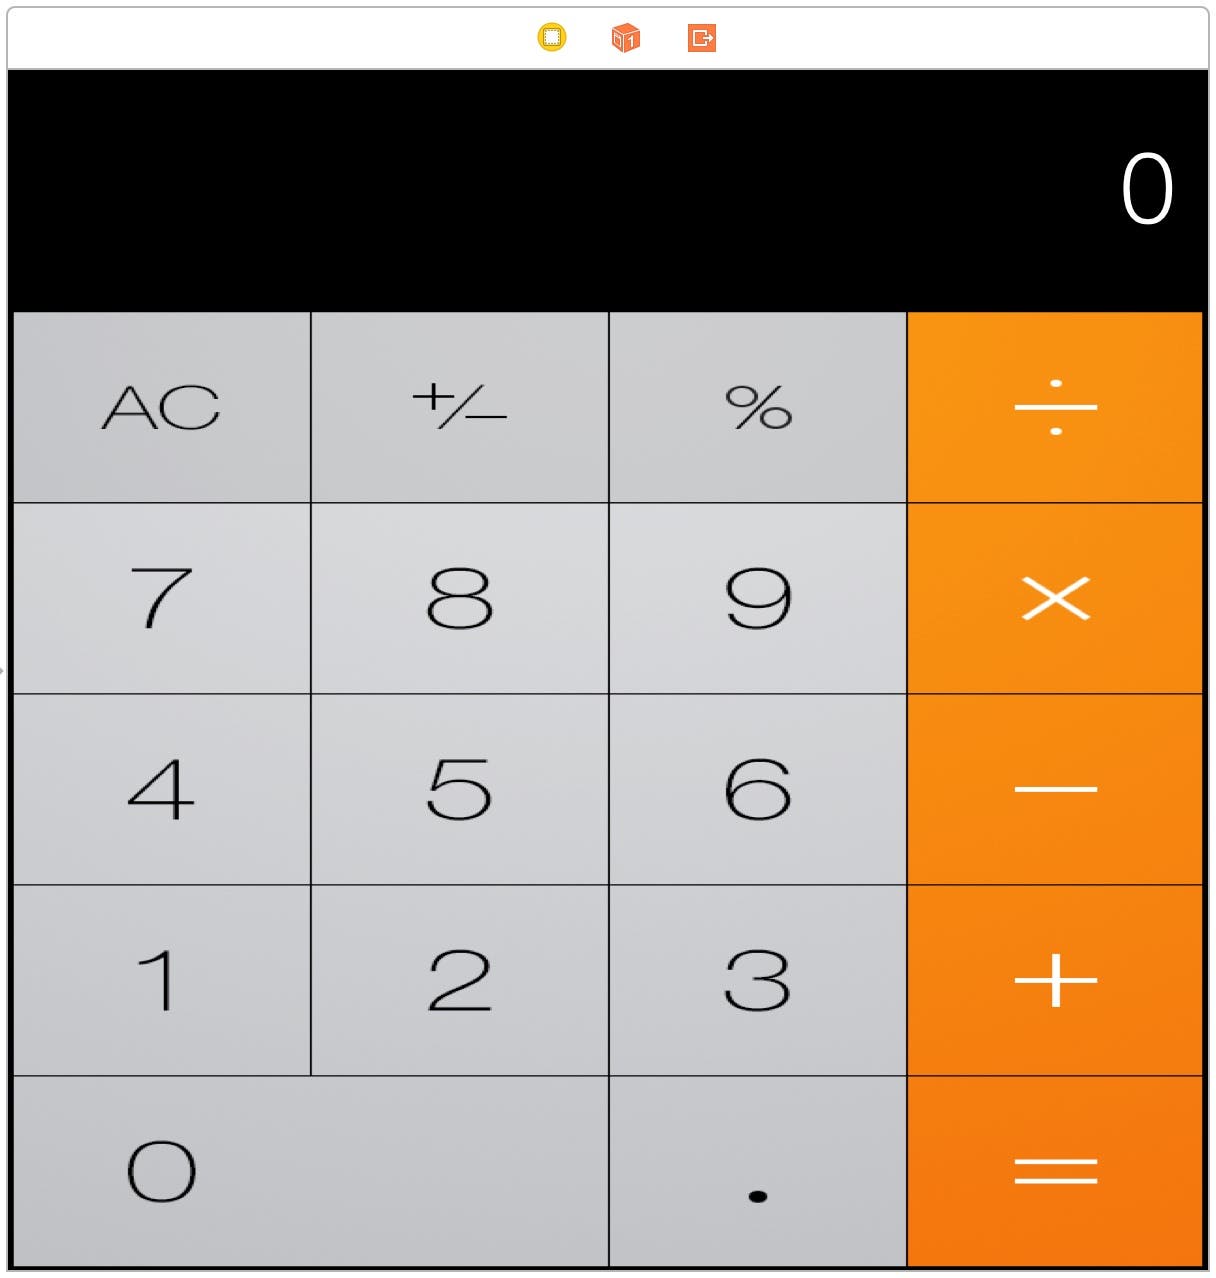
The first app I have created is a Calculator that looks and acts just like the built-in iOS Calculator. It can be downloaded from this link. Follow the steps in this section to get a look at how this app works behind the scenes.
- Open the App in Xcode. To do this, you can select File > Open... from the Xcode menu, navigate to the Downloads folder, drill into the CalculatorDemo folder, and double-click the Calculatordemo.xcodeproj file.
- In the Project Navigator, select the Main.storyboard file and you will see the scene shown in Figure 3.
 |
| Figure 3 - The main scene in the CalculatorDemo project |
- To see what the app looks like at run time, first make sure Xcode's Scheme control is set to the iPhone 6, and then click the Run button. When the app appears in the Simulator, click any number, and then click an operator such as the minus sign. Notice a highlight appears around the operator, just as it does in the built-in Calculator. This indicates the currently selected operation.
- Click another number and the equal sign, and you can see the Calculator is fully functioning. You can use the memory keys, add, subtract, read, and clear the Calculator memory. You can even use common Calculator shortcuts.
- Hold down any of the number or operator keys and notice the shading changes slightly to indicate the button has been pressed.
Now let's take a look at the Calculator app at design time to see what makes it tick.
- Go back to Xcode and click the Stop button.
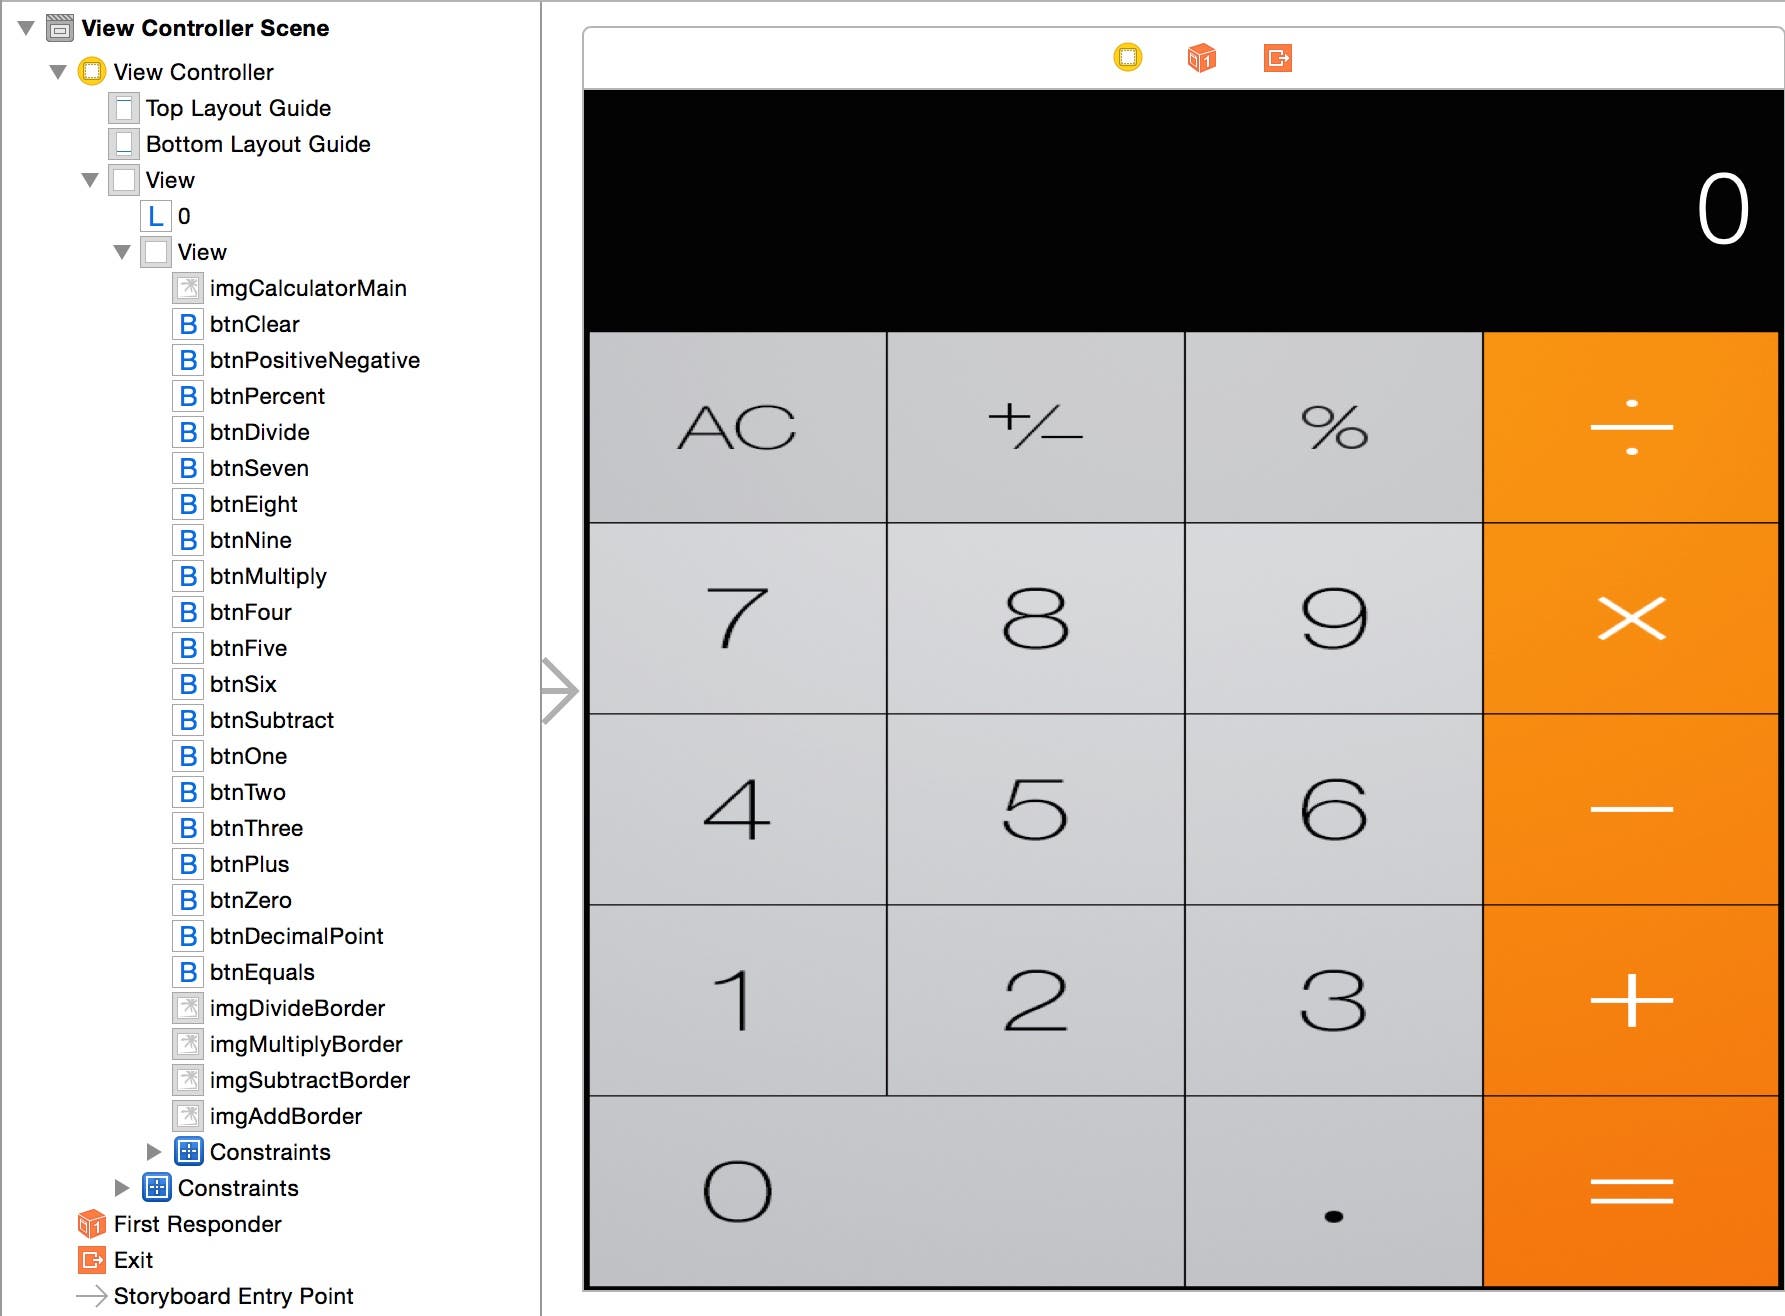
- With the Main.storyboard file selected, display the Document Outline panel by selecting Editor > Document Outline from the Xcode menu. As shown in Figure 4, the Document Outline displays a hierarchical view of all the UI objects on the currently selected scene. There are five images (identified by the "img" suffix), and there are quite a few button objects.
 |
| Figure 4 - User-interface objects in the Document Outline pane |
- Now go to the Project Navigator, expand the Support Files group, and select the CalculatorBackground.png file. This displays the image in the Interface Builder editor (Figure 5).
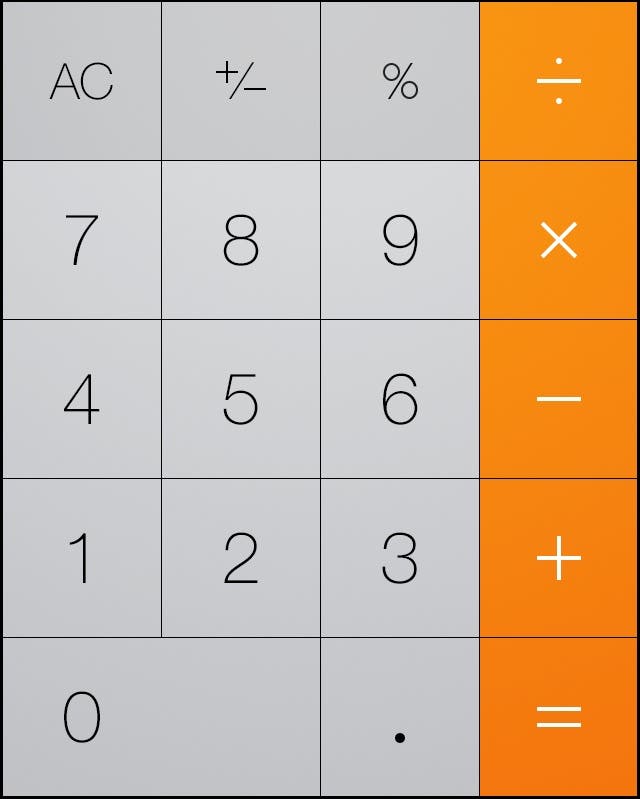 |
| Figure 5 - The Calculator background image |
You may be surprised to see the buttons are not separate images. The calculator background is a single image that includes all the buttons you see at run time! How is the illusion of separate buttons created when you run the app? There is an invisible, rectangular button over each of the buttons.
- To see this, go back and select the Main.storyboard file in the Project Navigator. Click on the number 9 button. As you can see in Figure 6, you have selected an invisible button that is positioned directly over the button.
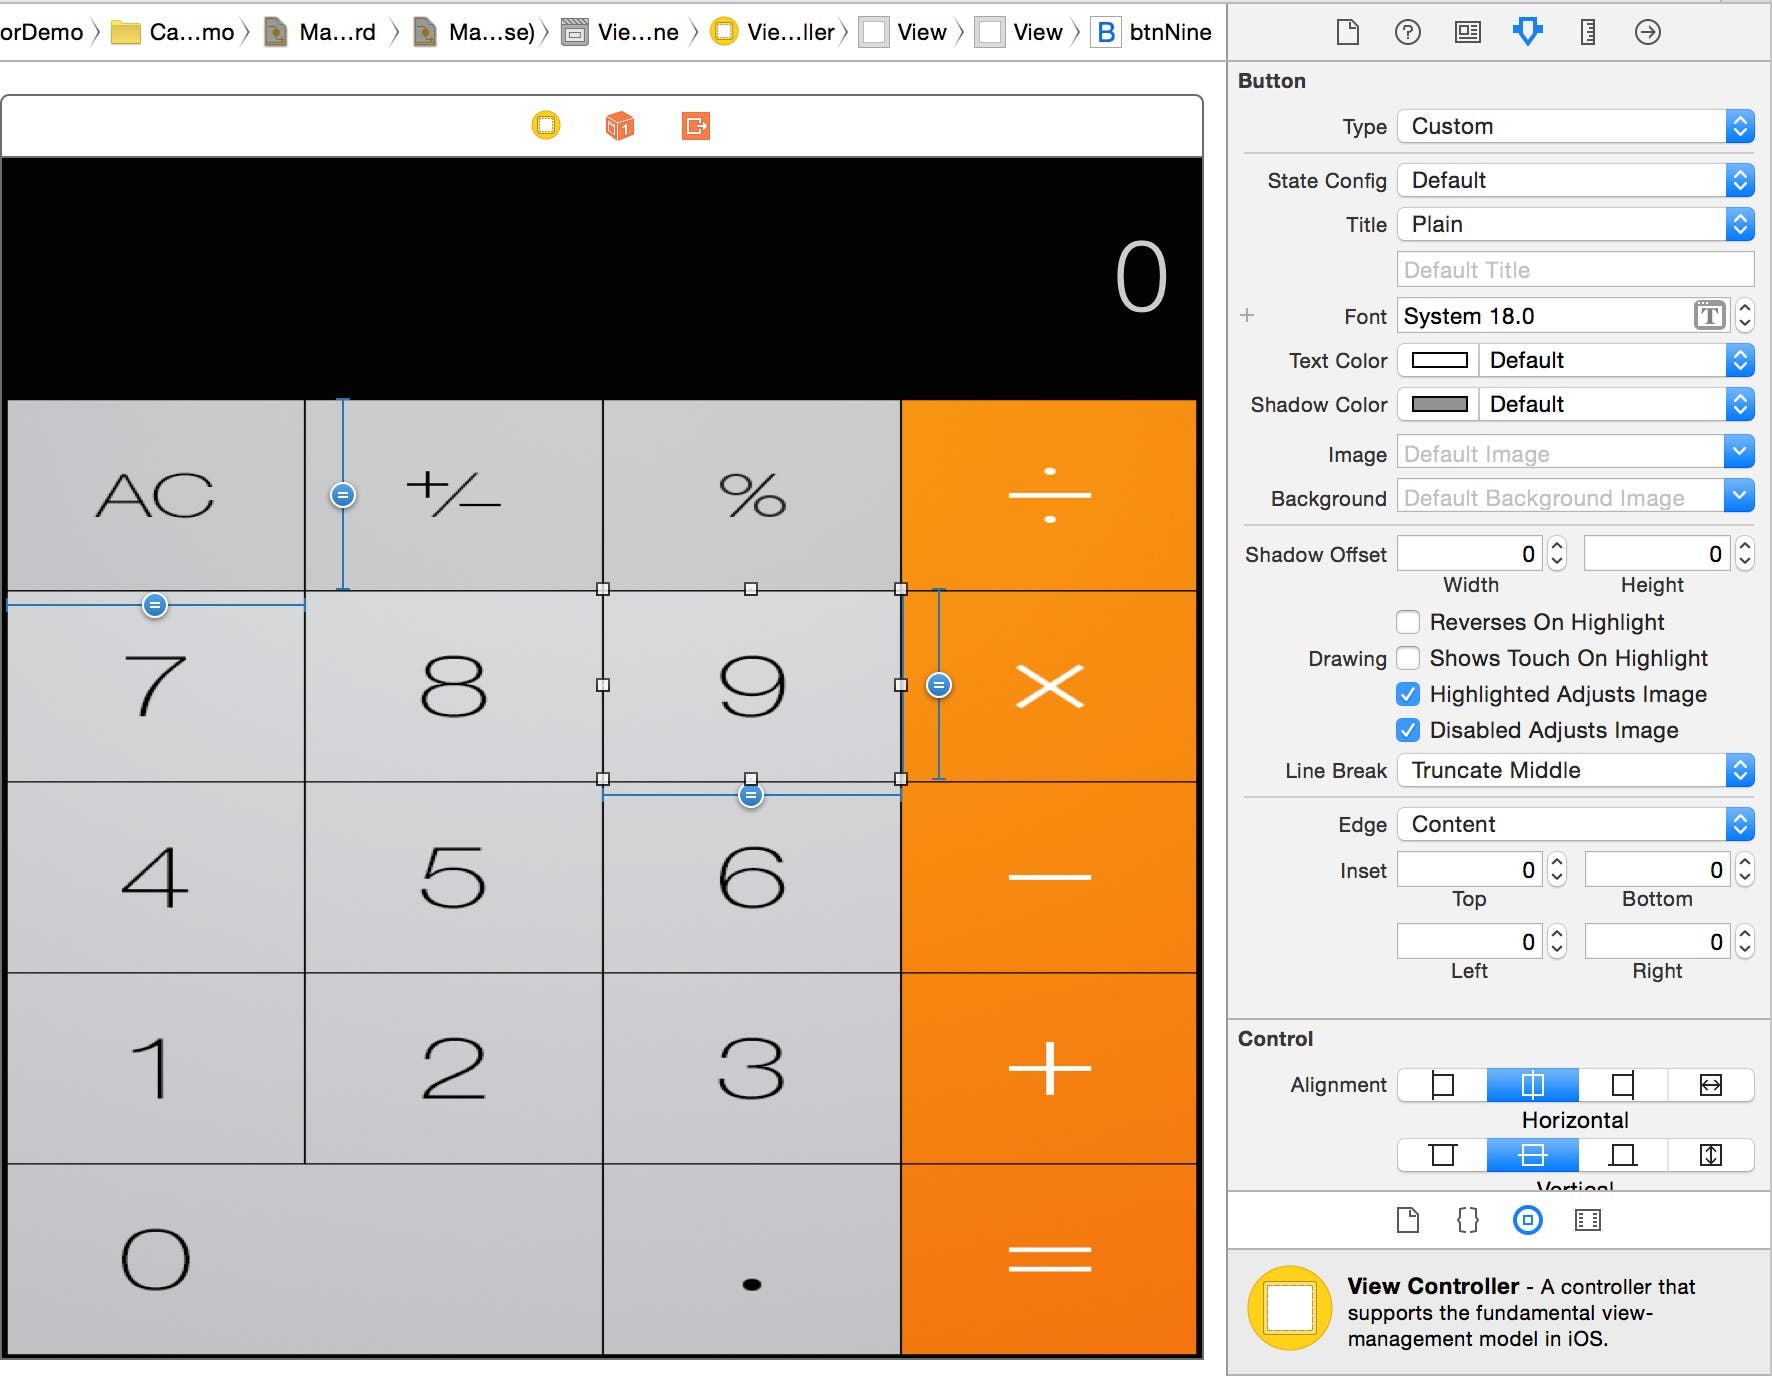 |
| Figure 6 - An invisible button sits on top of each button in the main app image. |
With the invisible button selected, go to the Attributes Inspector (the third button from the right in the Inspector toolbar). Notice that in the header at the top of the Inspector pane it indicates the object you have selected is a Button. By default, this button is invisible, allowing the number button on the image below it to show through.
At run time, when the user taps an invisible button above a number, another image, CalculatorButtons.png, is displayed in the area of the invisible button. This image's Alpha value is set so that it is mostly transparent. That's why when you tap one of these buttons at run time, it looks a little darker, giving the appearance of being pressed. When an operation button is tapped at run time, a hidden highlight image is made visible which displays a white border around the selected button.
At the top of the scene is the Calculator display. This is simply a Label with its Alignment set to Right-Justified sitting on top of a greenish-gray view. As number buttons are pressed and calculations are performed, the Calculator's current value is stored in the text property of the Label.
Calculator Core Logic
Now let's take a closer look at the code in the view controller associated with this scene to see how the Calculator's user interface interacts with the core logic code.
As shown in Figure 7, there are three action methods associated with the Calculator buttons found in the ViewController class:
- operationTouched: is connected to all operation buttons.
- highlightOperation: is connected to the add, subtract, multiply, and divide buttons. This method adds the highlight around the selected button and removes it from the previously highlighted button.
- numberTouched: is connected to all number buttons, including the decimal point button.
These methods are all user-interface specific since they are tied directly to UI controls.
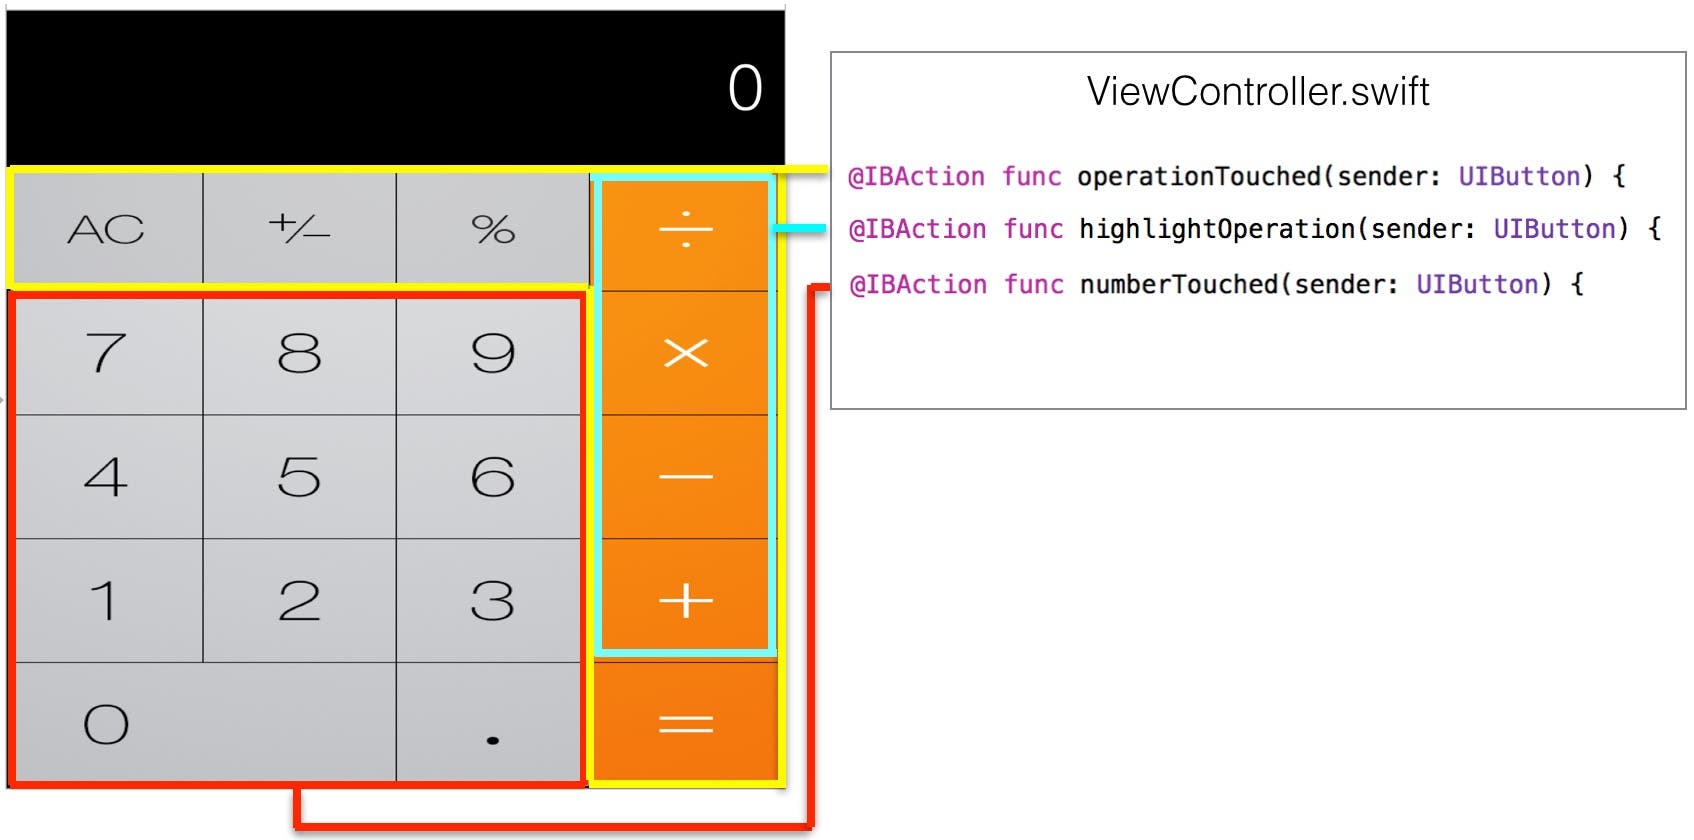 |
| Figure 7 - Calculator action methods |
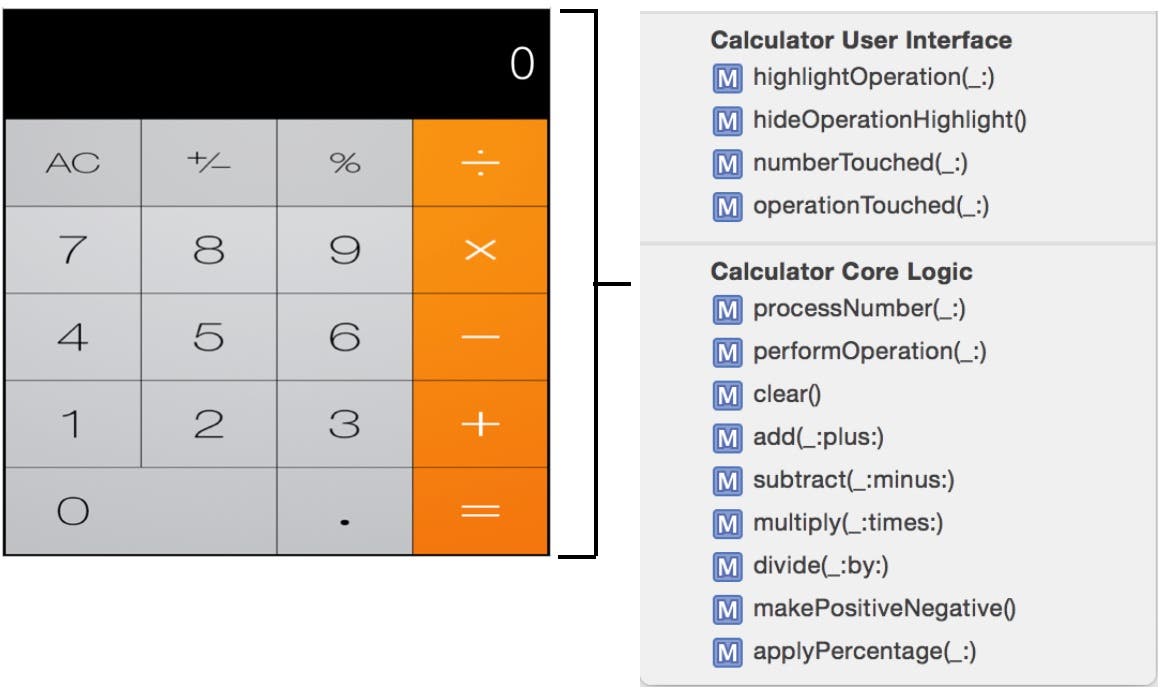
To see a list of the other Calculator core logic methods found in the ViewController class, check out Figure 8. All of the methods you need for a Calculator are found within the ViewController.
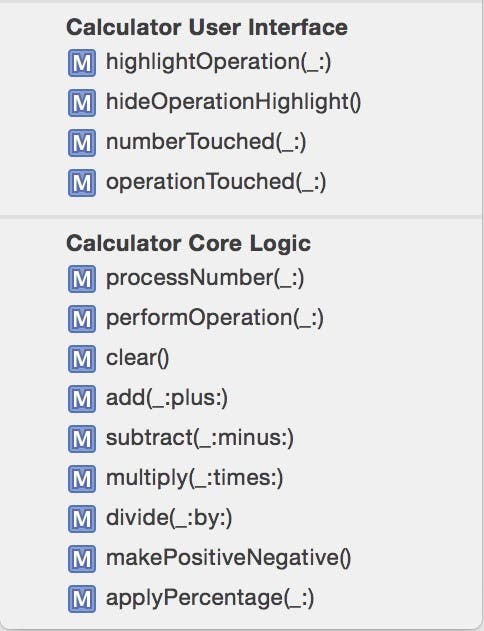 |
| Figure 8 - Calculator methods in the ViewController class. |
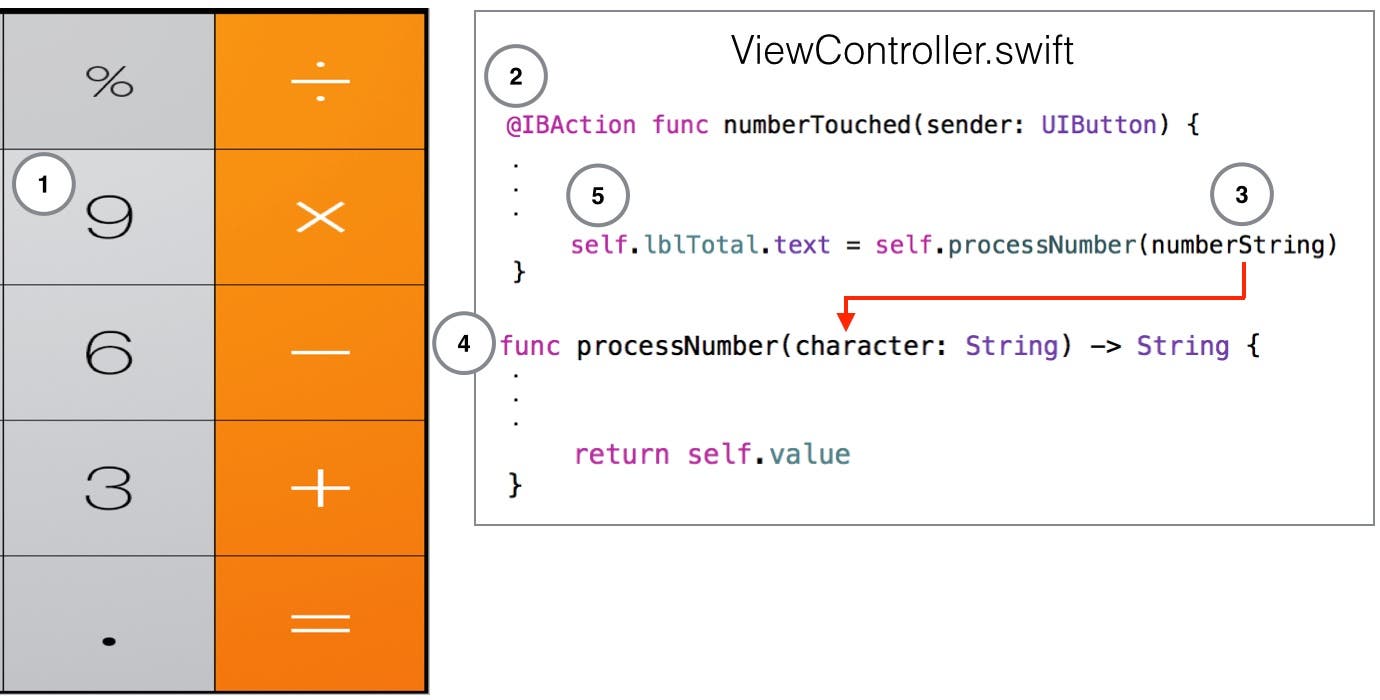
Figure 9 provides a high-level overview of the interaction between the numeric buttons of the Calculator in the user interface and the methods of the ViewController class.
 |
| Figure 9 - Calculator numeric button interaction with code |
- The user touches a numeric button.
- The view controller's numberTouched: action method is called.
- In the numberTouched: method, some user-interface processing is executed, and then the view controller's processNumber: method is called.
- The processNumber: method executes the Calculator's core logic for handling a new number and returns the new Calculator value.
- In the numberTouched: method, the return value from the processNumber: method is stored in the text property of the lblTotal label.
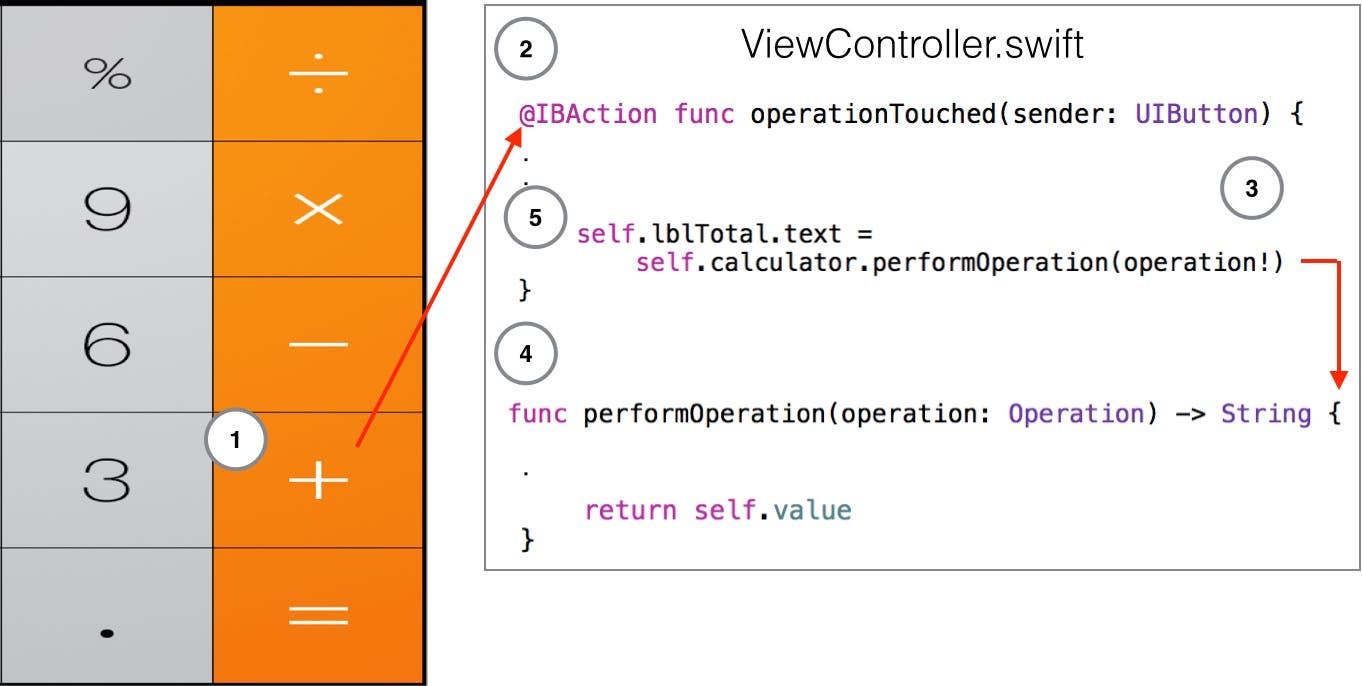
Now let's take a quick look at how the user-interface and view-controller code interact when an operation is selected as outlined in Figure 10.
 |
| Figure 10 - Operation button and code interaction |
- The user taps an operation button.
- The view controller's operationTouched: action method is called.
- In the operationTouched: method, after executing user-interface processing code, the view controller's performOperation: method is called.
- The performOperation: method executes the Calculator's core logic for performing an operation and returns the Calculator's new value.
- In the operationTouched: method, the return value from the performOperation: method is stored in the text property of the lblTotal label.
What's Wrong With This Architecture?
The Calculator App seems to work well. It adds, subtracts, multiplies, divides, and performs all other operations properly. So what's the problem?
Check out the strong link between the Calculator user interface and the view controller as shown in Figure 11. In object-oriented programming terms, this is known as tight coupling.
 |
| Figure 11 - Tight coupling between the Calculator UI and core logic |
The Calculator user interface is inseparably linked to the view controller. There are properties and methods in the view controller to which the user-interface controls are directly connected. According to Apple's documentation, a view is typically bound to a single view controller. Ultimately, the view controller is a user-interface object. It's not the tight coupling between the view and view controller that's the problem—that's perfectly fine. The problem is the core logic that's in the view controller. Why is this a problem?
A good app is often a victim of its own success. Let's say you release the Calculator app with its current architecture. If it does well in the App store, you may consider creating a Scientific Calculator app. Wouldn't it be great to reuse some of the Calculator app functionality since the Scientific Calculator does everything the regular Calculator does and more?
Unfortunately, because the Calculator's core logic is buried inside the view controller, there isn't a clean way to reuse this logic in another app. It's "stuck in the weeds" of the user interface.
A Better MVC Implementation
So, how do you fix this problem? You need to put the Calculator's core logic in some other place where you can access it from multiple apps, or from multiple view controllers in a single app. If you shouldn't put your core logic in a view controller, where should you put it?
Business Controller Objects
The answer is a business controller object (also known as a business object or domain object). A business object provides a neutral place to put your core logic that can be reused from any user interface, which includes view controllers. As shown in Figure 12, you can create a Calculator business class in which you put all of the Calculator's core logic methods.
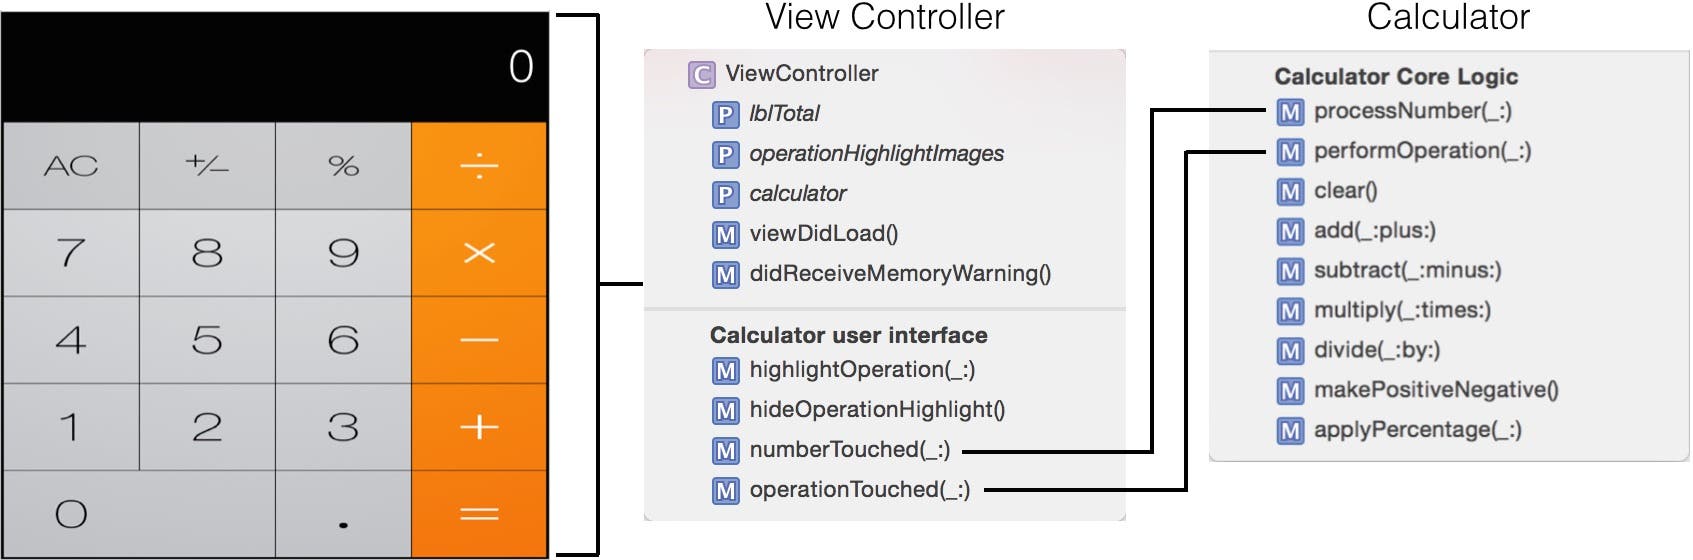 |
| Figure 12 - Implementing a Calculator business object |
In this figure, the Calculator UI and View Controller are tightly bound together, which is fine—they are both user-interface objects. When users tap buttons on the Calculator at run time, action methods in the view controller are called directly.
The only code you should put in the view controller is code that has something to do with the user interface. However, when core logic needs to be performed, the view controller should make a call to an appropriate method in the Calculator business object.
With your core logic in the Calculator class, you can easily create a ScientificCalculator subclass that inherits all the basic functionality of the Calculator and extends it by adding operations as shown in Figure 13.
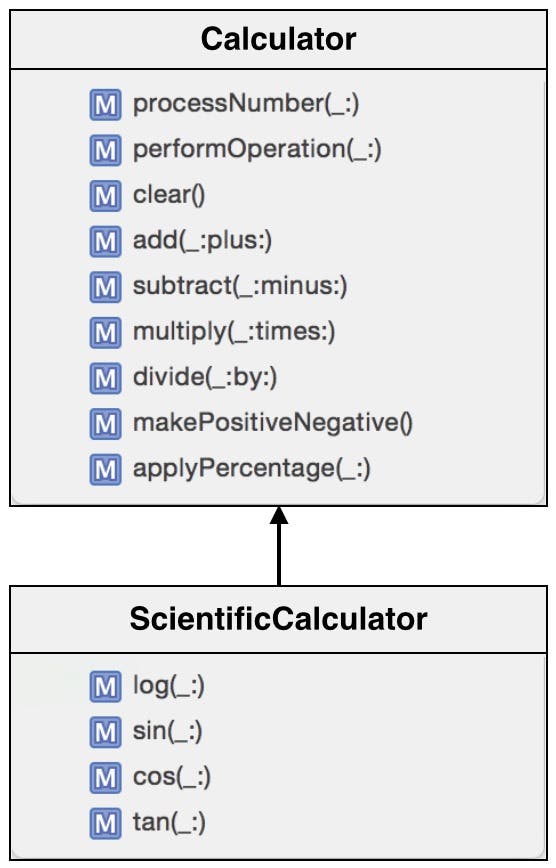 |
| Figure 13 - You can easily extend the Calculator core logic when it resides in its own class. |
Other Benefits of Using Business Objects
When you create business objects, you are creating a representation of objects in the real world. In the Calculator app, you are creating a representation of a real-world Calculator. In a real estate app, you can create House, Buyer, Owner, and RealEstateAgent business classes that represent real-world entities (Figure 14).
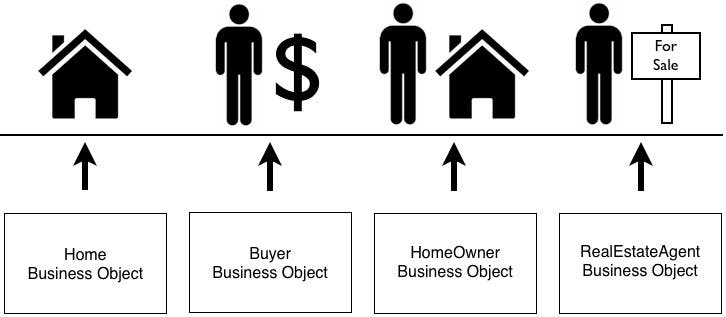 |
| Figure 14 - Business objects represent real-world objects. |
Creating business objects helps you bridge something called the semantic gap. The semantic gap is the difference between real-world objects and how you model, or describe these objects in your software applications. In many apps, this gap is extremely wide because the developer has not created any business objects. You will find that when you narrow the semantic gap by creating business objects that represent real-world objects, your apps are much easier to conceive, build, maintain, and extend.
You model real-world object attributes by means of properties, and you model their behavior by means of methods. For example, a house has attributes such as an address, a number of bedrooms, a number of baths, a price, and so on, which can be described, or modeled by class properties. A house can also have behavior such as "put on the market," "take off the market," and so on, which can be modeled as methods on a business object class.
Another benefit of using business objects is it helps you avoid playing the game of "Where's the code?" I mentioned earlier. All the core logic that has something to do with a homeowner is in the HomeOwner business object. All the code that has something to do with a real estate agent is in the RealEstateAgent business object, and all the code that has something to do with the user interface is in a view controller.
Using business objects also helps you avoid code redundancy. When you don't use business objects, it's easy to create duplicate code because you often forget you have already created a piece of functionality in another view controller. When you are using business objects, it's less likely you will create two methods on a business class that perform the exact same function.
The Improved Calculator Sample App
Now that you've seen how not to design an app, let's take a look at the new-and-improved CalculatorPlusDemo sample app that uses a Calculator business object, which you can download from this link.
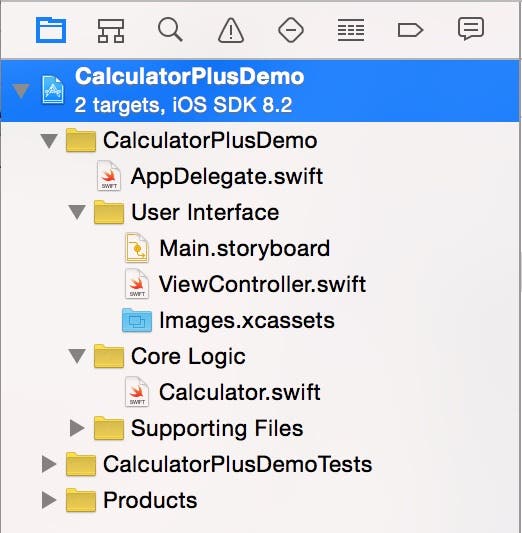
After opening the project in Xcode, go to the Project Navigator, drill down into the CalculatorPlusDemo node and then expand the User Interface and Core Logic groups. As you can see in Figure 15, under the User Interface group are the storyboard and view controller user-interface files. Under the Core Logic group are the Calculator business-object class files.
 |
| Figure 15 - CalculatorPlusDemo project files |
Let's check out the improved message flow of the CalculatorPlusDemo app. Figure 16 provides a high-level overview of what happens when a user touches a numeric button.
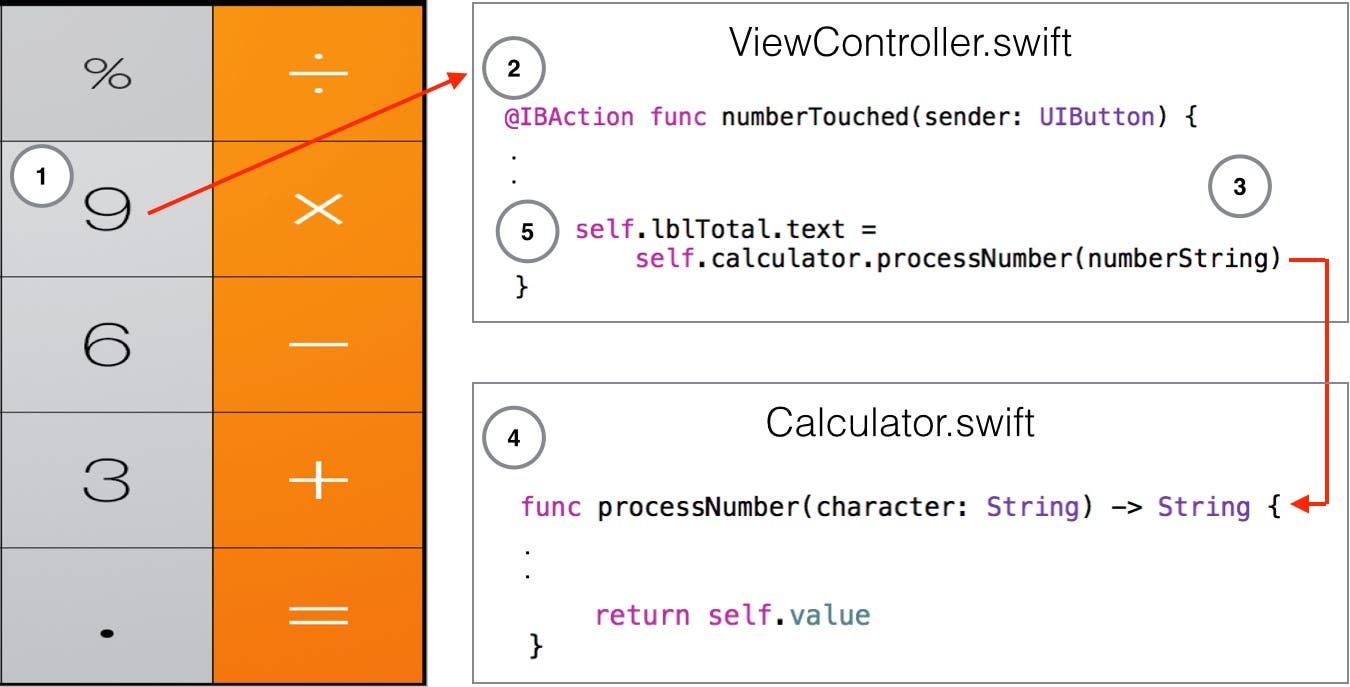 |
| Figure 16 - The improved Calculator numeric button and code interaction |
- The user touches a numeric button.
- The numberTouched: action method in the view controller is called, which contains user-interface-specific code.
- After executing the user-interface processing code, the view controller calls the Calculator's processNumber: method.
- The Calculator object's processNumber: method executes the core logic for handling a new number and returns the Calculator's current value.
- The view controller takes the value returned from the Calculator's processNumber: method and stores it in the text property of the lblTotal label.
Now let's look at a high-level overview of what happens when the user touches an operation button as shown in Figure 17.
 |
| Figure 17 - The improved Calculator operation button code interaction |
- The user touches an operation button.
- The operationTouched: action method in the view controller is called, which contains user-interface-specific code.
- After executing the user-interface processing, the view controller calls the Calculator object's performOperation: method.
- The Calculator object's performOperation: method executes the core-operation logic and returns the Calculator's current value.
- The view controller takes the value returned from the Calculator's performOperation: method and stores it in the text property of the lblTotal label.
The big difference here is that the performOperation: method has been moved from the ViewController class to the Calculator class.
Conclusion
When it comes to the Model View Controller design pattern, you have learned that the View and View Controller comprise your user interface, and together they are the View in the MVC pattern.
You also have learned that your App's core logic should be contained in business objects that represent real-world entities. These business objects are the Controller in the MVC pattern.
But what about the Model? As I mentioned earlier in this post, the Model is your app's data and usually takes the form of business entities. In my next post, I'm going to talk about an iOS technology known as Core Data that uses something called entity objects. These entity objects are the other half of the business-object picture that will complete your understanding of the MVC pattern.

Kevin McNeish
Kevin McNeish is author of the new book “Learn to Code in Swift” as well as the “iOS App Development for Non-Programmers” book series (www.iOSAppsForNonProgrammers.com), winner of the Publishing Innovation Award. Kevin is also an award-winning app developer, software architect, and conference speaker in the U.S. and abroad. He has spent much of his career making difficult concepts easy to understand. Follow Kevin on Twitter: @kjmcneish.

 Olena Kagui
 Devala Rees
 Rachel Needell
 Belinda Sanmiguel

 Sarah Kingsbury

 Susan Misuraca
 Rhett Intriago


 Cullen Thomas
 Nicholas Naioti

 August Garry