Do you have an idea for an app but lack the programming knowledge to begin building it? In this weekly blog series, How to Unleash Your Inner App Developer, I will take you, the non-programmer, step by step through the process of creating apps for the iPhone, iPod touch, and iPad. Join me each week on this adventure and you will experience how fun turning your ideas into reality can be! This is Part 10 of the series. If you're just getting started now, check out the beginning of the series here (this post has been updated to Swift 1.2, iOS 8 and Xcode 6.3.)
In my previous post, you learned the basic mechanics of calling methods on an object. There's very little you can do in Swift, the language of iOS development, without calling methods. In this post, we're going to put into practice what you have learned about calling methods and integrate social media into the iAppsReview app we've been working on in this blog. I'm also going to introduce a new Cocoa Touch Framework concept known as collections. You can get the latest version of iAppsReview from this link.

Social Media and iOS
Starting in iOS 6, Apple beefed up the abilities of iOS devices to share text, images, web pages, and so on with others by means of social media. For example, if you are in the Safari mobile browser, you can tap the Share button at the bottom center of the Safari window as shown on the left side of Figure 1. This displays a panel, shown on the right side of Figure 1 that contains a variety of sharing options including Twitter and Facebook.
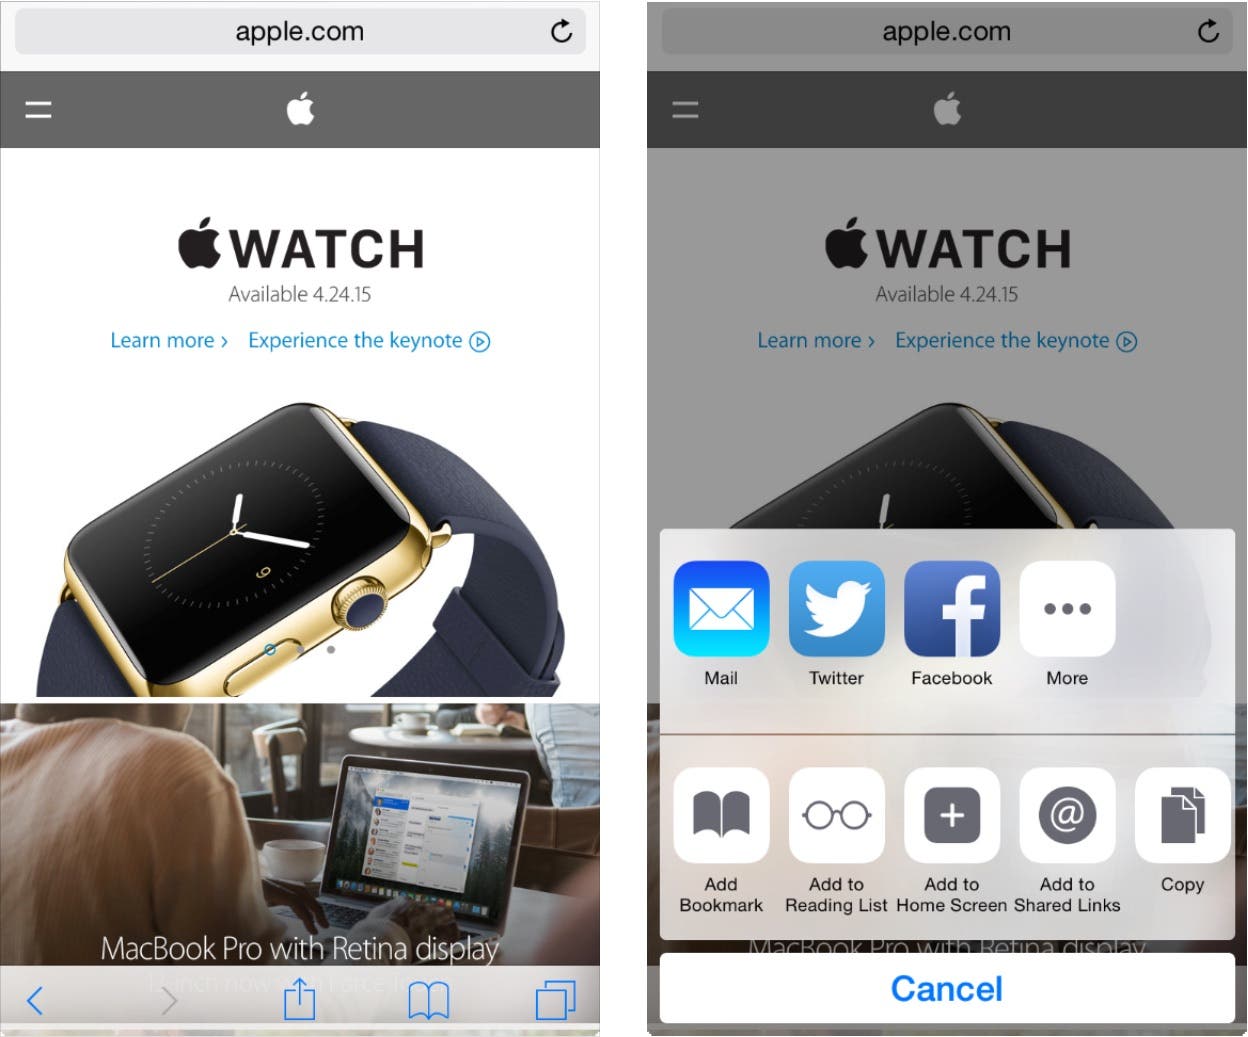 |
| Figure 1 - The iOS Share options panel lets you share web links with others via Twitter & Facebook. |
Depending on the item you want to share, different options appear in the Share Options panel. For example, if you want to share a picture from your photo library, when you tap the Share button, the Share Options panel includes other options such as Copy, Slideshow, AirPlay, Assign to Contact, and Use as Wallpaper (Figure 2) in addition to the Twitter and Facebook options.
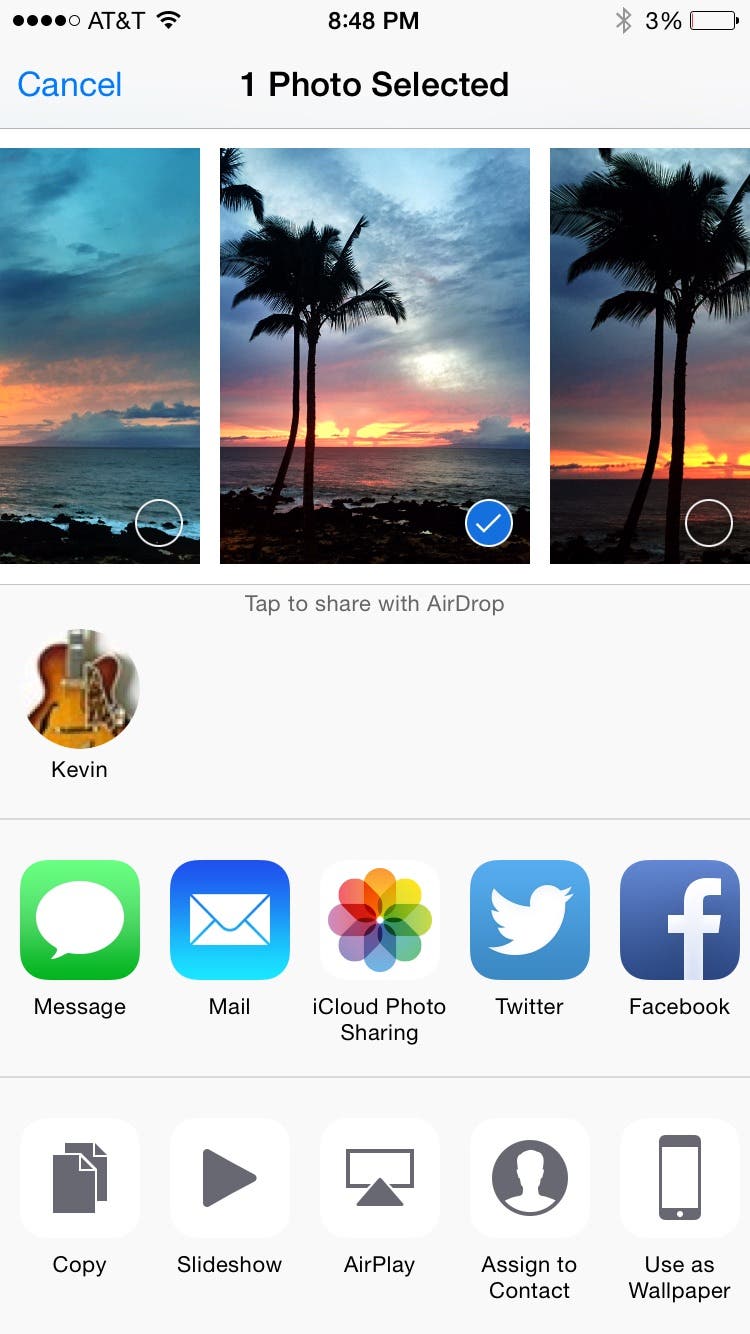 |
| Figure 2 - The Camera Roll Share Options panel |
Cocoa Touch Framework and Social Media
Apple has made it very easy for you to integrate social media with your apps using the Social Framework. When you're finished with the steps in this blog, you can compare your project to the completed (so far) version of iAppsReview, which you can get from this link.
To begin, you must first add the Social Framework to your project as outlined in the following steps:
- Open the iAppsReview project in Xcode.
- In the Project Navigator on the left side of the Xcode window, right-click the very top iAppsReview node and select New Group from the popup menu. This adds a new node to the Project Navigator and places it in edit mode. Change the name of the node to Frameworks and then drag and drop it directly above the Products node. When you're finished the Project Navigator groups should look like Figure 3.
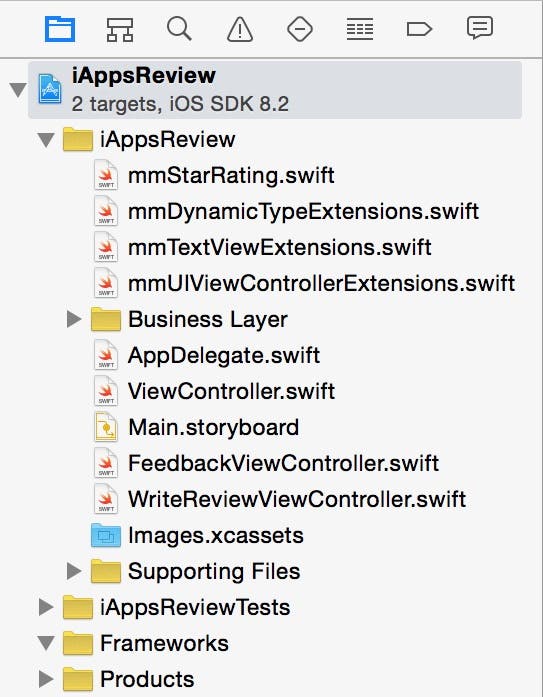 |
| Figure 3 - Add a Frameworks group to the Project Navigator. |
- In the Project Navigator select the very top iAppsReview node. This displays the Project Editor as shown in Figure 4. On the left side of the Project Editor, under Targets, select iAppsReview, and then select the General tab. Afterwards, scroll down to the section labeled Linked Frameworks and Libraries and click the plus (+) button (Figure 4).
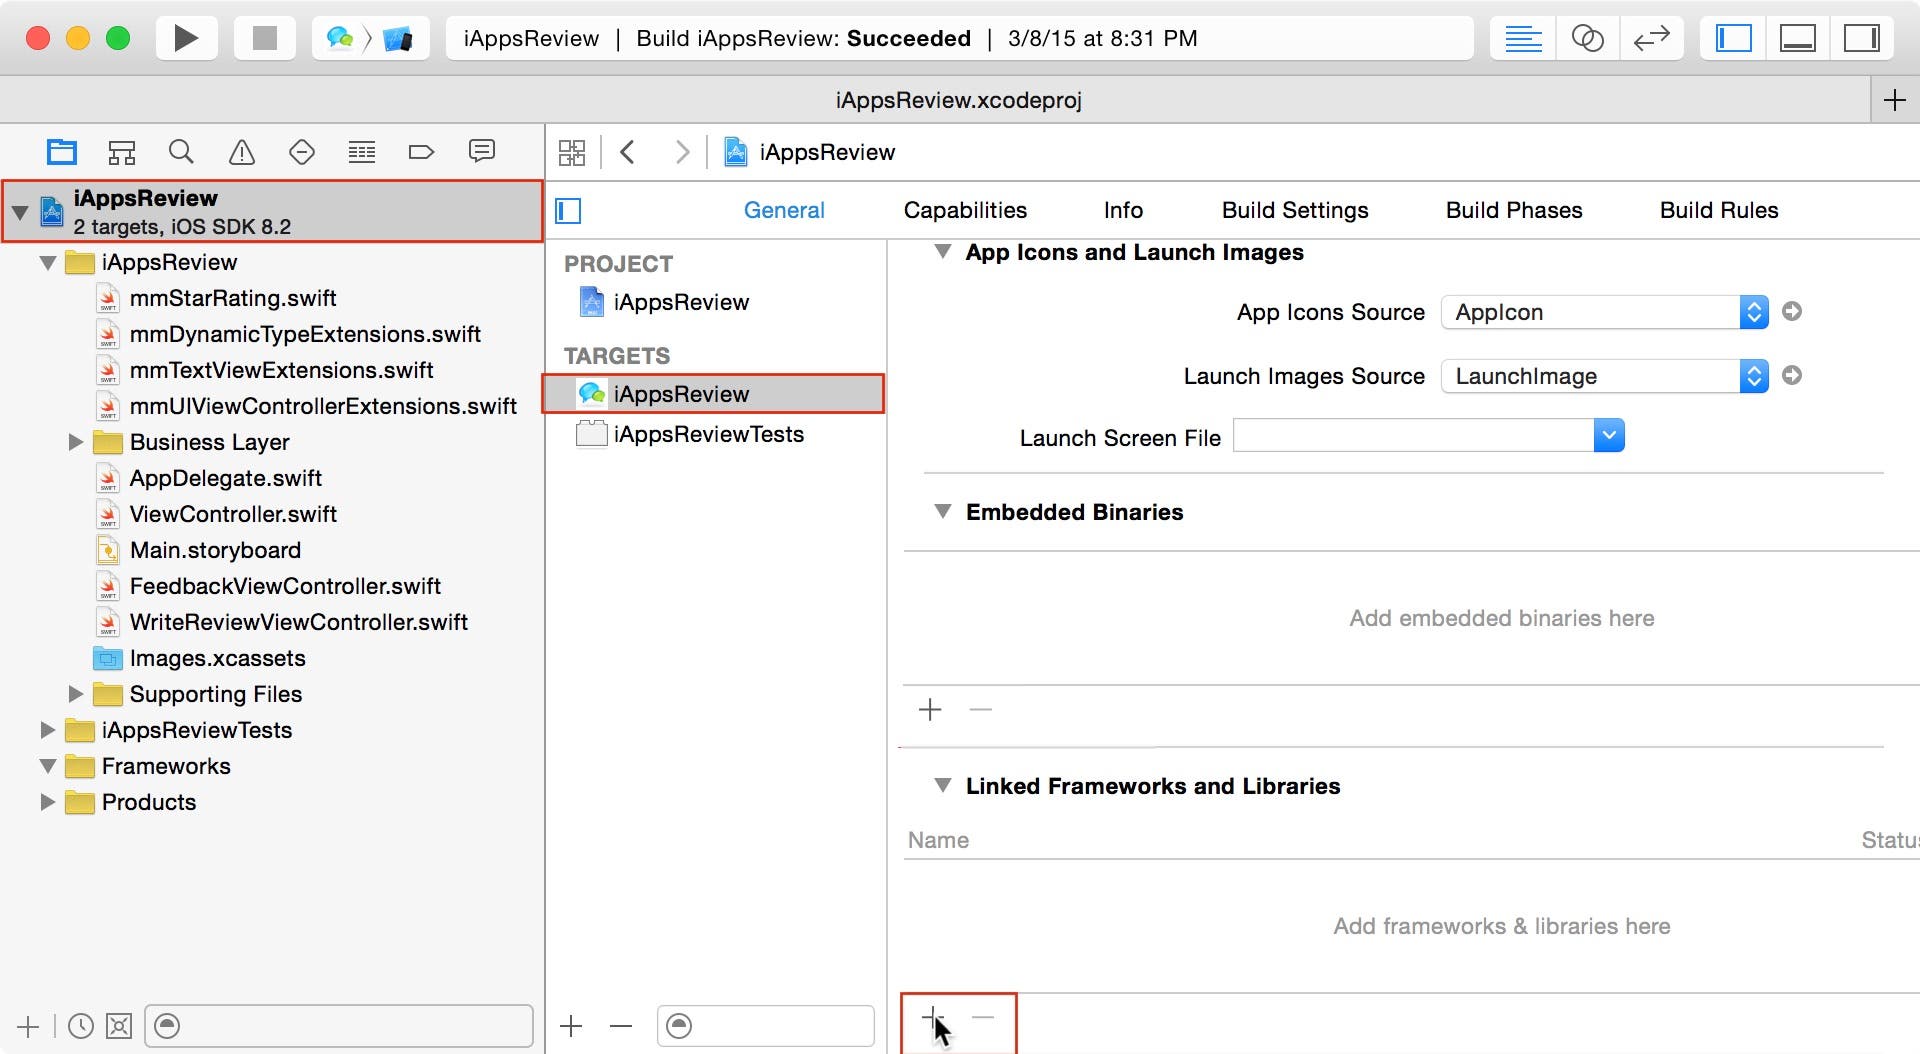 |
| Figure 4 - Adding the Social Framework to the iAppsReview project |
- Clicking the plus button displays the Add Framework dialog as shown in Figure 5. In the text field at the top of the dialog, enter the letters So to search for the Social Framework. When it appears in the list, click on Social.framework, and then click the Add button.
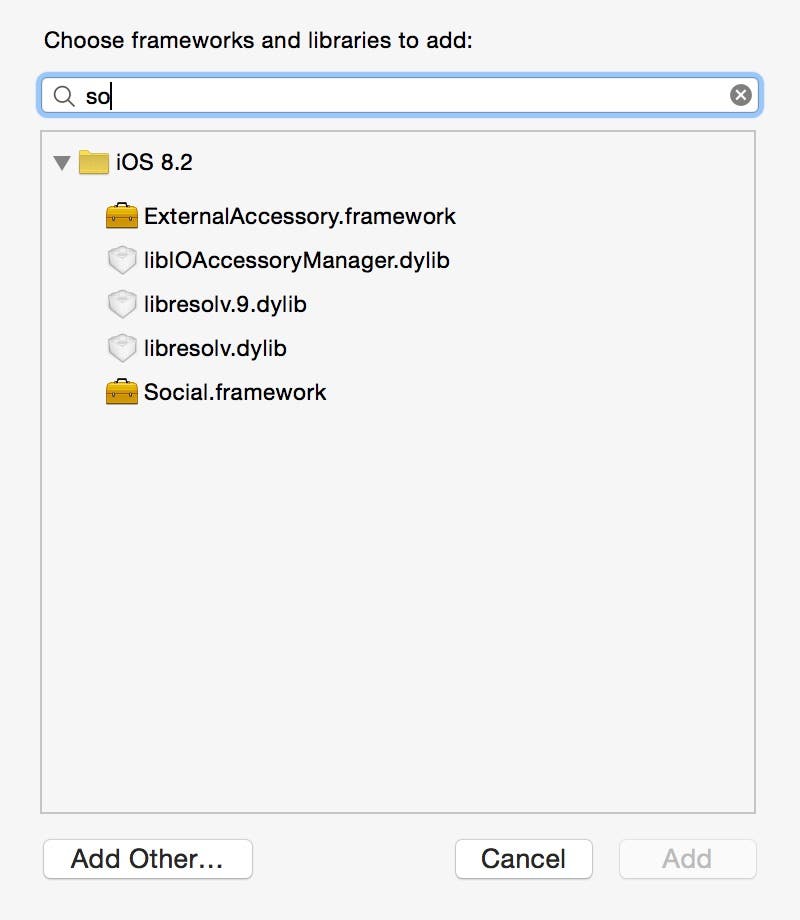 |
| Figure 5 - Filtering the list in the Add Framework dialog |
After you click Add, the Social.framework is added below the Frameworks group in the Project Navigator.
Wiring Up the iAppsReview Share Button
Now that you have the Social Framework added to the project, you're ready to create an action method for the iAppsReview Share button and write some code to display the iOS Share Options panel.
- In the Project Navigator, select the Main.storyboard file to display the storyboard in the design surface.
- Click the scene dock at the top of the Write Review scene's view controller.
- With the Write Review scene selected, go to the Editor button group at the top-right of the Xcode window and click the center button to display the Assistant Editor. The WriteReviewController.swift file should be displayed in the Assistant Editor. If it isn't, click the button that says Manual in the Assistant Editor toolbar, and then select Automatic > WriteReviewViewController.swift from the popup menu.
- In the Write Review scene, select the Share button at the top-right corner of the scene. With the Share button selected, go to the Connections Inspector (the button on the far right in the Inspector toolbar), click the selector connection well and drag down into the WriteReviewViewController.swift file above the viewDidLoad method as shown in Figure 6.
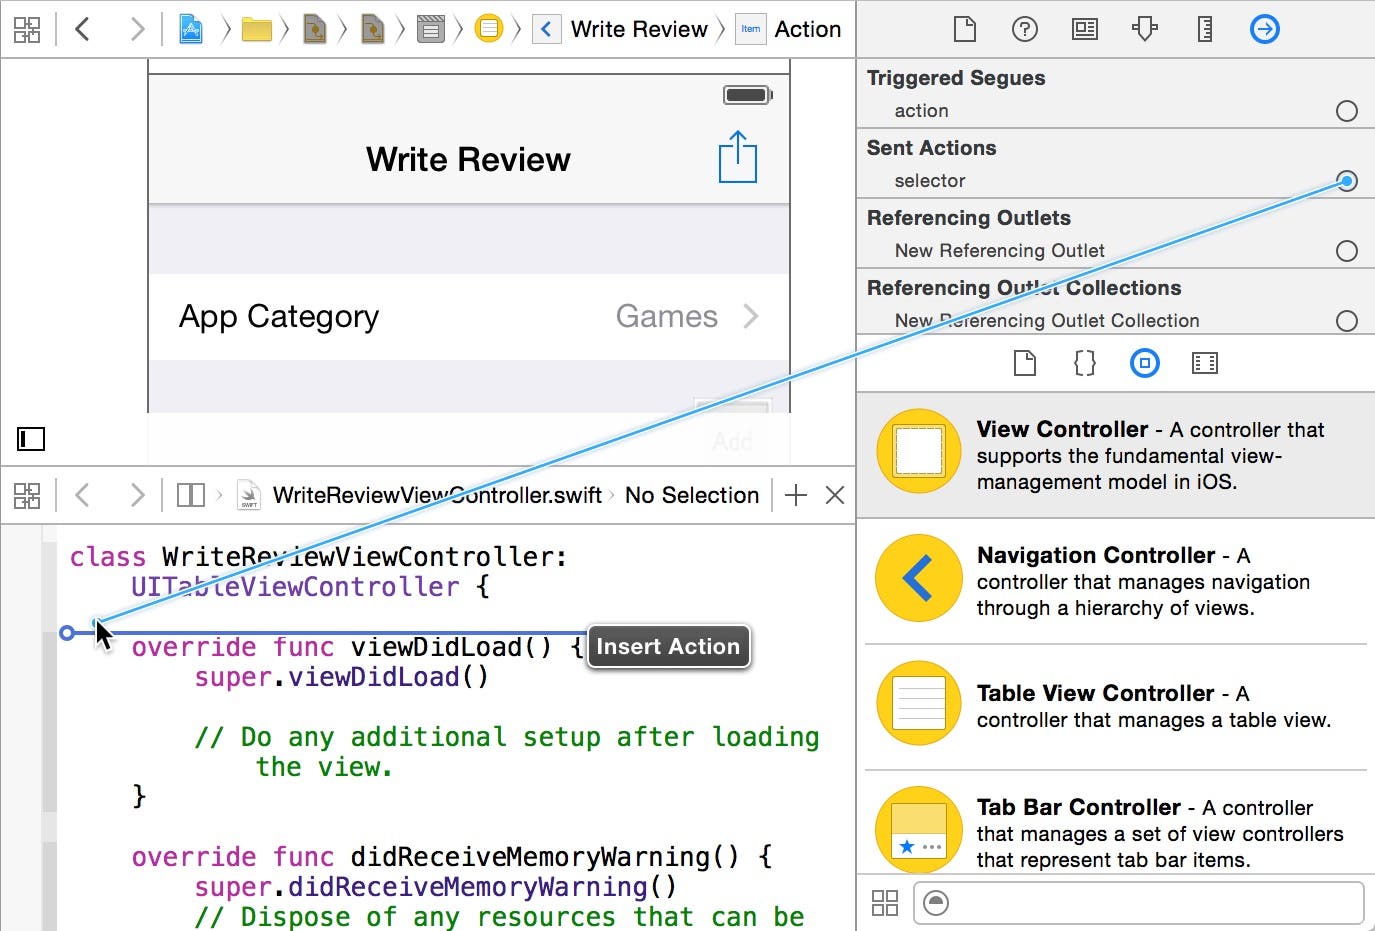 |
| Figure 6 - Drag from the selector connection well to create an action method. |
- When you see the Insert Action popup (Figure 7), let go of the mouse button to display the Connection popup shown in Figure 7. In the action method Name text field, enter shareReview;
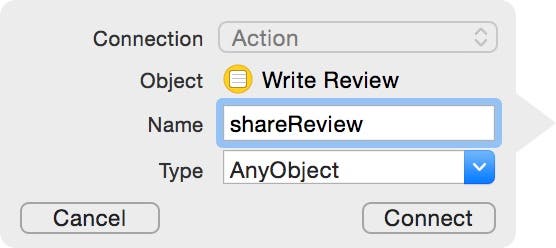 |
| Figure 7 - The Connection popup |
- Click the Connect button in the Connection popup. This adds a new shareReview: action method declaration in the WriteReviewViewController.swift file (Figure 8).
 |
| Figure 8 - The new shareReview: action method |
- We no longer need the Assistant Editor, so you can hide it by clicking the left button in the Editor button group at the top of the Xcode window.
Understanding Variables
Before we get down to the business of writing code, I need to introduce a new concept that you will use when integrating social media into your app. We'll begin with the concept of variables.
A variable is a place in memory where you can store and retrieve information. It's called a variable because you can change the information that you store in it. You can store one piece of information in a variable, and then store another piece of information in the same variable. Variables declared within a method are called local variables because they can only be accessed locally from within the method in which they are declared.
You can name variables anything you want, although something meaningful is best. Also, variable names must be unique within the same scope. This means that you can't have two variables in a method with the same name. However, you can have variables with the same name if they are in different methods.
Although you can change the information stored in a variable, there is a limit on the type of information you can store. Take for example the variable declaration shown in Figure 9.
 |
| Figure 9 - A variable declaration |
The first word in this statement, var, indicates a variable is being declared. Next, firstName specifies the name of the variable. The colon followed by String, indicates the variable can only store information of the type String. As you have already learned, the String class represents a set of characters, so you can store any set of characters in the firstName variable, but you can't store other types of information such as an integer, true or false values, and so on. When you declare a variable in Swift, you don't always have declare the type of information that it can hold. If you assign an initial value to a variable, you don't need to specify the variable type (Figure 10).
 |
| Figure 10 - Type inference in action! |
This is because Swift has something called type inference, which means that it can figure out, or infer, the type of the variable based on the value you assign to it.
Understanding Arrays and Other Collections
Now that you have a basic understanding of variables, it's time to learn about arrays and other collections.
When you hear the word "collection," you might think of stamp or coin collections. This is a good metaphor for collections in Swift because they provide a way to group one or more related objects together.
All the variables and properties you have worked with so far have held a single value (such as a Boolean, or a single object). In contrast, Swift's collection classes allow you to group multiple items together into a single collection. Swift's primary collection classes are:
- Array
- Dictionary
- Set
The Cocoa Touch Framework primary collection classes are:
- NSArray
- NSMutableArray
- NSDictionary
- NSMutableDictionary
- NSSet
- NSMutableSet
The newer Swift collection classes have great features that make them easy to use and help you avoid common bugs in your code. In contrast, the older Cocoa Touch collections have been around a long time and have a little extra functionality. It's perfectly fine to use a mix of Swift and Cocoa Touch collection classes in your apps.
Often, collections are used in iOS apps to create lists. For example, you can have a collection of strings used as a list of songs, or an array of images used to display album covers. Note that items in a collection are usually of the same type, but this isn't a restriction. In fact, the list we are going to use to integrate with social media will eventually contain different types of items.
We'll be talking more about the different collections available in iOS apps, but in this post, I'm going to concentrate on Array. The Array class is one of the most basic kinds of Swift collections. You declare an Array variable just as you would any other variable (Figure 11).
 |
| Figure 11 - An Array variable |
To initialize an array with a set of values, specify the values between square brackets and separated by commas. For example, check out the code shown in Figure 12.
 |
| Figure 12 - Initializing an array with a set of values |
When you initialize an array in this way, Swift can infer the type of items contained in the array so you don't need to explicitly declare it.
To find out how many items are in an array, you can access its count property as shown in Figure 13.
 |
| Figure 13 - You can get the number of items in an array from its count property. |
When referencing a property on an object, you specify the name of the object (names in this case), type a period, and then type the name of the property (count in this case). You'll learn much more about properties later in this series.
Creating an Outlet
Now that you have a basic understanding of variables and arrays, it's time to move on and write some code. The code that we write will take the text that the user entered in the Write Review scene's text view and share it in a variety of ways including Facebook and Twitter.
However, in order to get the text the user enters in the text view, we need a way to reference the text view from the WriteReviewViewController code file. It often surprises new iOS developers that, by default, there is no way to reference a user-interface control on a scene from the associated view controller. Fortunately, it's very easy to make this happen using Xcode. To do this, you need to create an outlet, which is a special type of property through which code in the view controller can reference a user-interface control. Let's do that now.
- First, select the Main.storyboard file in the Project Navigator and then click on the scene dock at the top of the Write Review scene to select the scene's view controller. Afterwards, display the Assistant Editor by clicking the middle button in the Editor button group at the top-right of the Xcode window.
- Next, hold down the Control key, click the text view in the Write Review scene and drag your mouse pointer down into the WriteReviewViewController.swift file directly above the shareReview: method declaration as shown in Figure 14.
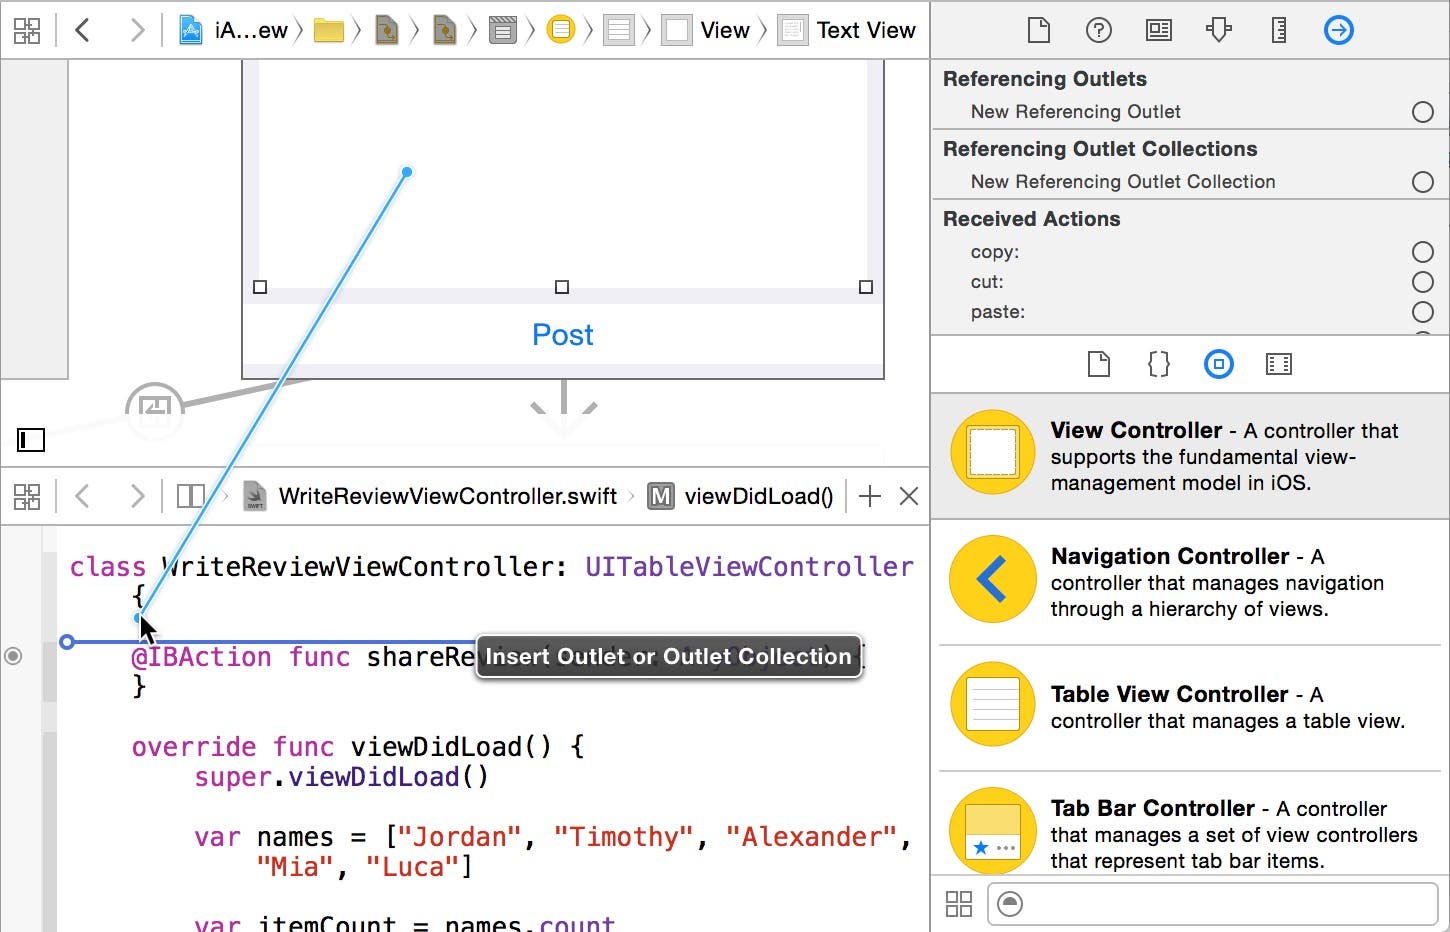 |
| Figure 14 - Control+Drag down from the text view into the WriteReviewViewController.swift file. |
- When you see the Insert Outlet or Outlet Collection popup appear, let go of your mouse button and the Control key. This displays the Insert Outlet popup shown in Figure 15.
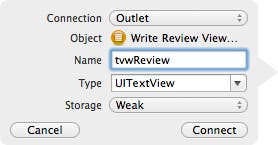 |
| Figure 15 - The Insert Outlet popup |
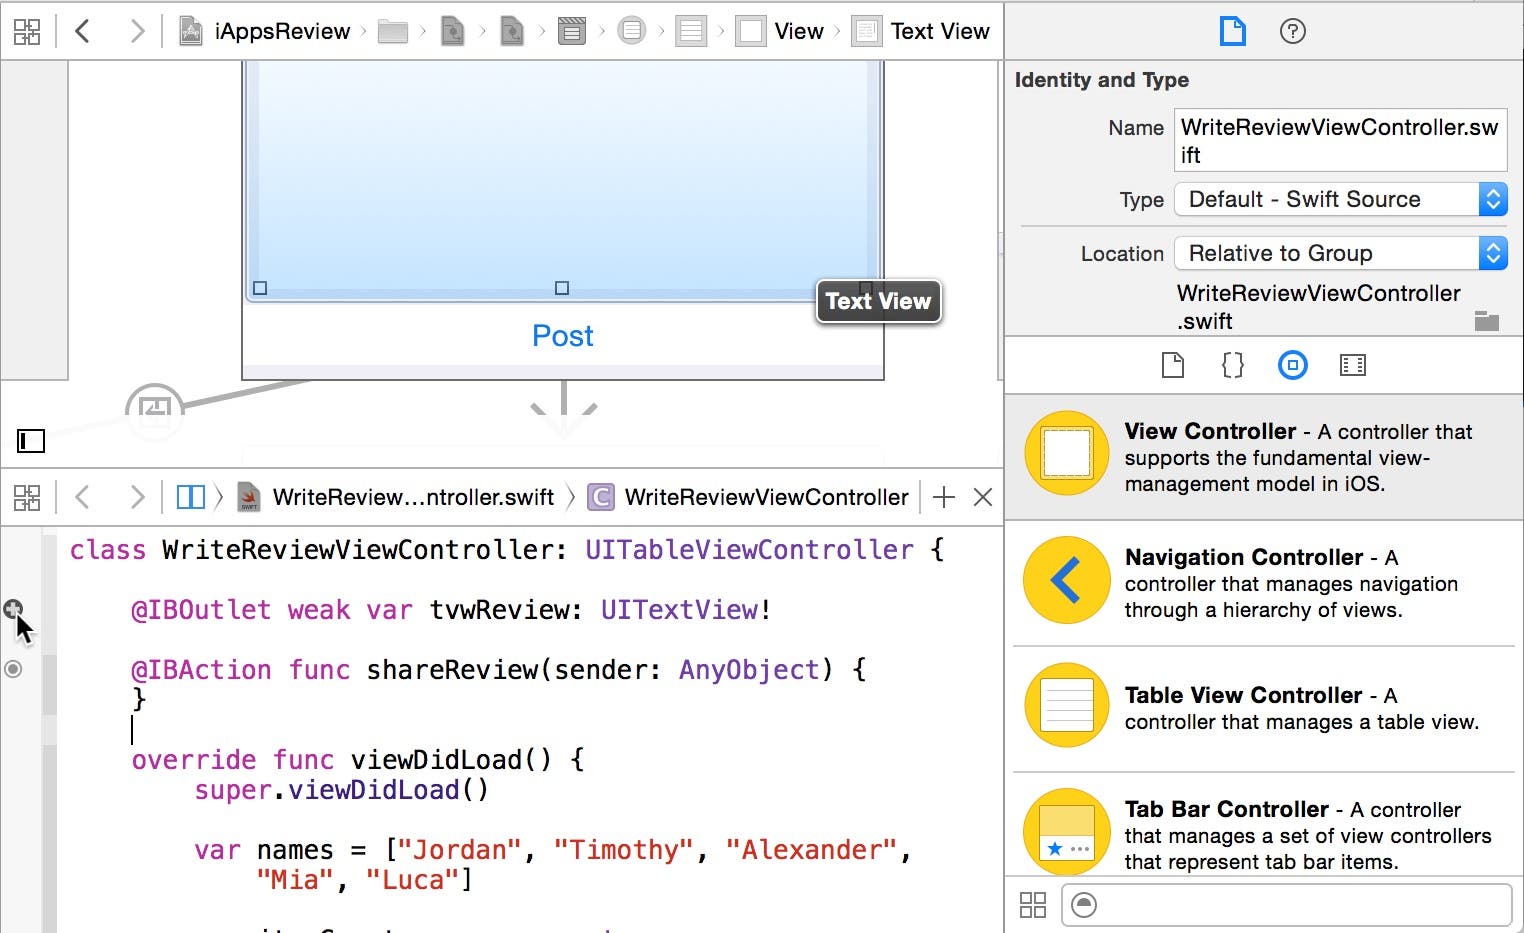
- In the outlet Name text field enter tvwReview and then click the Connect button. This adds the outlet property declaration shown in Figure 16 to the file.
 |
| Figure 16 - The new tvwReview outlet property |
In Swift, properties are similar to variables. They provide a place in memory where you can store and retrieve information. Let's take a closer look at the property declaration that Xcode generated for us. Here are some important things to note:
- The property declaration begins with the keyword @property;
- The IBOutlet keyword indicates that this property is intended to be connected to a user interface control on the associated scene.
- The weak keyword is an advanced concept that we will discuss in a future post.
- UITextView specifies the type of information the property can hold—in this case a reference to a UITextView object.
- The name of the property is tvwReview. I like to name my outlet properties with a three-character prefix that indicates the type of object the property is associated with. I use tvw for text views, txt for text fields, img for image views, and so on.
There is one other important concept to note about properties. Properties can be accessed from within methods declared in the same class as well as from methods in other classes declared in the same project.
- There is one other important point to note about this outlet property. As shown in Figure 17, if you hover your mouse pointer over the connection well to the left of the outlet property, the associated user-interface control is highlighted in the design surface. Very nice! By the same token, if the connection well has light gray center rather than a dark gray center, it indicates that the outlet is not connected to any user-interface control. When you see a disconnected outlet property, this is usually a problem because an outlet that's not connected to a user-interface control is useless!
 |
| Figure 17 - Hover over the outlet's connection well to see the associated user-interface control. |
- Let's close the Assistant Editor since we don't need it right now. To do this, click the left button in the Editor button group at the top of the Xcode window.
Implementing the shareReview: Method
Now that you have an outlet connection to the Write Review scene's text view, you're ready to write the code that shares the review via social media.
- In the Project Navigator, select the WriteReviewViewController.swift implementation file.
- Click in the code window directly to the right of the left curly brace at the end of the first line of the shareReview: method. Press the return key twice to add two empty, blank lines within the method's curly braces.
- Add the code shown in Figure 18 to the shareReview method.
 |
| Figure 18 - Create a reviewText variable |
Notice this code starts with the keyword let, rather than var. In Swift, let indicates you are creating a constant rather than a variable. In contrast with variables, constants are just that—constant. Their values don't change. Declaring constants in Swift is very similar to declaring a variable. You simply use the let keyword rather than the var keyword. Once you set the value of a constant, it can't be changed (that's what makes it constant!)
Best Practice: If a stored value isn't going to change, you should always declare it as a constant.
In Figure 18, the code on the right side of the equal sign references the tvwReview outlet property you created in the previous section. When referencing a property that's declared in the same class as your method code, you first type self, which refers to the class (in this case the WriteReviewViewController class). Next, you type a period, and then the name of the text view outlet. After that, you type the name of the property on the text view object that you want to access (in this case, text).
Best Practice: Swift allows you to reference a property without typing self first. However, it's a good practice to use self, because it makes your code more readable. Anyone looking at your code knows you are referencing a property rather than a local variable.
Also notice that self.tvwReview.text is enclosed within square brackets. As you learned earlier, this is how you declare an array in Swift. It looks a little unusual, because there is only one item in the array, but it is still an array. Since we are storing the array as a constant, you can't add any other items to this array. In other scenarios where you need to later add items to an array, you should store it as a variable.
- Now you're ready to write the actual code that displays the iOS Share panel. With your cursor still at the end of the previous line of code, press return to create a new, empty line. Now enter the partial line of code shown in Figure 19.
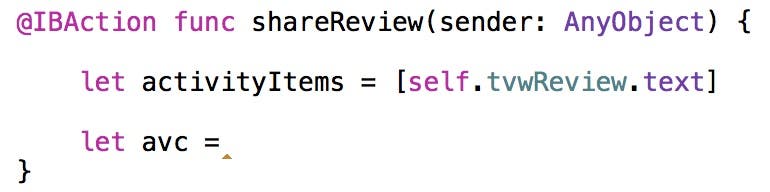 |
| Figure 19 - Declare a constant named avc. |
The code you have typed so far creates a constant named avc.
- Next, you're going to write some code that creates an object from the UIActivityViewController class. UIActivityViewController is part of Social.framework and makes it extremely easy to display the Share Options panel in your iOS apps. Again, we'll dive in more deeply on creating objects in a future post. For now, just enter the code UIActivityViewController( and Xcode's Code Completion popup appears (Figure 20).
 |
| Figure 20 - Code Completion lists a variety of options to choose from. |
Code completion shows four options you can choose from to complete this line of code. The option we want is the second in the list. Select this option by using your up/down arrows, and then press Return. This displays the code template shown in Figure 21.
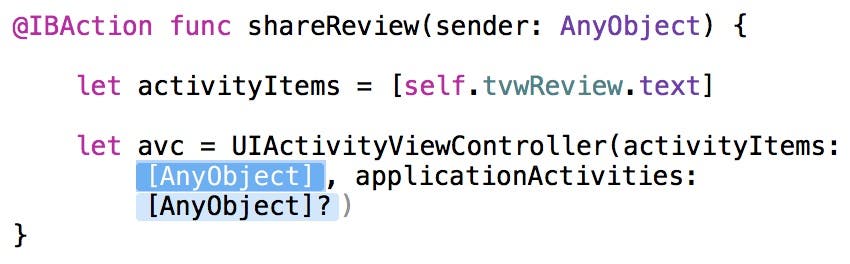 |
| Figure 21 - The Code Completion template |
The first placedholder contains text that indicates it wants you to pass an array that can contain any type of objects. You know this because AnyObject is between square brackets that indicate it's an array. Type activityItems to pass the array you created in the previous line of code as an argument.
- Press tab to go to the final placeholder in this code template, and type nil as the argument. This argument specifies custom services that your app supports. Since the app doesn't have any custom services, we entered nil. Next, press the right arrow (located at the bottom-right corner of your keyboard) to move past the closing parenthesis. When you're finished, your code should look like Figure 22. To recap, this code creates an object from the UIActivityViewController class passing the activityItems array that contains your review text as an argument. The resulting object is stored in the avc constant.
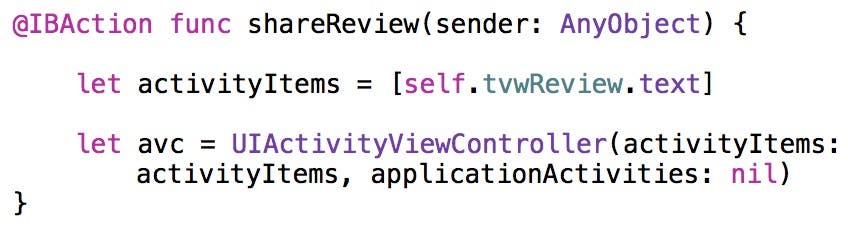 |
| Figure 22 - The completed code statement that creates a UIActivityViewController object. |
- Now that you have created an object from the UIActivityViewController class, you need to display the view controller. Now that I've guided you through using Code Completion and entering arguments into the code template, you're ready to try this one on your own. Go ahead and enter the new line of code shown at the bottom of the method in Figure 23.
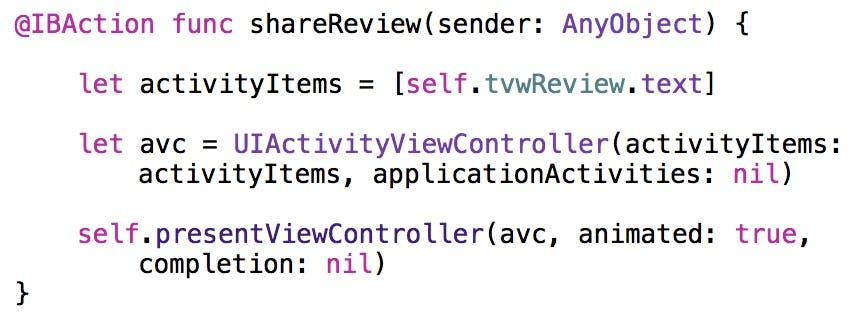 |
| Figure 23 - Show the Activity View Controller. |
Take a moment to see if you can figure out what this line of code does (I'll wait for you).
This code calls the presentViewController:animated:completion: method on self, which is the WriteReviewViewController. In the big picture, this code asks the WriteReviewViewController to display, or present, the activity view controller. When you pass true for the animated argument, the screen appears with a nice animation—sliding upward from the bottom of the screen. We don't need any code to execute after the view controller appears, so we pass nil for the second argument.
Now let's run the app in the Simulator and see how it works!
Testing the App in the Simulator
- Click Xcode's Run button to run the app in the Simulator.
- Before you try out the new social media feature of the app, you must first set up Twitter and Facebook accounts on the Simulator. To do this, in the Simulator menu, select Hardware > Home. This displays the iPhone Home screen. Click the Settings app's icon on the Home page and scroll to the bottom of the screen until you see the Twitter and Facebook options shown on the left side of Figure 24. Select the Twitter option and add your Twitter account (the center image in Figure 24), then select the Facebook option to set up your Facebook account (the image on the right in Figure 24).
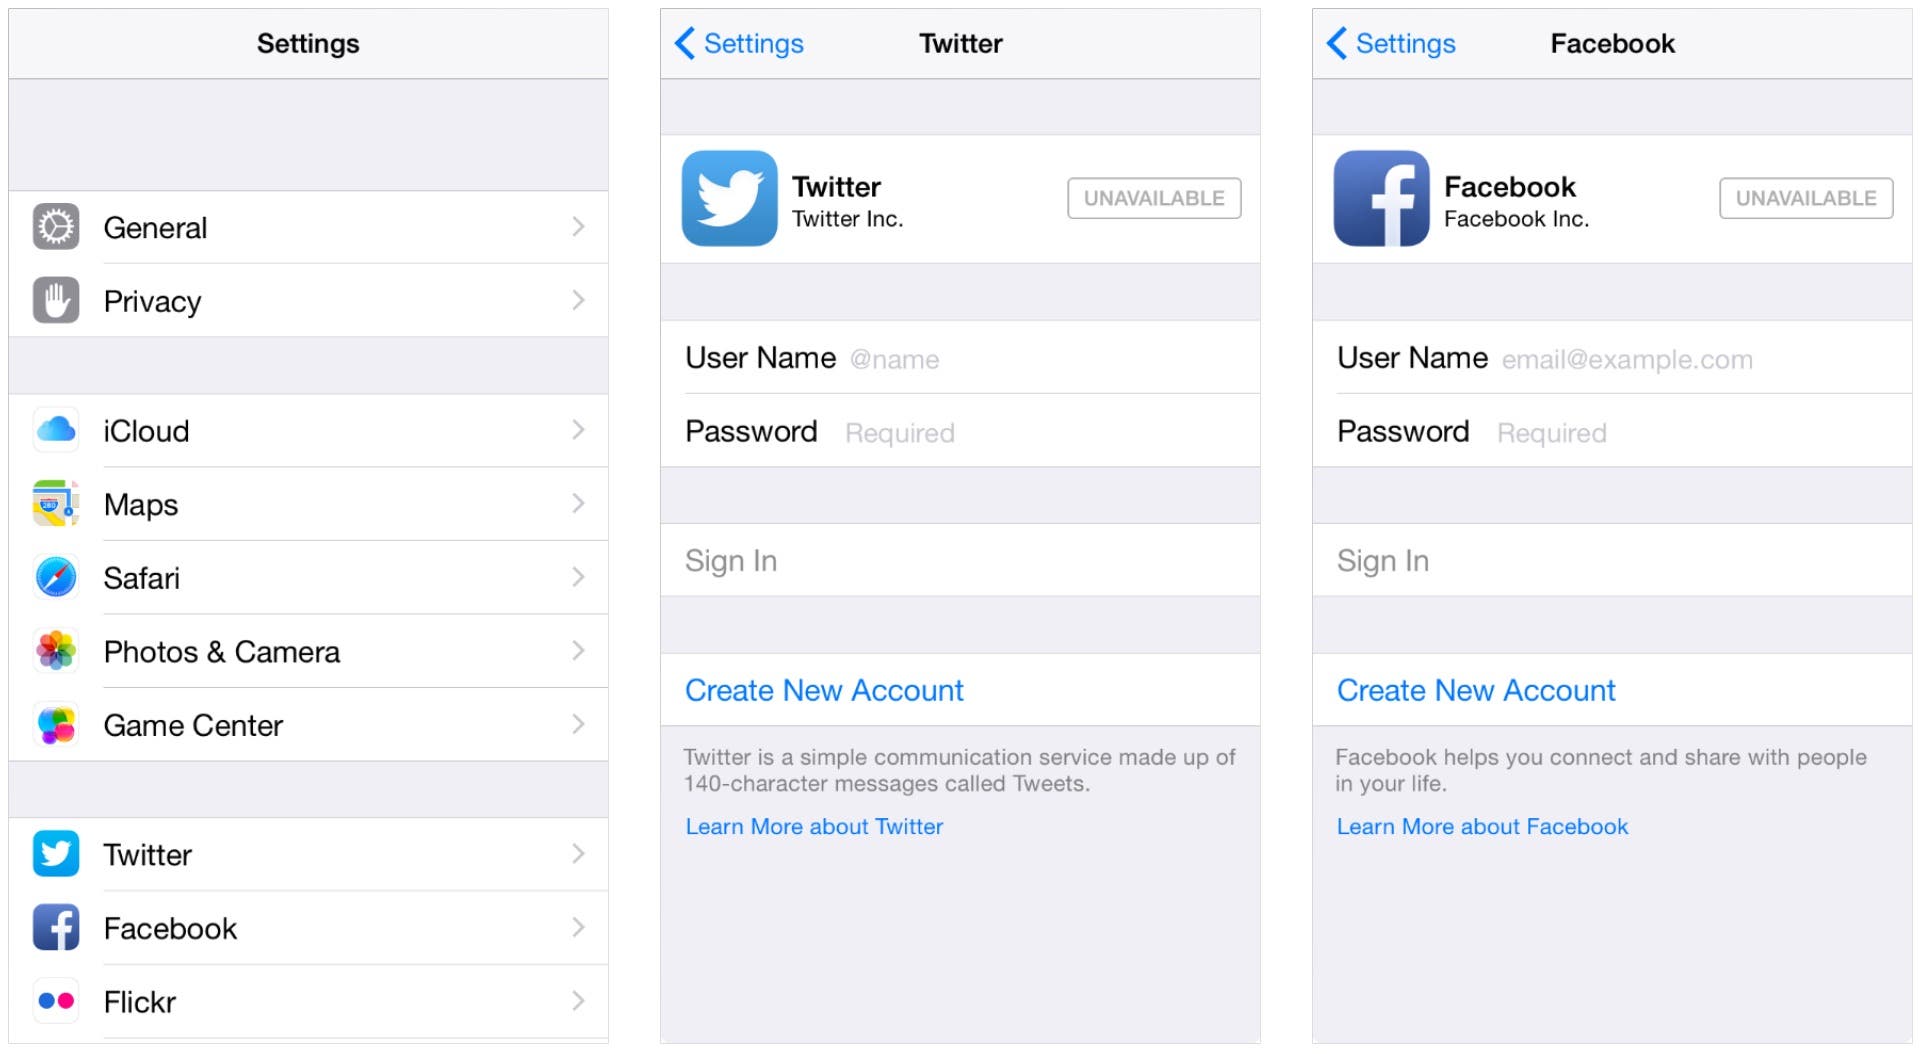 |
| Figure 24 - The Simulator's Settings app allows you to set up Twitter and Facebook accounts. |
- After setting up your accounts, go back to the Simulator's Home screen, and then click the iAppsReview app icon to launch the application again. When the app appears in the Simulator, click the Write a Review option. Click in the text view control, and when the keyboard appears, type in any text you want. For example, you could write a shameless plug for this iPhone Life magazine blog and tout your new-found app-writing skills at the same time:
I posted this message from an iPhone app I created from tutorials in an iPhone Life blog by Kevin McNeish. Awesome!
- Whatever you decide to write, when you click the Share button at the top right of the scene, the Share Options panel appears as shown in the image on the left in Figure 25. If you click the Twitter button, your review text appears in the Tweet window shown in the center image in Figure 25. If you click the Facebook button, your review text appears in the Facebook window shown in the image on the right in Figure 25. If you click the Send button in the Tweet window or the Post button in the Facebook window, it will post these messages for you. Give it a try!
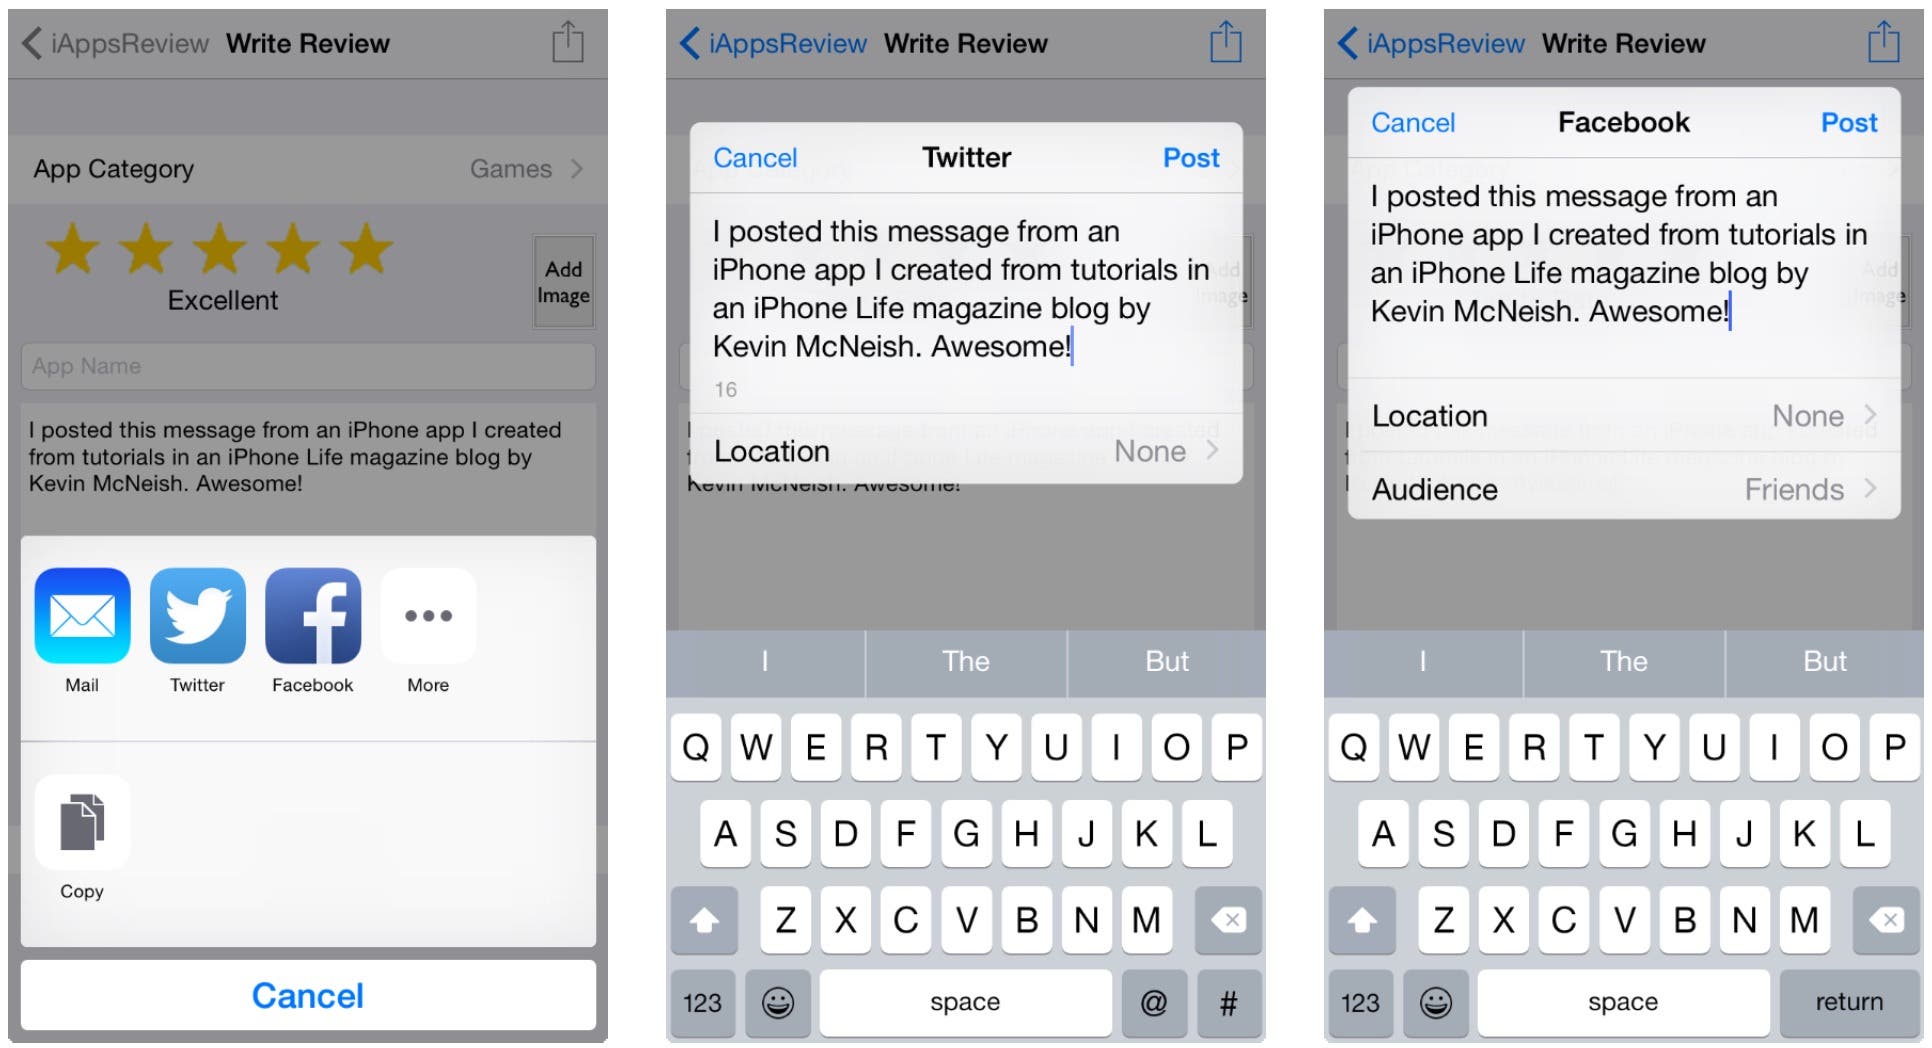 |
| Figure 25 - The Share options panel allows you to tweet or post your review text to Facebook. |
Conclusion—Your Homework Assignment
Now that you have learned the basics of variables, arrays, properties, outlets, as well as working with the iOS Social Framework, I've got an assignment for you. I find that trying something on your own really helps test what you know and provides an invaluable learning experience.
As it stands right now, the name of the app you are reviewing (as specified in the text field of the Write Review scene), doesn't get posted—only the review text is shared. For your homework, I'd like you to enhance the app so the name of the app as entered in the text field in the Write Review scene is also posted on Facebook and included in your Tweet. Here are the basic steps you need to follow to make this happen:
- Create an outlet for the text field.
- Change the shareReview: method to append the name of the app to the text of the review (hint: You can add two strings together using the plus (+) operator).
In my text post, I'll provide the solution to this assignment and you can see how well you did!