 For a long time I have been biking to work, to run errands, and to occasionally participate in organized rides. In the past, I used my own memory and simple bicycle computers like the CATEYE Velo2 to track my performance. There are more sophisticated solutions available, ones that incorporate GPS to log your rides, but they can cost from $300 to over $2,000. Fortunately, far less expensive solutions are available for users of the new iPhone 3G.
Improving GPS effectiveness
This article reviews three “GPS loggers.” These applications access the GPS receiver built into your iPhone, store the location data on your phone, and with two of the apps reviewed post that data to a Web site for later analysis. That data turns out to be very useful to bikers, runners, and others. Once you have GPS data for two or more locations, you can calculate your speed based on the distance between the locations and the travel time. In addition, there are applications that can take that data, along with your height, weight, and age, and estimate the number of calories you burned during the activity.

Before we get into the reviews, here are some general tips that should improve your results regardless of which GPS logging application you choose.
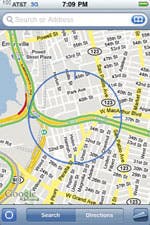
Figs. 1 & 2: Tap the “locate me” button in Maps and the iPhone’s
assisted GPS zeros in on your position (left & right above images).
Give GPS 20 seconds to find your location
 The iPhone 3G has “assisted” GPS capability, which augments GPS reception with location information received from the closest cell transmission towers. When you attempt to use an app that relies on GPS, the first location information you receive is derived using cell tower positions. You can see this effect when you first turn on Maps and click on the “locate me” button at the lower left of the screen. Normally the first thing you see is a large blue circle that indicates the iPhone’s first estimate of your position based on cell tower info (Fig. 1). After 10 to 20 seconds, signals from the GPS satellites are acquired and the blue circle reduces in size (Fig. 2) until it pinpoints your location as a blue dot (Fig. 3). You should give your iPhone at least 20 seconds to lock in on your position before you start your ride so that the iPhone can determine your location with the greatest accuracy.
Reduce screen brightness to maximize battery life
A brighter screen is easier to read, but it also uses more power. You need to adjust the brightness down as low as you can tolerate to maximize your battery life. Go to Settings >Brightness and drag the slider to the left. On the same screen you can also turn the Auto-Brightness setting on to have your iPhone automatically adjust to the current lighting conditions.
After about 10-20 seconds, it will pinpoint your position with a blue dot.
Avoid GPS signal interference
Carry your iPhone in a location where there is nothing to interfere with the GPS receiver having a clear “view” of the sky. Initially, I stowed the iPhone in a pouch underneath my bike’s seat, which worked well enough. But as I studied the iPhone’s GPS system, I realized that ANY obstruction can compromise performance. I considered a handlebar mount from RAM Mounts (ram-mount.com), but if I drop the bike…well, bye-bye iPhone. Currently, I place the phone in a plastic bag (if on a hot day) and stow in the back pocket of my biking shirt.
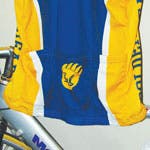
Fig: 4: A typical bicycling shirt with three pockets on the lower back.
Avoid heat and moisture
Remember that most electronic devices do not react well to heat or moisture. I strongly recommend that you place your iPhone somewhere where moist air, sweat, or body heat cannot get to it easily. A good plastic bag should protect it well enough. If you’re a runner, you might consider getting a bicycling shirt (Fig. 3) with pockets in the back and stow the phone there.
Three GPS logging applications
The iTunes App Store has a number of GPS logging applications applicable to bicycling, jogging, hiking, and other terrain traversing activities. This article looks at three of these apps: TrackThing Lite; Path Tracker; and Trailguru.
TrackThing Lite
App Store Category: Navigation
Developer: trackthing.ning.com/profile/2mfxf8jfibzmo
TrackThing Lite provides near real-time stats and can be used to track your performance during cycling, running, hiking, and virtually any other outdoor activity. What I like about it is the instant gratification of seeing graphs as soon as your ride is completed.
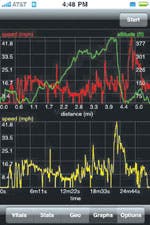
 Figure 5 shows TrackThing Lite’s split screen. The top portion of the screen displays your elevation (in feet) as a green line and your speed (in miles per hour) in red. The bottom part of the screen displays your speed in yellow, over the duration of your activity (measured in minutes and seconds). Note, however, that the red speed line in the top graph does not seem to be aligned correctly with the green elevation line. (In Figure 5, the red line indicates an upward spike in speed a little past the 3.3 mi distance mark, coinciding with an increase in elevation as I go up hill. In reality, speed tends to decrease when you peddle up hill.) I used Photoshop on the graphic to correct the alignment (Fig. 6), but the developer needs to fix it within the program. Until they do, we need to get our hands on the raw data.
Figs. 5 & 6: TrackThing Lite’s split-screen (left). The top graph shows
your speed in red and your altitude in green, both as a function of distance
traveled. The yellow graph at the bottom of the screen shows your speed
as a function of time traveled.
The corrected screen (right) shows the speed graph
properly aligned with the elevation in the top half of
the display.
Path Tracker
App Store Category: Navigation
Developer: PathTracks.com
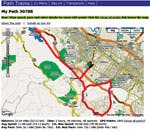
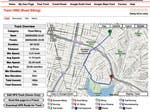
Path Tracker displays the distance you’ve traveled, elapsed time, latitude and longitude, and altitude using maps. It does not provide the instant gratification that TrackThing does, but it supports uploading data to a Website where I can see my ride mapped out on Google maps (Fig. 7). The user can also zoom in and look at each point logged by the iPhone (Fig. 8).
Figs. 7 & 8: You can upload Path Tracker data and
display your ride on Google maps.
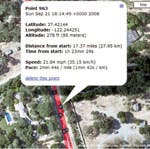
I can also delete unwanted points on the site directly. However, what I really like is Path Tracker’s ability to download the raw data so that I can do my own analysis. This allows me to remove large chunks of data logged before and/or after the actual ride, as well as remove or change erroneous data through programming instead of by hand. I can also break the ride up into sections and analyze those. Although there are tools out there for converting GPX to CSV (which Excel can read), I found it easier to write my own. As a service to my biking (and hiking and sailing) friends out there, I created a little Web page to convert GPX to CSV. (www.perivision.net/gpx)
You can also zoom in on each logged point in the ride.
Trailguru
App Store Category: Healthcare & Fitness
Developer: trailguru.com
Trailguru is similar to Path Tracker in that it lets you record and display data associated with your ride or run, and later upload it to a Web site that lets you view it on a map (Fig. 9 & 10). As with Path Tracker, you can also download the raw GPX data from the site. There are things about the TrailGuru Web site that I do not like, mostly associated with its design and usability, but what I find most interesting is its focus on community.
Figs. 9 & 10: With Trailguru, you can explore your ride with maps (left), download data, and view Speed and Elevation (right).
Information about each ride recorded and logged on the Web site is available to others interested in doing a ride in the same area. They can access and look at routes others have taken and review elevation maps, photos, and notes from those rides. The site also tracks your information over months, allow people to connect to each other as ‘friends’, plenty of categories for organizing activity types and other nice data sorting tools. I think they are on to something interesting here by building a community instead of just providing information.
Using GPS loggers for other outdoor activities
 The three GPS logging tools I looked at were selected from the titles available when I wrote the first draft of this article. Fortunately, more titles are being added to the App Store, providing more tools and Web resources to help runners, bike riders, sailors, and others improve their performance. I’ve seen a number of interesting features on other applications, including a calorie counter, reward system, and training log book. There’s even a free app called GolfTraxx, which provides hole-by-hole information for over 21,500 courses across the globe, downloadable to the phone via a cellular data or Wi-Fi connection.
Fig.11: I u sed GPS logger PathTracks to track two holes in a round of golf.
Unfortunately, GolfTraxx does not display maps of the course. However, you can use a GPS logging application that supports mapping to track your progress from hole to hole (Fig. 11). It’s interesting to look at the map of your game afterwards, to see where you went off course.
You can use GPS loggers to track your movements while you hike through a national park, tour an historic site, explore a new city, and more. You might even use it the next time you go hang gliding… Well, that one might be a bit extreme. But if someone tries it, send me an email. I’d love to see the maps!

