How to Set Up and Use Your Smart Home with HomeKit Devices


Apple first announced HomeKit, its smart-home platform, in June of 2014, but HomeKit-compatible devices have been slow in coming. And frankly, it may not have been easy to understand exactly what HomeKit is and what the benefits are. iHome generously sent me its smart plug a few weeks ago, and now I finally get what HomeKit is. It's really cool. I want to share with you what I've learned, in case you're interested in what HomeKit is and whether you may want to start creating a smart-home environment. This is especially relevant now, because with the annual Consumer Electronics Show currently going on, more and more HomeKit devices are being announced.

HomeKit basics
Controlling smart-home devices with an iPhone or iPad has long been possible, but the devices typically worked in different ways and couldn't be integrated into a single system. HomeKit-compatible devices can be integrated into a single system—one that you can control with Siri and via a HomeKit Hub. For example, let's suppose that on a cold winter morning you'd like your smart home to: turn up the thermostat a half hour before you intend to get up, turn on the lights when it's time to wake up, and start heating water for your morning tea. HomeKit lets you combine all those into a single "scene" and schedule when you'd like that scene to begin.
Similarly, you could have a scene for arriving home. When you head toward home in the evening, you could simply say to Siri, "Turn on 'Arrive Home'," and as you arrive your door will be unlocked, the lights will be on, and the heating adjusted to a comfortable level—all automatically.

iHome SmartPlug

Using a HomeKit-compatible smart plug like the iHome iSP5 SmartPlug, at $39, is a great way to start using HomeKit and to get a sense for what it can do for you. You plug it into any outlet and then plug any home appliance into the SmartPlug. You can schedule that appliance to turn on and off at particular times, as well as control it remotely via the free iHome Control app and via Siri.
I plugged it into an outlet in my living room and then plugged a lamp into it. Since I arrive home about the same time each evening, I've scheduled it to turn on the lamp about 15 minutes before I arrive. I can control the lamp with my iPad anywhere I have an Internet connection. I can be half a world away and simply say to Siri, "Turn on lamp," and my lamp will go on.
Setup is simple. The SmartPlug comes with a Quick Start Guide that tells you to download the free app and sign up for an iHome account. Plus, it walks you through a couple simple steps of setup that entails connecting it to your iPhone or iPad.
Once you've decided what you want to use the SmartPlug for, you name the device and assign it to a room. And you plug your electrical appliance into it. I plugged in my lamp, named the appliance "lamp" and assigned it to "living room." The purpose of the naming is to integrate devices into scenes and to let Siri know which particular device you want to control. So when I say to Siri, "Turn on lamp," Siri knows that I'm referring to that particular SmartPlug that my lamp is plugged in to.
Once you've assigned a name, you can create a rule that lets you set a schedule for the appliance.
A new $49 version of the iHome SmartPlug, the iSP8, will be coming out later this year that will add energy monitoring and a remote.
No hub needed
One of the reasons I like the iHome SmartPlug is that you don't need a hub. Many smart-home devices require a hub or bridge or base station that you set up with your iPhone or iPad and that then sends signals to the devices to control them. For example, I have a smart bulb setup (not HomeKit compatible) that uses a bridge, a small device about the size of a deck of cards. That bridge connects to my router and I use Wi-Fi to connect to it to set up schedules for the bulbs. This hub actually uses a wireless network other than Wi-Fi to connect to and control the bulbs in my house. One advantage of this is that once the schedules are programmed, it will control my bulbs even if I have my Internet connection turned off.
However, I personally don't like the idea of having to use a hub or bridge. It's just one more device adding to the clutter in my home, and one more electronic device that I need to attend to.
The nice thing about the iHome SmartPlug iSP5 is that no hub or bridge is needed. The iHome server acts as the hub, which is why they have you set up an account on the iHome website as part of the setup process. That means, of course, for your SmartPlug to keep to its schedule, it needs to be connected to your home Wi-Fi network. If you turn off your Wi-Fi, the plug no longer operates according to the schedule you set and no longer responds to Siri.
I'd really like to see more devices that work independently of hubs, but that's simply a personal preference.
The next step: A thermostat
If you're interested in a smart home, a smart plug is another great way to start. Once you have a sense for what HomeKit is, then in my opinion the next obvious step would be a thermostat. A HomeKit-compatible thermostat can offer convenience and save you money by ensuring that your home is heating and cooling to comfort levels only when you're actually home. They're pricey, in the range of $150 to $250, but installing one would likely pay for itself in the long run.
On the low end of the price range is the iDevices Thermostat, at $149. You can set up a customized seven-day schedule and control it remotely with Siri. Reviews say it's not as smart as others on the market, such as the Nest, which observes your daily routine and automatically schedules accordingly. Others also are capable of "geofencing," which senses when you're near home and makes adjustments accordingly. I do like the fact that the iDevices Thermostat can also be controlled via Bluetooth, since I don't always have my Wi-Fi network on.

The Ecobee 3 ($249) was the first HomeKit-compatible thermostat. It has a wide range of smart features, including geofencing to automatically trigger scenes based on your location. In addition, if you've set up a schedule and it senses that you're home at a time you're scheduled to be away, it makes relevant adjustments. Plus, a unique feature is its use of sensors that you place in various rooms. You can adjust the temperature for everyone's comfort by averaging the temperature of the selected sensors that detect motion or all of the selected sensors in your home, regardless of motion. The Ecobee 3 comes with one sensor, and for an additional $63, you can buy a bundle that includes three more sensors. Reviews say installing an Ecobee is easiest if you have a relatively modern heating and cooling system with five wires running to your thermostat. But it can accommodate older systems via the included Power Extender Kit.

The Honeywell Lyric Round ($249) HomeKit-compatible thermostat is expected to be available on February 1. Honeywell first came out with the Lyric last year and promised HomeKit compatibility. However, the first-generation model was never made compatible with HomeKit, and those wanting that functionality need to purchase this new model. Like the popular Nest (which isn't HomeKit-compatible), the Lyric learns by observing your coming and going, adjusting the heating and cooling schedule accordingly. You don't even need to manually set up a schedule; it's all done automatically. Of course, it has all the HomeKit features such as adjusting it remotely via Siri and creating scenes. And it includes geofencing.

If you're happy with manually setting up schedules, then the iDevices thermostat may be a good choice. If you like the notion of sensors so that heating and cooling takes into account the temperature in the various rooms, then the Ecobee would be the one you want. If you want a thermostat that automatically creates schedules and makes adjustments based on your coming and going, then the Honeywell is the one.
Everything else
The beauty of HomeKit is that everything works together. You can start out with a smart plug now and add a thermostat from a different company later, and then integrate them into a scene so that the furnace goes on and the lights come on when you say "Good morning" to Siri. As you add more devices, you can further integrate them. Apple has a list of HomeKit devices, which include lights and switches, video cameras, alarms and sensors, heating and cooling, and window shades. You can make Apple TV, HomePod, or iPad a HomeKit Hub to control all these with ease!
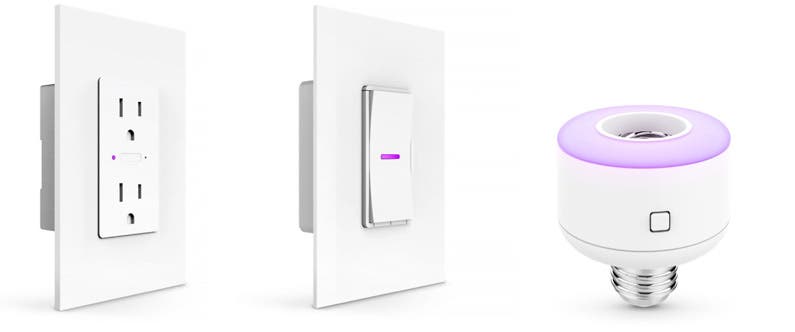
As I said above, a smart plug may be a good place to start, and then possibly a thermostat. The next items I'd be interested in getting would be those announced by iDevices, though they're not yet available. I'd be especially interested, depending on the price, in iDevice's smart socket. You screw it into a light bulb socket and then screw any light bulb into it. This makes so much more sense to me than buying smart bulbs. They also plan to release a smart wall switch and a smart wall outlet. The socket is expected to be available within the next three months and the switch and outlet later this year.

Jim Karpen
Jim Karpen holds a Ph.D. in literature and writing, and has a love of gizmos. His doctoral dissertation focused on the revolutionary consequences of digital technologies and anticipated some of the developments taking place in the industry today. Jim has been writing about the Internet and technology since 1994 and has been using Apple's visionary products for decades.

 Amy Spitzfaden Both
 Olena Kagui
 Kenya Smith
 Rachel Needell
 Rhett Intriago

 Leanne Hays