Do you have an idea for an app but lack the programming knowledge to begin building it? In this weekly blog series, I will take you, the non-programmer, step by step through the process of creating apps for the iPhone, iPod touch, and iPad. Join me each week on this adventure and you will experience how much fun turning your ideas into reality can be! This is part 29 of the series. If you are just getting started, check out the beginning of the series here.
As we continue to move the iAppsReview app forward, we now come to a point where we have to climb the learning curve on one of the more advanced Objective-C concepts—blocks. This discussion comes at an unlikely place. This week I'm going to show you how to take the image of a review that you have created in the Write Review scene and display it in the My Reviews scene. This seems like it should be pretty straightforward, but as you will see, it involves using the iOS Assets Library and using Objective-C blocks.

If you would like to follow along, you can get the latest version of the iAppsReview project at this link. I recommend following the step by step instructions to get the most out of this post, but if you get stuck, you can get the completed project at this link. When you are following the steps outlined in this post, you will need to have a review that contains an image from the Simulator's photo library. For instructions on how to add images to the Simulator's photo library, check out my earlier post at this link.
Saving a Photo Library Image to the Database
To refresh your memory, the Write Review scene in iAppsReview allows users to select an image from their device's photo library to include in their review. Let's take a look at the code that makes this happen.
- Open the iAppsReview project in Xcode.
- In the Project Navigator, select the WriteReviewViewController.m file and scroll down to the accessPhotoLibrary method shown in Figure 1.
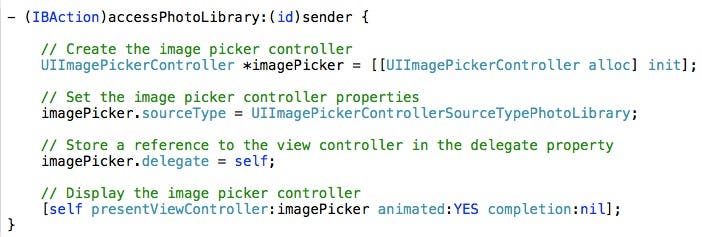 |
| Figure 1 - The accessPhotoLibrary method displays the image picker controller |
The code in this method creates, configures, and displays an image picker controller which looks like Figure 2 at run time.
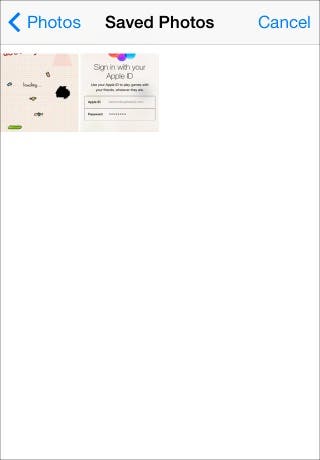 |
| Figure 2 - The image picker controller at run time |
- Scroll to the bottom of the WriteReviewViewController.m file and you will see the imagePickerController: didFinishPickingMediaWithInfo: method in Figure 3 that are fired when the user selects a picture from the photo library.
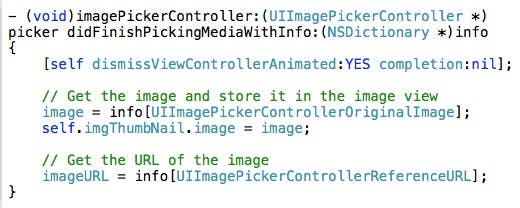 |
| Figure 3 - This method gets fired when the user selects an image from the photo library. |
This method hides the image picker controller, gets a reference to the selected image, and stores it in the imgThumbnail image view. Afterward, it gets the URL of the image (the location of the image on the iOS device) which is later stored in the database when the review is saved by the user.
Later on, when we pull up this review to view it, we need to use the URL of the image to retrieve the image from the photo library and display it in an image view. This is where we run into the "more difficult than you might think" code.
Working with the Assets Library
Retrieving a specific image or video from the user's photo library requires use of the iOS Assets Library. Apple's documentation for the Assets Library (ALAssetsLibrary) has this to say:
An instance of ALAssetsLibrary provides access to the videos and photos that are under the control of the Photos application.
The library includes those that are in the Saved Photos album, those coming from iTunes, and those that were directly imported into the device. You use it to retrieve the list of all asset groups and to save images and videos into the Saved Photos album.
So, although we are going to use the Assets Library to retrieve a photo from the photo library, you can also use it to save and retrieve videos.
Let's add the Assets Library to the iAppsReview project.
- In the Project Navigator, click the very first node with the blue icon to display the Project Editor in Xcode's center panel.
- Scroll to the bottom of the Project Editor and under Linked Frameworks and Libraries, click the plus button to add a new framework.
- In the Choose Frameworks dialog, select AssetsLibrary.framework as shown in Figure 4, and then click the Add button.
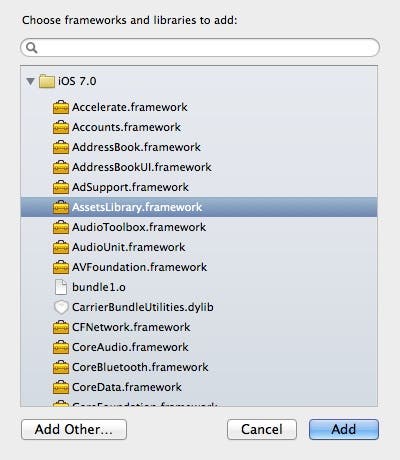 |
| Figure 4 - Choose the AssetsLibrary.framework. |
This adds the Assets Library framework below the Project Navigator's Frameworks group (Figure 5).
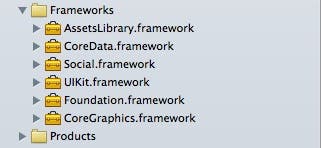 |
| Figure 5 - The newly added Assets Library |
Accessing the Assets Library
Before we dive into code, let's take a look at the big picture of what's going on in the app when a user selects a particular review.
As shown in Figure 6, when the user selects a review in the My Reviews scene at run time, the ReviewEntity associated with the row they have selected gets passed to the Review scene's ReviewViewController.
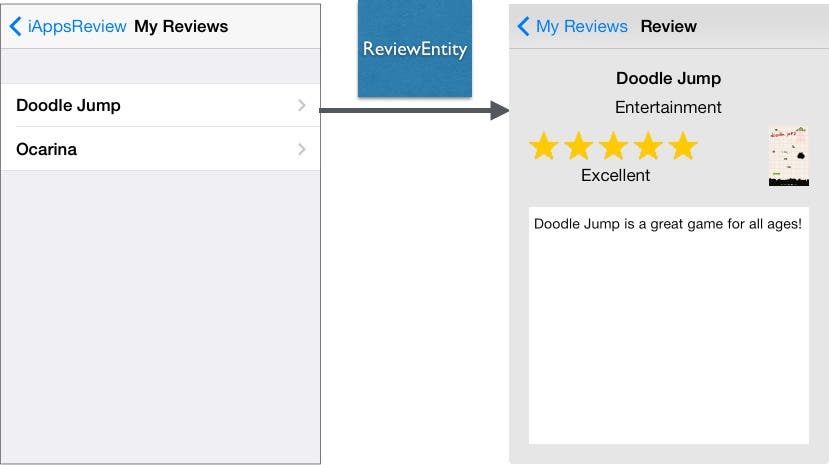 |
| Figure 6 - The ReviewEntity is passed from the My Reviews scene to the Review scene. |
Next, the viewDidLoad method in the ReviewViewController gets fired and it copies the values from the ReviewEntity object to the user interface controls as shown in Figure 7.
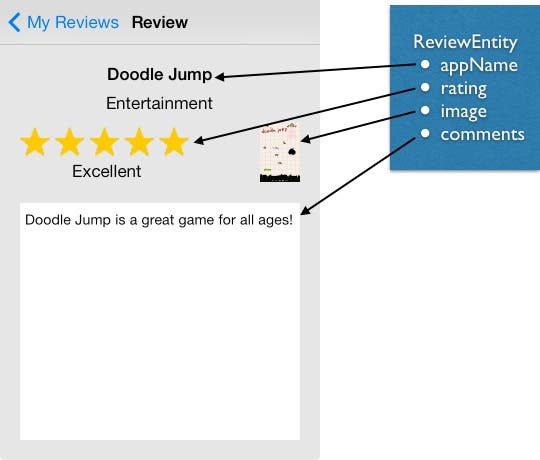 |
|
Figure 7 - The values from the ReviewEntity object are copied to the user interface controls. |
Now lets add some code to the project that retrieves the image from the Assets Library, and in the process you will gain an understanding of how blocks work.
- In the Project Navigator, select the ReviewViewController.m file.
- At the top of the code file, add the #import statement shown at the bottom of Figure 8.
 |
| Figure 8 - Import the Assets Library. |
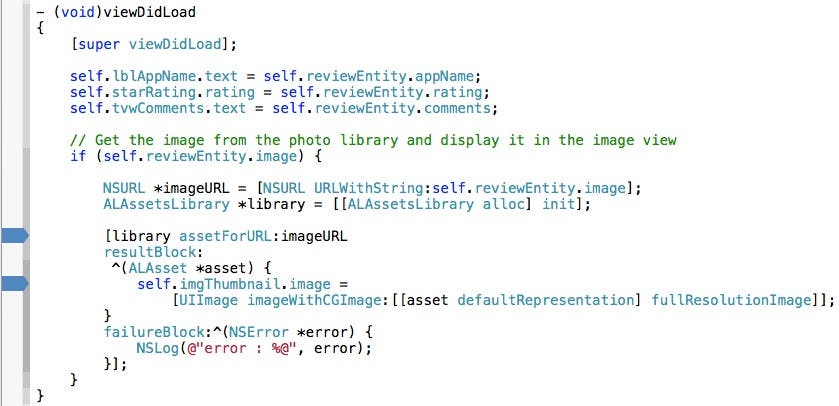
- Next, scroll down to the viewDidLoad method and add the code shown in Figure 9.
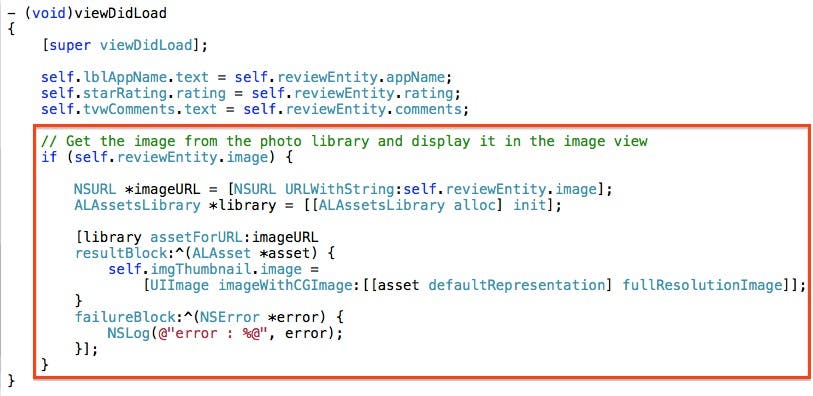 |
| Figure 9 - The code that gets an image from the Assets Library |
The first three pre-existing lines of code in viewDidLoad are very straightforward. They get the property values of the selected ReviewEntity (appName, rating, and comments) and store them in the UI controls. However, the code for displaying the image in the image view is far more complex, so let's break it down.
The first line of code you just added checks the image property of the reviewEntity object. If it's not nil (meaning this review has an image associated with it), then the if statement executes.
The first line in the if statement gets the value of the image property on the selected ReviewEntity and converts it to an NSURL object by means of the URLWithString: class method. The next line of code creates an instance of the AssetsLibrary class and stores it in the library variable. The next section of code shown in Figure 10 is where we encounter Objective-C blocks.
 |
| Figure 10 - The assetForURL message call |
Understanding Blocks
The assetForURL: method shown in Figure 10 accepts three arguments:
- assetForURL - The URL of the asset (in this case, image) that you want to retrieve from the Assets Library
- resultBlock - The block of code you want to execute if the asset is found
- failureBlock - The block of code you want to execute if there is an error retrieving the asset
As indicated by the name of the parameters, the assetForURL: method expects you to pass Objective-C blocks for the second and third parameters.
A block is a self-contained chunk of code, usually small in size that can be passed around as an object. In fact, blocks are objects in Objective-C. Blocks are a relatively new feature added in iOS 4.0. If you are coming from other programming languages such as Ruby or Python, the concept of blocks should be familiar to you. If you are coming from the Microsoft world, blocks are equivalent to anonymous methods.
Blocks can be executed:
- As a callback when an operation has finished, or in response to the occurrence of an event.
- Concurrently (simultaneously) on multiple threads of execution.
- Over items in a collection
In the case of the assetForURL: method, the blocks are executed as a callback when the operation is finished (option 1).
Let's take a closer look at the syntax of the block parameter as shown in Figure 11.
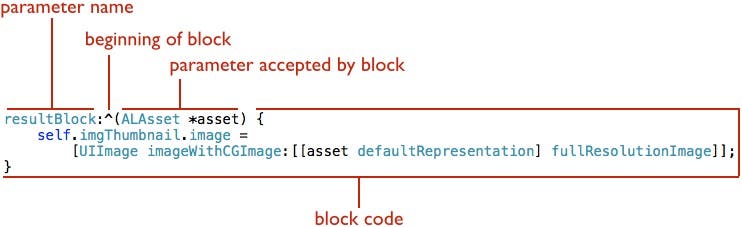 |
| Figure 11 - The breakdown of a block parameter |
In Figure 11, resultBlock: is the name of the block parameter. The block itself begins with a caret (^) character. The block accepts an ALAsset parameter and the code in the block is enclosed in curly braces.
To help grasp the syntax of blocks even further, let's see how the block in Figure 11 is declared differently than a regular method. Figure 12 shows a method on top and an equivalent block on the bottom.
|
|
| Figure 12 - Comparing a method to a block |
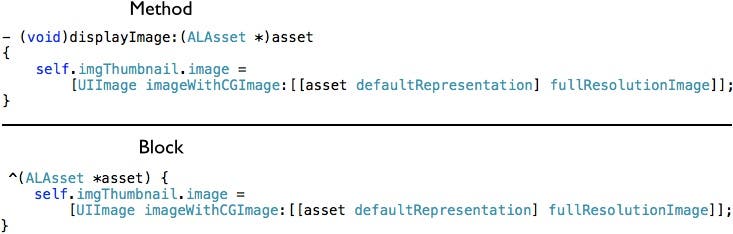
Here are a few things to note:
- The method on top specifies a void return value.
The block on the bottom doesn't specify a return value. A block can specify the type of its return value, but doesn't have to. The compiler can look at the code in the block and infer, or figure out, the type of the value returned from the block. This is known as type inference.
- The name of the method on top is displayImage:.
Blocks don't have names—they are anonymous. In fact, you can think of the tilde (^) character as a placeholder for where you would normally specify a method name.
- The method on top has a single parameter. A colon separates the method name from the parameter. The parameter type (ALAsset) is enclosed in parentheses, followed by the parameter name, asset.
In a block declaration, there is no colon before the parameter and both the parameter type and name are enclosed in parentheses. Commas are used to separate multiple block parameters.
Why Use Blocks?
So why does the Cocoa Touch Framework use blocks rather than just using methods? There are a few advantages to using blocks:
- They allow you to locate the code to be executed near the code that is invoking it. In the code sample in Figure 10, you don't have to create a separate method to be called when the asset is retrieved. You can pass the code as a block—it's more straightforward, and more obvious what's going on for someone reading your code (once you understand block syntax).
- Blocks have access to variables that are in scope at the time the block is declared. This means you don't have to pass arguments to give the block information it needs. It can just access the variables directly.
Stepping Through the Code
I find that when I'm teaching students about blocks, it's helpful to set some breakpoints and step through the code to get a visual feel for how blocks are executed.
- In the ReviewViewController.m file, click in the gutter to the left of the code in the viewDidLoad method as shown in Figure 13 to create two breakpoints.
 |
| Figure 13 - Add two breakpoints to the viewDidLoad method. |
- Click Xcode's Run button. When the app appears in the Simulator, select the Read Your Reviews option.
- In the My Reviews scene, select a review that has an associated image and you will hit the first breakpoint as shown in Figure 14.
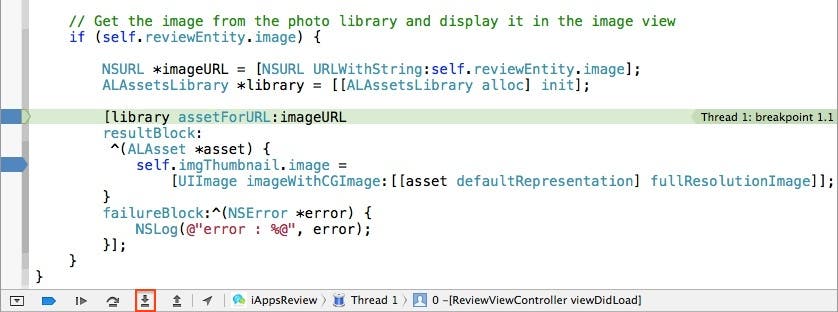 |
| Figure 14 - The first breakpoint has been hit. |
- Next, click the Step Into button at the top of the Debug area, highlighted in red in Figure 14. You may be surprised to see that execution jumps to the bottom of the if statement as shown in Figure 15. The code in the block isn't executed yet. In fact, if you click the Step Into button a second time, execution jumps to the bottom of the viewDidLoad method.
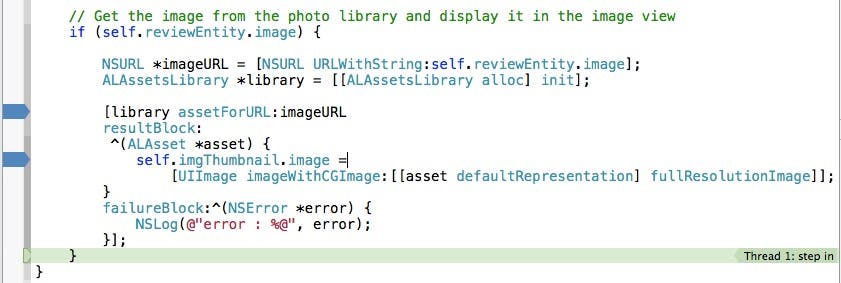 |
| Figure 15 - Execution jumps to the bottom of the if statement. |
- To see the block get executed, click the Continue button (highlighted in red in Figure 16) and you will hit the second breakpoint. You are now executing the block code!
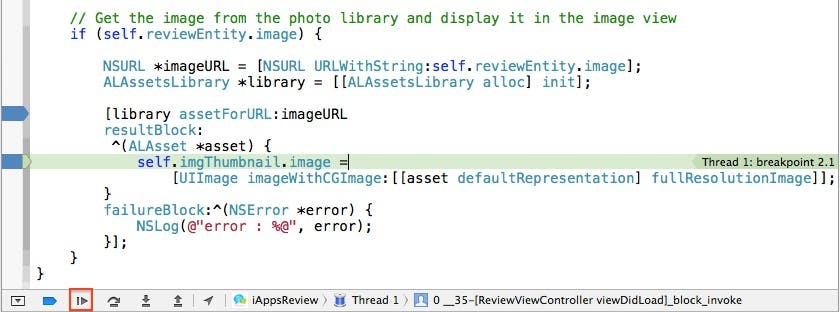 |
| Figure 16 - Executing the block code! |
- Now press Continue one more time and you should see the image appear in the image view as shown in Figure 17.
 |
| Figure 17 - The image is displayed in the image view. |
If you would like to delete the breakpoints, you can go back to Xcode, right-click each breakpoint and select Delete Breakpoint from the shortcut menu.
Conclusion
The syntax of Objective-C blocks can be a little intimidating at first, but once you understand each piece and how blocks are executed, you will find they are a great tool that you will look forward to using. With each release of the Cocoa Touch Framework, Apple continues to add more methods that accept block parameters, so I recommend going through this post a few times to make sure you have a solid understanding of blocks.